Vic Smeed’s Silver Mist

Vic Smeed’s Silver Mist

Home Forums Scratch build Vic Smeed’s Silver Mist

  • This topic has 962 replies, 11 voices, and was last updated 2 days, 1 hour ago by Colin Bishop.
Viewing 25 posts - 926 through 950 (of 963 total)
  • Author
    Posts
  • #127148
    Colin Bishop
    Moderator
      @colinbishop34627

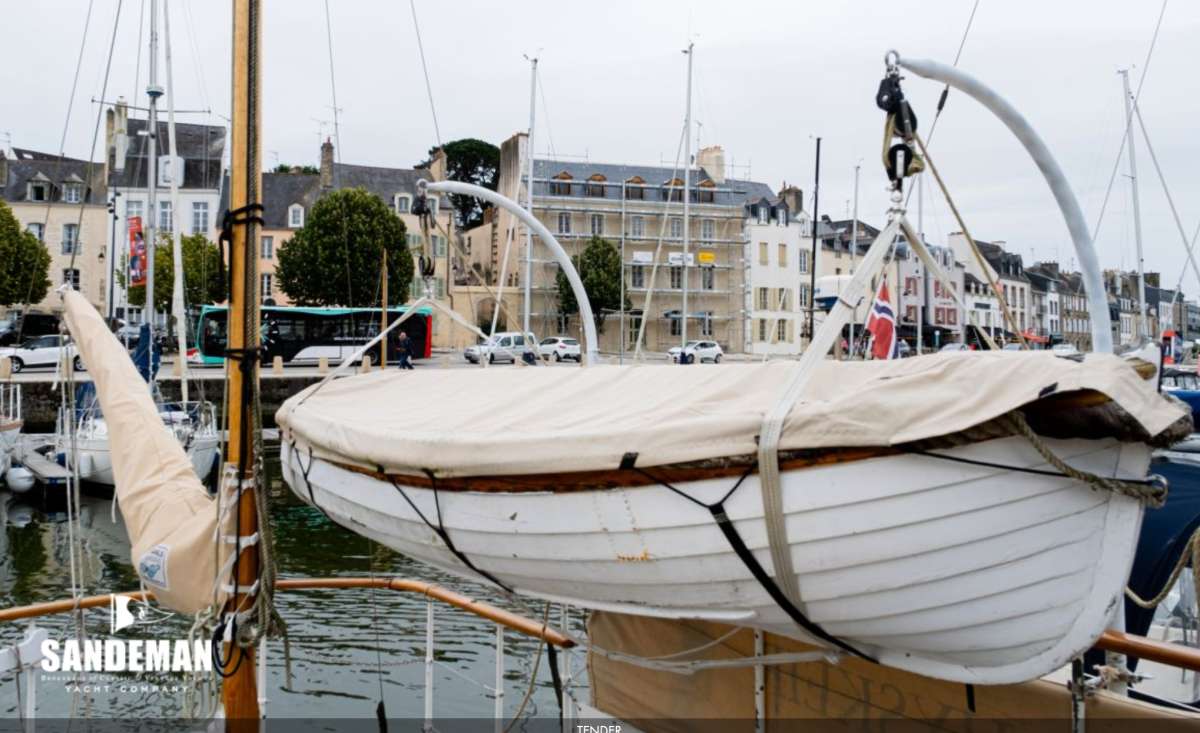
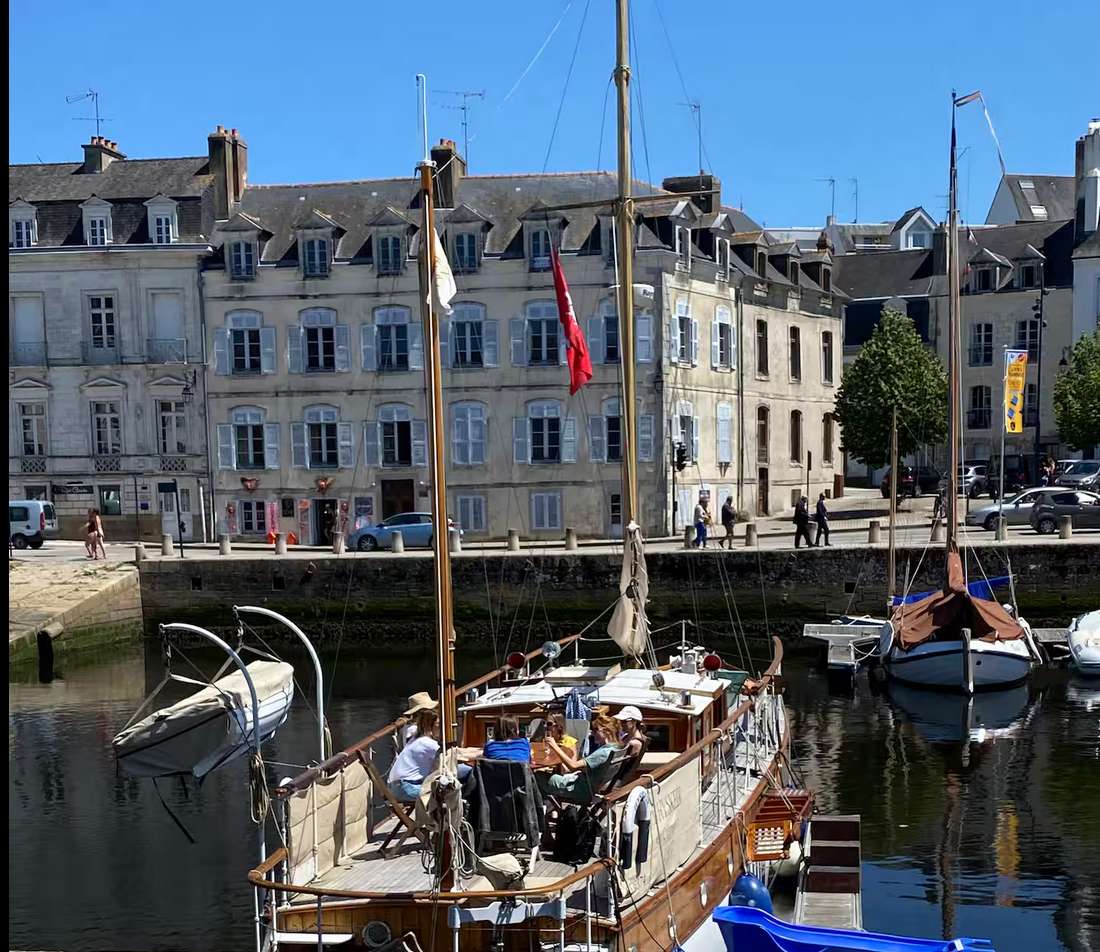
      Some more digging online seems to have come up with an answer. I have found a Silver Leaf class boat with the tender carried in davits. The davit positions are near the stern but on the port side rather than the correponding ones towards  the stern on Vic’s plan. The following pgotos show that the tender can be swung out for launching at sea or out of the way while in port whilst normally being carried inboard above the guardrails. Everything then falls into place and there is no need to manhandle the tender around the expensively finished deck etc.

      Colin

      Tender (1)


      Tender (2)

      Tender (3)

      #127460
      Colin Bishop
      Moderator
        @colinbishop34627

        All a bit quiet on the Silver Mist front recently for various reasons but the model is slowly progressing. I had a frustrating time making a skylight for the deck in front of the wheelhouse which took much longer than expected. However the basic structure is all now complete so it is a matter of adding the many details.

        The first of these is to fit the railings which is tricky as there is a wooden capping rail around the main deck abaft the wheelhouse and this has required some experimentation. I am using the brass Caldercraft type stanchions. As Ray will be aware, the awkward bit is the capping rail around the stern. I had some walnut strip of about the right size which was responsive to steaming but on my 21 inch model  there would be a problem in attaching the rail to the stanchions which are the three hole type.

        After a lot of headscratching, I realised that if I ground down the sides of the stanchion top balls, then plasticard channel section would fit over the top rail and the ball giving the appearance of a capping rail which just needed to be painted mahogany colour.

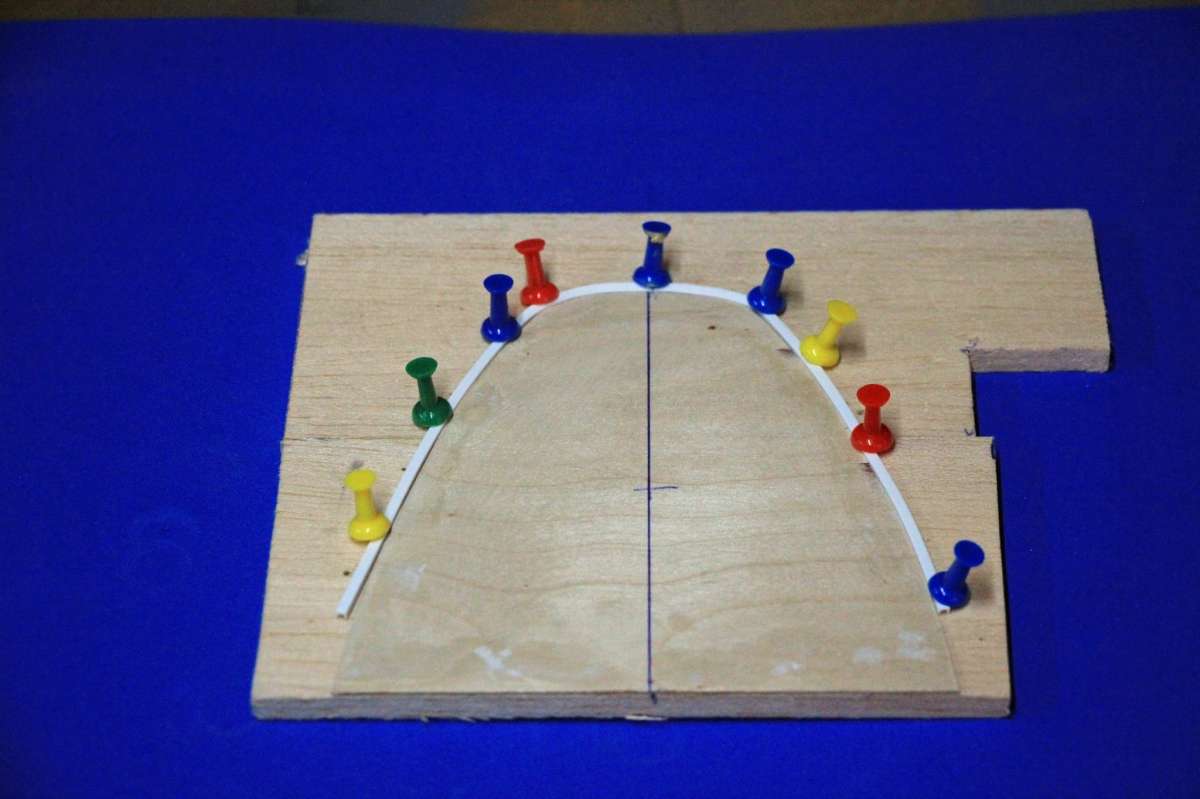
        So far, so good, but channel section doesn’t like being bent horizontally and twists upwards when you try. The answer to this was to use heat to soften the plastic and let it cool into its new shape. Easier said than done though. I made up a horizontal jig around which the plastic could be bent and forced into shape using push pins. After that it was a matter of applying heat. I tried a heat gun and a portable steam cleaner. The latter proved to be the best option and it took five attempts before I could get the pastic channel to set as I wanted. There is a minor imperfection at the stern but I can conceal that when fitting the ensign staff.

        The photo below shows the stern railing section before fitting the capping rail. My usual method of construction whereby the stanchions are temporarily mounted into the deck and the rails fed through after which everything was straightend up and  the joints fixed using solder paint worked well.

        More to come soon I hope.

        ColinIMG_7062

        #127462
        Ray Wood 3
        Participant
          @raywood3

          Hello Colin,

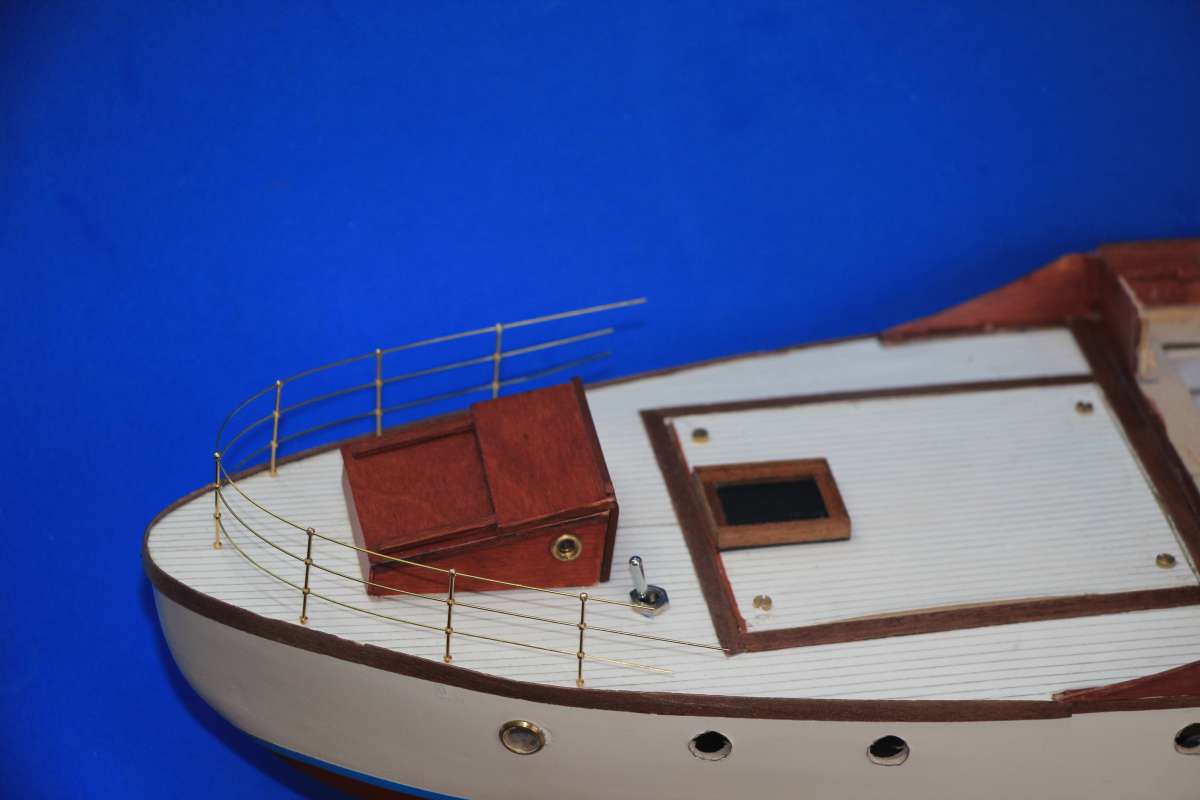
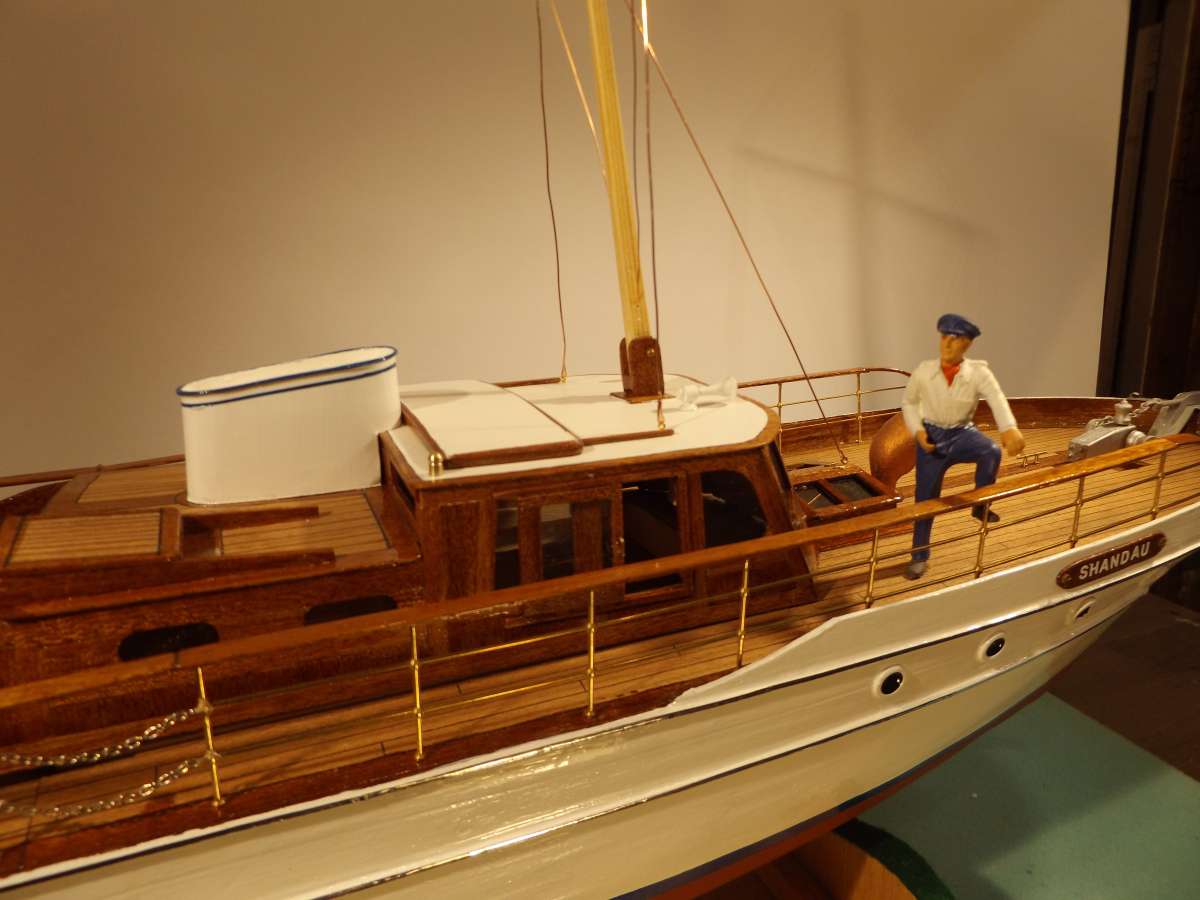
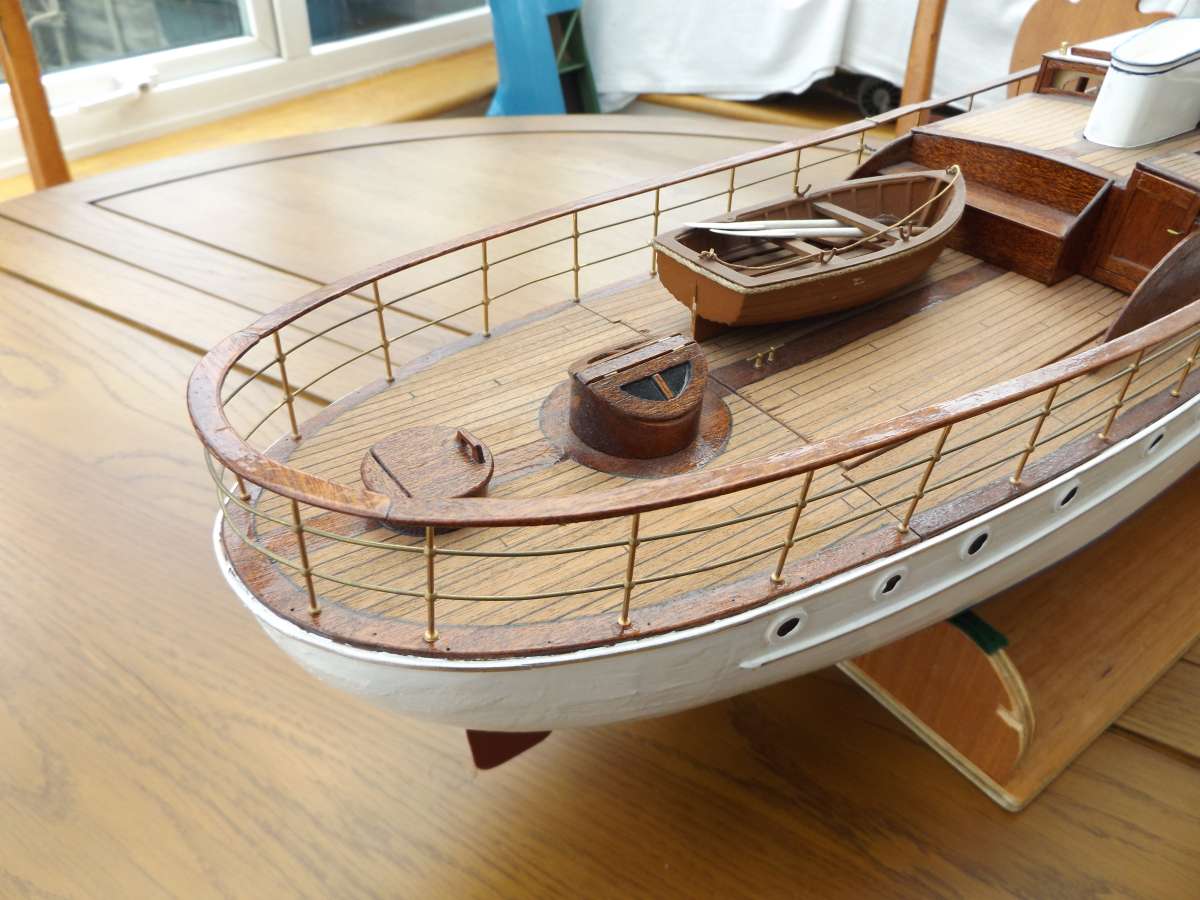
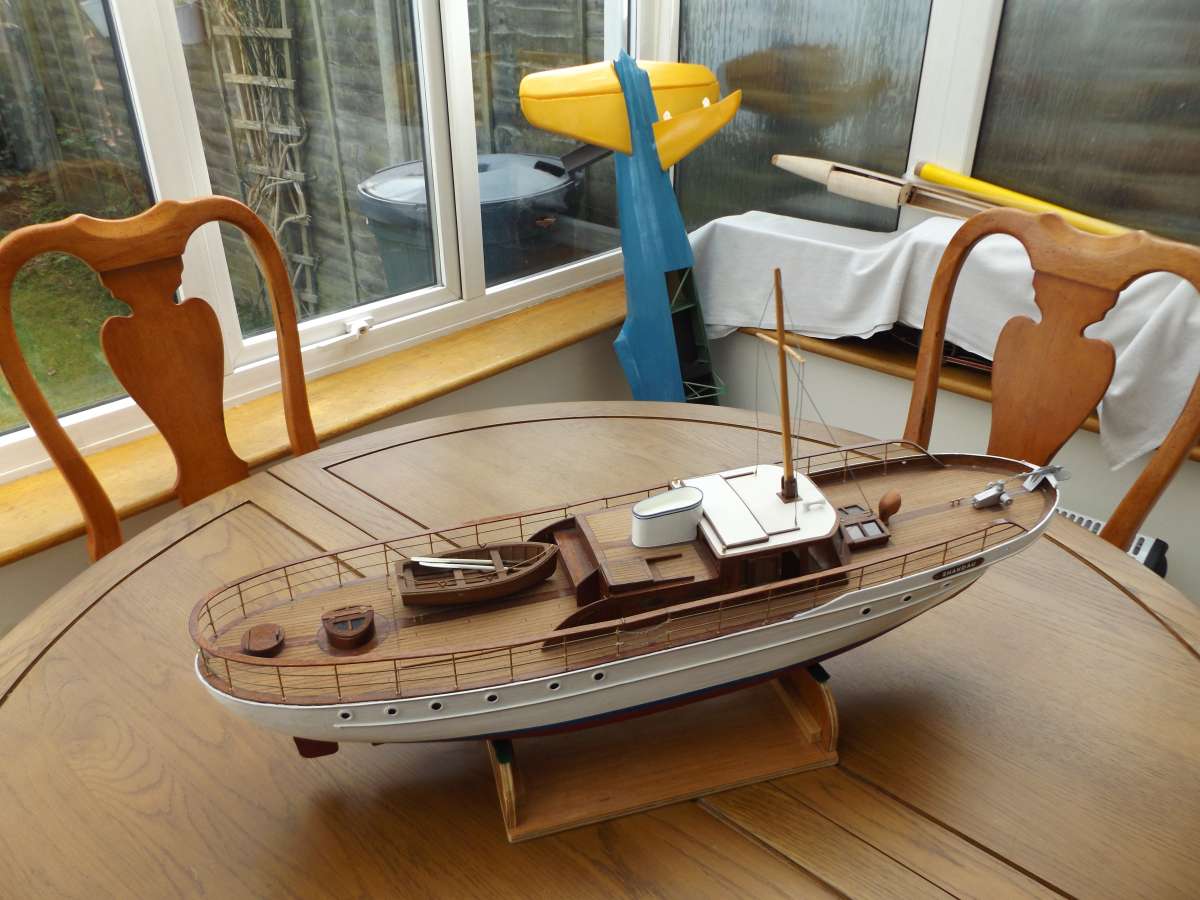
          She is looking good, I think my solution was to nip the top ball off the stanchion and lightly drill the underside of the 1/16″ capping rail, maybe shown on my Shandau build ? not the stern rail unfortunately !! but I liked the chain guarded access 🙂

          Regards  RayShandau53

          #127463
          Colin Bishop
          Moderator
            @colinbishop34627

            Ray, You can buy the stanchions without the top ball for use with a capping rail. The scale capping rail on my boat would be about 3mm. I did try drilling the walnut but with no binocular vision it is really difficult to get a central vertical hole so I had to find another way.

            Colin

            #127466
            Ray Wood 3
            Participant
              @raywood3

              Hi Colin,

              I just remembered how I did the stern rail, It’s 2 laminations of 1/32″ Mahogany the lower one drilled from a card template and stuck in position with super glue 🙂

              Regards  RayDSCF3127DSCF3128

              #127470
              Colin Bishop
              Moderator
                @colinbishop34627

                Very neat job Ray, cutting out those curves on the rail must have been tricky. I have been woring on one of the remaing two sections of stern deck railing this afternoon. Getting there slowly.

                One thing has puzzled me about a lot of these traditional Gentleman’s yachts. These days, the vessel’s tender is invariably an inflatable as it can be deflated when not in use. But back in the day, the tenders were commonly small clinker built rowing boats, ofted shown stowed on the deck behind the wheelhouse either upside down or the right way up. The Silver Mist plan shows a couple of davits attached to the side of the vessel but they would not reach the boat stowage so presumably the tender would have been manhandled to within reach of the davits.

                A look online suggests that some motor yachts were fitted with crane like davits giving a greater reach or had a mast abaft the wheelhouse fitted with a derrick which could be used to hoist the tender overboard.

                In one instance the tender appears to have been permanently stowed in the davits above railing level and swung inboard when the parent vessel was at sea and outboard out of the way when in port or when it was in use.

                There is plenty of free space abaft the wheelhouse on Silver Mist so mine will sit there awaiting manhandling!

                Colin

                #127531
                Colin Bishop
                Moderator
                  @colinbishop34627

                  Here are some photos of my Silver Mist based model with railings in progress. Staunchions are Caldercarft, rail is 020 inch brass rod. capping rail on stern is plasticard channel section glued over the top rail and painted mahogany colour. I had to grind down the width of the top balls on the stanchions to allow the channel to fit over it using canopy glue.

                  Plastic channel section doesn’t like to be bent horizontally so a jig was needed to which steam from a steam cleaner could be appled to soften and reset it. It took several attempts to get it right. The sections of railings are connected with tubular metal beads which are unobtrusive. Those on the aft section of the model will be concealed by lifebelts.

                  Colin

                  Railings (1) - 2K JPEG

                  Railings (2) - 2K JPEG

                  Railings (3) - 2K JPEG

                  Railings (4) - 2K JPEG

                  #127558
                  Richard Simpson
                  Moderator
                    @richardsimpson88330

                    Lovely neat job Colin.  You can get brass tube that slides over common sizes of brass rod and makes for a fairly unobtrusive joint.  If you were to solder them though you can arrange the joints to be inside the stanchion ball.  I know you’ve done it now though so just thinking out loud.

                    #127563
                    Colin Bishop
                    Moderator
                      @colinbishop34627

                      Hi Richard.

                      The stanchions I am using are O.85mm in diameter and the ball is 1.8mm diameter. No way could I make an effective joint within the ball, just threading the rod through is difficult enough for me. There is however another potential disadavantage in that the Silver Mist hull is very tubby so the railings follow a distinct curve. A joint within the ball could introduce a discontinuity in that curve which would be noticeable. Sleeving the rails avoids this as the overlaps can be cut accurately and the sleeves inserted without distorting the curve.

                      I have made the railings in seven sections. One at the stern, two leading forwards towards the wheelhouse. Two on the bridge deck and two on the fordeck. This has only required four sleeved joints using very short metal beads. The joints at the stern will be masked by life rings whilst the others are on the sections where the railings angle down from the bridge deck to the foredeck. They are not too obtrusive.

                      Colin

                      #127567
                      Richard Simpson
                      Moderator
                        @richardsimpson88330

                        I agree Colin, if that was me I would have complete lengths around the curve of the stern then joints where they straighten out to go forwards.  I understand that eyesight plays a part in all this so has to be taken into consideration.  I’m doing more and more nowadays with my glasses off and the work on the end of my nose!

                        #127590
                        Colin Bishop
                        Moderator
                          @colinbishop34627

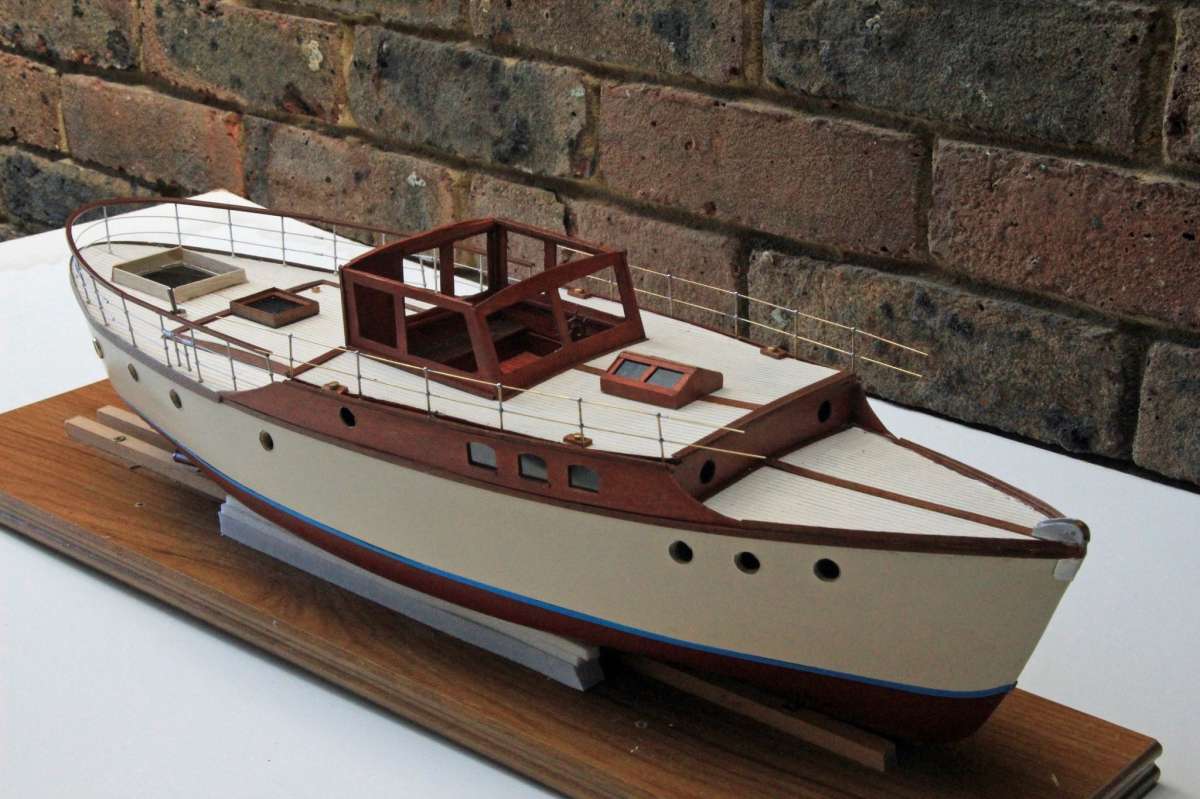
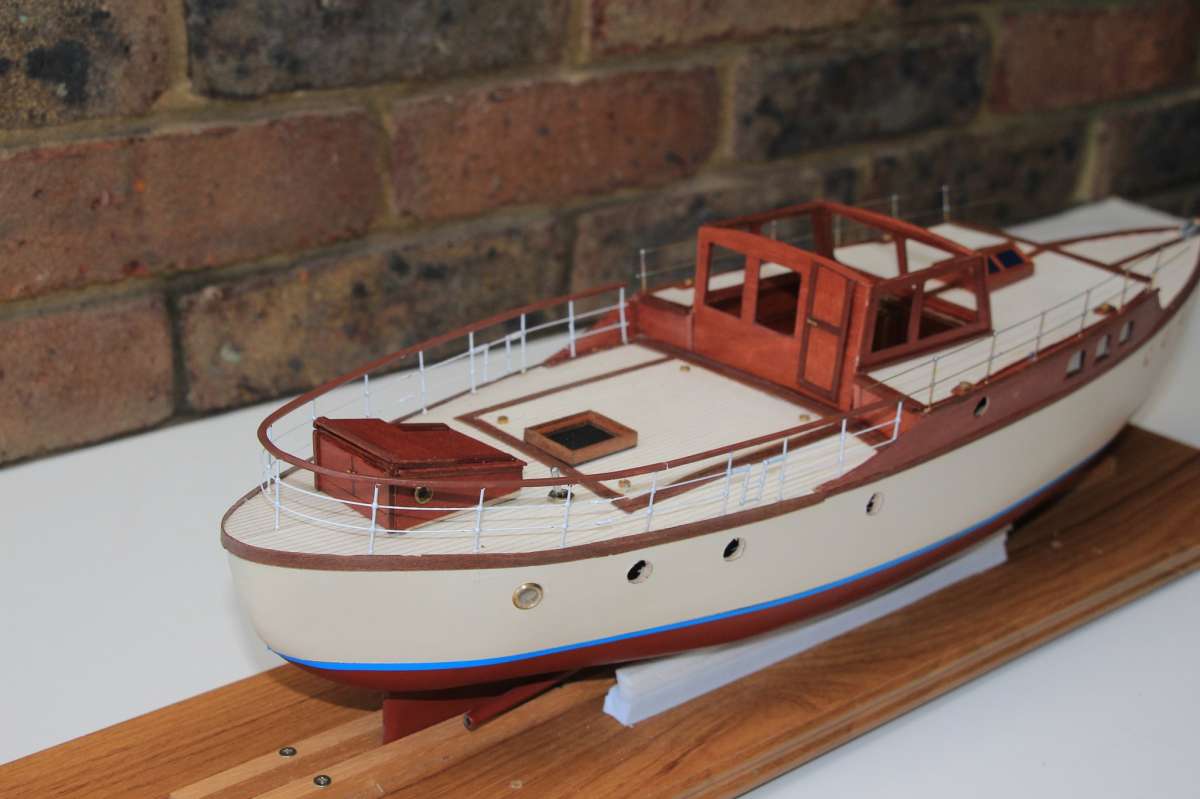
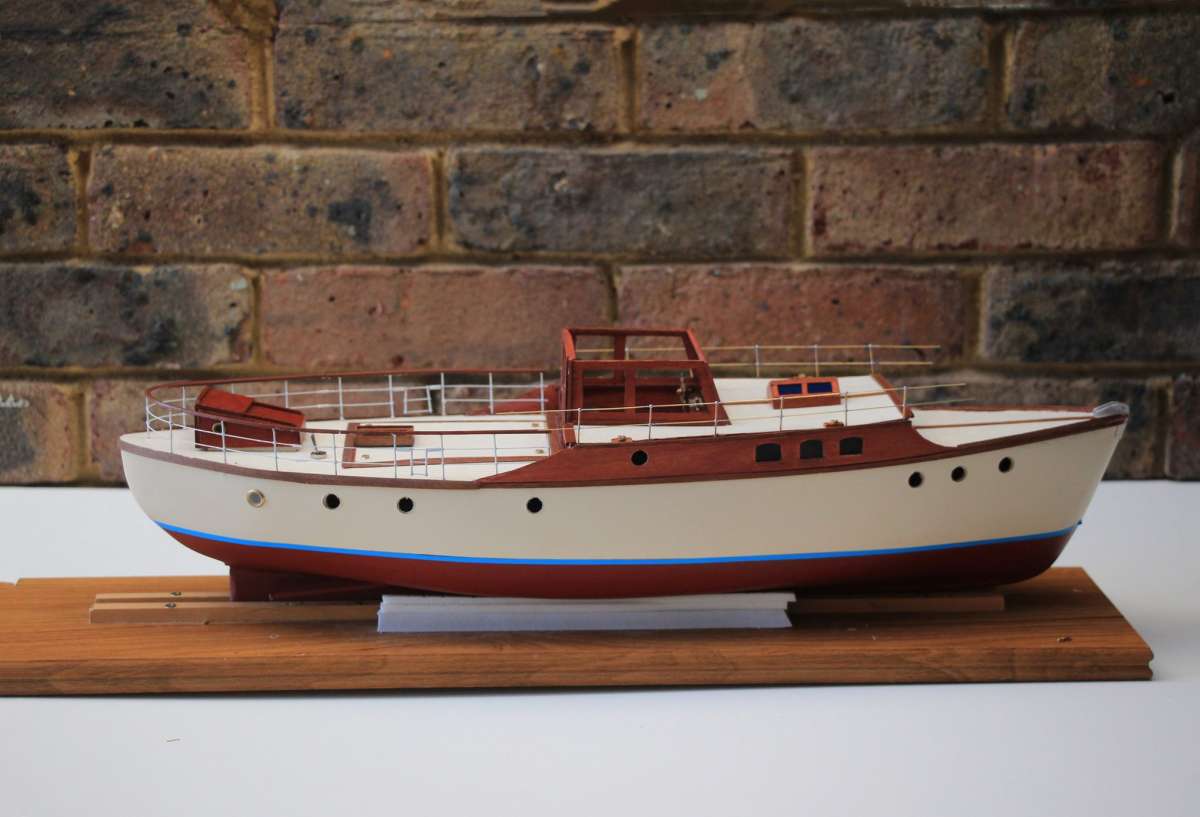
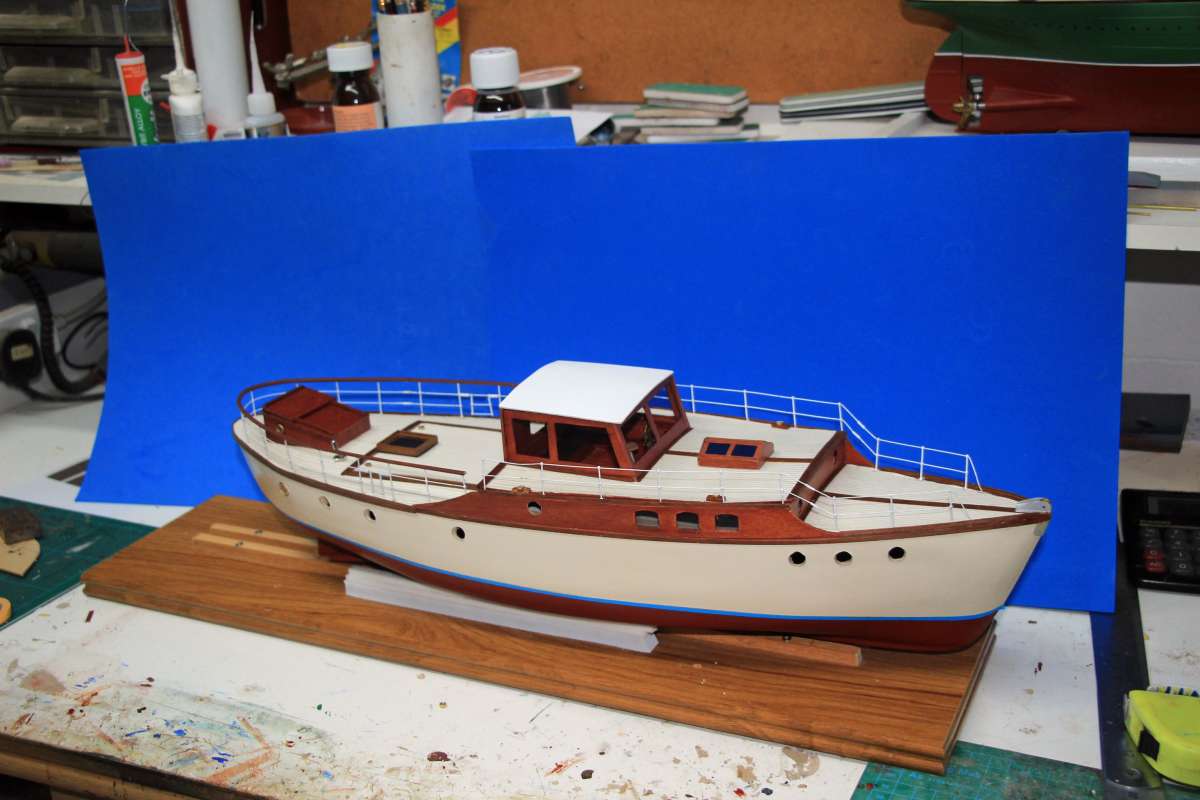
                          Well, the railings are now complete and the photo below shows current progress. A lot of the remaining work consists of ‘sticking things on’.

                          Overall the model is not quite up to the standard I would have liked. There are some bodges but I am hopeful that most of these can  be disguised or at least minimised to the extent that they will not be immediately noticed. It was intended to be a near scale model and I remain hopeful that it will achieve that.

                          Colin

                          Progress April 2026

                          #127595
                          Tim Cooper
                          Participant
                            @timcooper90034

                            Colin

                            Looking very nice. It’s model I have always liked since seeing it in my brother’s Model Maker

                            Richard

                            I know what you mean about the glasses

                            I tend to take mine off for close work, being short sighted . It’s finding them again that could be a problem. I have made some small stands to put them on so I know roughly where they should be.

                            Tim

                            #127653
                            Colin Bishop
                            Moderator
                              @colinbishop34627

                              A lot of the remaining work consists of ‘sticking things on’.

                              Famous last words…  I’ve not spent as much time as I would have liked on SM this last couple of weeks as there have been other priorities and  things getting in the way including wrestling with a recalitrant washing machine over the last few days which won’t pump out. ‘Uses very little water’ the handbook says. Well it didn’t feel that way this morning emptying the machine through a small rubber tube into a receptacle which would fit beneath the outlet in the filter compartment. It was like bailing out the Titanic with a frying pan… Filter was clear but there was some lint blocking the end which connects into the kitchen sink waste pipe. I managed to clear this the other day and the machine worked afterwards but was slow to drain and gave up the ghost completely this morning. From the error codes I suspect there is a buildup of debris in the loop that hangs down between the machine and the sink connection. Unfortunately you cannot detach the tube at the back of the machine and just flush it out as the tube is directly connected to to the pump, access to which apparently entails taking various parts of the case off which is beyond my capabilities. Fortunately it is still under guarantee but how long we will have to wait for a service technician to appear is in the lap of the Gods. Mrs B is not happy but we did hang on to our old spin dryer so can probably manage for a bit.

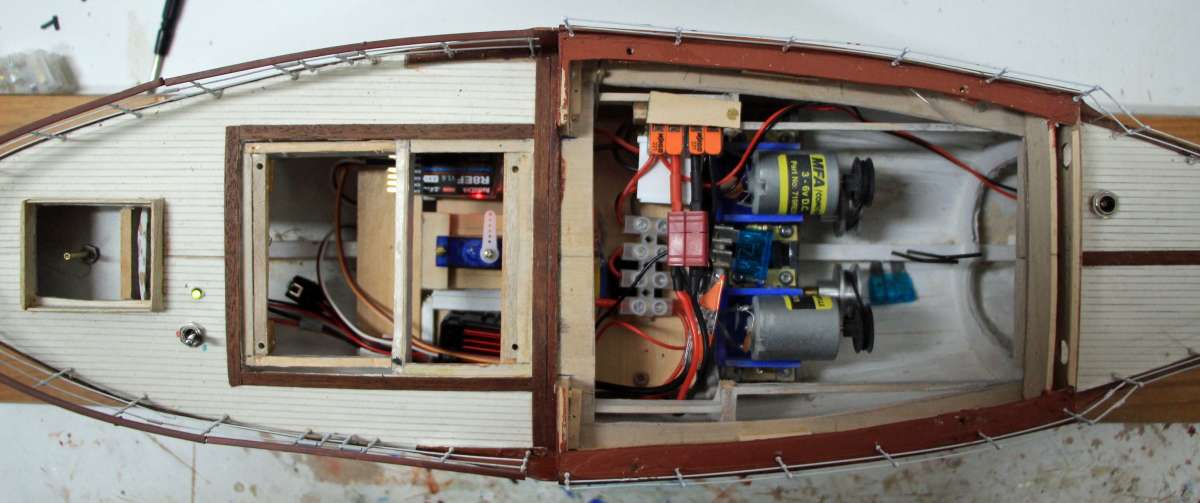
                              Back to the model, the wiring is proving a bit of a headache. I like to fit an on deck power switch, indicator LED and deck charging point to avoid opening up the boat unnecessarily. I also like to fit a fuse. Doing a wiring schematic is simple enough, the problem is that while there is as lot of spare space inside the hull, it is in all the wrong places. This makes the physical wiring layout problematical, not helped by by the large diameter wires to and from the speed controller which have a mind of their own. I seem to be getting there slowly but it is dependent on a selection of  Wago connectors and probably some chocolate bar type terminals to install everything in a layout which will facilitate fault finding and repairs if necessary in the future.

                              I suppose it is inevitable to some extent with such a small model that was originally designed to have a single prop attached to a stonking great entry level Taycol Asteroid powered by an Ever Ready dry battery and launched as a free sailing model in the hope that the battery wouldn’t give out before the boat reached the other side of the pond.

                              Still, we all love a challenge, don’t we?

                              Colin


                              #127656
                              Tim Rowe
                              Participant
                                @timrowe83142

                                Hi Colin

                                It’s what I find. 5% of the time to complete 95% of the model.  95% of the time doing the last 5% sticking things on and getting it finished.

                                Worth it in the end and the challenges are good for the grey matter!

                                Tim R

                                #127669
                                Richard Simpson
                                Moderator
                                  @richardsimpson88330

                                  I used to know a shore side superintendent that had a very similar philosophy and one to which I have seen in action so many times over the years.  That was ” If 80% of the result can be achieved for 20 % of the effort why would anyone put 80% of the effort into the last 20% of the result?”

                                  #127673
                                  Colin Bishop
                                  Moderator
                                    @colinbishop34627

                                    In some cases you still have to finish the job… Or the thing won’t work.

                                    At least we now have an appointment for the washing machine on Wednesday now.

                                    Colin

                                    #127682
                                    Chris Fellows
                                    Participant
                                      @chrisfellows72943

                                      I was going to comment earlier but the reply box was greyed out despite being able to comment on Tim’s post – same problem I had when trying to update my own posts in the past!

                                      Anyway, it’s looking really nice Colin and will certainly be a near scale model despite your reservations.

                                      I share your grief with washing machines. Ours has a tumble dryer on the top, which is quite heavy as we had to change it to a condensing type from the outside hose type and it was difficult to put on due to the restricted space and having to slot the feet into the mounting kit – managed with the help of a son though.

                                      The heat from the tumble dryer caused the paint to come off at the wall/ceiling corners which was difficult to reach to remedy and I thought what a nightmare it will be if the washing machine and/or tumble dryer needs to come out at any time. A couple of months ago my fears were realised when the washing machine started making an ominous noise on the fast spin which got worse and so it was decided to replace it. Despite the tumble dryer being fine I suggested replacing both with a washer dryer so that we didn’t have the same problem again (and indeed putting them both back in) when we got older. As it was, it happened when I was having wrist and finger pain and strength is noticeably reducing but I got it done and decorated the room as well so worked out well in the end!

                                      Chris

                                      #127686
                                      Colin Bishop
                                      Moderator
                                        @colinbishop34627

                                        Well done Chris, these things become more difficult as you get older. Draining our washing machine at floor level did my back and knees no good at all. Hopefully it will get fixed on Wednesday.

                                        Main wiring on Silver Mist is now virtually complete and hoping that when I flick the switch, the green indicator LED comes on rather than a puff of smoke. Watch this space.

                                        Colin

                                        #127695
                                        Colin Bishop
                                        Moderator
                                          @colinbishop34627

                                          Completed the main wiring today and flicked the switch and…….. the green light came on! The battery charging point works too. Just need to tidy up a bit and plug in the RX. Fortunately it has a reasonably long aerial lead which I can run into the upper hull as only the exposed bit at the end actually picks up the signal.

                                          More photos if it all works….

                                          Colin

                                          #127711
                                          Colin Bishop
                                          Moderator
                                            @colinbishop34627

                                            Progress today!

                                            At 7:10am two Bosch engineers arrived to inspect our washing machine. I’d managed to get dressed by then…

                                            From the info I gave them they zeroed in on the discharge pipe and quickly discovered the problem. We temporarily store our food waste in a pot in the kitchen on a worktop immediately above the washing machine. By some incredible fluke, a pistachio nut shell had apparently fallen into the partially open detergent dispenser and managed to make its way through the bowels of the machine, bypass the filter, and end up against the plastic internal cross member of the discharge pipe where it entered the sink outlet thus acting as a sort of organic non return valve blocking the machine pump. You couldn’t make it up really!

                                            Having extracted the offending object, the machine is now apparently back to normal much to Mrs B’s relief and got a good working out during the day.

                                            Oh yes, Silver Mist! Wiring now all tidied up and the RX installed. On switching on, the rudder servo moved in the right direction and the propellors revolved in the intended direction too. Photo shows current layout with just the  servo to tiller linkage to be refitted. At the stern there is a master switch which will normally be disguised as an oil drum. There is a green LED nearby to show whether power is on. Up forward on the foredeck is the charging socket for the battery which will be disguised as a mushroom vent.

                                            There are a multitude of connectors, WAGO and Chocolate Block, which allow the various sections of the wiring to be  disconnected for testing etc. if required. A Deans connector is fitted to the battery which can be disconnected when the model is in storage.

                                            It has all been a bit of a 3D puzzle to route the wiring, but turned our reasonably well in the restricted space in the end as per the photo.

                                            Colin

                                            IMG_7111 - 3K JPEG

                                            #127746
                                            Colin Bishop
                                            Moderator
                                              @colinbishop34627

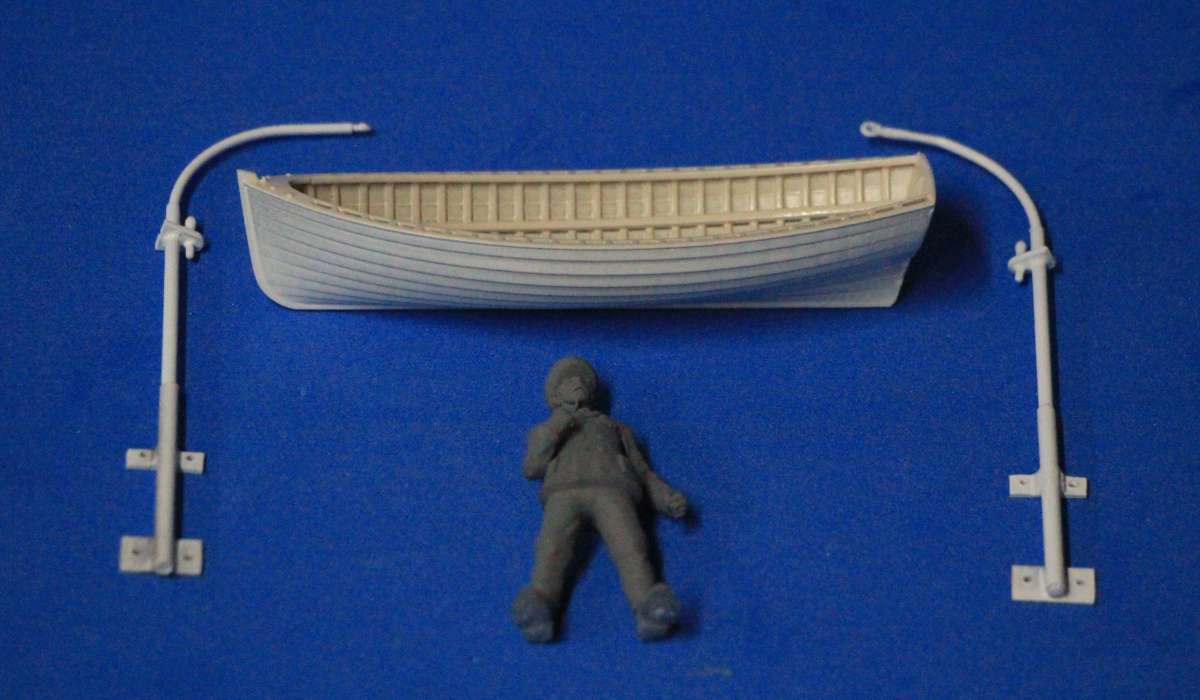
                                              Working on davits now. I have been looking at the tender arrangements the last couple of days. Before inflatables became common these motor yachts typically used wooden dinghies to get ashore when the yacht was anchored and this is indicated on Vic’s plan. I am in the process of making a set of davits which are consistent with a typical 11 foot tender. Vic’s drawing is a bit sketchy in this respect so I have had to make some changes to come up with a practical working arrangement. I think Vic’s davits are too high as the tender only has to be hoisted enough to clear the railings. After a bit of research I think I have got a viable solution. The davits are attached to the side of the hull so I am fabricating them of brass. Phots when completed.

                                              Colin

                                              #127762
                                              Richard Simpson
                                              Moderator
                                                @richardsimpson88330

                                                By coincidence Colin I am putting the boat davits on the plastic QE2 kit I’m putting together.  Ten boats down each side giving a total of 40 davits.  I have airbrushed them black on the sprue so each one has to be removed, paint scrapped from the locating pin and the rear support before fitting in place inside the PE handrails I have fitted.  They need individually aligning by sight both vertically and in a transverse attitude.  All done with glasses off at around two inches from my nose.

                                                I spent a couple of hours yesterday completing just five boats worth!  I’m seeing davits in my sleep at the moment!

                                                #127766
                                                Colin Bishop
                                                Moderator
                                                  @colinbishop34627

                                                  Rather you than me Richard! I had forgotten the odd paint job on QE2’s boat deck designed to give a ‘floating’effect to the lifeboats with the black davits against the khaki deckhouse. Having looked up some photos in one of my books I can’t say I liked it all that much. There was a comment that it made the boat deck feel claustrophobic when you were aboard the ship.

                                                  Of course the lifeboats and davits were removed around 10 years ago to create more deck space but I also saw a report that the heavy steel davits were putting stress on the aluminium superstructure.

                                                  Apparently the ss United States is now ready to be sunk as a reef with the date to be announced. This obviously comes at a bad time for the US government with their former iconic record breaker being sent to the bottom. No doubt there will be some very sharp comments…

                                                  Silver Mist davits below. The dinghy comes from Mark’s Model Bits at a very decent price and he can supply it in many different sizes. I boungt the 100mm one as it is fractionally smaller than the one on Vic’s drawing and thought it might look too big at first but it is typically the size of what would have been carried on a gentleman’s classic large motor yacht. Rather than just stow it upside down, I will take the opportunity to fit it out.

                                                  Colin

                                                  IMG_7116 - 3K JPEG

                                                  #127769
                                                  Richard Simpson
                                                  Moderator
                                                    @richardsimpson88330

                                                    Nice Colin,  Looks similar to the old Quaycraft resin lifeboats, which I was always a fan of.

                                                    As for QE2, I did a lot of digging and eventually came up with a couple of photographs when she had the black davits but a white boat deck bulkhead.  Consequently that’s what I went for.  I think this was round about 1987 just before the re-engineing.  I was releaved I found them as I really didn’t like the khaki bulkhead.  Not much choice with the davits though as they were black right up to the 1987 refit.

                                                    #127773
                                                    Colin Bishop
                                                    Moderator
                                                      @colinbishop34627

                                                      Richard,

                                                      Just an example of how ships change their appearance in so many ways. QE2 underwent  massive changes both in her external appearance and in her internal arrangements – not always for the better.

                                                      The dinghy is resin printed, weighs next to nothing and cost just £4. The two Quaycraft boats on my Fishery Cruiser were very heavy and cost far more than that back in 2015. The current Quaycraft offerings contain more internal detail but cost over £20. An advantage from my point of view is that the boat is an empty shell so enabling me to fit it out to whatever scale and layout I like.

                                                      https://marksmodelbits.com/shop/ols/products/clinker-built-transom-end-boat-kit/v/CLN-BLT-TRN-END-CRB5

                                                      Colin

                                                    Viewing 25 posts - 926 through 950 (of 963 total)
                                                    • Please log in to reply to this topic. Registering is free and easy using the links on the menu at the top of this page.

                                                    Code of conduct | Forum Help/FAQs

                                                    Latest Replies

                                                    Home Forums Scratch build Topics

                                                    Viewing 25 topics - 1 through 25 (of 25 total)
                                                    Viewing 25 topics - 1 through 25 (of 25 total)

                                                    View full reply list.