Sulair – Scottish styled ring netter

Sulair – Scottish styled ring netter

Home Forums Scratch build Sulair – Scottish styled ring netter

  • This topic is empty.
Viewing 8 posts - 1 through 8 (of 8 total)
  • Author
    Posts
  • #30005
    Kimosubby Shipyards
    Participant
      @kimosubbyshipyards
      I have taken on a restoration and scratch build to completion of a ring netter for a family as a reminder to them of their fathers past in fishing here on the island.
       
      The model boat was started in the early 1950’s by the father and was to be a working model of the family boat, a ring netter type but converted for scallop and/or prawn and/or lobster fishing. The full size vessel had been built during the war to assist the navy in mine hunting? and was part of a fleet then commissioned. The vessel had no register number till being so registered in the Isle of man as CT 25 and named the Sulair in 1950’s.
       
      I have a problem.
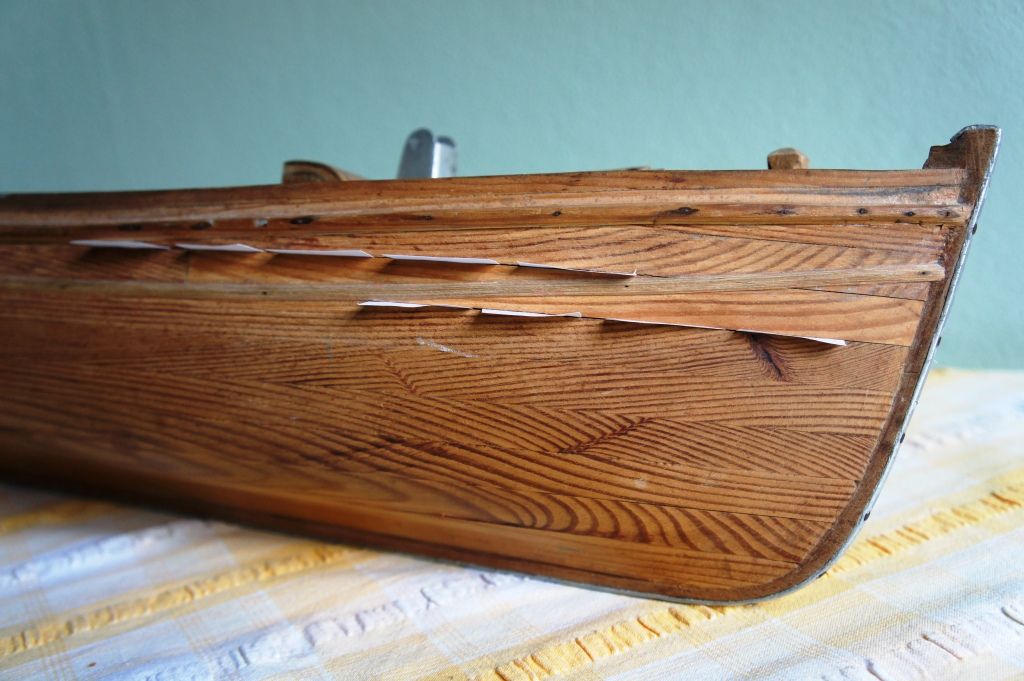
      The construction follows the 1/24 plans of Harold Underhill, and is bread and butter. The timber used is pine. The shape is superb – BUT some of the layers have sprung apart by about 1mm.
      Not knowing what glue was used I’m not sure if I can immerse in water to try to close the gaps. I’ve had the boat inside a plastic bag with water container inside to try and re-humidify the wood – there has been some closing, but after 6 months, nothing more has occurred. Does anyone have any suggestions?
      The intention is to complete the boat for the family in memory of her last fitting out and instal simple R/C to it.
      The model came with a mark 1 BEE series two engine installed (complete with box and instruction manual), but this is now removed and has never been run.
       
      Thanks, Kimosubby


      #6702
      Kimosubby Shipyards
      Participant
        @kimosubbyshipyards

        Bread and butter construction

        #30011
        ashley needham
        Participant
          @ashleyneedham69188
          Kim. Bit of a dilemma there! I would be tempted to simply fill the gaps with p38 or something, this would not only fill but effectively glue the parts together, as further humidifying may do more damage than good..is the shape sufficiently good to fill or do these gaps need closing up? Is the outside painted and so possibly could be epoxy coated??
           
          What were boaters using in the 50`s to glue their ships together with I wonder>
          ?
           
          Ashley
          #30013
          Kimosubby Shipyards
          Participant
            @kimosubbyshipyards
            Ashley,
             
            yes, filling would be simple, but when the boat is completed and back to the water for use will the wood try to return to its original shape and position and thereby distort the shape?
             
            At present the hull is bare wood outside, but has been painted inside but that is no problem. The hull shape is superb, good enough to use as a plug for glass moulds!
             
            Final finish will be paint.
             
            It’s the 1950’s glue that has me worried – could be cascamite or its earlier equivalent,.
             
            I’ll pop a couple pics up later on, they’re worth the look.
             
            Kimosubby.
            #30014
            neil hp
            Participant
              @neilhp
              I would imagine, that during the build in the 1950’s either “animal ” glue,” fish” glue or Cascamite powder resin were used….these being the common glues of that era.
               
              The glues can easily be seen as both the animal and fish glues went brown in colour when heated in a pot to a sticky dark brown colour…….once dried and cured which used to take anything up to 48 hours, they would go very brittle.
              being made from animal and fish bones “stewed up” they were quite waterproof, but dried out over the years and fell apart……you can usually see it on older(pre 1950’s dining chairs etc).
              The cascamite powder resin, also water proof was a white powder which when thoroughly mixed with water also went brittle but dried to a clear colour……….If any of these were used, and still hold the planks, then you will have to clear off any area where the plank has sprung with sand paper……there’s no solvent that will touch it being dried organic matter, and then re glue……I would use a two part liquid epoxy to re glue and then coat on the inside with polyester resin.
               
              neil.
               
               
              #30016
              Kimosubby Shipyards
              Participant
                @kimosubbyshipyards
                Thanks neil,
                 
                when I put up some pictures you’ll be able to see the limited areas where some of the layers have partially sprung. At present I don’t intend to prise it apart and start again – any twists or strains currently held by the still sound glue might then become a problem.
                 
                There’s no colour about the surfaces I can see, and with cascamite (I use aeroglit two part glue myself) there appears to be no tell tale hard clear/opaque lumps or smears on the inner surfaces.
                 
                I shall have to clear the inside surface as well, then maybe that will show something.
                 
                Thanks for your input and suggestions, I too polyester inside to seal wooden builds, especially my yachts and the latest build, “Bounty”.
                 
                Kimosubby.
                #30024
                Kimosubby Shipyards
                Participant
                  @kimosubbyshipyards
                  Hi Neil and Ashley,
                   
                  I’ve created an Album named Sulair with several images of this 1950ish started model. I’ve slipped paper in all the sprung areas.
                   
                  Having done that it looks like the top two/three layers are the only seriously affected. The glue would appear to be cascamite or similar (hard white rhime present) when examined closely.
                   
                  I’ll try a gentle squeeze up to see whether the layers want to come together – if they do then I can fill with glue and clamp, else I’ll know to fill carefully with epoxy glue so as to fill and fix at same time.
                   

                  Kimosubby
                  #30028
                  ashley needham
                  Participant
                    @ashleyneedham69188
                    After all these years I would have thought that the hull would be stable now, having had time to dry out, and provided it is sealed up so no water could get in one would have thought it would stay in that shape, and so could be filled with confidence.
                     
                    Or is there a flaw in my reasoning ??
                     
                    Looks very nice.
                     
                    Ashley
                  Viewing 8 posts - 1 through 8 (of 8 total)
                  • Please log in to reply to this topic. Registering is free and easy using the links on the menu at the top of this page.

                  Code of conduct | Forum Help/FAQs

                  Latest Replies

                  Home Forums Scratch build Topics

                  Viewing 25 topics - 1 through 25 (of 25 total)
                  Viewing 25 topics - 1 through 25 (of 25 total)

                  View full reply list.