Second ever build – airboat

Advert

Second ever build – airboat

Home Forums Build Blogs Second ever build – airboat

  • This topic is empty.
Viewing 25 posts - 1 through 25 (of 102 total)
  • Author
    Posts
  • #100796
    Simon Anderson 1
    Participant
      @simonanderson1

      Hi all,

      As a relative new starter with model boats a few months ago, seeing the amazing boats people had built around the pond, it inspired me to take the plunge and built my very first boat from plywood, using some plans I found on the web and adapted to my own preferences. I would say it was a reasonable success, but the huge number of mistakes along the way and less than ideal quality of finish have made me decide to attempt a second build which I would like to log the ups and downs here in case it is of interest to anyone!

      So, this is my second ever attempt to build a boat. The starting point for boat number 2 is basically:

      • An airboat / swamp boat style design
      • Blue and silver theme

      and that’s pretty much it!

      Advert
      #9831
      Simon Anderson 1
      Participant
        @simonanderson1
        #100797
        Simon Anderson 1
        Participant
          @simonanderson1

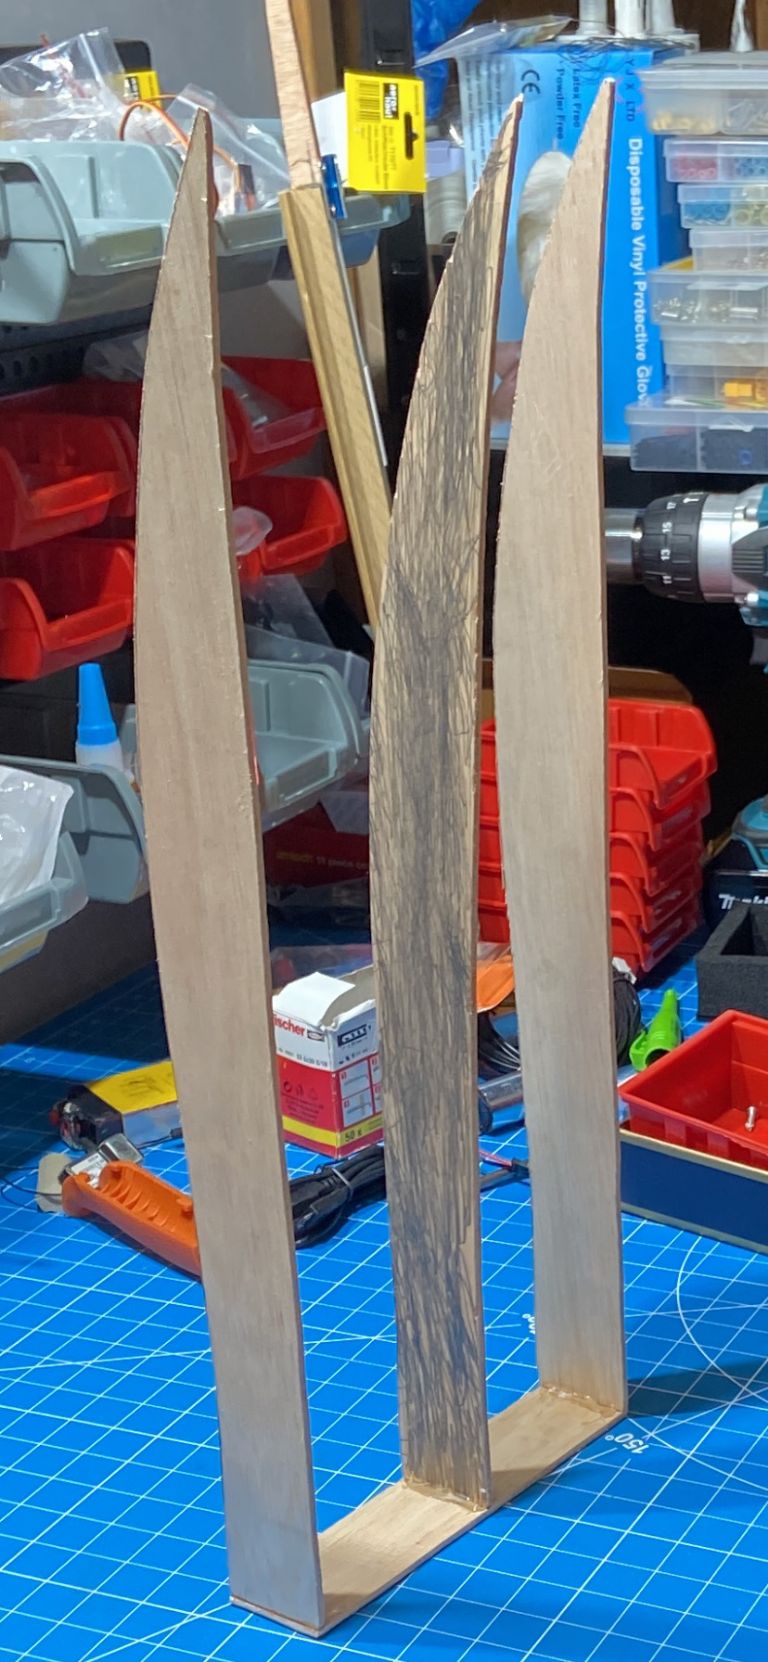
          My first step was to hand draw the side profile on a 3.6mm plywood piece and then cut it out with a jigsaw roughly. Then I made 2 more identical pieces and sanded all the pieces together to make them as uniform as possible.

          I then made a rectangular piece to hold the 3 profiles together, initially with superglue and then with contact adhesive which was left to dry for a day. I don't think the superglue would be strong enough to hold in the final model, but I could be wrong – going on the safe side with some extra glue for now.

          Airboat step 1

          Edited By Simon Anderson 1 on 14/06/2022 21:42:22

          #100798
          Simon Anderson 1
          Participant
            @simonanderson1

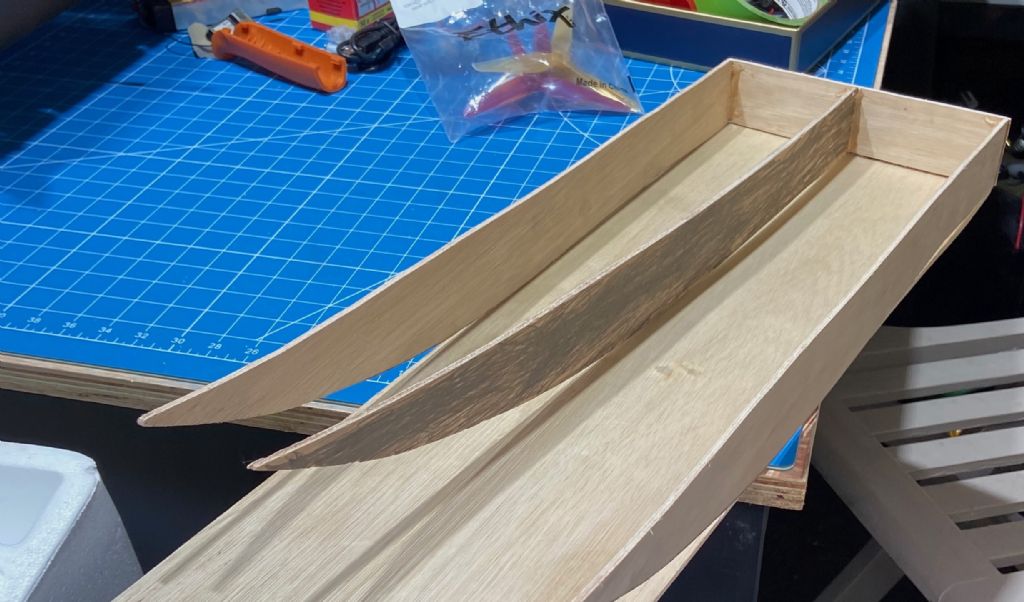
            Once that had dried, I cut another piece of plywood for the bottom of the boat – I made it quite a bit longer because it seems that some of these boats have a longer protruding section at the front anyway, and besides I could always trim it later if I needed to. So I glued this down at the back of the boat.

            First issue – my less than ideal woodworking skills shows the middle profile piece has too much taken out and there is a bit of a gap with the bottom. The 2 side pieces are much more snug, so I decide to carry on as it doesn't seem to have any big impact on anything (I will probably regret that later!)

            Also I only have 3.6mm plywood and the thickness of that on the base seems like it's going to be a bit challenging to bend it around the curved profiles at the front.

            Airboat step 2

            Edited By Simon Anderson 1 on 14/06/2022 21:43:05

            #100800
            Chris Fellows
            Participant
              @chrisfellows72943

              Hi Simon

              How did the middle piece end up different to the outside pieces given that you sanded them together, did it move? You could glue some strips of timber either side along the bottom edge. Aliphatic resin e.g. from Deluxe Materials is a glue that many of us use for general gluing of ply. Strong and grabs quite quickly. I've only ever used contact adhesive for gluing my decks down – not the best for most construction.

              I think the sheet you are using for the bottom skin is far too thick and as you surmise will be very difficult to bend if not impossible. Around 1.5mm would be more suitable. If you want to use the 3.6mm ply you could just cut the front at an angle and so the base and front would just be straight pieces.

              Hope you don't mind the comments/advice?

              Chris

              #100801
              ashley needham
              Participant
                @ashleyneedham69188

                Simon. Although there is a bit of a gap in the centre runner I wouldn’t worry too much about it as a bit of glue or as suggested a bit of wood either side will be ok.

                Balance is needed on an airboat and personally I would have used 4 formers so that the battery could be located centrally and not to one side, as you will have to have with a former in the middle. The existing centre one should prise out ok, and a couple more could be made to suit.

                if sanding several runners or whatever at the same time , I pin them together with small nails or the staple gun to make sure they don’t move.

                3.6 is a bit thick for the underside, however it may bend sufficiently if you were to cut it so the outside grain ran side-side and not along the length of the boat for a separate front half?

                Ashley

                #100806
                ashley needham
                Participant
                  @ashleyneedham69188

                  Thinking about it, the easiest way to go about this is not to have a curve underneath but a simple single cut up (slope) at the bow, or even a flat bottom and two slopes. Once sanded, and there is lots available to sand on 3.6m, it will be as curved as you want.

                  The inner formers can be drilled with a hole-cutter to lighten them…don’t know how big you are making it? Did we discuss 8×16 inches or something around that mark?

                  Shouldn't be too heavy, and in any event, if it’s too light you have stability issues.

                  Ashley

                  #100816
                  Richard Simpson
                  Participant
                    @richardsimpson88330

                    As Chris has mentioned a contact adhesive does not have the required strength for main constructional work. Opinions will vary but I would use a PVA based glue. This could be something such as a white wood glue such as 'Resin W' or Deluxe Materials 'Speed Bond'

                    As regards the balance a similar sized battery either side of the main spine would also be worth considering.

                    #100817
                    Simon Anderson 1
                    Participant
                      @simonanderson1
                      Posted by Chris Fellows on 15/06/2022 00:10:52:

                      Hi Simon

                      How did the middle piece end up different to the outside pieces given that you sanded them together, did it move? You could glue some strips of timber either side along the bottom edge. Aliphatic resin e.g. from Deluxe Materials is a glue that many of us use for general gluing of ply. Strong and grabs quite quickly. I've only ever used contact adhesive for gluing my decks down – not the best for most construction.

                      I think the sheet you are using for the bottom skin is far too thick and as you surmise will be very difficult to bend if not impossible. Around 1.5mm would be more suitable. If you want to use the 3.6mm ply you could just cut the front at an angle and so the base and front would just be straight pieces.

                      Hope you don't mind the comments/advice?

                      Chris

                      Hi Chris,

                      Many thanks for the advice – of course it is welcome – I have a lot of learning to do so any help is greatly appreciated.

                      Regarding the glue I will take a look into that resin glue and use that instead going forward.

                      I have tried bending the existing ply and it *almost* made it around the curve with some clamping (photo to follow). However, I need to think over the 2 options of using either 2 pieces at angle) or a thinner plywood (I've ordered some regardless as I will probably need it in future). As you say that means the middle pieces then can be straight cuts at the end instead of curves which simplifies that too.

                      For the gaps/differences in the wood there is only one explanation – my woodworking skills are still not very refined! If I remember correctly I cut the middle piece first, then 2 outside pieces which I did a better job on, and then sanding down I probably didn't pay enough care to check everything was uniform enough. Lesson learned, especially with the core bits of the hull to make sure that are better cut/measured/sanded in future.

                      Simon

                      #100818
                      Simon Anderson 1
                      Participant
                        @simonanderson1
                        Posted by ashley needham on 15/06/2022 08:05:03:

                        Simon. Although there is a bit of a gap in the centre runner I wouldn’t worry too much about it as a bit of glue or as suggested a bit of wood either side will be ok.

                        Balance is needed on an airboat and personally I would have used 4 formers so that the battery could be located centrally and not to one side, as you will have to have with a former in the middle. The existing centre one should prise out ok, and a couple more could be made to suit.

                        if sanding several runners or whatever at the same time , I pin them together with small nails or the staple gun to make sure they don’t move.

                        3.6 is a bit thick for the underside, however it may bend sufficiently if you were to cut it so the outside grain ran side-side and not along the length of the boat for a separate front half?

                        Ashley

                        Thanks Ashley – I think a fair bit of "re-jigging" is in order anyway, so I'll probably take the opportunity to cut 4 of the centre pieces instead of 3 to help with the balance – good idea to leave a space in the middle for the battery as well.

                        Agreed on the sanding – I think I taped them together with masking tape (not very secure), and then didn't take enough time/care on them – simple as that. Lesson learned to clamp them down or something like that in future.

                        The plywood very nearly made it round the curve, but I think I will go back a step and try either a 2 piece of this plywood or the thinner one when it arrives.

                        Suggestions are greatly appreciated.

                        #100819
                        Simon Anderson 1
                        Participant
                          @simonanderson1
                          Posted by ashley needham on 15/06/2022 14:33:35:

                          Thinking about it, the easiest way to go about this is not to have a curve underneath but a simple single cut up (slope) at the bow, or even a flat bottom and two slopes. Once sanded, and there is lots available to sand on 3.6m, it will be as curved as you want.

                          The inner formers can be drilled with a hole-cutter to lighten them…don’t know how big you are making it? Did we discuss 8×16 inches or something around that mark?

                          Shouldn't be too heavy, and in any event, if it’s too light you have stability issues.

                          Ashley

                          Great idea – the internal ones I can trim right down where they are not needed for support. I guess that would be easier after installing them with a small cutter tool or something like that.

                          I will look at the options when I get the thinner ply – you are right, the curved effect can still be achieved by sanding a couple of pieces at an angle – I'll weigh up the options on that one when I have both.

                          Size wise it is about 20cm wide and about 2.5 times that long. As I'm rejigging it, I may adjust the proportions as well.

                          #100820
                          Simon Anderson 1
                          Participant
                            @simonanderson1
                            Posted by Richard Simpson on 15/06/2022 19:21:19:

                            As Chris has mentioned a contact adhesive does not have the required strength for main constructional work. Opinions will vary but I would use a PVA based glue. This could be something such as a white wood glue such as 'Resin W' or Deluxe Materials 'Speed Bond'

                            As regards the balance a similar sized battery either side of the main spine would also be worth considering.

                            Thanks Richard – I haven't tried any of those glues but will definitely take a look into them.

                            Good idea on the battery on either side – not sure yet whether I will keep the single internal spine or replace with 2 so there is a slot in the middle. Good to know there is a solution either way on the balance.

                            Was it your article in the magazine this month on the steam boat? If yes, amazing details there and I like the painted green servos that look like a piece of machinery – cool idea!

                            #100821
                            Simon Anderson 1
                            Participant
                              @simonanderson1

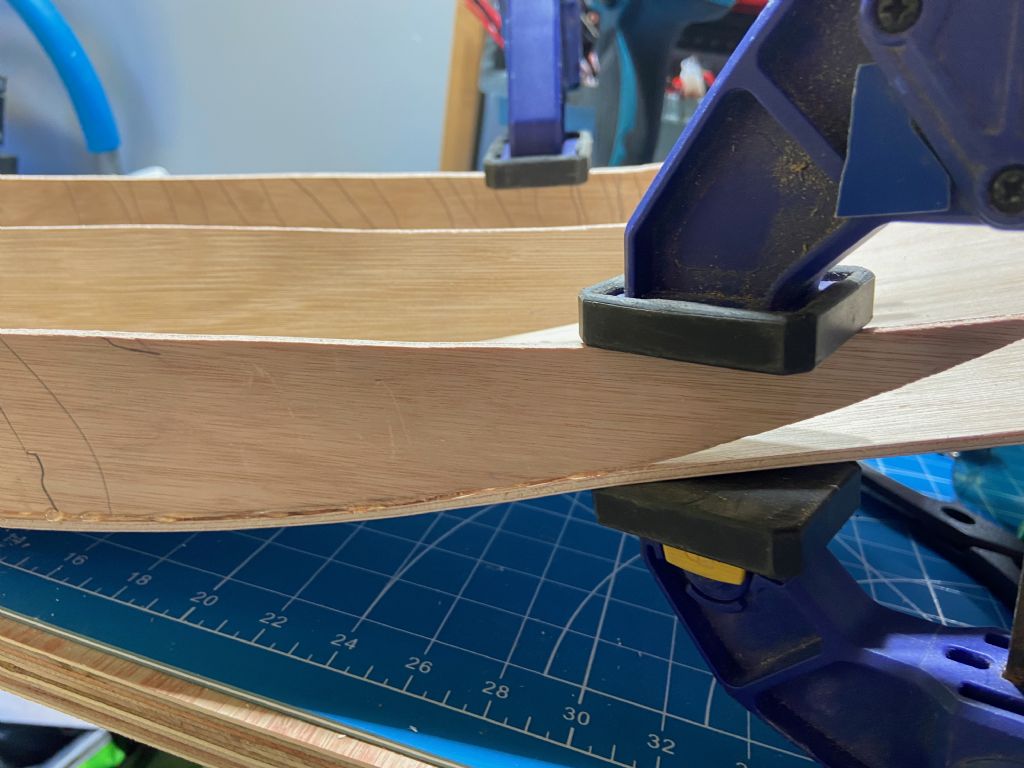
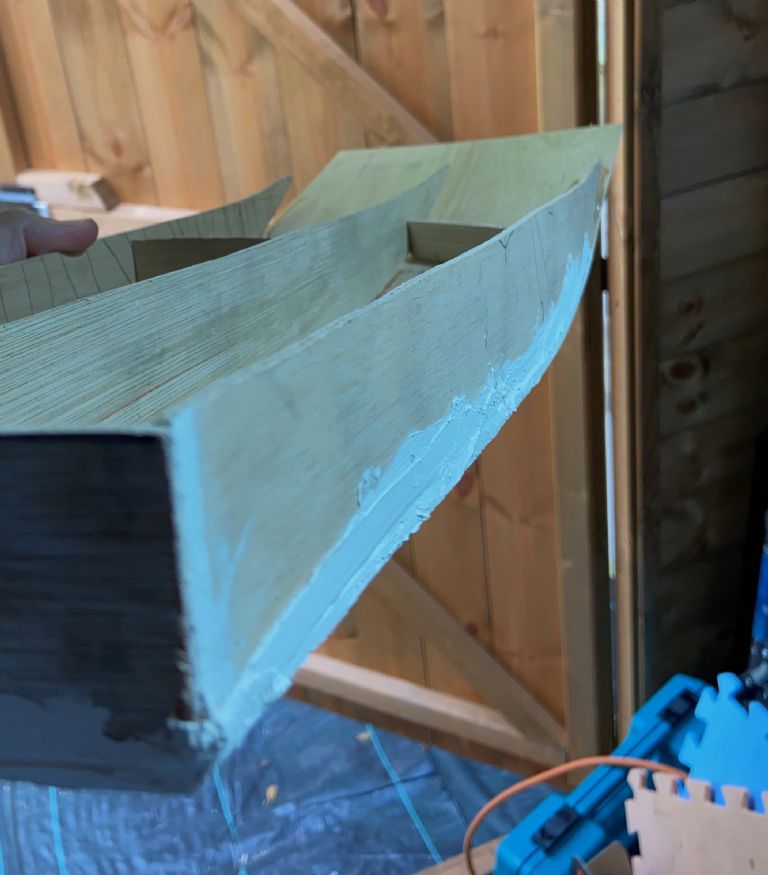
                              Here is curve after first part of some glueing and clamping – after that dried I then clamped the final part of the curve but it didn't quite make it and there was a gap… So, yes need to either go with the angled pieces or try the thinner plywood when it shows up.

                              Airboat step 4

                              #100822
                              Simon Anderson 1
                              Participant
                                @simonanderson1

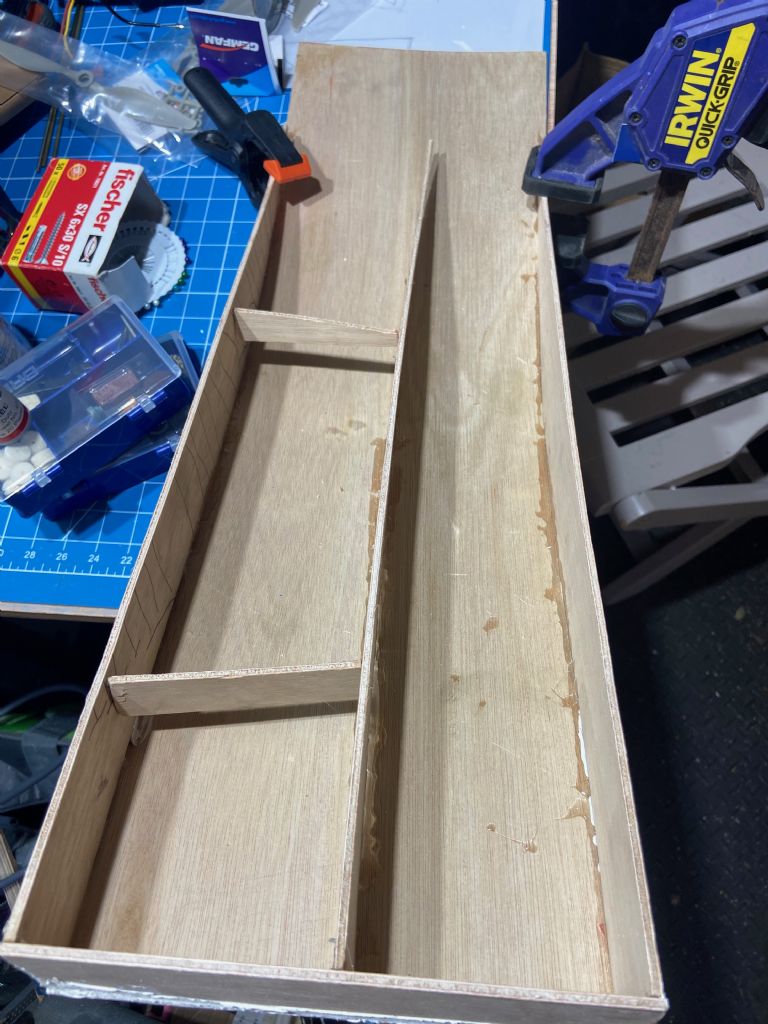
                                Here is final clamping attempt …

                                Airboat step 5

                                I am quite pleased with the overall shape that is emerging – it matches what I had I mind initially, but some rework to do …

                                Airboat step 6

                                #100823
                                Richard Simpson
                                Participant
                                  @richardsimpson88330
                                  Posted by Simon Anderson 1 on 15/06/2022 19:44:20:

                                  Posted by Richard Simpson on 15/06/2022 19:21:19:

                                  As Chris has mentioned a contact adhesive does not have the required strength for main constructional work. Opinions will vary but I would use a PVA based glue. This could be something such as a white wood glue such as 'Resin W' or Deluxe Materials 'Speed Bond'

                                  As regards the balance a similar sized battery either side of the main spine would also be worth considering.

                                  Thanks Richard – I haven't tried any of those glues but will definitely take a look into them.

                                  Good idea on the battery on either side – not sure yet whether I will keep the single internal spine or replace with 2 so there is a slot in the middle. Good to know there is a solution either way on the balance.

                                  Was it your article in the magazine this month on the steam boat? If yes, amazing details there and I like the painted green servos that look like a piece of machinery – cool idea!

                                  Hi Simon, yes that was me, many thanks for the comments.

                                  #100824
                                  Richard Simpson
                                  Participant
                                    @richardsimpson88330

                                    Simon, just a thought as regards your bending. If you part bend a curve in a piece of wood and then glue it and clamp it part way the glue will set at the point where the curved wood leaves the frame. When you then move forward a little more the glued joint will hold the curved part at the wrong angle and you will end up with a lumpy curve.

                                    It is better to arrange to hold the curved part for the entire length of the curved joint and then glue all in one operation to ensure a nice smooth curve. In your case I would be looking at supporting the base of the model on a block of wood towards the rear, then forcing the bow down with a heavy weight. Old lead acid batteries are good for this.

                                    Once the entire curve is held exactly as you want it first apply a glue that is quite thin and will soak into the joint, such as an aliphatic glue then, when that has completely cured, put a heavy fillet of PVA glue on either side of the joint.

                                    Or you could go for the double angle approach as Ashley has suggested. You will find a huge improvement when you get the thinner ply and you won't have to fight it anywhere near as much!

                                    #100827
                                    ashley needham
                                    Participant
                                      @ashleyneedham69188

                                      I’m with Richard on the gluing it up in one operation, doing it like this evens out any deviations in your cut curves, as, barring defects in the ply, it will bend in a nice even curve.

                                      If you had the room, a small hobby bandsaw would make all this sooooo much more straightforward, and your basic shapes would be much easier to get right from the start. Your three formers, for instance, could be cut all at once by pinning three bits of ply together and cutting the three in one go, and thus be identical with minimal sanding.

                                      Ashley

                                      **LINK**

                                      #100832
                                      Simon Anderson 1
                                      Participant
                                        @simonanderson1

                                        Thanks both – will take that approach on the next iteration. I like that idea of using a heavy weight on the curved bit at the front and then adding glue – I never would have thought of that.

                                        Maybe it’s not too late to request a new saw for Father’s Day!

                                        #100838
                                        ashley needham
                                        Participant
                                          @ashleyneedham69188

                                          Simon. Machine mart in Twickenham. Not far from you. Stuffed with goodies. Bandsaws, clamps, sandpaper on a roll (much better than the stuff sold in squares), compressors and spraying equipment…..

                                          Ashley

                                          #100842
                                          Chris E
                                          Participant
                                            @chrise

                                            Posted by ashley needham on 16/06/2022 00:43:50

                                            :……………………….If you had the room, a small hobby bandsaw would make all this sooooo much more straightforward, and your basic shapes would be much easier to get right from the start. Your three formers, for instance, could be cut all at once by pinning three bits of ply together and cutting the three in one go, and thus be identical with minimal sanding.

                                            Ashley

                                            **LINK**


                                            This looks like a bargain to me:

                                            Bandsaw for £150 which looks like the twin of this one for £280 Bandsaw

                                            Chris

                                            Edited By Chris E on 17/06/2022 11:39:03

                                            #100843
                                            Richard Simpson
                                            Participant
                                              @richardsimpson88330

                                              As with all these things it pays to do some research and be guided by recommendations from people who have actually purchased the product. The trouble with machine tools is that manufacturers can purchase the same frame and cast components, then fit differing quality components, such as bearings, motors, electrical gear etc. into it. If you are 100% sure you are comparing like for like then you are in a better position to compare prices but that is extremely difficult to do. Then there is the old chestnut of after sales service, support and back up etc. I purchased mine from Axminster because they are UK based and I had a very lengthy conversation with one of their team as I asked all sorts of questions. They also produce a comprehensive series of set up guides on YouTube to ensure that you set up the saw perfectly once it has been installed. The biggest challenge with band saws is that owners do not set them up correctly and then blame the tool for poor performance. Again the quality of the components affects how you set up the machine, higher quality bearings and blade guides makes a difference.

                                              Having said all that, if you know what you are doing and use the saw very occasionally and only lightly then you may well be happy with a cheaper one. I went for this one and I am extremely pleased with it. The cuts are superb and I should have bought one years ago:

                                              Band Saw

                                              #100847
                                              ashley needham
                                              Participant
                                                @ashleyneedham69188

                                                Not had a problem with machine mart gear and they do have an extensive good after sales spares service, on its own a good reason for buying their stuff.

                                                i have the small MM one and a larger DeWalt one. In both cases spares have been required after some years in service (switch for the small one and a bearing for the large one)..just a phone call away. In my case MM are quite close.

                                                Not saying they are the best, just outlining a viewpoint.

                                                Getting a larger machine is best if you only have room for one, as small machines struggle to cut long straight lines due to the thin blades, and this deteriorates as the blade gets less sharp or even blunt.

                                                Simon, if you want to come over and play with either of my bandsaws just shout, and this will show you a)the utility of a bench bandsaw, and b) the difference. We could cut up sufficient pieces for a lander in 30 mins easy.

                                                Ashley

                                                #100850
                                                Simon Anderson 1
                                                Participant
                                                  @simonanderson1

                                                  Thanks all for the great suggestions, ideas and links and for the very kind offer Ashley! When I get some time, I will see how far I can get with "take 2". Looking forward to seeing how it goes. New glue at the ready too (titebond waterproof).

                                                  Aside from hopefully being operational at some point, I definitely am aiming to make the quality of the finish of this one better than my first offering, so I think taking the time now to get all the basic cuts accurate should help towards that.

                                                  #100856
                                                  Chris Fellows
                                                  Participant
                                                    @chrisfellows72943

                                                    If you listen to these guys you're on a slippery slope! I only mentioned one glue, the one I use most, but have many I use.

                                                    And they are already talking about bandsaws! Fine if you are looking to build a number of models and are able/want to make the financial commitment. Another alternative is a scroll saw which is what I use. Both good and have pros and cons.

                                                    I've only been building for a few years and have already built up quite a collection of tools, glues and materials, mainly the fault of this and other forums. smiley You have been warned! PermaGrit sanding blocks and files are essential, nice to have, and make sanding so much easier. Then there's………………..laugh

                                                    Chris

                                                    #100863
                                                    Ray Wood 3
                                                    Participant
                                                      @raywood3

                                                      Hi all,

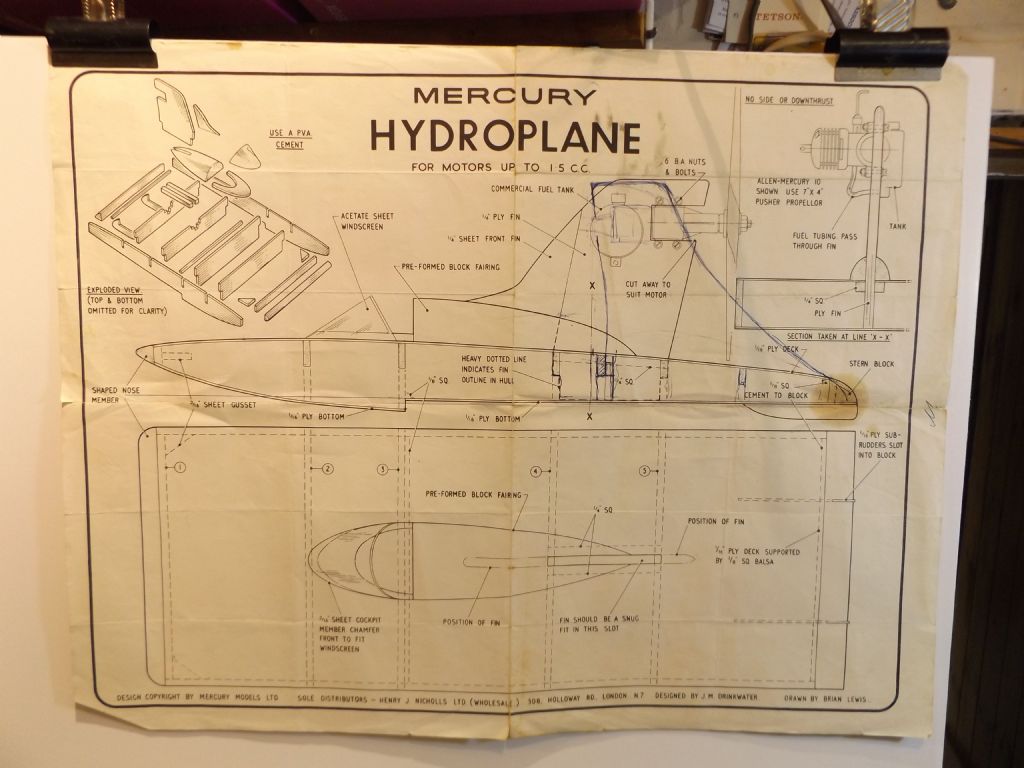
                                                      Yes I agree with Chris on the tools required, can be very basic, As most of us have been modelling forever we have lots of various materials in stock, some tricks like adding doublers to the sides before you started trying to bend the base would have increased the gluing area that said Ashley's comment of using the ply cross grain would have made bending & gluing easier. Some of us have been doing model making for 50 – 60 years so Rome wasn't built in a day

                                                      I would have made the central ply part the motor support similar to this attached.

                                                      Good luck

                                                      Raymercury hydroplane 030821.jpg

                                                    Viewing 25 posts - 1 through 25 (of 102 total)
                                                    • Please log in to reply to this topic. Registering is free and easy using the links on the menu at the top of this page.

                                                    Code of conduct | Forum Help/FAQs

                                                    Advert

                                                    Latest Replies

                                                    Home Forums Build Blogs Topics

                                                    Viewing 25 topics - 1 through 25 (of 25 total)
                                                    Viewing 25 topics - 1 through 25 (of 25 total)

                                                    View full reply list.

                                                    Advert