How to handle metals?

How to handle metals?

Home Forums Scratch build How to handle metals?

  • This topic is empty.
Viewing 18 posts - 1 through 18 (of 18 total)
  • Author
    Posts
  • #33370
    Kimosubby Shipyards
    Participant
      @kimosubbyshipyards
      Hi all,
       
      just today I was trying to bend a short piece of brass for a specific job and again it took a couple of failures before I got it acceptable.
       
      I have no engineering experience what so ever, but I can “bodge” with the best. Books are to work from but the voice of experience is much better.
       
      For instance, I know to heat up my metals then cooling them, enables me to bend and work with them, but how do I harden them again?
       
      I can solder items, even silver solder and have differing temperature solders, but what do you use to hold the work whilst applying the heat. I end up wedging bits together only to see them move apart slightly as the flux bubbles up. I get some good joints, many go in the bin.
       
      I’ve a box of discarded attempts at small jobs hoping one day I can re-use them.
       
      For now, I want to bend at right angles to size; solder small diameter tube to the ends of narrow sheet (3mm x 0.8); and make several in the range 8 – 16mm brass rings but bearing eyelets equally spaced about the outer surface.
       
      Any advice? Yup, this is where you can tell me where to go! Kimosubby
      #6783
      Kimosubby Shipyards
      Participant
        @kimosubbyshipyards

        tips and advice wanted

        #33373
        Bob Abell 2
        Participant
          @bobabell2

          Hello there, Kimo

          Hello Kimmo
          With silver soldering, as opposed to soft soldering, where you can get away with quick simple joint, silver soldering is quite a serious undertaking!

          The surfaces need to be spotlessly clean, bolted together, even pickled in sulphuric acid, well fluxed, heated to a bright cherry red, then touched with the silver solder stick in the right spots.
          Silver solder can’t be used as a filling material, as the solder layer is too thin!

          The secret is holding the parts together in their final resting place, using rusty nuts and bolts, where necessary

          Wire could be used, in certain circumstances, but tends to slacken off, due to the high temperatures involved

          Silver soldering is used where a very strong joint is required, but for general model making, soft soldering is quite adequate

          Bob
          Bob

          #33375
          Kimosubby Shipyards
          Participant
            @kimosubbyshipyards
            Hi Bob,
             
            thanks for the info and heads up on “ol’ bolts and nuts” which could be me!
             
            I have found with some brass that when at cherry red the metal collapses and melts away -is this because its a cheap poor quality?
             
            I’ve found I can use fine brass wire (salvaged from around wine bottles) to tie bits together, but this can lead to lumps in the final effect.
             
            I’ve noticed the silver solder layer, when things goes just right – zap, the solder is in and done, and bleeds into the contact space well.
             
            Kimosubby
            #33377
            Bob Abell 2
            Participant
              @bobabell2

              Hello Kimo

              I think you may be overheating the brass, when it melts away.
              Try soft solder for brass and silver solder for copper

              There may be various types of silver solder, that melt at different temperatures, but I’m not sure

              You’re right about the silver solder flashing over when the temperature is just right…….It’s very pleasing to see

              Bob

              #33378
              Trevor Holloway
              Participant
                @trevorholloway99134
                Yup, silver solder comes in various grades with different melting points.
                The idea is to use the hottest grade first then only heat up to the next lower grade melting point, lowering the temp grades as you go.
                This allows several goes at attaching items.
                If you try using a hotter grade after the lower ones they will fall off !
                #33401
                Telstar
                Participant
                  @telstar

                  Hi Kimosubby

                  Brass can be one of the most difficult metals to work with. There are many alloys called 'Brass' and some of them are 'notch sensitivity' so often snap when trying to bend. Annealing works well with copper and some brass alloys, but not with others. As an apprentice I was told copper and bronze where 'lost art' metals, and the method of hardening and tempering though it was used for weapons in the past could not be carried out sucessfully now. (or then when I was younger man thinking) When bending brass you need the right grade,

                  Methods : When bending sheet metal e.g for a corner I use bending bars, small ones are like a large split pin made from square section steel bar the sheet to be bent is slid between the leg's of the thing, line up the bending line, clamp tight (usually in the vice) and bend the sheet with a wood block or similar and a mallet.

                  To bend pipe (tube) I resorted to making formers on the lathe, these ars shaped like a pulley, with the inside smallest radius no smaller than 3x the O/D of the pipe to be bent, it is essential that the groove round the pulley is a snug fit on the pipe to prevent it collapsing when bending.

                  For soldering I have a selection of jigs and clamps similar to the ones used when gluing parts together, the smaller ones having crocodile clips on adjustable arms, larger ones made from retort stands and clamps. I have found that solder paste can be very useful, if you clean the area to be soldered, coat the area ot be joined with solder paste (which has its own flux in) , assemble the joint, holding as needed then heat with a small blowlamp or hot air gun until the solder in the joint melts.

                  hope this helps Tom

                  Have just read this after posting,    I must try to add some drawings or something to explane this

                  Tom

                  Edited By Telstar on 16/02/2012 15:05:16

                  #33403
                  Kimosubby Shipyards
                  Participant
                    @kimosubbyshipyards

                    Tom, Trevor and Bob, thanks all.

                    Had another go in the blacksmith's shop again, and eventually managed to make two spar end collars each with three loops attached and both silver soldered!

                    Tips on bending very helpfull, hadn't thought about using block formers, I'll try tomorrow as I have a couple of pulley block housings to make that sit flush to the hull, a square U shape with arms top and bottom to take fixing bolts, but the depth needs only be that of the sheave.

                    I have a bender for small bore pipe, down to 4mm, below that I stick in a couple of nails the width of the bar apart and after heating the rod, put between and bend round.

                    Keep it coming and thank you.

                    What is hardening and how do you do it?

                    Kimosubby

                    #33405
                    Trevor Holloway
                    Participant
                      @trevorholloway99134

                      Hardening depends on the metal.

                      Some "Work harden" while others need to be heated to specific temperatures and quenched ususlly in water or oil.

                      Hardening and tempering are a detailed processes relating to capturing the microstructure of the material crystals at their optimum for the material characteristics you require (thats why I dropped "Material Science" as soon as possible at college in favour of extra "Manufacturing Technology&quot.

                      #33478
                      Kimosubby Shipyards
                      Participant
                        @kimosubbyshipyards

                        Thanks you all for your comments, I have now managed to make almost all my fittings over the last week.

                        I've made "holders" from aluminium angle with slots cut to hold chain links etc, and used old nuts and bolts as weight when bringing work together.

                        Most importantly, I've started to "tin" with the high temperature solder, something I always do with low temp but never considered with the high temp. What a difference that makes – no need to prod and move the whole assembly by accident trying to get the solder to the correct place. I can now make a spar end ring with three stay mounts attached in one heat up.

                        I also found that suspending the area to be heated clear of the heat pad on small alumium strips greatly assisted in heat up, the support still being close to the work.

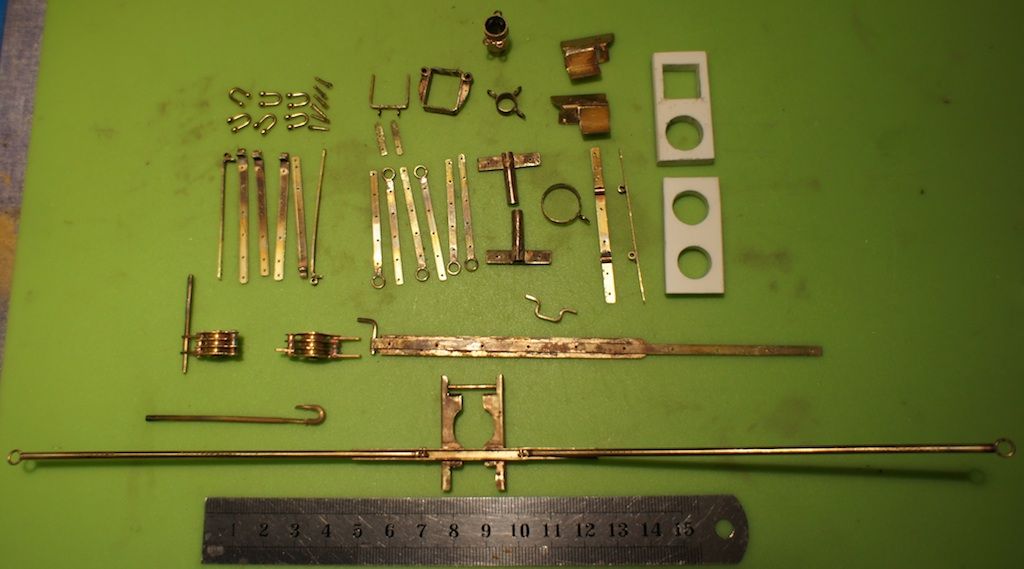
                        Here's a quick look at some of the items, chain plates, spar bands, triple pulley blocks, stem head band, mast head mounts etc. Thanks again, now how do I cut threads and how to cut a reverse thread on the same rod……………………………..?

                        Kimosubby

                        tb Lady Daphne

                        #33479
                        Bob Abell 2
                        Participant
                          @bobabell2

                          You`ve done a great job there, Kimo

                          Soft solder would probably have been good enough, but silver soldering has really raised the stakes!…..Nice!

                          What size of thread are you talking about?

                          I`ll guess at about 5mm?

                          I`ll guess again and assume you are using stainless steel?

                          I`ll guess yet again and say you don`t possess a lathe?……Yep!

                          You will need a 5mm die and die holder. For stainless steel, you`ll need a quality die at about £15 to £20 …….The cheap ones from the handyman shops are simply not good enough!

                          The material will need a generous chamfer, about 1.5mm X 45 to start the thread off in a vice.

                          Hold the material vertically and apply a drop of oil, then press the die holder down onto the job, as you carefully rotate the die holder. Starting the thread is quite tricky at first! Make sure the die is square to the material. As the die begins the cut, don`t try and break the swarf coming from the cut, until you are sure the thread is being cut properly.

                          As you proceed down the thread, rotate the die backwards every few forward cutting rotations, to break the swarf and keep adding oil.

                          That`s about it really. If you can get away with using brass, then the task is easy, but some stainless is very tough to screw.

                          For the left hand thread, you will need a special die and that could be very expensive……..About £50.00 at a guess!

                          I would imagine that you could buy a length of LH threaded material and by using a brass coupling, you could silver solder the assembly?

                          Hope this lengthy description is OK for your requirements?

                          Bob

                          #33481
                          Kimosubby Shipyards
                          Participant
                            @kimosubbyshipyards

                            Hi Bob,

                            I'm flattered by your comments, especially having seen some of your work posted here. I once soft soldered chain plates for a colleage, and he managed to break two so I re-did his in silver for added strength. They were on a 1OM yacht so took some tension.

                            I have a lathe, in fact 2, though the liitle one just does small spars and wood only. The bigger one scares me a bit. It has a 4 jaw chuck and a box of cutters and add ons – I got the whole thing from a keen amateur sadly no longer here to offer his advice. I only do wood at present, I really need to get to an engineering show to see how to use it with metal.

                            I've dies and a holder, and yes, about 3 – 5mm brass rod was the target. I wasn't really asking, just a tongue in cheek comment of mine.

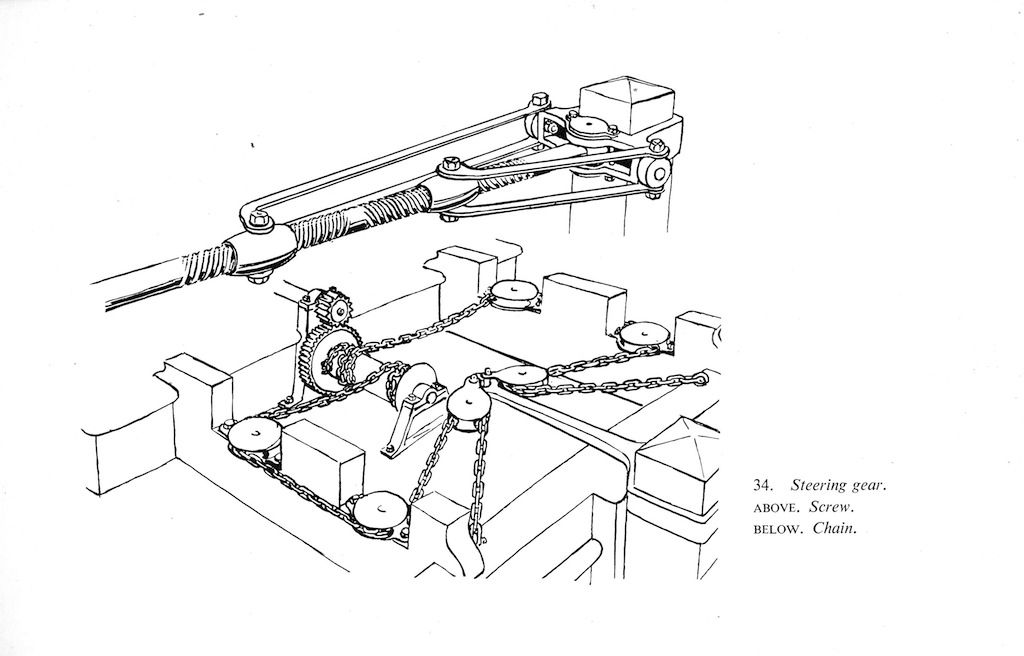
                            BUT its a long tapering thread I was wanting, probably referred to as a worm thread, but it"s only for show. Some barges had a worm threaded rod which connected to the wheel operating the rudder. I just wanted to simulate this. I've managed to cut threads by the method you suggested, and I actually have "thread cutting oil"!!

                            I may try and cut a thread in plastic and see how that looks.

                            Thanks Bob, I assume the GE project is still waiting air time.

                            Kimosubby

                            #33483
                            Bob Abell 2
                            Participant
                              @bobabell2

                              Kimo

                              I agree, soft solder is not suitable for loading bearing joints like shroud plates etc

                              You mention long tapering threads?…………Don`t think you mean "tapering" thread?

                              I`m guessing again…….I think you are referring to a worm and wheel. but the worm won`t be a long thread

                              You could be referring to a thread with a long pitch?…….This can only be done on a lathe, with change gears.

                              More info required………Bob

                              #33488
                              Kimosubby Shipyards
                              Participant
                                @kimosubbyshipyards

                                Bob,

                                my description let me down, so here's what I meant, the top system of the two. Its very similar to that used in big ships, I have a working model of such.

                                As I said, its only going to be a dummy, the actual rudder is driven with rods from the servo but slowed down using a servo morph from our freind Dave, else it flaps about like a "duck's foot".

                                Thames barge

                                Kimosubby

                                #33489
                                Bob Abell 2
                                Participant
                                  @bobabell2

                                  That looks very complicated!

                                  If the mechanism is only for appearance, then you could simulate the left and right hand threads by winding brass wire soldered to a length of shafting?

                                  Or you could use RH thread all the way…..nobody will notice anyway?

                                  Bob

                                  #33535
                                  Telstar
                                  Participant
                                    @telstar

                                    Kimo

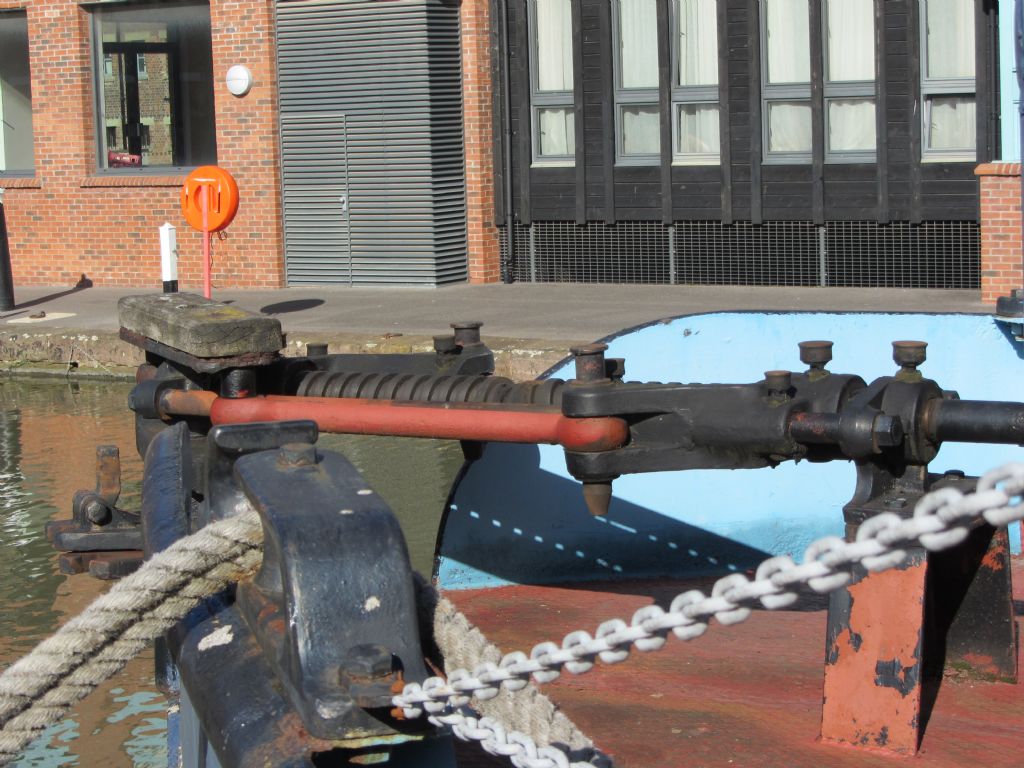
                                    They say 1 picture says 1000 words. So here's a long post, spotted on a walk round Gloucester Dock I thought of you

                                    the thread is on approx 3in shaft and is about 3/4 in square thread.

                                    I think Bob's idea of fabricating would be best, using square section wire on a plain rod

                                    Tom

                                    #33548
                                    Kimosubby Shipyards
                                    Participant
                                      @kimosubbyshipyards

                                      Thank you Telstar, I think I got that image too.

                                      I'm gonna do as Bob suggests, solder a twist of 0.5mm wire on a 3mm rod, then flatten slightly with hammer! I've not heard of square section wire, we're lucky to get basic lengths of brass.

                                      Most of the blacksmithing is now done, only an anchor to fabricate and solder some chain links for added strength as its used in some of the rigging.

                                      Kimosubby

                                      #33553
                                      Telstar
                                      Participant
                                        @telstar
                                      Viewing 18 posts - 1 through 18 (of 18 total)
                                      • Please log in to reply to this topic. Registering is free and easy using the links on the menu at the top of this page.

                                      Code of conduct | Forum Help/FAQs

                                      Latest Replies

                                      Home Forums Scratch build Topics

                                      Viewing 25 topics - 1 through 25 (of 25 total)
                                      Viewing 25 topics - 1 through 25 (of 25 total)

                                      View full reply list.