Galileo – A resurrection

Advert

Galileo – A resurrection

Home Forums Sailing Models Galileo – A resurrection

  • This topic is empty.
Viewing 5 posts - 176 through 180 (of 180 total)
  • Author
    Posts
  • #88597
    Tim Rowe
    Participant
      @timrowe83142

      Ray asked me some while ago if I was going to fit a cabin and cockpit. The answer was no then, and it's still going to be ostensibly a flush deck. Although the hull is scale, it is a fully functioning RC yacht so I like the simplicity besides which the original model was flush deck.

      I will describe the hatches later but they are flush too and when sailing will be sealed with tape or ring patches. A better solution for keeping the water out. This leaves the problem of changing the battery and accessing the switch. Before the advent of 2.4 ghz radios there was also the need to change crystals as well. The solution is a screw top plastic container again available from SailsEtc and other sources. Inevitably this breaks up the line a bit but this is a practical model and so I have to make provision for the pot. I kept it as far inboard as possible but this was limited by the swing of the lever arm winch. It is close to the main hatch for easy of making the electrical connections.

      p1020788.jpg

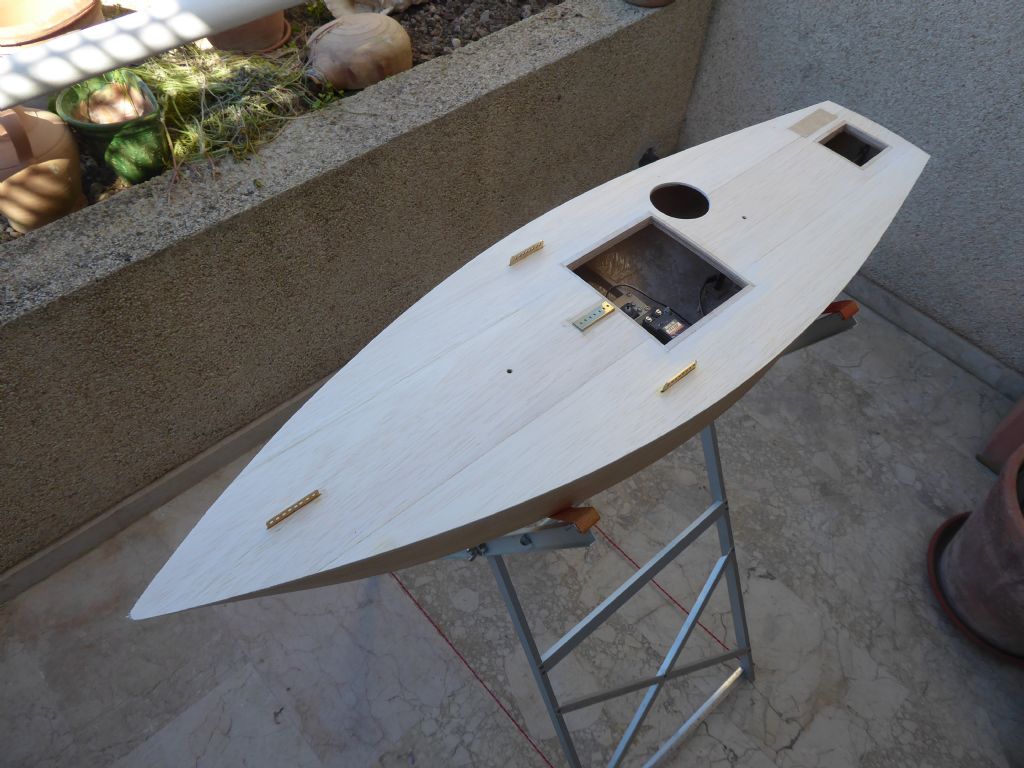
      Here is a reminder of the deck layout with the main hatch, hole for the pot off to starboard, the hatch over the rudder stock and on the starboard quarter, the hard point for the mounting pole for the GoPro camera.

      p1110396.jpg

      Here is the pot with three layers of balsa wrapped around it. The elastic is the clamp.

      The pot is slightly tapered so I made the balsa ring slightly low on the taper to give me some sanding allowance on the inside. The ides being that the pot will ultimately seal on the taper when the flange is at deck level.

      p1110398.jpg

      The ring is now on the deck for marking out.

      p1110407.jpg

      The finished ring sealed with tissue and paper like the deck itself and the pot.

      p1110408.jpg

      The ring was made oversize for ease of construction but I don't need all that width. Just enough to stabilise the cut edge of the deck and to provide a reasonable sealing area.

      p1110409.jpg

      A couple of minutes with the razor saw and job done. O how I like reinforced balsa!

      p1110659.jpg

      Easing out the hole with the curved Permagrit which by complete coincidence was just the right size.

      p1110660.jpg

      Trial fit before gluing with epoxy.

      p1110667.jpg

      Just a little bit more sanding to do to bring it flush with the deck and something else to tick off the list.

      Tim R

      Advert
      #88605
      Chris Fellows
      Participant
        @chrisfellows72943

        I'm going to give up model boat building and stick to my other hobbies!

        Chris

        #88627
        Tim Rowe
        Participant
          @timrowe83142

          Chris – You are going to continue to be an inspiration to a lot of builders, old and new.

          The question arose early on whether I was going to be happy with a plastic screw top on the deck.

          p1130834.jpg

          Quite ugly I think you'll agree so it got some treatment.

          Going back a bit I had my disaster moment when I put the contact adhesive on the wrong side of the veneer. Pretty stupid thing to do but after sulking for a suitable period I got back on my horse and bought a new sheet.

          I have to cut a hole in the veneer so why not use the scrap piece on the top and give it a go.

          p1130830.jpg

          Here is the piece of veneer but it is very, very thin and the grain (which is the special feature) is all over the place. It would never be possible to sand it perfectly round so it had to be stuck to a temporary backing pad to give it some beef. Here I am marking out a piece of balsa which is stuck to the veneer with Pritt Stick. This is quite strong but releases easily when dampened.

          p1130833.jpg

          This is the disk (upside down) that I can handle easily and will stop the edge from breaking away while I sand it perfectly round on the Proxxon Dustmaker.

          p1130835.jpg

          The temporary backing was taken off and the veneer stuck permanently to a piece of 1/64 birch ply which is the permanent backing. The veneer now gets a border that has to be fitted in segments. That's why the backing is marked and number so that when I make the "petals" I can make sure they go in their correct places.

          p1130836.jpg

          Here are the petals and you can see that numbers 1 and 2 have been sanded at a radius to match the round veneer. Each petal is numbered for it's corresponding place.

          p1130837.jpg

          Petal number 1 is hiding under the red plastic strip which spreads the force, protects the petals and doesn't stick to anything. I am using Aliphatic.

          p1130838.jpg

          The petals are now all on and the joints line up with the sectors marked on the backing. The orientation of the joints and the veneer is important because when fitted, the veneer pattern will match the main piece it was taken from with the grain lining up.

          p1130839.jpg

          The whole disc it then cut to size using a compass cutter so that it fits in the shallow recess of the screw top.

          p1130842.jpg

          Like this.

          The lid still sticks up like before but it has lost some of its ugliness.

          Tim R


          Edited By Tim Rowe on 02/06/2020 18:51:53

          #88673
          Tim Rowe
          Participant
            @timrowe83142

            I was in the boatyard for big boats yesterday and saw something that made me a bit more relaxed about the keel tang on Galileo.

            p1160895.jpg

            This keel is about 4 metres deep and look at the tiny amount that gets plugged into the hull! Amazing!

            The fin is high tensile steel CNC milled from a billet and the bulb is of course lead although there are a few yachts around using depleted uranium. I don't know where the boat is that it belongs to.

            Tim R


            Edited By Tim Rowe on 04/06/2020 06:47:03

            #88674
            Ray Wood 3
            Participant
              @raywood3

              Hi Tim,

              I hope you have the chance to find out what goes on top of that keel 😄

              I was always amazed that the keel fell off Simon Le Bon's yacht Drum in the 85 Fastnet race !! Hell of a thing to happen to a 71' yacht 😯⛵

              Regards Ray

            Viewing 5 posts - 176 through 180 (of 180 total)
            • Please log in to reply to this topic. Registering is free and easy using the links on the menu at the top of this page.

            Code of conduct | Forum Help/FAQs

            Advert

            Latest Replies

            Home Forums Sailing Models Topics

            Viewing 25 topics - 1 through 25 (of 25 total)
            Viewing 25 topics - 1 through 25 (of 25 total)

            View full reply list.

            Advert