Returning modeller

Advert

Returning modeller

Home Forums Beginners Returning modeller

  • This topic is empty.
Viewing 25 posts - 326 through 350 (of 367 total)
  • Author
    Posts
  • #101562
    Ray Wood 3
    Participant
      @raywood3

      Hi Jim,

      The rudder servo will have a maximum deflection relative to the full movement of the transmitter stick, but the movement of the rudder can be increased or decreased by using the holes on the tiller arm nearer it's centre.

      So the extra travel is a mechanical thing not limited by the servo, but check if your radio has rate switches to reduce control throws, mainly for aeroplane use which radio set are you using ? If it's a computer radio the travel will be in the set up.

      Regards Ray

      Advert
      #101563
      Richard Simpson
      Participant
        @richardsimpson88330

        If you look at the servo arm only, ignore the rudder, the arm should move approximately 45 degrees either side of the neutral position, i.e. a full travel side to side of approximately 90 degrees. if you haven't got that then the movement is limited in the transmitter and needs adjusting. If you have got the full 90 degrees of movement in the servo arm then it is up to you which hole in the servo arm you connect the linkage to. Closer to the servo spindle will give you less movement of the rudder and further towards the end of the servo arm will give you more movement at the rudder.

        You may also have a number of holes in the tiller arm on the rudder so, again, movement is determined by which hole the linkage is connected to. This time though, closer to the rudder stock will give you more movement of the rudder and further towards the end of the tiller arm will give you less movement. A good starting point is to have the connecting linkage around the same distance from the spindle at either end so, if you have the 45 degrees movement either side at the servo, you should have round about 45 degrees either side at the rudder.

        If you only have 5 degrees either side at the servo arm then, as Ray says you need to adjust the throw in your transmitter.

        #101564
        Colin Bishop
        Moderator
          @colinbishop34627

          The geometry of servo to rudder movement was discussed by Glynn Guest in the February 2022 issue. As Ray says, rudder movement is dependent on the connections between the servo arm and the tiller. A good starting point is to have the distance between the connection hole in the tiller and the rudder shaft the same as the distance between the connection hole in the servo arm and the servo shaft. You can then adjust from there either by using different holes on the servo arm or by altering the servo end point throw (extent to which the servo arm moves) if your transmitter has this facility.

          End point adjustment has the merit of preserving the servo arm to tiller geometry as adjusting the hole connections on the servo arm cn potentially result in the rudder turnng more to one side than the other.

          Snap Richard!

          Colin

          Edited By Colin Bishop on 07/08/2022 14:50:53

          #101566
          James Hill 5
          Participant
            @jameshill5

            Thankyou gentlemen for your answers,

            Ray, the transmitter is an Absima. The top right hand side has a Dual Rate knob for adjusting the steering angle (which I hadn`t got round to trying before my query ) It was set to zero so I tried max and it does what it says on the tin,. and has made a lot of difference.

            I find some of the extra sticks and knobs on some of these transmitters a bit confusing as to their use and I get reluctant to try them in case I beggar something up then don`t know how to correct it.

            Richard and Colin, I `ve just measured the lengths you suggested and I had 29mm from the centre of the rudder spindle to the the outer hole of the tiller arm and 45 mm from tiller arm hole to the servo arm. With this dual steering adjusted to max , the servo arm now moves through the 90deg, so things are moving in the right direction.

            I may have been lucky with my other boats , but I`ll make a point of checking them as well. That`s something else learned this afternoon.

            Many thanks,

            Jim.

            #101702
            James Hill 5
            Participant
              @jameshill5

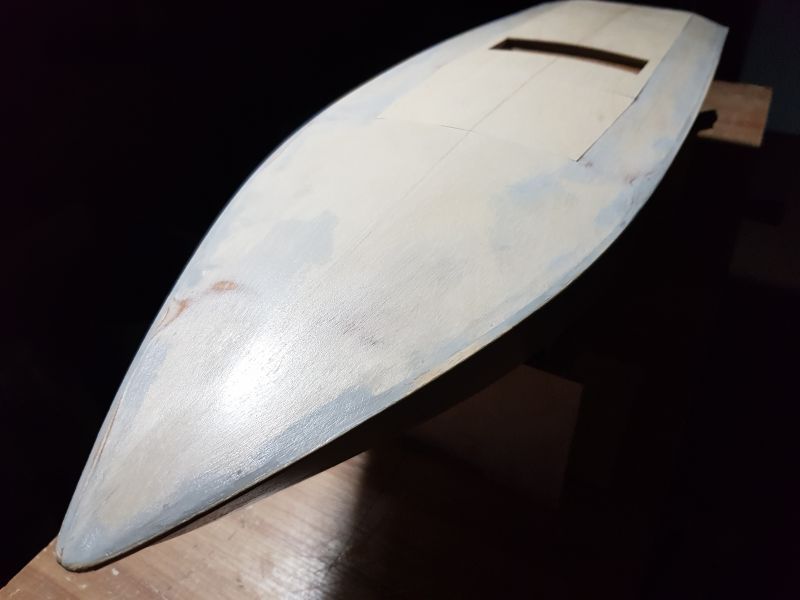
              Having now completed the deck ,in three sections, I need to seal it from water intake when in use.

              With the best will in the world, edge to edge fitting with wood and a curved shape as well is never going to be perfect and there will be small gaps.

              I`ve seen pictures of boats that have these edges sealed with a tape on each run, being removed each time access to the inside is required. If that is still standard practice, does anyone know the type of tape to use? Would there be a particular type that won`t rip the paint off when removed? Tape would also help holding the deck in place when running.

              Many thanks,

              Jim.20220819_203613s.jpg

              #101706
              Ray Wood 3
              Participant
                @raywood3

                Hi Jim,

                You really don't need to worry about the water getting in through the hatches during normal running, but I use 3m Invisible tape to stop the wind taking the top off by chance, but not all the way round, it is low tac so doesn't take the paint off.

                I think the racers would tape everything up because they are half expecting to be inverted at some stage during the race

                Regards Ray

                #101708
                James Hill 5
                Participant
                  @jameshill5

                  Hi Ray,

                  Thanks for that. That was my was my other concern, the decks lifting off when moving, I`ll look out for that tape. N o doubt you can get it online.

                  I`ve been looking at your album pictures. I see the production line is still in full swingsmiley

                  Regards, Jim

                  #101789
                  James Hill 5
                  Participant
                    @jameshill5

                    Decided to have a look at changing the trasmitter and receiver on one of the boats to a 2.4GHz system. The tx and rx are Tamco. The tx looks to be pretty basic as there isn`t a model number on it anywhere. The receiver is a 2 channel one with four connection points.

                    The bottom set of pins are marked + – and then positions 123 upwards. I can get the motor and rudder to work, but on opposite sticks. No amount of swapping around gets anywhere. Is there a way of changing the two stick functions. The speed controller connection only works when put in the + – connection and the rudder control in position 1.

                    There`s a setting button on the receiver but no bind button on the trasmitter.

                    I appreciate the first answer might be " bin it " but I just thought it worth a try to see if it did work.

                    Many thanks,

                    Jim.

                    #101792
                    Richard Simpson
                    Participant
                      @richardsimpson88330

                      Hi Jim, I'm not sure what you mean by the bottom set of pins. Obviously the receiver will have a row of connection points for the servo plugs. The pins are in groups of three for each servo plug. Those three pins are +ve, -ve and signal. On the servo plug the signal wire is usually white or orange so you know which way the servo plug goes onto the three pins.

                      The connections are usually, the first is for an external power supply if you are using a separate receiver battery, the second is for the speed controller plug, which can also carry the receiver power if you are using a speed controller with a battery elimination circuit, and the third connection will be for the rudder. With a two channel set one stick will be designated up and down, usually in the UK the left one, and the right one will be designated left and right to be used for the rudder. Unlike a four or more channel set where you have channels up and down and left and right on both sticks with a two channel set up you are limited to one or the other on each stick. Therefore while you could theoretically change the two channels round you would end up with throttle on a left and right stick and rudder on an up and down stick.

                      I would expect a paired transmitter and receiver to be already bound so should not need it. To test on the bench use a receiver battery, plugged into the first three pins and then test with a spare servo which pins correspond to which stick movement. Then you can connect up the rudder and speed controller accordingly. Don't leave the separate power supply plugged in if your speed controller uses a battery elimination circuit.

                      #101799
                      James Hill 5
                      Participant
                        @jameshill5

                        Good morning Richard,

                        Thankyou very much for your reply.

                        Having another play this morning, I have had some success. Speed controller into position 1 and the rudder control into the external connection ( marked + – ) on the receiver. This was a combination I hadn`t tried last night. Whether this makes any sense to you , I`m not sure. Putting the rudder lead in any other position resulted in the rudder going hard over with the servo still trying to move it and no throttle control.

                        I`ve no idea of the history of the tx and rx. They might well have come from different set ups and just be the same make.. One thing I have noticed is the rudder servo twitches a bit and I`m not sure why, but that may sort itself out.

                        If all this works, then fine. If not, then I`ll get a new system. The idea was to see if it worked rather than bin it straight away.

                        Many thanks for your help,

                        Jim.

                        #101801
                        Richard Simpson
                        Participant
                          @richardsimpson88330

                          The + and – signs will refer to the row of pins in the same position. Glad you are getting somewhere though.

                          When you consider you can buy a new 2.4 set now with a receiver for around £50.00 sometimes it might be worth it for the piece of mind knowing that you have a new reliable set.

                          #102315
                          James Hill 5
                          Participant
                            @jameshill5

                            Now my attempt at building the Cigarette from the plan drawn up by Ray is nearly complete ( just the numbers and lettering to go on ) I`m looking at what the next project might be.

                            I`ve always fancied trying a Clyde Puffer, having seen them on the Clyde when visiting relations in Gourock in the late fifties ,early sixties. The plans I`ve seen advertised are for a boat around 24/26" long.

                            As I`d like to build a bigger one, I could get a drawing doubled in size but Iv`e come across Replica Plans who have one at 40" which would be a nice size. I wondered if anyone had had any dealings with them at all? They have a short video showing a copleted one sailing which looks very nice.

                            Regards , Jim.

                            #102319
                            Ray Wood 3
                            Participant
                              @raywood3

                              Hello Jim,

                              Only thing is the shear bulk/weight of a 40" Puffer, hope you have a crane at home ??

                              The 24 – 26" puffers are 1/48th scale, so I guess your looking at 1/24th scale

                              My 39" Tug Cullamix weighs in at 35lbs !! hasn't seen the water for 2 years

                              Regards Ray

                              #102321
                              James Hill 5
                              Participant
                                @jameshill5

                                Hi Ray,

                                I have to say, I hadn`t thought about the weight that might be involved. That`s made me think againsmiley.

                                I certainly don`t have a crane here at home, only a dodgy ticker.sad. It`s a pity on the Replica Plan video it doesn`t show how it goes in the water, maybe he has to use a lifting device!!!

                                I remember you saying your Cullamix was a heavy boat, my TID weighs in at 20lb. The thing is they sail so well when they are weighty.

                                Looks like it will be a smaller one then. The other boat that always interested me was the Virgin Atlantic Challenger 1.

                                I saw a model of that at Sandown Park model weekend back in the seventies and never forgot it.

                                Regards, Jim.

                                #102322
                                Richard Simpson
                                Participant
                                  @richardsimpson88330

                                  A puffer is quite a deep draught boxy shape with a very high 'block coefficient' so will take a substantial amount of ballast to get it down to it's marks. Having said that you don't have to build a fully loaded model, you could just as easily build a light ship version, which would be a lot lighter to lug around.

                                  Just checking some numbers though, the Mount Fleet Highlander model is 1/24th scale and comes out at 33 inches long and displaces 15lbs so a real life vessel of around 66 foot long. A puffer at 40 inches long would roughly work out at 1/20th scale, which sounds like an unusually large scale for a model boat of this type and would displace quite a lot more than the 15lbs. Have you considered a kit?

                                  Mount Fleet Highlander

                                  #102328
                                  Ray Wood 3
                                  Participant
                                    @raywood3

                                    raylight1.jpgHi Jim.

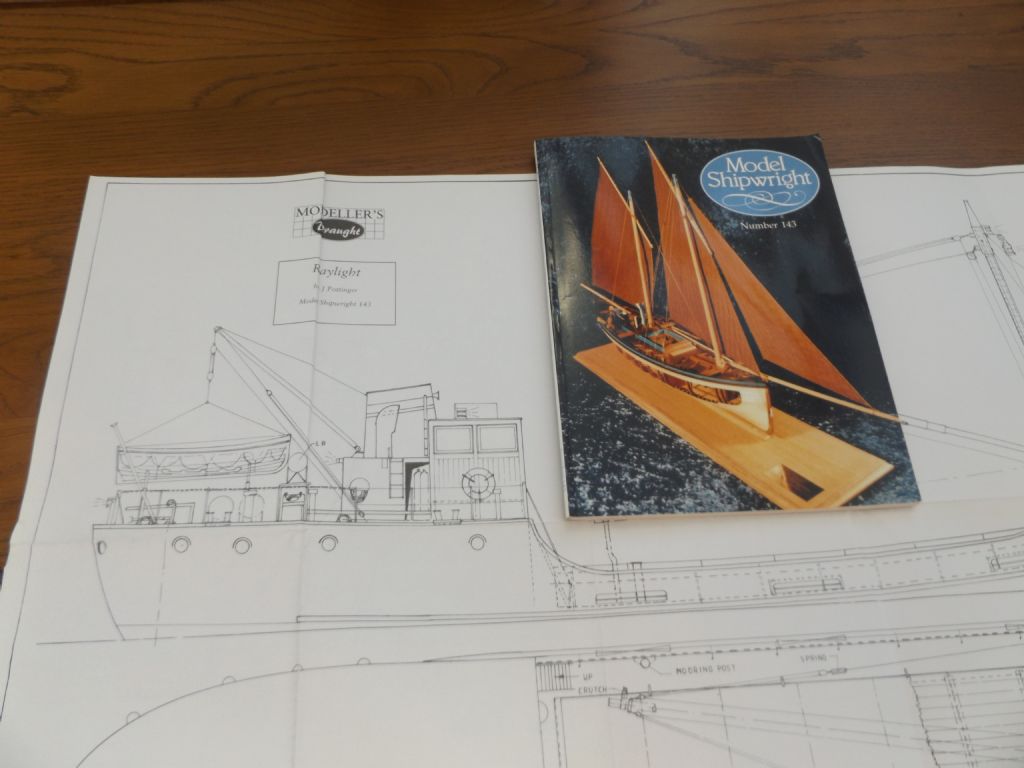
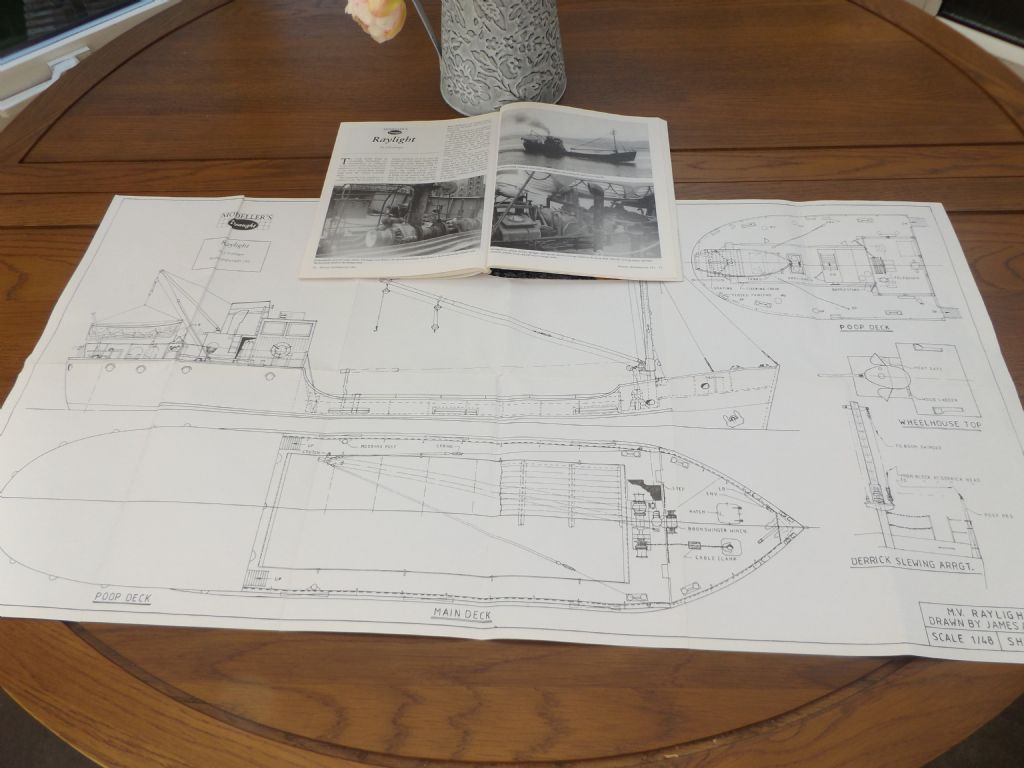
                                    I have the Modellers Draft by Jim Pottinger for Raylight a more modern 100ft Clyde Puffer which is 24" long at 1/48 scale,raylight2.jpg your more than welcome to the drawing and the Model Shipwright mag with it, you could enlarge it ??

                                    The hull lines and sections on the back of this drawing

                                    Richard,

                                    £420 for plastic kit OMG !! no fun at all ? Jim is an old school scratch builder

                                    Regards Ray

                                    Edited By Ray Wood 2 on 06/10/2022 09:52:22

                                    #102329
                                    James Hill 5
                                    Participant
                                      @jameshill5

                                      Hi Richard,

                                      Thankyou for your reply. I`ve certainly looked at a kit build and the Mount Fleet model gives you a very nice one. I`m not sure at the moment I could justify spending £400+ on a kit but I won`t totally dismiss the idea. The other thing is, I enjoy the challenge of scratch building. The fact that you start with a flat sheet of ply or whatever else you might use and end up with something that looks a reasonable representation of what you`ve been trying to build and performs as you would hope is what gives me the fun in model making.

                                      The 33 inch length of that kit is a nice size and would be a good length to aim at if a scratchbuild was to take place.

                                      Certainly more to think about,

                                      Many thanks, Jim.

                                      #102333
                                      Colin Bishop
                                      Moderator
                                        @colinbishop34627

                                        I assume you have been looking at the plans offered by Sarik:

                                        **LINK**

                                        There is no reason you can't enlarge any one of these to whatever size you want at a copy shop. Having said that, it could be a good idea to enlarge to a size where fittings and crew figures are readily available. I'm sure Richard will have some ideas on this.

                                        Jim Pottinger's drawings are always good but they do not contain constructional information, you have to do that for yourself but all the info is there.

                                        Colin

                                        #102336
                                        James Hill 5
                                        Participant
                                          @jameshill5

                                          Hi Colin,

                                          Thankyou for your reply.

                                          Yes, I have been looking at Sarik`s plans and I think I may go for the Vic Smeed plan of Lochinvar. There seems to be a choice of bread and butter construction or frame. As I`ve never tried Band B I would prefer plank on frame.

                                          Vic Smeeds plans always seem well received by others so we`ll see what turns up.

                                          I was looking on a Britmodellers forum earlier and a chap on there, several years ago, had built a Puffer at 1/200 scale.It was shorter than a Parker ball point biro. Scatch built with incredible detail. He built it as a diorama.

                                          Many thanks once again,

                                          Jim.

                                          #102338
                                          Colin Bishop
                                          Moderator
                                            @colinbishop34627

                                            You can't go too wrong with a Vic Smeed design.

                                            Colin

                                            #102408
                                            James Hill 5
                                            Participant
                                              @jameshill5

                                              Looking at a plan of the next build ( waiting for the proper plan to come from Sarik ) on an online sight, could some one explain the advantages or disadvantages between plank on frame or bread and butter construction, or would they be equal in ease of build?

                                              I`ve built in double diagonal plank and found getting round tight(ish) curves quite a challenge but I`ve not tried straight plank on frame or bread and butter and just wondered if one was much better than the other , from other peoples experience.

                                              I realise builders will have their own preference but there might be things I hadn`t considered.

                                              Many thanks,

                                              Jim.

                                              #102411
                                              Ray Wood 3
                                              Participant
                                                @raywood3

                                                Hi Jim,

                                                For the Puffer with the bluff bow & Cruiser stern plank on frame for the whole boat is not practical, Vic's way round this is to plank the centre section and block/carve the bow and stern from foam or balsa.

                                                Bread and butter of course would work in pine or similar, but would be heavy duty woodwork, although Neil found some Obeche planks for his lifeboat plug which would be great timber for carving you also need some decent large clamps to hold the planks together ?

                                                Spanish Fishing Boat, no way I could plank the bow & stern

                                                Regards Raysfb 090118 001.jpg

                                                #102413
                                                Colin Bishop
                                                Moderator
                                                  @colinbishop34627

                                                  The difference between the two construction methods is that with Bread and Butter you buy a lot of expensive knot free wood and end up throwing 85% or more of it away in firewood, shavings and sawdust. With Plank on Frame nearly all the sheet and stripwood you buy (and you can cut strips yourself with a bandsaw) will actually go into the model.

                                                  However, that's not the whole story as Ray says, as some hulls are difficult to reproduce in plank on frame, particularly at the bow and stern.

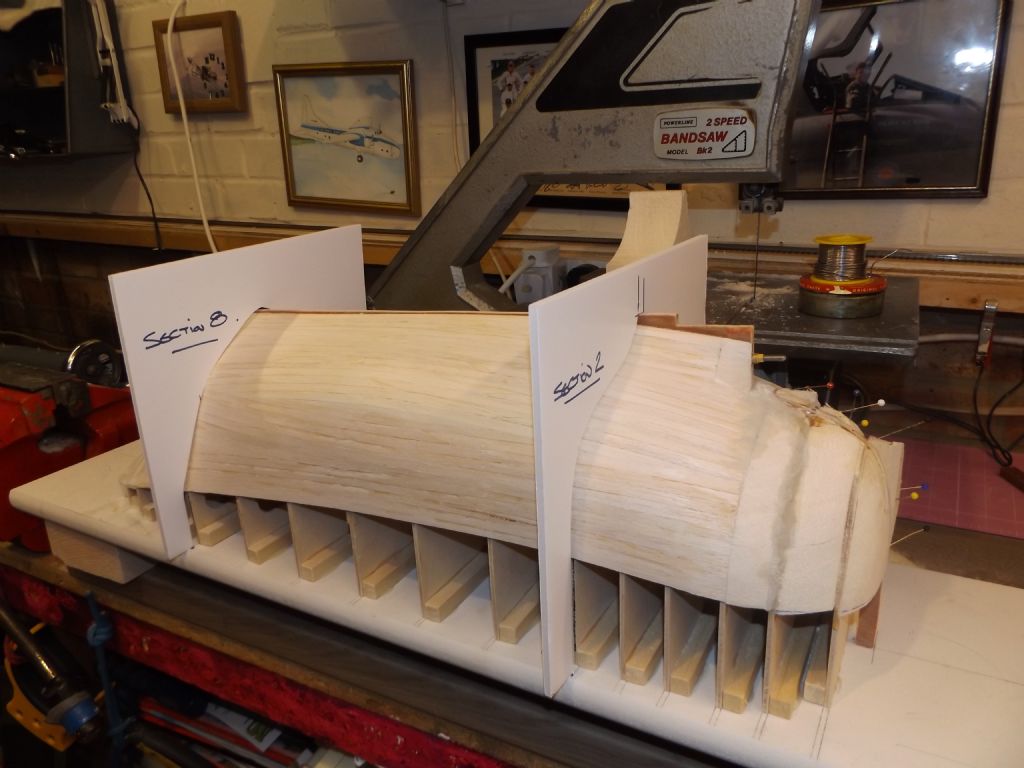
                                                  The 'smart' solution is to combine different methods in the same hull in what I call 'composite construction'. So, for example, you can bread and butter the hull up to the turn of the bilge, use sheet for parallel amidship sections with plank on frame fore and aft of these supplemented by carved blocks or short sections of bread and butter to shape the tricky bits bow and stern.

                                                  My Miltiades liner hull uses all of these methods. Horses for courses depending on the type of hull.

                                                  Colin
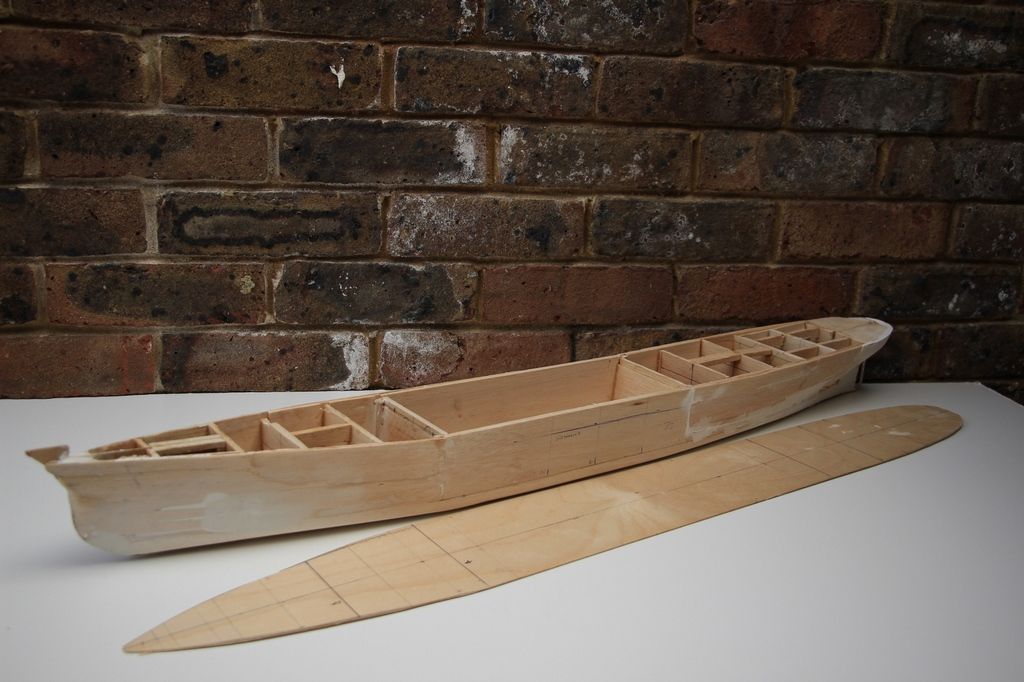
                                                  miltiades hull (2).jpg

                                                  My Miltiades hull demonstrates

                                                  Edited By Colin Bishop on 11/10/2022 10:54:05

                                                  #102414
                                                  James Hill 5
                                                  Participant
                                                    @jameshill5

                                                    Ray and Colin,

                                                    Thankyou for your suggestions,

                                                    Once my plan arrives I`d like to get it doubled in size giving me a model of 35" length ( remembering to keep in mind the size of crew figures ). We have a Hobbycraft shop not too far away that sells Balsa in varying sizes so a balsa bow and stern could be made. Is there a particular glue that works well with balsa? Lately I`ve been using standard Gorilla glue.

                                                    Looking forward to getting started.

                                                    Many thanks, Jim.

                                                    #102415
                                                    James Hill 5
                                                    Participant
                                                      @jameshill5

                                                      Ray,

                                                      I forgot to ask. When you painted the lettering on the side of the Cigarette hull, did you stipple paint with a short brush over the cut outs for the lettering or paint with a normal brush inside the edges? I did the latter with the number on the deck but needed a bit of touching up afterwards. ( wobbly hand!!! ).

                                                      Cheers, Jim.

                                                    Viewing 25 posts - 326 through 350 (of 367 total)
                                                    • Please log in to reply to this topic. Registering is free and easy using the links on the menu at the top of this page.

                                                    Code of conduct | Forum Help/FAQs

                                                    Advert

                                                    Latest Replies

                                                    Home Forums Beginners Topics

                                                    Viewing 25 topics - 1 through 25 (of 25 total)
                                                    Viewing 25 topics - 1 through 25 (of 25 total)

                                                    View full reply list.

                                                    Advert