The world's leading magazine for all model boating interests
Suitable large brushes for static boat hull
Suitable large brushes for static boat hull
Home › Forums › Static modelling › Suitable large brushes for static boat hull
- This topic is empty.
-
AuthorPosts
-
24 January 2018 at 11:09 #75339
John Arnold 3
Participant@johnarnold3Thanks Byron,
Good point (temperature and humidity). At present daytime temperatures where I live are in the mid 30's (celsius) and humidity usually quite high although with aircon in my house it doesn't go over 25C.
Yes car accessory/spare parts shops will mix paint and supply in 'rattle cans' only I think. These are quite expensive at over $A30 a can (GBP18). I thought though that they only supplied enamel type paint. I will follow up on that and if they supply touch up paint.
24 January 2018 at 11:10 #75340Banjoman
Participant@banjomanRon,
That is a very valid comment! I live in humid Belgium (very similar, I think, to southeastern UK) and build and paint indoors in a heated area.Typically, my workshop is around 21° C in winter, with a relative humidity between 40 and 50%, and 22 or 23° C in summer with relative humidity between 50 and 60%, and so I tend to forget that other climes are, well, other climes!
Mattias
24 January 2018 at 13:26 #75345Banjoman
Participant@banjomanJohn,
I did a quick google, and came up with this article about the 2012 refit of Bluenose II, in which there are some very good photos of the hull, then newly painted: **LINK**. I note that the red is not the dullish-brown-red of basic iron or lead oxide anti-fouling paint, but more of a fairly deep, vibrant red tending slightly towards brown. Probably at least to some extent chosen for esthetic reasons, as she is in the representing-her-country-and attracting-tourists trade rather than a workaday ship.
If you are still interested in pursuing brush painting using Vallejo Model Color, I'd be happy to go to my local model shop tomorrow and look at the different reds available in that range of paint to see if there's one in particular that looks reasonably close to the bottom red shown in the above-mentioned photos; I am in any case going there to buy other stuff, so it won't be any problem for me

Mattias
24 January 2018 at 13:53 #75346 Colin BishopModerator@colinbishop34627
I saw Bluenose up close in July 2016 and agree with Mattias that the colour was a deep red with a sligh bias towards brown. You need to bear in mind that underwater antifouling paint does change colour as it ages so several shades could be correct at differing times. As long as you get the colour generally right I really wouldn't worry.
Colin
24 January 2018 at 14:25 #75347Dave Milbourn
Participant@davemilbourn48782You can always rely on what my friend Scott Pett calls the "6th June 1967" strategy. If challenged about a colour or a particular fitting you simply say that, on the information you have, it was that way on 6th June 1967. No-one is ever going to argue with you, unless you accidentally stumble across the owner on 6th June 1967!
DM
Edited By Dave Milbourn on 24/01/2018 14:25:47
24 January 2018 at 17:01 #75356Banjoman
Participant@banjomanJohn,
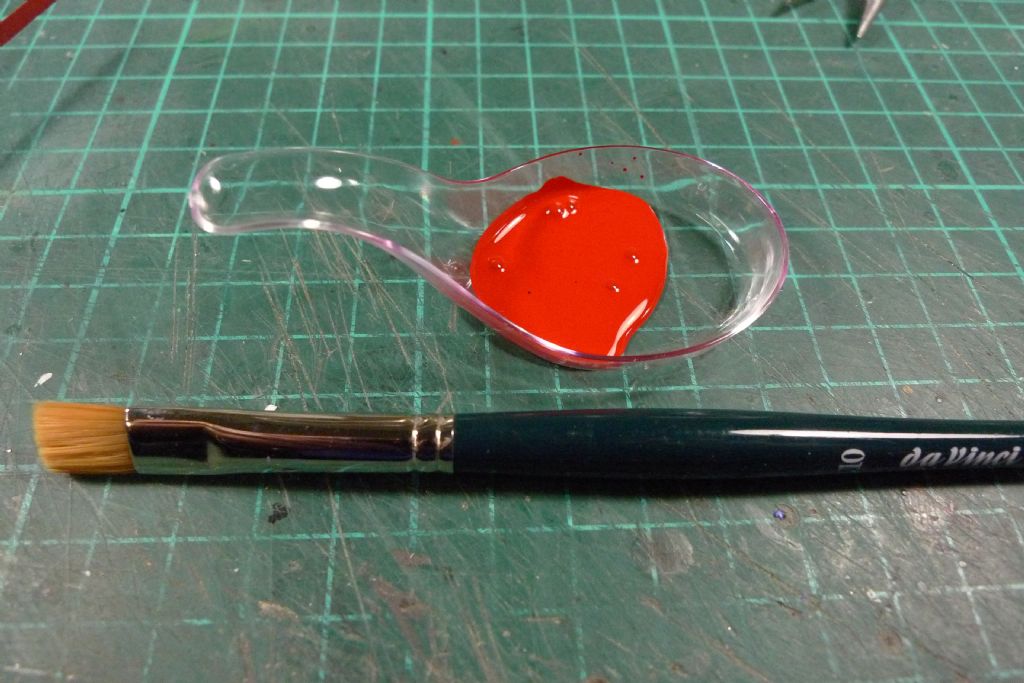
In order to make the covering capabilities of model paint more visible, I got out my box of Vallejo Model Color paints, amongst which were one red (70957 Flat Red to be precise).
Using my paint scales, I measured exactly 1 gram of paint into a plastic spoon, and got out a #10 flat synthetic brush …
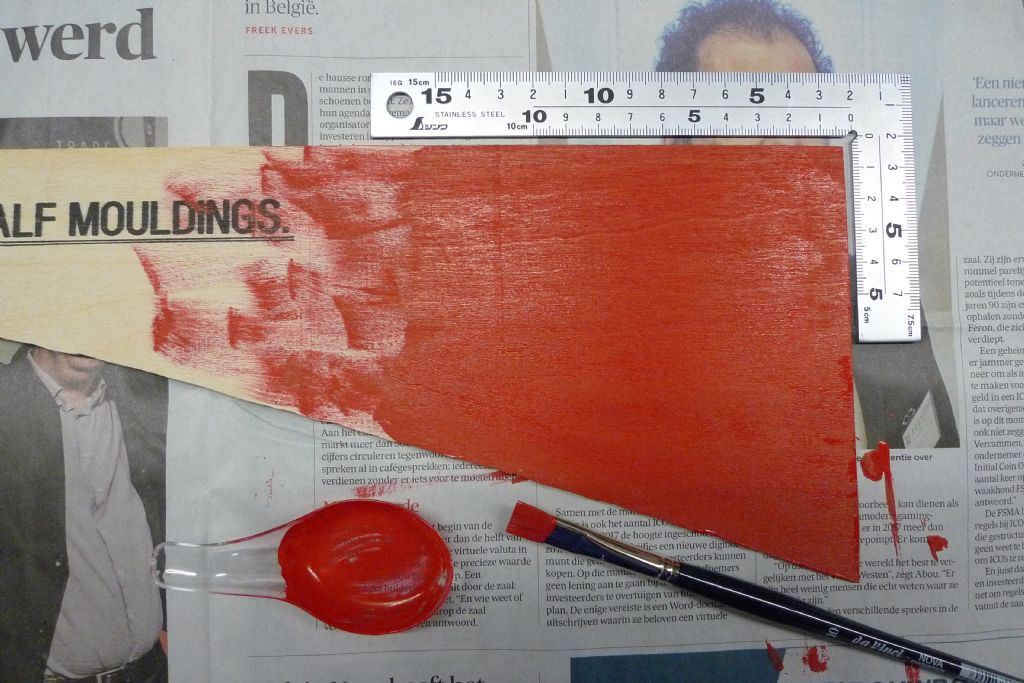
… and also some scrap plywood sheet, and proceeded to paint as much of the plywood as I could. When the 1 gram of paint ran out, I had covered +/- 15,000 mm2!
Please note that the plywood was completely untreated: no sealer, no primer, nothing – just the bare wood, and one single coat of paint.
Such a good result is, I think, largely due to the quality of the pigments, which is probabaly also the reason why this kind of paint is horrendously expensive when you calculate the price by the litre (+/- AUD 295 per liter!) – but also the reason why it is enough to buy it in milliliters!
Mattias
24 January 2018 at 21:53 #75360John Arnold 3
Participant@johnarnold3You chaps/guys are the best

What efforts you are obviously putting in and just for me.
I won't take you up on your very kind offer Mattias and sort this out here in Australia. I do appreciate that kind gesture.
Yes I knew that the cost per pitre of model paint is really over the top BUT we don't buy even 100ml usually AND its always more expensive marketing anything in very small quantities. Wouldn't it be great if paint selling model shops could offer a tinting service like the hardware shops do with house paint?
Regarding the real colour of the Bluenose II hull. I too saw the real thing when in Nova Scotia a few years back and actually took photos of it. Little did I know then that I would become interested in building a model of it.
Also I have found quite a few images of it both in the water and out of the water AND quite a few videos in and out of the water on Youtube.
The hull paint colour in all of these look slightly different and so it would be impossible to match exactly HOWEVER all I want to do is get a close match especially of the brightness as with the area ABOVE the water line being BLACK I thought a very dark shade of red/brown might make the entire hull look too dark and drab.
I Looked at Vallejo 70.982 Cavalry Brown and I would settle on that colour however the first Australian hobby shop I looked at was out of stock. I will look further.
BTW I am at a complete loss on the "6th June 1967" strategy. IT must be maybe an 'in joke' about something which happened in Europe or UK?
Regards
John
24 January 2018 at 23:40 #75362Dave Milbourn
Participant@davemilbourn48782BTW I am at a complete loss on the "6th June 1967" strategy. It must be maybe an 'in joke' about something which happened in Europe or UK?
It's a completely random date, John – or the joke wouldn't work. We Brits have a very strange sense of humour e.g Brexit, Strictly Come Dancing, The
Daily MailBeano etc.Actually, now that you remind me, I think it was 20 years ago on that date that Sergeant Pepper taught the band to play…..
"Goodnight, Dave".
25 January 2018 at 04:01 #75363John Arnold 3
Participant@johnarnold3Thanks Dave,
Understood.
Which Sergeant Pepper? If's its the one associated with the Beatles then it's almost 50 years ago. 50 years ago, I can't believe that. Wow I must be old.
25 January 2018 at 04:03 #75364John Arnold 3
Participant@johnarnold3BTW who do I contact about having my 'avatar' accepted and posted. I have uploaded one twice and still waiting for it to be approved, YET when I accidentally uploaded a picture from my 'library' as an avatar it obviously got accepted (just look at it next to my name) and although I have 'deleted' it online it has mysteriously reappeared.
25 January 2018 at 05:39 #75365John Arnold 3
Participant@johnarnold3Hello Mattias,
I was quite interested in your article where you used a 50/50 blend of 62.005 (Bright Red) and 62.017 (Raw Sienna) to produce quite a nice match to anti-fouling paint. I have been unable to find these numbers or colours listed on the internet.
What brand of paint were they?
Regards
John
25 January 2018 at 06:31 #75366Banjoman
Participant@banjomanJohn,
About your avatar, the new one (i.e. a photo of you) is sometimes visible, while sometimes it is still the old one of the Bluenose II rudder that shows; try refreshing the webpage, and I think you'll find that the new one is there … ?! I had teh same issue when I changed avatar some time ago — seems the browser stores it somewhere rather than reload it every time.
My 50/50 blend of 62.005 (Bright Red) and 62.017 (Raw Sienna) was made with Vallejo Premium RC paints. You can get them from Metro Hobbies (**LINK**) in Melbourne. Yes, I agree that it is a lovely red colour; less brown than red oxide pint, but not too far towards firetruck red either. And those paints are really nice to work with, also with a brush.
My preferred type of container for mixing paints is this one: **LINK**. Obviously any container will do that has ahole in one end but not in the other, and that can be closed off airtight, but I really like these ones. Putting a ball bearing ball or a small (clean) pebble or similar in with the paint facilitates mixing by shaking.
On a further note, I prefer mixing paints by weight rather than volume; I find that the mix is much more realiably repeatable that way. I have a set of small digital scales specifically for the purpose that are precise to a tenth of a gram, but if you mix not too small a batch, mixing by the whole gram on ordinary digital kitchen scales (if you have a set of those) should do as well.
Mattias
25 January 2018 at 06:48 #75368Banjoman
Participant@banjomanA brief further note, John, to say that should you decide to send off for Vallejo Premium RC, you might consider also getting some of the retarder from the same series: **LINK**.
This will delay the surface drying time of the paint, thereby improving its already excellent self-levelling properties. I find it particularly useful to mix in with the gloss (**LINK**) and satin (**LINK**) varnishes from the same range.
Mattias
25 January 2018 at 07:38 #75369John Arnold 3
Participant@johnarnold3Thanks Mattias for the advice,
My avatar now displays – bit of a shock eh?
I had ordered some paint which arrived today. One is Vallejo surface primer (Grey 73.601 60ml) which I'm sure will be more than enough the cover the hull. It is also labeled Acrylic-Polyurethane. I had also ordered satin white and satin black and the 17ml containers sure look small and too small for the amount of 'hull red' paint required. Once I get the primer on (which covers top and bottom of hull) I will have a better idea how much 'hull red' I need.
I does concern me though that it the Vallejo Grey Primer only mentions applying with an airbrush and the contents appears very thin – just like water. Are all Vallejo paints like this? Also it suitable for plastic, brass, resin etc. No mention of wood. I always thought that a primer was to 'prime' the surface to allow top coats to stick and therefore usually for metal and plastic. Hope I got the best one.
Maybe I should invest in a cheaper airbrush (or see if any of mt friends own one). I have no concerns about noise where I live. The inexpensive ones only have small compressors and maybe they don't give good results eg **LINK**
I wonder if glass jars with tight twist lids (like old jam jars) seal well enough to mix paint in?
The retarder appears to be a good idea. I considered using retarder in the gloss house paint last summer but wondered if it affected the life of the paint so didn't. A model is something different.
25 January 2018 at 08:08 #75370John Arnold 3
Participant@johnarnold3There is another option and I put it to you for comment and it gets back to using paint designed for houses. I remember that it has been mentioned that it is too thick for models and tends to cover an obliterate any texture.
BUT it is only for the bottom of the hull where there is little if any 'texture' apart from the thin strips of pine glued to the hull and rudder to (I guess) represent hinges.
AND I wonder if it would 'work' successfully as a paint if I thinned it down considerably. That might destroy some of its properties.
I prefer your suggestion of using Bright Red and Raw Sienna and the quantities are better (60ml) but they are only in the 'premium' range and isn't that designed for airbrush work or will it also work ok brushed on? Some manufacturers label their paint as suitable for brush and airbrush but not Vallejo premium.
Lastly where on earth do you find shops selling these paints here in my own country? I had 'googled' all sorts of words and never found the ones you have found. Makes me think that others will think I am not trying.
25 January 2018 at 08:13 #75371John Arnold 3
Participant@johnarnold3Yeh googling "thinning acrylic paint' tells me not to use more than 50% water otherwise the paint may not adhere and peel and better to only to up to 30%.
I still prefer your paint mix suggestion but wonder if it can be brushed on.
25 January 2018 at 08:42 #75372Banjoman
Participant@banjomanJohn,
Ah. Quite a few questions there! yes, the Vallejo 73.601 primer is a very, very good primer as such. It is indeed quite thin (you will find, I think, that it is considerably thinner than the top coat paints you also bought), and for my part I have never tried to apply it with a brush, although I was told by a chap in the know (a few years ago, I bought a plastic model kit with paints and tools and all sorts of stuff for a friend's 50th birthday) that it should be fine for brush application, too.
Wood is indeed not mentioned (the main target for these products are plastic modellers) but it will not be a problem, that I know for sure!
The purpose of a primer is indeed primarily (pun intended) to prime the surface for better top coat adhesion, in addition to providing a first layer of uniform colour. This uniformity of colour is also very useful for showing up surface errors that otherwise tend to blend in or disappear. Furthermore, if painted on unsealed wood, it will also help saturate the wood, so that subsequent top coats cover better; it may also have the effect of getting the wood surface to raise slightly, in which case you should lightly sand down the result before applying the top coats.
That said, on a static model like yours, it is not absolutely necessary to use a primer! It is not going in the water, it won't be handled all that much, and so I think you could probably skip the primer if you don't get along with it.
Before you abondon it, though, I would as always suggest that you try it out on a small test piece! This way, you'll learn how it behaves, and you can figure out how best to apply it for a result that you're pleased with!
Of course glass jars with twist lids will do. If they are not truly airtight, the paint will eventually dry out, but that will be long, long after you've finished your model. As I said: a hole in top but not in the bottom, and some sort of airseal is all that's really needed …

I'll answer your airbrush question in a separate post, as I suspect that answer will run a bit long …

Mattias
25 January 2018 at 08:45 #75373Banjoman
Participant@banjomanJohn,
Before I go on to airbrushes, the answer is YES! The Vallejo Premium range is perfectly fine for brush application! I know this for zartain shure, because I have brushed it on many times myself!
If you'd like, I can do a test piece at home tonight, with Model Color and Premium RC in parallell, and post some photos of the process and the result!
Mattias
Edited By Banjoman on 25/01/2018 08:46:52
25 January 2018 at 09:06 #75374Banjoman
Participant@banjomanNow. Airbrushes. This is a bit of a minefield, not least when you ask me about it. As I recently confessed in the drilling thread, I am a bit of a tool fetischist and will pretty much by reflex cast my eye only towards the upper end of whatever product line it is that catches my fancy.
This in turn means that I tend to be prejudiced against and on the whole very suspicious of budget solutions.
This in turn means that I very rarely try budget solutions, and thus have little to no personal experience of them; my opinions about this end of the market are therefore based on reading up on the subject and discussions with others.
When I decided to take up airbrushing for my model building some years ago, I therefore saved up and then went out and spent roughly 1,350 AUD on equipment in one go. Of this, the actual airbrush (a Harder & Steenbeck Infinity 2-in-1, **LINK**) was about $450, while the compressor (a EuroTec 30A) came to around $700 (I also bought an additional needle and some other smaller stuff to bring the total to about $1,350). This is not the absolute top of the line, or the very most expensive equipment available, but I would say that both quality- and price-wise, it sits at around 7 out of 10. I knew that I intended to use this stuff for years and years to come (I fully intend to build model boats for the rest of my life), and I wanted any problems or errors to be down to my lack of skills rather than faulty or shoddy equipment, so I found the large initial investment worth it.
Now, I don't mention those prices in order to brag about my fancy stuff, or to suggest that one has to spend as much as that to get started, but to provide the necessary pinches of salt with which my opinions on airbrushes should be taken.
That sorts of sets the scene, so in my next posting, I'll go on to talk about compressors.
To be continued …
Mattias
Edited By Banjoman on 25/01/2018 09:07:06
25 January 2018 at 09:13 #75376John Arnold 3
Participant@johnarnold3NO problems Mattias. The test on my behalf is not required unless you really want to.
No need to go on to airbrushes. I think it would be best if I stay away from them now that the Vallejo premium is brushable.
I will go ahead and order those two paints and mix together.
I realised after my last post that house acrylic paint is by name only. They are really LATEX paints and so possibly different.
John
25 January 2018 at 09:18 #75377Banjoman
Participant@banjomanIt is too late, John: you pushed the button and got me started, so I'll finish the job (although I think you are quite right not to consider airbrushing for your current needs).
If you are sending off for Vallejo Premium paints, and, after testing, find that you don't like the grey primer you already have, you could also get some Vallej Premium primer: **LINK**
It is a tad thinner than the Premium top coat paints, but thicker than the grey standard vallejo primer.
Mattias
25 January 2018 at 09:44 #75378Banjoman
Participant@banjomanIt is too late, John: you pushed the button and got me started, so I'l finish the job (although I think you are quite right not to consider airbrushing for your current needs).
Dedicated airbrush compressors come in three basic types.
The simplest and least expensive ones are so-called membrane compressors. The one you linked to is most likely to fall into this category, and they produce compressed air by moving a membrane back and forth. This makes them noisy (typically around 70 dB or more), jumpy (they vibrate a lot) and, because they usually don't have an air tank, they have to run continously and will quickly run very hot and either shut down (if they have overheating protection) until cool again, or overheat. Also, the air tends to pulsate, which can be very irritating and/or lead to an uneven paint job or, worse, splotches of too much paint, or paint in unwanted places. They are also quite low capacity, so basically only fine for running the finest needles.
That said, if noise is not a problem, and one does not plan for extended painting sessions, a decent quality membrane compressor can be an alternative for the occasional airbrusher.
The other two types are both piston compressors, that is the compressed air is produced by a piston and cylinder, and sub-divided into oil-free and lubricated ones. Both sub-types exist in all sizes and capacities required for airbrush work, and with tanks ranging in size from 1.5 to 25 litres or more.
The main difference is that the lubricated ones can be made to be much more quiet than the oil-free, typically running at around 40 to 45 dB (i.e. very similar to a typical fridge), while the oil-free ones tend to fall in the 55–65 dB range. The latter level of noise is usually fine overday and in reasonable moderation, but if you are painting in the room next to your partner's bedroom in the wee hours of the night, you are likely to be the recipient of some fairly choice remarks on the racket you're making that keeps them from sleeping … and even more so from the neighbours, if they are within earshot like they might be in an apartment.
Also, longevity tends to be considerably better for the lubricated models as the oil protects against wear and tear of the moving parts. On the other hand, they require an oil change at least once every two years or so, and maybe even more often, and once they've been filled up with oil, they cannot be moved except in a fully upright position, or the oil will run out or into parts of the compressor where it shouldn't be. In other words, if you are running a nail art saloon doing housecalls, you probably don't want a lubricated compressor!
I have also mentioned air tanks. The smaller and/or least expensive compressors usually don't have them, as they are a complication and thus an additional cost. However, they are very much worth having! In part because they give a perfectly even airflow, but they also have the advantage that once the tank is full, the compressor can be turned off (most models with tanks have auto-shutoff once a certain pressure is achieved) and thus will only need to run every now and then to top up the tank (again, most models will turn on automatically when the pressure falls below a certain level). This means a reduction of noisy time, but also a much reduced risk of the compressor running too hot.
The final consideration is airflow capacity. For painting normal size plastic model kits, precision is king, and so small needles (0.15 to 0.2 mm) tend to be used; this requires fairly moderate airflows, and so a smaller compressor with a smaller air tank and a smaller price tag will do just fine. However, for painting something like the hull of a r/c model boat, maybe a metre or more in length, a larger needle (0.6, 0.8 or even 1.2 mm) is required (or it will take basolutely forever), or even a miniature spray gun, and these need much better airflow to run properly, and enough compressor airflow capacity for it not to overheat.
To be continued …
Mattias
Edited By Banjoman on 25/01/2018 09:45:10
Edited By Banjoman on 25/01/2018 09:45:57
Edited By Banjoman on 25/01/2018 09:47:07
25 January 2018 at 10:33 #75379Banjoman
Participant@banjomanAnd now for the actual airbrushes.
I will not be able to cover this subject in anyway near enugh detail, as the array of options and variations is quite impressive and, at a first glance most likely also bewildering.
An airbrush works by using compressed air to turn a liquid (e.g. paint) into a spray of very, very fine droplets.
The first division is between external and internal mix airbrushes.
External mix means that paint and air are mixed outside of the actual airbrush, usually by the airflow creating a vacuum that sucks paint up out of a container. A classic example is the Badger 250 and 250-4, mentioned by Dave M above: **LINK**.
This type of airbrush is usually very reasonably priced and from what I understand actually very good for larger, mono-colour surfaces, while less well adapted to very fine or highly detailed work, not least because they are pretty much off or on, as flow regulation and paint quantity has to be adjusted by adjusting the air pressure from the compressor. Also they're very easy to clean. Maybe I should actually get one of these some day and give it a spin for painting hulls … ?!
Internal mix airbrushes will be either gravity or suction fed, but in both cases will mix air and paint inside the body of the airbrush. This means that full cleaning requires dismantling at least parts of the tool. Gravity fed airbrushes have a cup above the body, or in some cases a detachable container on the side, but works by the paint running down by gravity onto the needle just behind the nozzle; when the needle is pulled back, air flows across the needle and the paint and produces the spray.
Suction feed has a container below the body, and sucks the paint up by creating a vacuum; for the rest, it works the same as a gravity feed internal mix.
Internal mix airbrushes can also be aither single or double action.
On a single action airbrush, airflow is regulated at the compresspr or with a separate valve somewhere on the air line. When the trigger is pulled back, so is the needle, paint and air will meet and mix and be sprayed forward. This is easy and intuitive to use, but has the drawback of separate air flow control, i.e. a fixed ratio of paint to air in the airbrush itself.
A double action airbrush has (surprise!) two actions. Pushing the trigger straight down opens an valve that releases the air flow, while pulling back on the trigger gradually releases more and more paint. This takes alittle bit of getting used to, as it is very important to allows to things in the correct order: (a) push down and release air, (b) pull back and release paint, (c) let trigger off to stop paint with air still running, and only then (d) release completely to stop the air flow. Respecting this pattern makes sure there is absolutely no paint left in the nozzle to be unintentionally blown onto the target when one next opens for air. It takes a little bit of traing to get used to, but is by far the most precise and flexible type of airbrush, as one has great and immediate control over the air/paint mix ratio.
A varition on the double action is the pistol trigger double action, where a pistol type trigger first opens the airvalve when pulled back just a little, and then gradually opens the paint flow as it is pulled back further; releasing the trigger inverses the process. This thus combines the better control of the double action with the simpler movement pattern of the single action, but is less wide spread, I suspect nor least because many users have developed very strong habits on the traditional double action (I know I certainly have by now) and prefer to stick with what they are familiar with.
To be continued …
Mattias
25 January 2018 at 20:50 #75385Banjoman
Participant@banjomanJohn,
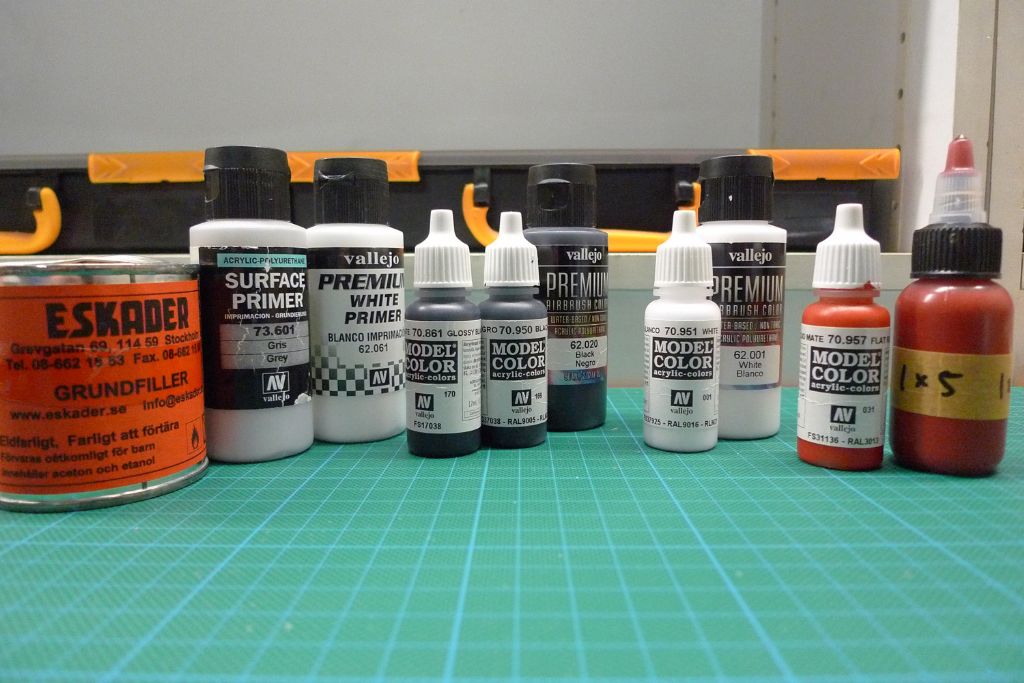
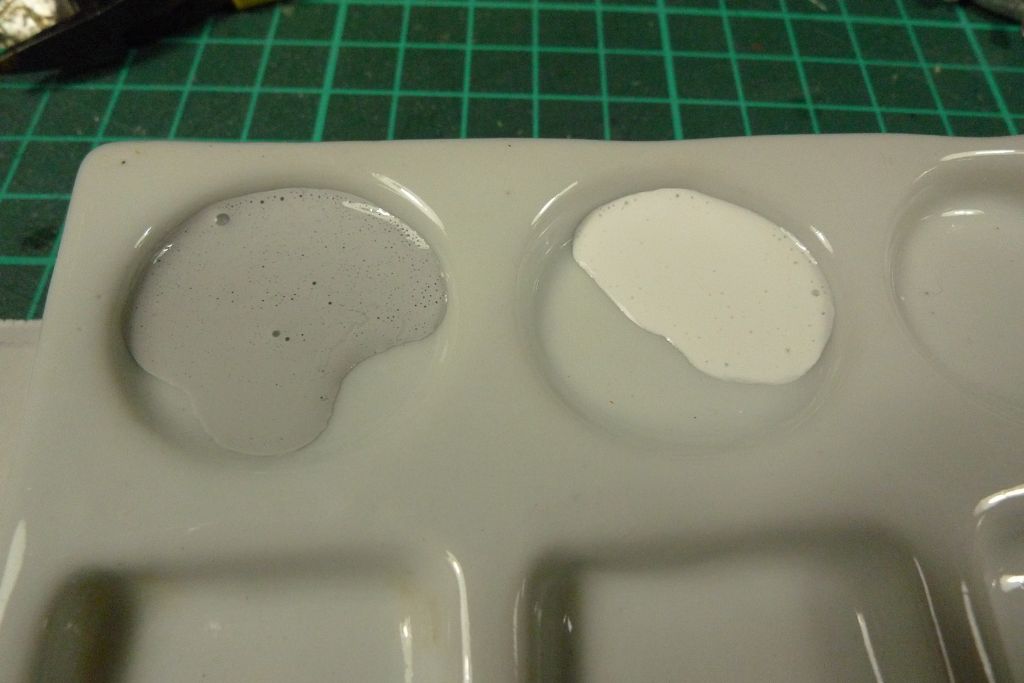
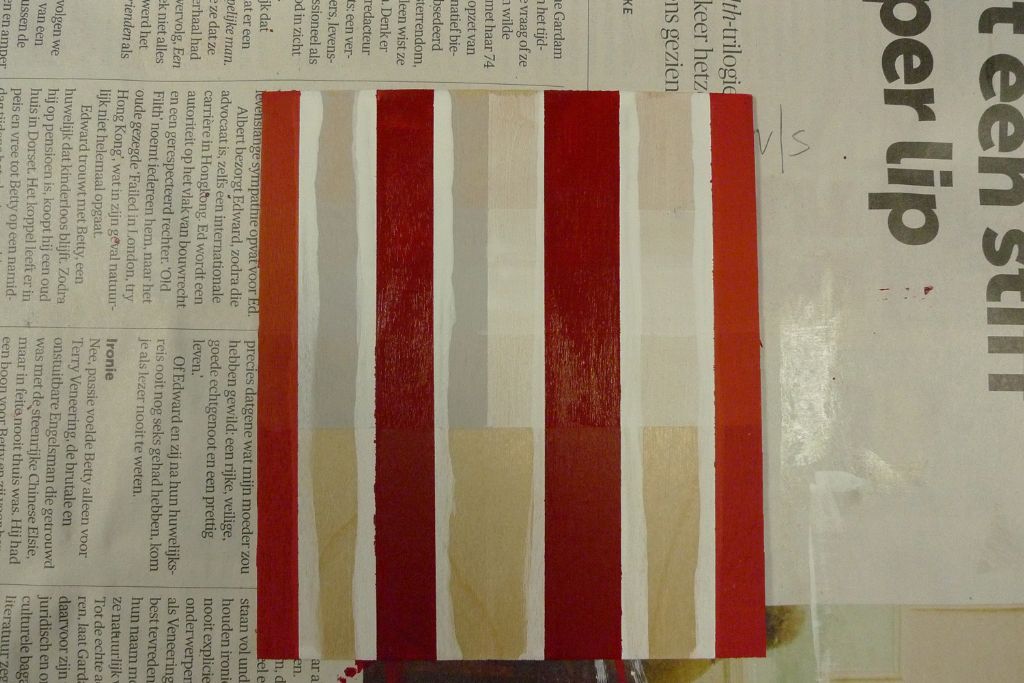
Here's a parade of paints about to be tested! From left to right, a tin of Eskader grundfiller (a sanding sealer from classic model shop Eskader in Stockholm, Sweden), Vallejo standard Surface Primer Grey (73.601), Vallejo Premium White Primer (62.061), Vallejo Model Color Glossy Black (70.861), Model Color Black (70.950), Premium Black (62.020), Model Color White (70.951), Premium White (62.001), Model Color Flat Red (70.957), and finally the Premium 50/50 mix Bright Red (62.005) and Raw Sienna (62.017).
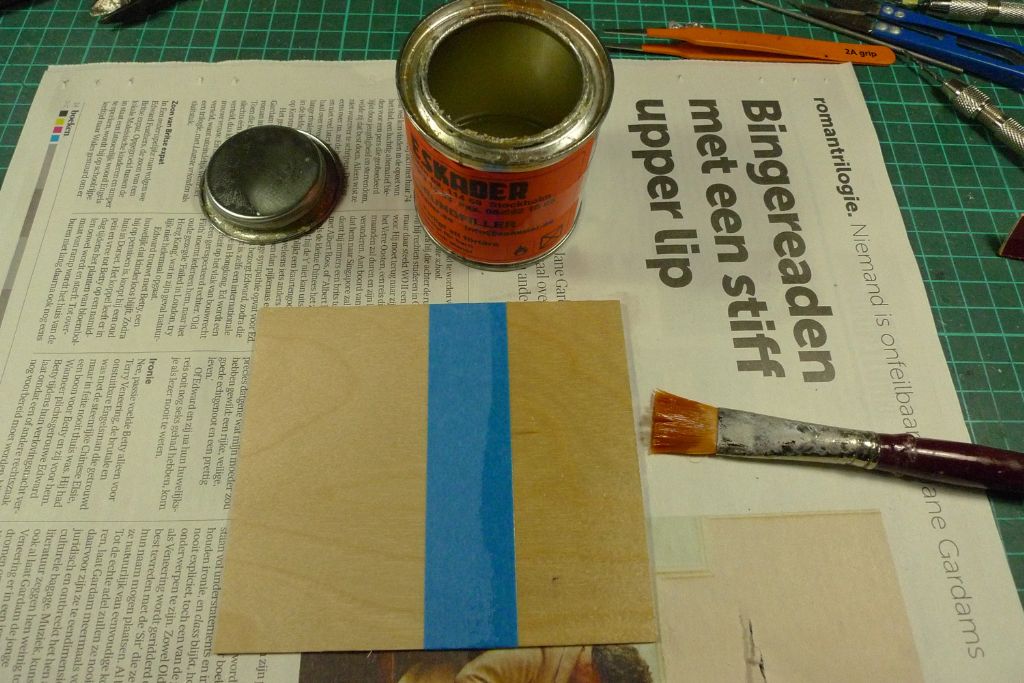
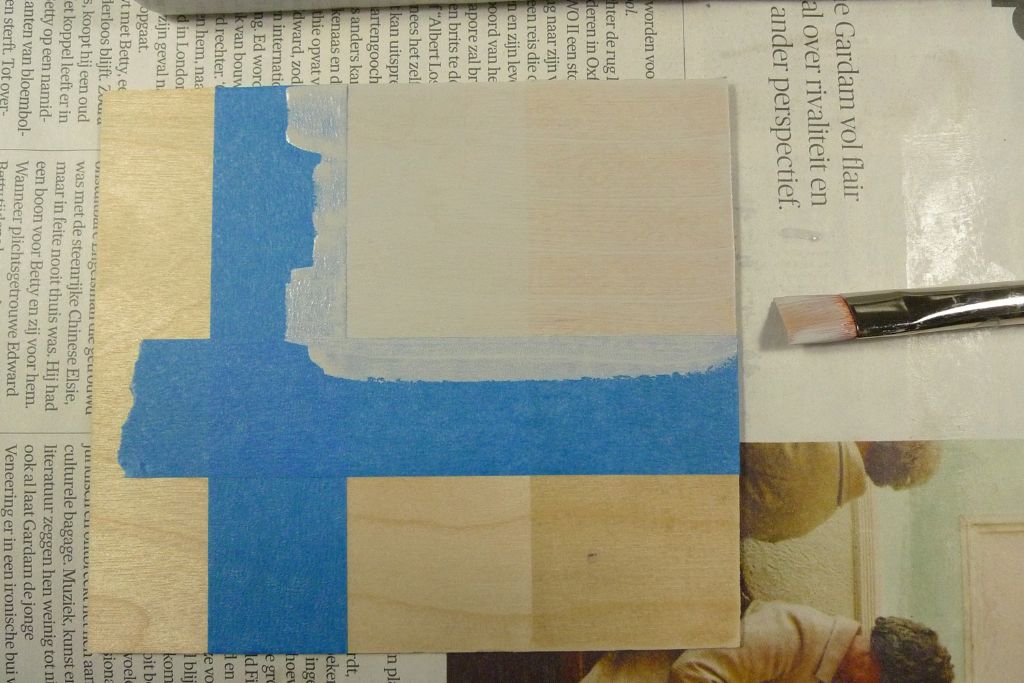
I begand by taking a +/- 10×10 cm piece of 1.5 mm plywood, masked off one third, and gave this two coats of sanding sealer, lightly sanded down after drying.
I the went on to the primers, which I found are actually pretty much the same consistency.
I first gave one corner one coat of grey …
… and the opposite corner one coat of white.
I then added a band across, covering the lower part of the bit with sanding sealer and the upper part of the bit with just primer, so that in these areas there are two coats of each primer.
The bottom third of the plywood, I left bare wood.
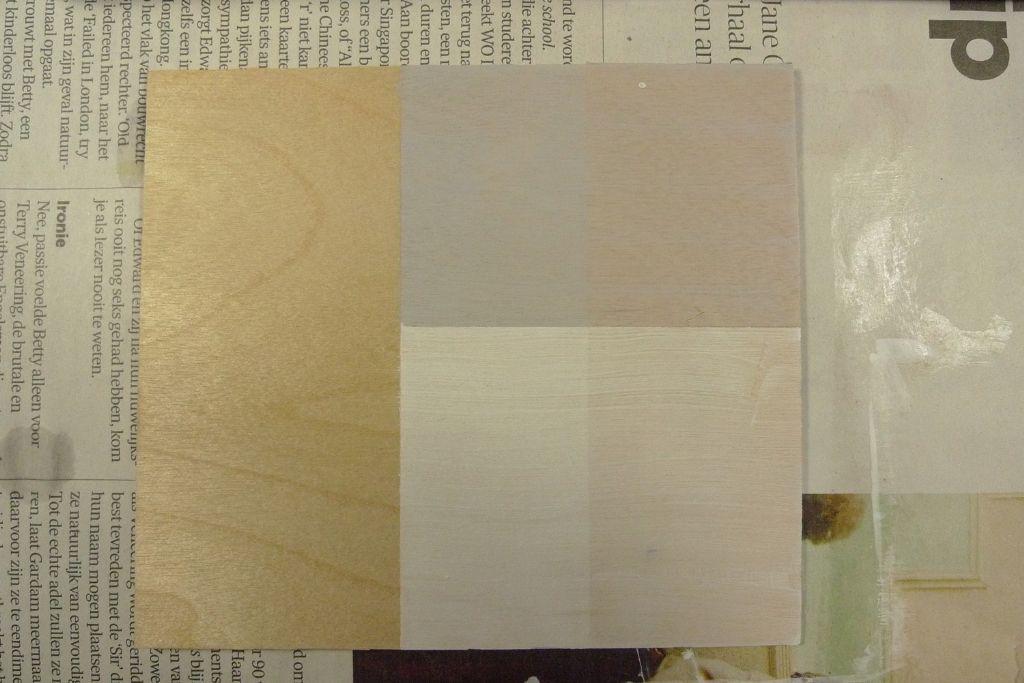
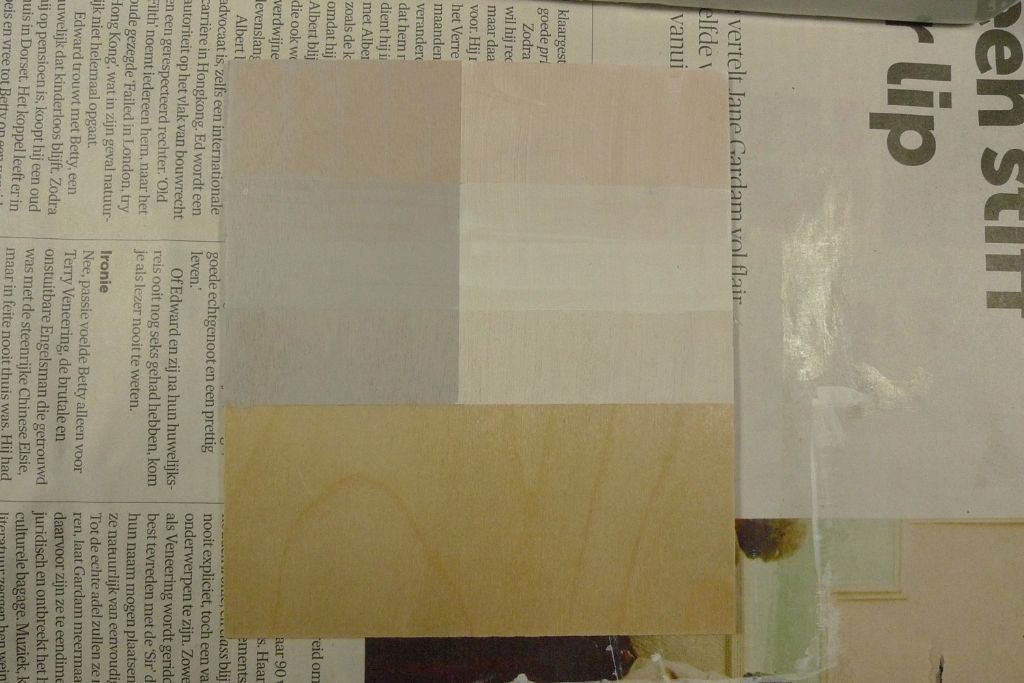
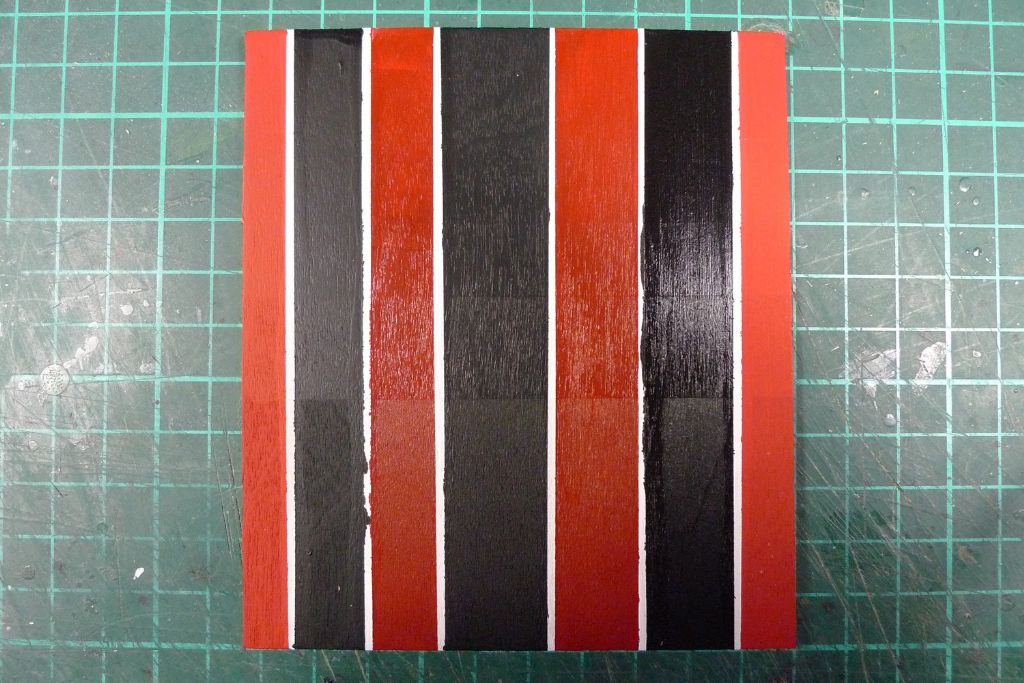
I then painted on a series of stripes of white (left to right they are Model Color, Premium, Model Color, Premium, Model Color and Premium), and, once these were dry, masked them off and added red paint. The two outer fields of red are Model Color Flat Red, the two inner ones are the Premium Red/Sienna mix.
Once the red was drt enough I added three black stripes, left to right Model Color Black, Premium Black and Model Color Glossy Black.
In the above photo, the grey primer is to the left, and the white primer to the right; in other words, it is the top third that has both sanding sealer and primer, the middle thrid that has just primer and the bottom third that is bare wood underneath the top coats.
It is difficult to take a photo that really does everything justice, but I'd say that the best result was had on the middle third.
I would thus recommend you to do use either primer – which one makes no difference, and to put on two or three thin coats of that before going on to the top coats.
Mattias
Edited By Banjoman on 25/01/2018 20:51:09
Edited By Banjoman on 25/01/2018 20:51:31
25 January 2018 at 22:17 #75387John Arnold 3
Participant@johnarnold3Mattias what can I say. Thanks doesn't seem enough.
Before I continue I have been meaning to ask this question for some time and keep forgetting but as I type this reply I am reminded as I look above where my reply is going and that is "Edited By Banjoman on 25/01/2018 20:51:09" and I think that I know exactly what that means (that you entered the post and then changed/edited it). I have seen and done this before on other forums but when I post (at this forum) something and review it and find I have made an error or wanted to add something else I don't see anything to select to edit my last post. Can you advise on that please?
I note the various 'parameters' of airbrush outfits and am "gob smacked". What a lot to know and I am much more wiser for your description and explanation so thanks again. I always thought that airbrush outfits were mainly to paint small objects and doing 'art work' such as those pictures you sometimes see painted on cars. I have learned a lot.
I seem to remember once a long time ago seeing something which sprayed paint and used a can of aerosol as the propellant. Have you ever seen those?
Regarding primer and top coats. I will now do some experimenting myself. I WILL be starting with a sanding sealer BUT one which is marketed for furniture etc not models. I already had this in my workshop. I have already tested it in some scrap timber from my model and it works well. I also tested it on some BALSA wood which is difficult to seal and usually DOPE is used and it worked well, after the second coat and a light sand it was very smooth and the grain was not being 'picked up' during the sanding.
I will then 'test' the Vallejo 73.601 primer on top of that and if I'm happy go ahead and get the hull ready for topcoats using the sanding sealer (2 coats) lightly sanded then 2 or 3 coats primer using a blend of those two colours you mentioned.
I think that as this is my first wooden model of any type I feel a little clumsy and almost frightened of doing something wrong and all the time wanting to ensure that I have "covered all bases" and don't make mistakes which need to be corrected.
Thanks again.
John
-
AuthorPosts
- Please log in to reply to this topic. Registering is free and easy using the links on the menu at the top of this page.
Code of conduct | Forum Help/FAQs
Latest Replies
Home › Forums › Static modelling › Topics
-
- Topic
- Voices
- Posts
- Last Post
-
-
The new journey begins
1
2
3
Started by:
 mick east
in: Build Blogs
- 9
- 52
-
19 hours, 43 minutes ago
 mick east
-
New Website Forum – Discussion Topic
1
2
…
7
8
Started by:
 Colin Bishop
in: News and Feedback
- 20
- 183
-
1 day, 1 hour ago
 Colin Bishop
-
Tin Plate Clyde Puffer
1
2
…
7
8
Started by:
Len Morris 2 in: Scratch build
- 12
- 177
-
1 day, 2 hours ago
 Richard Simpson
-
Puffer advice
Started by:
 Alasdair Allan
in: All things floating
- 4
- 20
-
1 day, 4 hours ago
Len Morris 2
-
Todays Boating
1
2
…
200
201
Started by:
 ashley needham
in: All things floating
- 83
- 5,002
-
1 day, 13 hours ago
 ashley needham
-
Kempton steam open days incl boats
Started by:
 ashley needham
in: All things floating
- 2
- 7
-
1 day, 14 hours ago
 ashley needham
-
Purchasing Kits.
Started by:
Michael Cole 8 in: Building Kits
- 6
- 15
-
2 days, 12 hours ago
 ashley needham
-
Kempton Park Steam Engines
Started by:
 Colin Bishop
in: Shows and Events
- 1
- 1
-
2 days, 22 hours ago
 Colin Bishop
-
another Clyde Puffer
1
2
Started by:
mmcp42 in: Scratch build
- 7
- 45
-
3 days ago
mmcp42
-
Wanderer III
Started by:
grich101 in: Scratch build
- 4
- 5
-
5 days, 10 hours ago
 Ray Wood 3
-
Two more of my old models gone
Started by:
Bob Wilson in: Static modelling
- 1
- 1
-
5 days, 21 hours ago
Bob Wilson
-
Two more of my old models gone
Started by:
Bob Wilson in: Static modelling
- 1
- 1
-
5 days, 21 hours ago
Bob Wilson
-
May 2024 issue not in the archive?
Started by:
mmcp42 in: News and Feedback
- 2
- 5
-
1 week, 2 days ago
mmcp42
-
My Clyde Puffer
1
2
…
9
10
Started by:
James Hill 5 in: Scratch build
- 17
- 241
-
1 week, 3 days ago
Len Morris 2
-
Wild Duck meets Eventide
1
2
Started by:
Tim Rowe in: Scratch build
- 5
- 30
-
1 week, 4 days ago
 Tim Rowe 1
-
Ben Ain
1
2
3
4
Started by:
 Richard Simpson
in: Steam powered models
- 8
- 99
-
1 week, 4 days ago
 Richard Simpson
-
getting the boat to pond
Started by:
 Alasdair Allan
in: All things floating
- 3
- 8
-
2 weeks, 1 day ago
 ashley needham
-
MFA Motors ceasing business
Started by:
 Colin Bishop
in: All things floating
- 3
- 3
-
2 weeks, 4 days ago
 ashley needham
-
HMS Glory
Started by:
 Colin Miller
in: Build Blogs
- 4
- 18
-
2 weeks, 5 days ago
 Colin Miller
-
ss Miltiades 1901
Started by:
 Colin Bishop
in: Scratch build
- 2
- 3
-
2 weeks, 6 days ago
 Colin Bishop
-
Amati j class yacht kit
Started by:
 ashley needham
in: Buy/Sell or Trade
- 4
- 6
-
3 weeks, 1 day ago
 ashley needham
-
North West Model Shipwrights Society
Started by:
Bob Wilson in: Club News
- 6
- 17
-
3 weeks, 3 days ago
Bob Wilson
-
ballasting a paddle steamer
Started by:
 Alasdair Allan
in: All things floating
- 5
- 17
-
4 weeks ago
 Colin Bishop
-
Aerokits pt boat bulkhead plans wanted
Started by:
Roo Hawkins 1 in: All things floating
- 1
- 1
-
4 weeks ago
Roo Hawkins 1
-
building a display case
Started by:
 Alasdair Allan
in: All things floating
- 5
- 17
-
1 month ago
 Colin Bishop
-
The new journey begins
1
2
3
-


