The world's leading magazine for all model boating interests
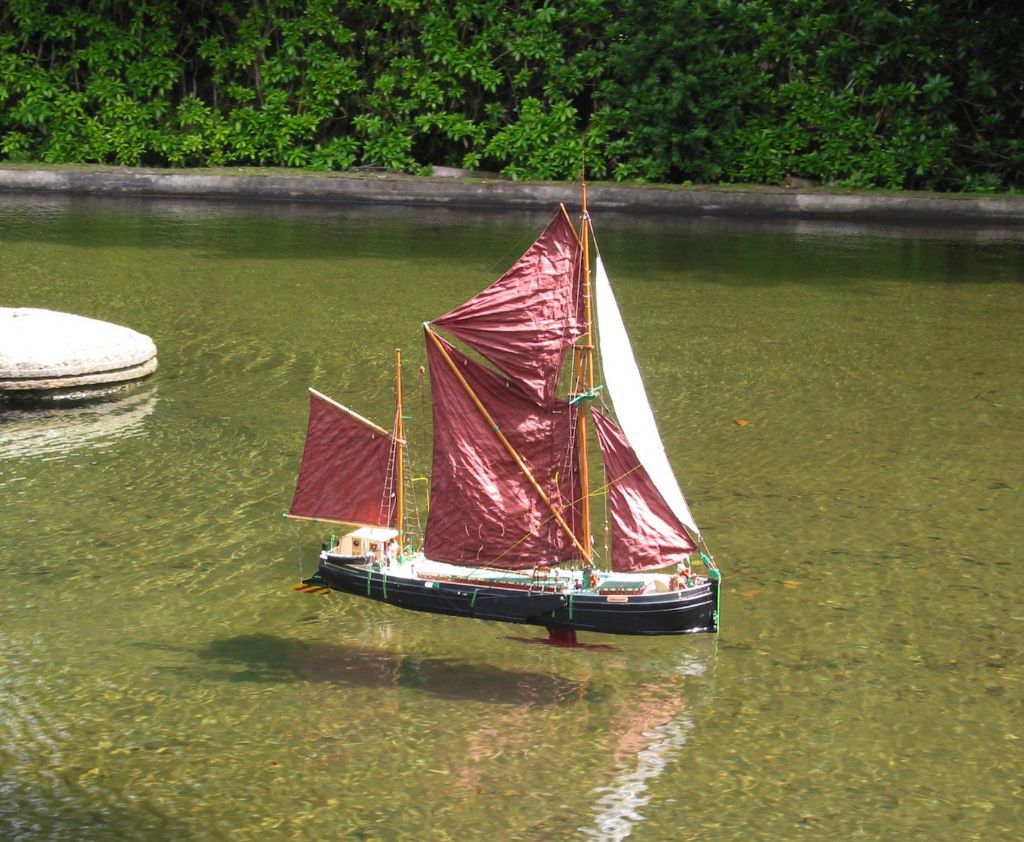
Spritsail barge Veronica
Spritsail barge Veronica
Home › Forums › Scratch build › Spritsail barge Veronica
- This topic is empty.
-
AuthorPosts
-
9 October 2014 at 16:35 #52578
Geoff Sleath
Participant@geoffsleath41411I'm mainly an aeromodeller but I was racing dinghies before that and my first attempts at RC was with a Rhythm 1 metre I built from this magazine's free plan about 20 years ago. I just thought I'd have a go at building something that didn't include my taking a bin liner in my toolbox each time I used it
 Actually I usually get my planes both up and down but even the best pilots have the odd incident.
I've always been interested in sailing barges after spending a few holidays chartering yachts on the Blackwater and the Veronica fills he bill for me. She's a respectable size at about 1.1 metres in length and there's both a DVD and a CNC wood pack available with the 7 sheet plan. I wonder if the fact that the plans are supplied by T*****t will make a tread here unwelcome?
Apparently there's been quite a demand for the plans so I wondered if there's any interest here for a mutual help thread as it's quite a complicated model. More complicated than I thought.
Having looked at the DVD and the plans my first thoughts are:
1: Should I fit an auxiliary motor? I have a few unused Johnson brushed motors I bought before the brushless revolution and they're easier to reverse.
2: Sail control – winch or long-arm servo?
I intend to use one of my FrSky Taranis transmitters for control so I have lots and lots of useable channels and mixes available as well as ultra cheap 2.4 gHz receivers so I could even arrange to raise and lower the leeboards even if they wouldn't be very effective.
Any interest? I don't want this to be a build thread as such (at least not mine) but more of a self help arena.
Geoff
9 October 2014 at 16:35 #6982Geoff Sleath
Participant@geoffsleath414119 October 2014 at 18:53 #52585Kimosubby Shipyards
Participant@kimosubbyshipyardsHello Geoff and welcome to the forum.
Yes, do please create a thread here, it would be great to follow your build and thought processes too. Why worry that the plans are from Traplet, this is about boat building and models, never any politics here is there lads!!!!!
Me, yes I'm a barge builder as well, have two thames barges at 1/24, a Celia jane and a scratch Lady Daphne. I know the designer of Veronica very well, Richard Chesney, we "show" together when possible and will be at Warwick IMBS with the AMBO stand as usual this year. Whilst I mentioned it, AMBO, the Association of Model Barge Owners, have their own website stuffed full of helpful tips, hints and articles, why I even wrote some myself.
Your two questions raised so far. On my first barge I installed a motor, as the original had one fitted, and I use it as a "get out of danger" tool as well as having fun motoring about on calm days. I've even done well in steering comps with it. Remember though, the shaft does NOT go through the stern post, it is most usual for it to be on the port side side but there were at least two barges that went with a starboard shaft. I use a 6V decaperm, doubt you'll find one of them now, but something powerful and fairly slow speed is ideal.
Sail control is always raised by first comers, and even I attempted to control all the sails. The simple answer is just the main and vangs (control the spreet top end) and if fitted the staysail. The foresail is always on the fore horse, no sheets and the topsail sets with the spreet. I would also recommend using a sail winch, I've used Eurgle winches with no problem. And before you ask, the leeboards are too small at scale size to actually do anything, though it does look good to have them upping and downing as you tack, but thats for a later consideration and you'll probably require a programmable transmitter for that aspect.
Are you going for the bowsprit version or staysail/coastal – or have you yet to decide. Again, it is possible to have the model do both, just means having two extra staysails when the bow sprit is used, and some extra fittings up in the bows.
Most important, have fun building her. I'm in the Isle of Man so a bit away, but there are many barge owners around.
Aye, Kim
9 October 2014 at 21:03 #52586Geoff Sleath
Participant@geoffsleath41411The Frsky Taranis is one of the most programmable 2.4 gHz transmitters available as well as one of the cheapest (£140). It has up to 16 channels but usually 8 and almost uncountable mixes. The receivers are incredibly cheap as well. So channels won't be a problem. It's mainly directed at aeroplanes/helicopters but a transmitter's a transmitter.
I'm very conversant with electric flight where there's a lot of importance on prop sizes and motor current draw. However I'm totally in the dark about boat props and the loads they impose on the power train. The brushed motors I have were very cheap (£2 at our local electrical parts shop) and are roughly 700 size but I don't know the rpm/v (kv). They're certainly happy at 30 amps so I don't think that will be a problem and I don't suppose the weight will be either. What size prop and at what rpm would be reasonable for a 1 metre ish barge?
I have lots of questions about te rig and how it should be controlled but they can wait until I have the hull shell completed. I need some waterproof PVA as well. That's not much of a consideration for aeroplanes

We used to go to 'The Island' every year for the TT on our vintage motor cycles (me a 1932 Scott and my wife on a 1928 250c Raleigh). It's a lovely place. The last time we went was to a model aircraft week at Jurby in 2001. We have friends who live in Port St Mary.
Thanks for the reply
Geoff
9 October 2014 at 21:54 #52587 Tony HadleyParticipant@tonyhadley
Geoff,
I don't know much about barges (or scale sail fir that matter), but couldn't help but notice in you first the reference to taking home the remains of your aircraft in a bin liner. Many of us have done that, my disasters were control line.
Nowadays for aircraft – Rc airsim for xbox and windows phones is a great way to fly, without the damage.
.
9 October 2014 at 22:08 #52588Geoff Sleath
Participant@geoffsleath41411Tony, often, in the spirit of club friendship, the bin liner was used for someone else's model. I'm told there was a mid-air a few weeks ago when I wasn't at the field when 2 1/3 scale Sopwith Camels were seriously damaged. A bin liner wouldn't have been sufficient to clear up after that aeromodelling tragedy.
I'm hoping such things won't happen to my barge. In any case even a sinking shouldn't be terminal as the local park pond I hope to use isn't very deep

Geoff
16 October 2014 at 12:20 #52724Geoff Sleath
Participant@geoffsleath41411I've made some progress with my barge and found a few interesting discrepancies in the drawings and the wood pack on the way but nothing not easily overcome with a little thought. Despite my advanced years I'm a firm believer in metric units so it's slightly disconcerting having to drag myself back into the early 20th century and get my head round Imperial measurements. Although he DVD refers to some" 1/4 ply the wood pack hull frames sensibly are cut to accept 6mm (although I actually used some hardish 6mm balsa for the hatch sides and I'll use a lot more balsa than birch ply or other wood because it's what I have in stock.
1: The aforesaid hatch sides aren't shown on the drawings. The GA doesn't show the hull formers as they are shown (and supplied) on the formers drawing.
2. The keel is supplied in 4 plywood parts which have to be glued together before building commences. That's to make it double the length and double the thickness (2x6mm = 12mm). The completed keel is 5mm longer than the drawing so some compromises need to made as to former positioning. Not a serious problem.
3. Two 6mm ply doublers are supplied to reinforce the hull where the shroud chainplates fit. Someone misread the drawing (I think) and added a bit extra on the top which is actually showing the mast step doubler hidden behind the gun'l. Anyway it makes fitting the gun'l difficult and I'm going to trim it.
I was a bit concerned that the the forward hatch on my hull is slanted upward towards the bow and panicked that I'd incorrectly identified the hull formers and placed the in the wrong order! A check on the drawing shows that as correct! Sigh of relief!
Both the gun'l and chines are made from 4 laminations of 3mm x .5" balsa (mixed units! grrr) so my trusty SLEC balsa stripper has come into its own. The DVD starring builder Peter Simmonds is excellent and strongly recommended but I opted to use my SLEC fuselage jig rather than use Peter's method. My fuselage jig has ensured numerous straight model aeroplanes and seems to be working OK for my barge hull so far.
Just got to finish off the gun'l and fit the chines then I'll be ready for planking. Not made up my mind if it'll be as per the drawing (1/32" ply and 3/32" balsa), or as the DVD (1.5mm – 1/16" – ply) or all balsa and epoxy glassed with lightweight woven mat. It seems add that the DVD method is half the thickness shown on the drawings but …? Any suggestions gratefully received. I like the idea of all balsa (3mm) glassed for strength and durability partly because I've probably got enough in stock.
Geoff
Edited By Geoff Sleath on 16/10/2014 12:21:04
16 October 2014 at 22:32 #52746Geoff Sleath
Participant@geoffsleath41411Discovered a rather more serious problem.
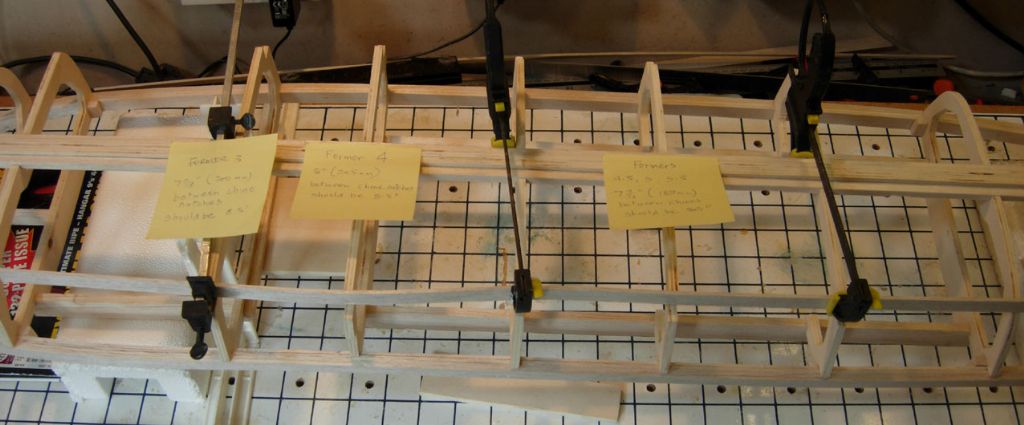
The 5 central hull formers (3, 4, 4.5, 5, 5.5 for some strange reason) are the only ones with notches cut out to take the laminated chine. Forward and aft of there the chine continues to the next former but is intended to be fared in to the rounded sections at bow and stern.
According to the main drawing, the distance athwartships to the chine should be the same for each former (8.5"
 . However on the separate former drawing the dimensions are 3 = 7 7/8" (200mm): 4 = 8" (205mm): 4.5, 5, 5.5, = 2 7/16" (189mm): ie the last 3 still wrong, but the same. The CNC cut formers supplied in the woodpack are cut to the incorrect drawing. I didn't think to check the main layout drawing against the formers drawing. Why would I?
It wouldn't have been so bad if I'd discovered the error before getting so far with the hull framing. All I have to do before skinning is fit the chines and as it is they'll be a most peculiar and wavy shape which won't exactly enhance either the model's appearance or performance.
The only solution I can see will be to pack out all the formers to match number 4 because I'm certainly not going to be able to replace the faulty components. So anyone thinking of building Veronica beware! Pity, because it was all going so well!
I will be contacting Traplet for a full refund of the woodpack costs.
Geoff
17 October 2014 at 13:20 #52752 Ray Wood 3Participant@raywood3
Hi All
I've been waiting to have a complete set of drawings for a barge to be available, so happy days when Veronica has been published. I too have been aeromodelling and dinghy sailing for 40 years and now's its the time for a sailing barge !
I have cut out the bulkheads from the plan and found some strip wood for the keel, stem & stern post, having read Geoff's comments about the CNC cut bulkhead sizes are they not as the plan ? or will I not have the same problem having traced them and cut them out with my trusty band saw ?
I also prefer the idea of planking the hull with Lime which apparently our american cousins call Bass wood, as balsa may be prone to hanger rash, I have generally done more damage to my model aeroplanes getting them out of workshop into the car.
My almost complete HMS Diamond 48" from a Hobby Store plan is 1/8" balsa planked and glass clothed and West epoxied very strong will do Veronica the same way.
Ray W (Maidstone Kent)
17 October 2014 at 13:53 #52753Geoff Sleath
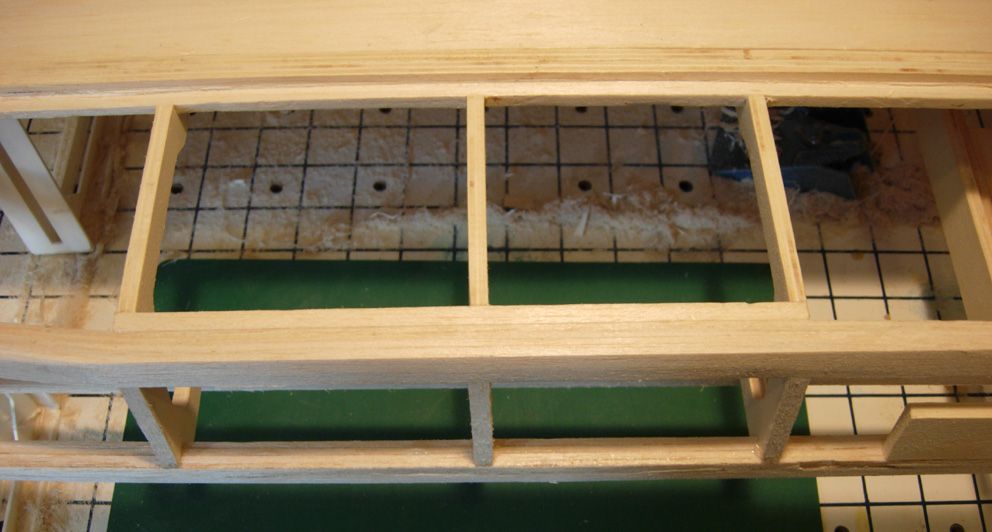
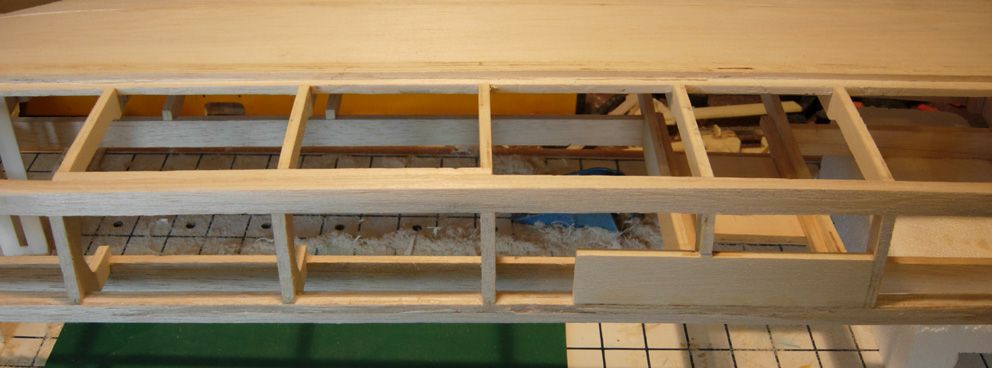
Participant@geoffsleath41411Ray, I think the former drawing (sheet 3) is wrong, too. The woodpack formers are the same as the drawing but don't match the main layout drawing (sheet 4). Check that the chine cutouts on the 5 formers are the same (they should be 8.5" but none of mine are) as each other or you'll have the same problems as I have but after far more work.
Here's my hull on my SLEC fuselage jig which seems to work very well. This before I turned it over to fit he chines. Just 1 lamination of the gun'l in place.
Here you can see the wavy chine! It's correctable by adding a 6mm spacer to formers 4, 5 and 5.5 and a 2.5mm one to former 3. Still not to the main drawing but better.
Just a more general shot of the hull as it is now.
I've been in touch with Traplet by phone and sent them an email with these pictures and other details so we'll see what happens.
I'm going to plank mine in medium balsa and use West epoxy over lightweight cloth. It'll probably be 2.5mm because I think that's what's in my balsa store
 I think it's worth keeping the overall hull weight down and concentrate it at the centre and in the fin lead.
You're right about hanger rash. Most of my planes are kept in the roof space over my workshop and there's a lot of them – probably too many!
Geoff
19 October 2014 at 14:33 #52821Geoff Sleath
Participant@geoffsleath41411Not heard from Traplet yet but I didnt expect to until next week as I only contacted them about the incorrect hull formers on Friday. However I've pressed on with the build and managed to 'bodge' it enough to start sheeting/planking the hull frame. It looks so much like an aeroplane fuselage I was almost tempted to cover it in something like Profilm or, perhaps, the more robust Solartex. Has anyone ever tried that? It would certainly float – at least until the film was pierced by another boat or some floating debris. I intend to use Solartex to simulate the canvas covers of the hatches. It will also strengthen the big flat unsupported hatch tops.
Here you can see how I needed to fit an extra 6mm balsa strip to 3 formers to get the chine anywhere near straight. It wasn't a complete solution and my long Permagrit sander was pressed into service to straighten the outer surface. The chine isn't a consistent thickness but the bit that matters looks OK.
I also had to add 6mm balsa packing to the ends of the formers to give a glueing surface for the side sheeting. As the centre section of the hull is really just a box with flat sides and bottom (though the sides slant outwards slightly from chine to gun'l) it's easy to use sheets of 2.5mm balsa with no need for the planking required for the bow and stern sections. Balsa seems to be more than stiff enough even without the glass cloth and West epoxy.
I don't seem to be getting much response to this build either in comments or views. Is there any point in my continuing to post as there is so little interest.?
Geoff
19 October 2014 at 18:28 #52829 Colin BishopModerator@colinbishop34627
Yes, please carry on Geoff. I don't think we have seen a wood pack build on here yet (even if it is from the 'opposition'
 . It is quite likely that interest will pick up as the built continues, particularly if you need to ask for advice/opinions.
I am surprised at the inaccuracies you have found with the formers as I would have expected that the pattern would have been thoroughly tested before being marketed. It is easy for errors to creep in when bringing something like this, or even a plan, to market but it should have been properly tested to check for these. There are kit manufacturers who still fall into similar traps.
Exactly the same thing happens with computer software and is often compounded when the programmer 'fixes' the problem without actually testing it!
I will be very interested to hear what the response is from Traplet.
Colin
19 October 2014 at 18:39 #52831Amy jane September
Participant@amyjaneseptember49770My apologies Geoff
I have been following your thread, and I should have popped in sooner to say hi!
Amy jane
19 October 2014 at 21:34 #52842Geoff Sleath
Participant@geoffsleath41411Colin,
There is a DVD associated with the build which also uses the woodpack. Peter Simmonds is the builder and is clearly very experienced; he comes up with lots of useful tips which help a new boat-builder like me. However he uses a laser cut set and the packs sold to customers are router cut. I've built a few aeroplanes with laser cut kits and they are so accurate that they hold together without glue. In fact the method of assembly is to put them together and drip thin cyano into the joints – job done!
The disadvantage of laser CNC cutting is that it leaves a black burn mark on the edges that needs to be sanded clean to ensure a good glue joint but they seem to be more accurate and also offer the potential to label the components automatically. Router cutting seems to be a bit cruder even when the parts are accurate. It seems there might have been a glitch twixt laser and router machines.
As a retired electronics engineer who, like most of us, ended up writing the software to drive my designs, I know what you mean about software SNAFUs. I've occasionally removed some apparently unnecessary code only to find it wasn't unnecessary after all.
Amy Jane
No problem at all. I guess I'm too accustomed to the huge threads on toy aeroplane forums. We had over 50 scale models at our airfield last Sunday and most of them were forum members. I think you're a Kiwi? My wife and I had a great cycle tour of South Island back in 1999 and visited all the usual places and cycled on almost the only roads there are
 Super place to be in our winter but Arthur's Pass is the hardest climb I've ever done, including the Alps and Pyrenees.
Anyway, I've now got the easy centre section sheeted with balsa. Tomorrow is the tricky bits at bow and stern, but I think it will be easier with balsa the either ply or hardwood. OK, I know balsa is officially a hardwood but not the young stuff we usually use.
Geoff
19 October 2014 at 22:41 #52844 Colin BishopModerator@colinbishop34627
I think that the occasional mishaps in these areas are inevitable, the important thing is to try and catch them before they escape into the wild! Editing magazines also falls into that category but the typos still get through!
You must have been pretty fit to do a cycle tour of NZ. My Wife and I did three weeks driving around both Islands last year and were blown away by the scenery,it was the most enjoyable driving I have ever done with something new around every corner. I'd love to do it again over different routes but it's a long way to go… We settled for the Canadian Rockies this year.
Colin
20 October 2014 at 08:42 #52848 Ray Wood 3Participant@raywood3
Hi All
Having offered my set of bulkheads up to the plan view, they are out by a country mile as all the sides are angled to some degree and I believe the sides should be near vertical amidships.
I have Richard C's sections for his earlier Westmoreland as a reference. This maybe more than a typo, I think the bulkheads need re-drafting, I will check tonight from a centre line which the plan view does'nt have the transfer to CAD maybe were the errors have crept in ! The old way of tracing and produce an overlay to see what all the chine positions are doing.
KR
Ray
20 October 2014 at 09:07 #52851Dave Milbourn
Participant@davemilbourn48782Geoff
I'm a bit unsettled by your description of the motors as "happy at 30A". That's a huge current for any brushed motor and certainly unnecessary for a model boat of that size, even if it's OK for a model aircraft. It's likely the motors were taken from electric drills or similar and were designed to be run through a gearbox. I wouldn't fit something like that to any of my models except as ballast. You don't want a sailing barge up on the plane! Low speed and high torque is the objective with a slow displacement model.
I reckon you need something of the order of a 45 or 50mm 3 or 4 bladed prop, and I would suggest using the 755 motor sold by Component Shop, running on a 12v supply. Here's a link. A 10A ESC would be more than happy with one of these! **LINK**
Dave M
20 October 2014 at 10:31 #52856Dave Milbourn
Participant@davemilbourn48782Thinking a little more about it, a 60mm or even 70mm prop would be suitable as long as it was of a fine pitch. Some larger props are designed for steam units which need a coarser pitch than direct-drive electric. If you do go for a prop this size then you might be better off with a geared motor e.g. MFA Torpedo 500 6:1. I had this motor and a 70mm 4-blade brass prop in my 43" Envoy tug and it was perfect for cruising around the lake. The ACTion P79 (10A) ESC didn't even get warm.
I bought a wood-pack for an Aquarama speed boat from Traplet at Shepton Mallet this year. I was very disappointed when I opened it; the parts looked badly cut and uneven and the whole thing has gone back into its box and on top of a cupboard until either I've completely forgotten about it or someone finds it after I'm gone. On the other hand if someone wants to make me a half-sensible offer for the pack and the plan I'd sell them tomorrow.
I like the use of the SLEC fuselage jig for building the hull – I'd not thought of that! Keep the build coming, Geoff – you've some interesting slants on the subject.Dave M
Edited By Dave Milbourn on 20/10/2014 10:31:40
20 October 2014 at 12:23 #52858Geoff Sleath
Participant@geoffsleath41411Ray
Yes the sides amidships are angled using the CNC formers even after my modifications. I've just made a rough measurement and using a bi of trig it's about 8 degrees. That's not the main problem though unless you're interested in a very true scale outline. What does make building difficult is the placing of the chine notches but, to some extent, one follows from the other. I've managed to overcome the chine problem but still have the angled sides. It looks quite nice now I've sheeted it even if it isn't Veronica any longer. I'll rename her Acinorev, perhaps

Whatever the standard of the drawing, the DVD is very useful and I strongly recommend it.
With model aeroplane fuselages the drawings usually show the sections at crucial points. It would have been helpful for someone like me who has never studied barges in such detail if tat had been the case with the Veronica drawings. They've fascinated me for years and I even wrote a short story/novella about one sailing up the Essex coast back to the Blackwater in a storm – unpublished!
Dave
30 amps isn't so unusual for a brushed motor. I have much flown electrically-assisted 1.8 metre glider that had a Graupner 7.2v 600 size motor on 7 NiCad cells driving an 8×4.5 folding prop and drew near 30 amps without having a really fast climb out. The Johnson motors I have were sold for £2 each at our local electrical/electronics component shop some years ago (Potts in Derby). I guess the Kv to be around 1100 rpm/volt which may be too much for an auxiliary 'engine' for a barge.
It's just that I have a box full of old brushed motors that won't ever be used for aviation now the brushless revolution as turned. Low kv brushless outrunners tend to be quite big and designed to use with relatively high voltages (5S+ LiPo) and low(ish) currents in big models with big props. I do have a geared 400 size motor which might do the job. It's a brand new Graupner intended for small electric gliders. The barge only needs to be propelled at a couple of knots or so max and that will be far too fast as a scale speed. Hmmm, it will, won't it? 48 knots!!!
Thanks for the advice on prop size and the motor suggestion. I'm intending to visit the IMBS nr Warwick next month to get a few ideas and perhaps spend a little money.
Both my SLEC balsa stripper and the fuselage jig are proving to be very useful on this project. The jig is brilliant because it's so easy to adjust to hold the hull whilst work progresses. I use a lot of SLEC stuff.
Geoff
20 October 2014 at 14:06 #52861Dave Milbourn
Participant@davemilbourn48782Geoff
MFA's datasheet quotes the 6:1 Torpedo motor as revving at about 2700RPM on 12v with no load. With a 70mm 4-blade brass prop of some reasonable pitch I'd guess my Envoy's motor output shaft was doing maybe 2000-2300RPM. If the Johnson motor is the same as the one I bought from Bob Potts (Babbington Lane) in the 80's then that would be doing around 15000RPM on the same voltage. The model would probably just sit there while the cavitation from the prop boiled the lake away – that's until the speed controller burned its way through the bottom of the hull!
I'll be on the Component Shop/ACTion stand at that show so come and have a chat if you can elbow your way through the crowd.
Dave M
20 October 2014 at 15:40 #52862Geoff Sleath
Participant@geoffsleath41411The motors I have are probably the same as you bought from Potts (a mecca for diy electronics people). They were so cheap it was difficult to resist. As I had access to as many electronic bits and pieces either at work or through Dad's radio/TV shop as I needed I wasn't as regular a customer as many were.
It looks like I'll be buying a more suitable motor. These boats are a whole different scene from aeroplanes but I'm enjoying the change. I'm still weight conscious but it's not so important. I will still try to keep it as near the centre of the boat as possible.
Geoff
21 October 2014 at 08:03 #52876Amy jane September
Participant@amyjaneseptember49770Geoff and Colin.
I'm glad you enjoyed your trips around our fair land! The Southern Alps are quite something. Being from the north my self, I find the mountains fabulous. I've not been to England, but from what I've seen, it looks very beautiful.
Geoff, I've been playing with RC planes for the last year or so, and have gotten bored with electric slow fliers, and am now starting to play with aerobatic glow engine ones… (had a pleasant flight tonight with a .12 powered flying wing…)
I shall continue to enjoy your progress!
Aj
21 October 2014 at 17:23 #52887Geoff Sleath
Participant@geoffsleath41411Amy
There are lots of electric very aerobatic and very fast aeroplanes. In fact most international model aerobatic competitors use electric power rather than glow these days. Try a foamie Acrowot if they're sold in NZ and watch your compatriot Bruce Simpson's YouTube channel RCModereviews.
I started the planking at the bow yesterday but ended up tearing off what I'd done because it was so awful. It's harder than it looks to do a decent, or even a satisfactory, job. Still, I have all winter to acquire new skills. I haven't reached sail-making yet which will probably be harder than planking!
Geoff
21 October 2014 at 20:41 #52889Kimosubby Shipyards
Participant@kimosubbyshipyardsHello Geoff, you've been busy, having reached planking already.
If you've not planked before it can be quite a challenge. I note your conversation regarding the sides being angled, which they were by about 5 – 8 degrees off the vertical. Here's my Lady Daphne, scratch built from plans which kind of shows the sheer and the planking runs too.
I've just completed making new sails for my Celia Jane, after 16 years the old set were slightly worn, and I was never happy with their fit either, too tight without room to fill in a blow.
You may be interested in this website, Ivor Bittle. Amongst a whole raft of stuff he has an interesting section on thames barges and how he makes them. Its worth a look, though he does go into some depth in areas. Heres a link for his site **LINK**
Aye, Kim
29 October 2014 at 12:21 #53137Geoff Sleath
Participant@geoffsleath41411A bit of an update.
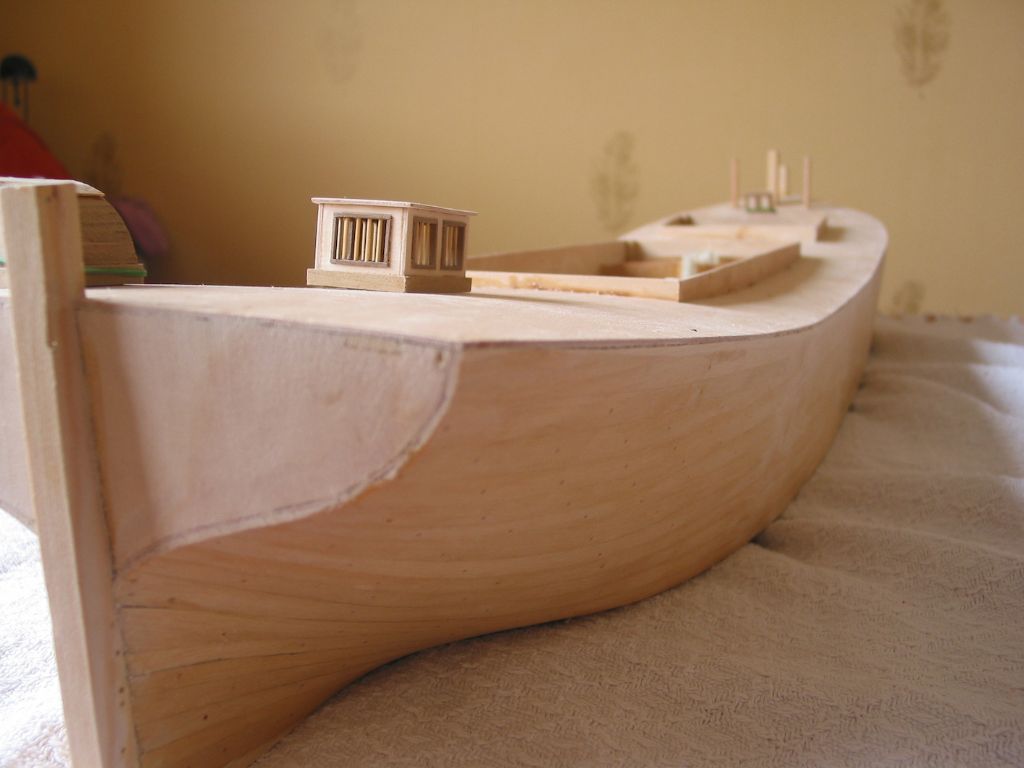
I haven't been idle this past week but planking seems to take a long time! Each plank needs to be left for the glue to go off enough and clamping is a nightmare because nothing is square. Still, I now have a full planked hull. It's far from perfect but, after sanding, filling and glass clothing it should approximate to the required shape.
With best will in the world there are fine gaps between the planks that can be seen when holding it up to the light and will certainly not be watertight. But then, even full-size wooden ships of the Napolionic era had the planking calked with oakum. What is the best way of dealing with this? The planks are 2.5mm balsa.
1: I'll be using some P38 polyester body filler in some areas to fill the worst parts. I'm not keen on using too much of this and certainly not along every small gap in the planks, partly because the final finish will West epoxy and lightweight glass cloth and epoxy and polyester resins don't attach to each other well.
2. I have thought of mixing my own filler with powder I already have with the waterproof PVA I've used for the rest of the hull (Wudcare 5 minute Super Fast). I would brush that on the planking to force it into the cracks and rub down once it had dried. Would that work? Is there a conventional technique?
I've heard from Traplet about the errors in the drawings and the woodpack but not yet had a satisfactory solution. The guy I contacted initially was off sick all last week which is why there has been a week's delay. They've admitted that there is an error and are going to correct both the drawing and the CNC cutting schedule. However, I don't think their analysis of what's wrong is correct. Their solution would end up with a much increased slope on the hull sides (it's 8 degrees on my finished hull) which I don't think would be right but I'm not really familiar with what a full-size barge hull looks like in that much detail.
They offered me some replacement formers which is pointless because there's no way I can replace them without destroying what I've spent some hours building. They also offered my a complete corrected woodpack but I don't want to start all over again and buying a stack of balsa. So it's on going. All I would say to anyone building from either the plans or the plans + woodpack (Ray Wood for one) is don't start yet or, alternatively, modify the hull former drawings yourself to correct the errors.
Geoff
Edited By Geoff Sleath on 29/10/2014 12:24:19
-
AuthorPosts
- Please log in to reply to this topic. Registering is free and easy using the links on the menu at the top of this page.
Code of conduct | Forum Help/FAQs
Latest Replies
Home › Forums › Scratch build › Topics
-
- Topic
- Voices
- Posts
- Last Post
-
-
The new journey begins
1
2
3
Started by:
 mick east
in: Build Blogs
- 9
- 53
-
44 minutes ago
 Richard Simpson
-
Todays Boating
1
2
…
200
201
Started by:
 ashley needham
in: All things floating
- 83
- 5,004
-
45 minutes ago
 Richard Simpson
-
New Website Forum – Discussion Topic
1
2
…
7
8
Started by:
 Colin Bishop
in: News and Feedback
- 20
- 183
-
1 day, 17 hours ago
 Colin Bishop
-
Tin Plate Clyde Puffer
1
2
…
7
8
Started by:
Len Morris 2 in: Scratch build
- 12
- 177
-
1 day, 18 hours ago
 Richard Simpson
-
Puffer advice
Started by:
 Alasdair Allan
in: All things floating
- 4
- 20
-
1 day, 19 hours ago
Len Morris 2
-
Kempton steam open days incl boats
Started by:
 ashley needham
in: All things floating
- 2
- 7
-
2 days, 5 hours ago
 ashley needham
-
Purchasing Kits.
Started by:
Michael Cole 8 in: Building Kits
- 6
- 15
-
3 days, 3 hours ago
 ashley needham
-
Kempton Park Steam Engines
Started by:
 Colin Bishop
in: Shows and Events
- 1
- 1
-
3 days, 13 hours ago
 Colin Bishop
-
another Clyde Puffer
1
2
Started by:
mmcp42 in: Scratch build
- 7
- 45
-
3 days, 15 hours ago
mmcp42
-
Wanderer III
Started by:
grich101 in: Scratch build
- 4
- 5
-
6 days, 1 hour ago
 Ray Wood 3
-
Two more of my old models gone
Started by:
Bob Wilson in: Static modelling
- 1
- 1
-
6 days, 12 hours ago
Bob Wilson
-
Two more of my old models gone
Started by:
Bob Wilson in: Static modelling
- 1
- 1
-
6 days, 12 hours ago
Bob Wilson
-
May 2024 issue not in the archive?
Started by:
mmcp42 in: News and Feedback
- 2
- 5
-
1 week, 3 days ago
mmcp42
-
My Clyde Puffer
1
2
…
9
10
Started by:
James Hill 5 in: Scratch build
- 17
- 241
-
1 week, 4 days ago
Len Morris 2
-
Wild Duck meets Eventide
1
2
Started by:
Tim Rowe in: Scratch build
- 5
- 30
-
1 week, 4 days ago
 Tim Rowe 1
-
Ben Ain
1
2
3
4
Started by:
 Richard Simpson
in: Steam powered models
- 8
- 99
-
1 week, 4 days ago
 Richard Simpson
-
getting the boat to pond
Started by:
 Alasdair Allan
in: All things floating
- 3
- 8
-
2 weeks, 1 day ago
 ashley needham
-
MFA Motors ceasing business
Started by:
 Colin Bishop
in: All things floating
- 3
- 3
-
2 weeks, 5 days ago
 ashley needham
-
HMS Glory
Started by:
 Colin Miller
in: Build Blogs
- 4
- 18
-
2 weeks, 6 days ago
 Colin Miller
-
ss Miltiades 1901
Started by:
 Colin Bishop
in: Scratch build
- 2
- 3
-
3 weeks ago
 Colin Bishop
-
Amati j class yacht kit
Started by:
 ashley needham
in: Buy/Sell or Trade
- 4
- 6
-
3 weeks, 1 day ago
 ashley needham
-
North West Model Shipwrights Society
Started by:
Bob Wilson in: Club News
- 6
- 17
-
3 weeks, 3 days ago
Bob Wilson
-
ballasting a paddle steamer
Started by:
 Alasdair Allan
in: All things floating
- 5
- 17
-
4 weeks, 1 day ago
 Colin Bishop
-
Aerokits pt boat bulkhead plans wanted
Started by:
Roo Hawkins 1 in: All things floating
- 1
- 1
-
4 weeks, 1 day ago
Roo Hawkins 1
-
building a display case
Started by:
 Alasdair Allan
in: All things floating
- 5
- 17
-
1 month ago
 Colin Bishop
-
The new journey begins
1
2
3
-


