Hunstman 31 by Tim Rowe

Advert

Hunstman 31 by Tim Rowe

Home Forums Build Blogs Hunstman 31 by Tim Rowe

  • This topic is empty.
Viewing 25 posts - 1 through 25 (of 39 total)
  • Author
    Posts
  • #88097
    Tim Rowe
    Participant
      @timrowe83142

      Here I am joing the flotilla of Fairey Marine yachts. In real lfe, one of my favourite powerboats and being a Hamble lad, part of my heritage.

      This looks like a good attempt at a mass build but for me progress will be slow as I have a flying boat on the go and in the finishing stages of Galileo.

      p1150437.jpg

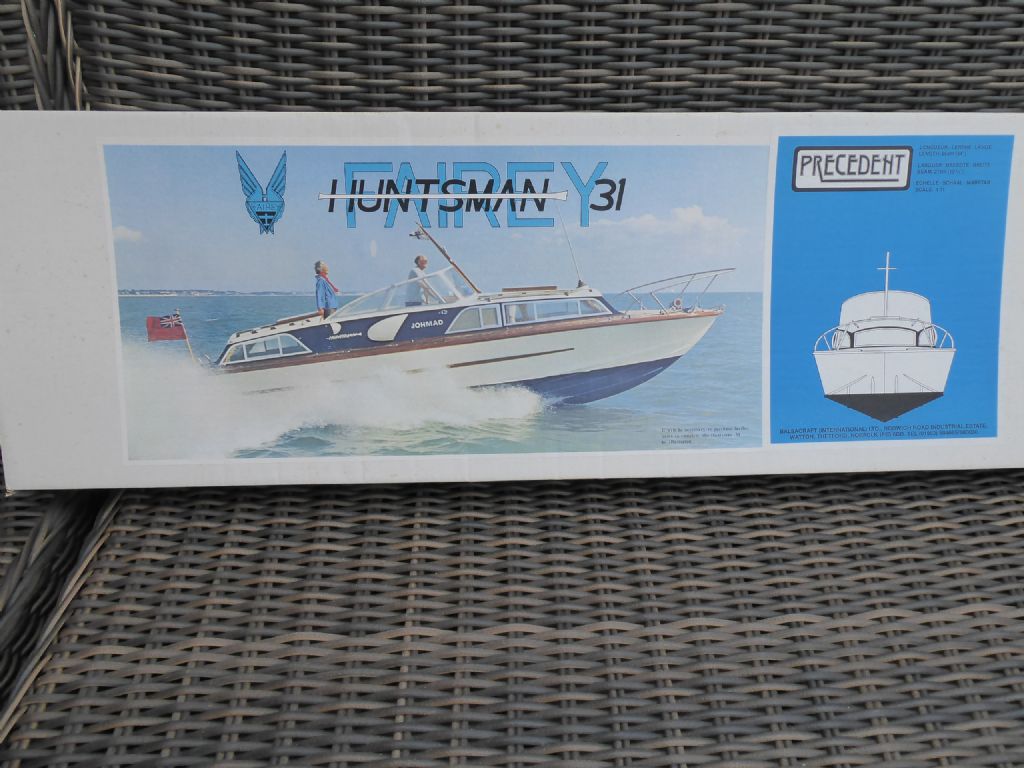
      This is the one I am building. An Ebay purchase before I managed to get control of my addiction to bidding. It has been in its box for at least four years but a few weeks ago I decided to take the plunge.

      I am fairly sure the photo was taken in the Solent looking East towards Portsmouth. The shore would then be Hill Head joining to Lee on Solent in which case the boat could well be on its way to Cowes from Hamble. A route I must have done hundreds of times.

      This one is IC powered which I hope will please Ray.

      Here goes

      Tim R

      Advert
      #9799
      Tim Rowe
      Participant
        @timrowe83142

        The 34″ version from the Precedent kit

        #88098
        Eddie Lancaster
        Participant
          @eddielancaster

          Hi. Tim, nice to see another Huntsman, it will be interesting to see how different designers have gone about the build.

          Glad to hear that Galileo is nearly finished, I learned a lot from that build.

          Regards.

          Eddie.

          #88102
          Ray Wood 3
          Participant
            @raywood3

            Hi Tim,

            Now your talking 😃 it's great to hear your going to install a real engine , and it will be great to hear it !!

            I always wanted a watercooled 4 stroke, what have you in mind ??

            Regards Ray

            #88104
            Tim Rowe
            Participant
              @timrowe83142

              Just noticed the miss-spelling on my title. I should be forgiven because the instructions in the kit refer to a FAIRY Huntsman – eeek!

              Thanks Eddie for your comments. I have some catching up to do with a few phases on Galileo and will post soon. It had its first top-coat colour yesterday.

              p1160217.jpg

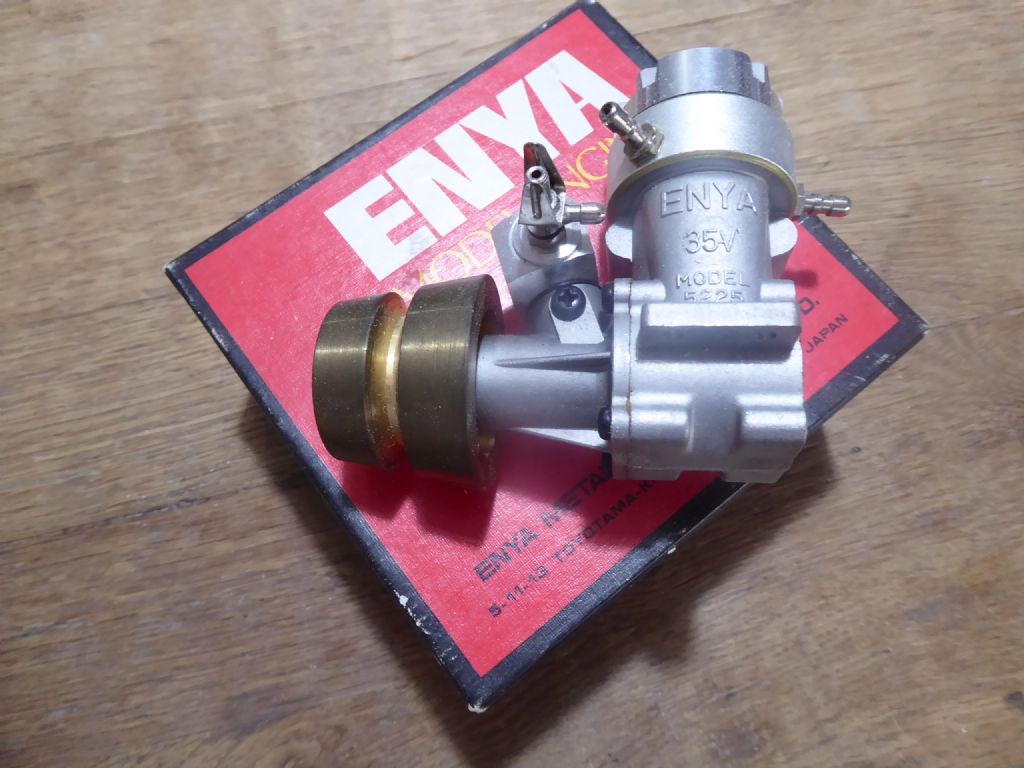
              This is what is going in. Not a particularly powerful engine being and old cross-flow design but Enyas had a good reputation for reliability and this is not a racing boat. It is New in Box from Ebay but without silencer or instructions. I too would like a water cooled 4 stroke but it is missing from my collection. I have over 150 engines of various sizes and types ranging from a 70cc radial to a tiny CO2 motor. This is the only marine one. I have less than twenty electric motors but I am getting to appreciate them better.

              p1160221.jpg

              p1160220.jpg

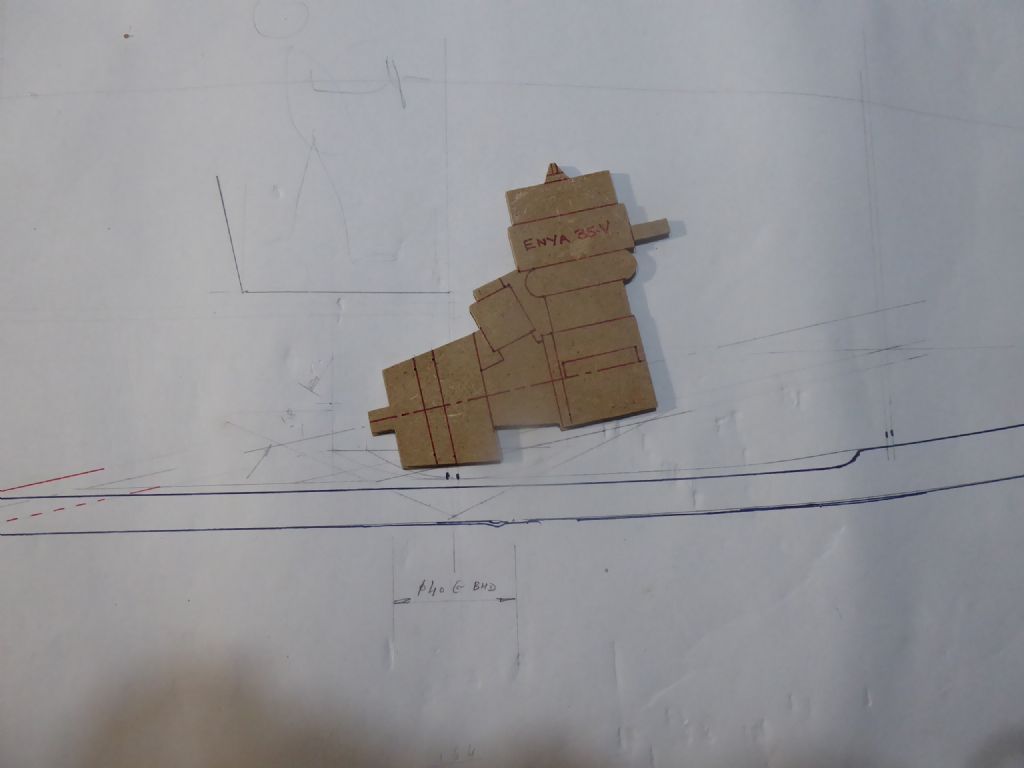
              Oops – This shadow upside down

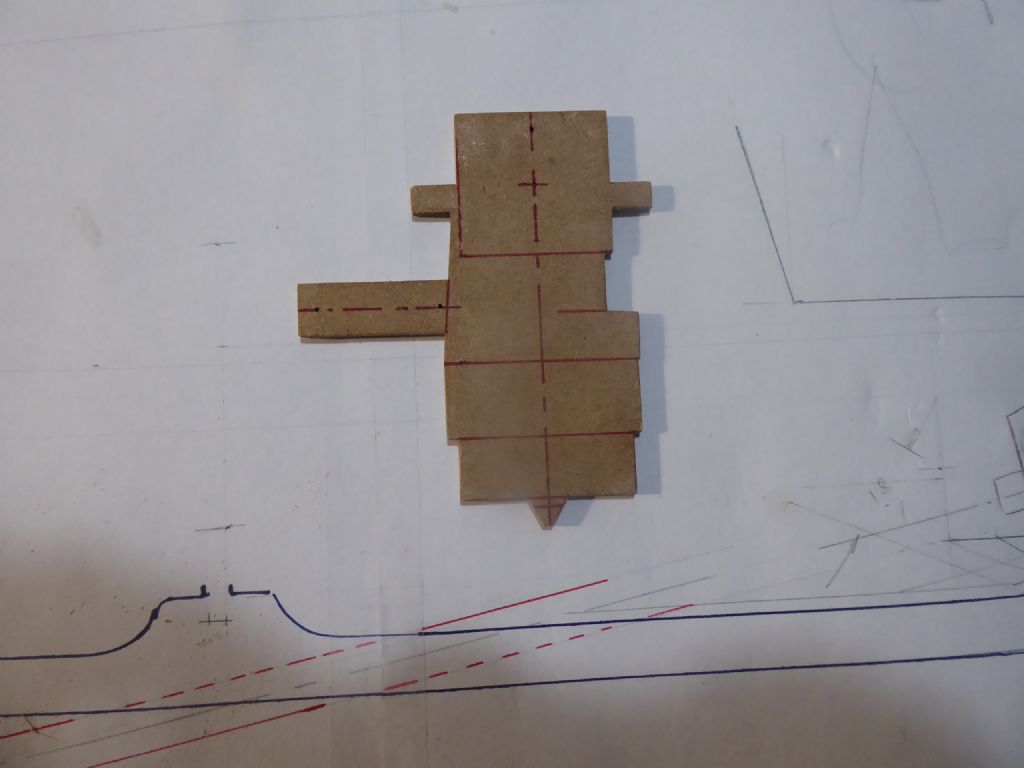
              First job was to make a couple of 3mm MDF shadows so I can play around with clearances, access and alignment on a self drawn plan. This kit just has instructions and schematics now as the dropped the plan some time ago when they made the parts "self-jigging". The absence of a plan makes it very hard to position the equipment and there is no reference to a waterline except on the box. Dropping the plan was a shame in my opinion and a design waterline is probably the most important datum for establishing displacement and weight distribution.

              I will also apologise in advance to all those good people at Balsacraft as already I have made some fairly significant changes. I am having lots of fun with it though.

              Tim R

              #88107
              Chris Fellows
              Participant
                @chrisfellows72943

                Hi Tim

                Great to see you starting the Huntsman build. As Eddie says it will be interesting watching the different kits and scratch builds and at different sizes. And with an IC too.

                What size is your model and is it a GF or timber hull?

                I have the kit plan of the Modav version for the 34" model. Ordinarily I'd get it scanned for you but I can photograph it in parts if it's any good to you?

                Chris

                #88132
                Tim Rowe
                Participant
                  @timrowe83142

                  Hello Chris

                  The engine is a little bit weedy for the boat with a decent prop and some tweaks here and there it will be good enough. It is the 34" wooden hull kit. The parts are die-cut and actually the cutting is quite good but the accuracy and symmetry is not the same as laser and cnc cut of course. The difference is particularly noticeable at the moment because the flying boat kit is all laser.

                  Dave Milbourn has very kindly sent me the plans so thank you for your offer but I am fixed up now.

                  Ray is feeling it. At the rate he builds he could design a Faireyesque model and have it in paint by the weekend.

                  Tim R

                  #88133
                  Chris Fellows
                  Participant
                    @chrisfellows72943

                    Hi Tim

                    As I was posting I was thinking that Dave would probably sort you out but mentioned it anyway.

                    Yes, I was going to mention Ray's speed on his Osprey thread. I don't know how he does it!

                    Chris

                    #88134
                    Eddie Lancaster
                    Participant
                      @eddielancaster

                      Ray has locked himself in the shed to avoid having a pot of paint and brush put in his hand😄.

                      Eddie.

                      #88135
                      Chris Fellows
                      Participant
                        @chrisfellows72943

                        laugh Yes, I've still got some to do and am running out of other jobs as an avoidance tactic!

                        Chris

                        #88136
                        Ray Wood 3
                        Participant
                          @raywood3

                          Hi All,

                          Never a truer words spoken, but for exercise today we drove to Pevensey Bay in Sussex, with my new fancy trunks bought for next month's cancelled holiday and went swimming in the English Channel , it was blo*dy freezing 😄

                          Regards Ray🐬

                          #88148
                          Tim Rowe
                          Participant
                            @timrowe83142

                            Hi all

                            You've got to admire Ray's inventiveness in avoidance tactics. Going for a lunatic swim just to avoid building a Fairey!

                            You can't get away without posting a picture of your trunks (wearing them of course).

                            Anyway, enough frivolity and back to the serious business of boatbuilding and thank you Dave for the drawings.

                            Tim R

                            #88150
                            Tim Rowe
                            Participant
                              @timrowe83142

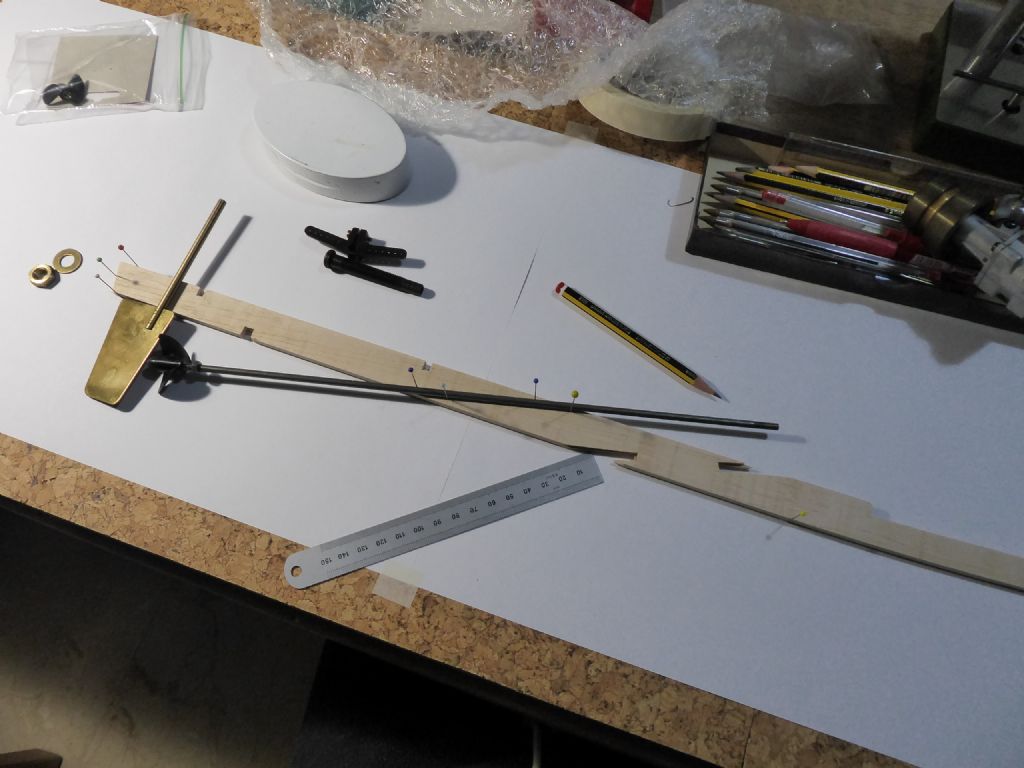
                              Just to prove I do read instructions I noticed that it was advised that this model sits a bit bow down and needs trimming ballast at the stern. I have also wondered why, in model boats the engines always seem to be so far forward and likewise the propellers and the rudders. Most full sized powerboats have the rudders very close to the transom or hanging from it and the props are as far aft as possible close to the rudders and with minimal down-angle on the shafts.

                              My first significant mod to the kit is intended to fix all these points so I made a sketch of the keel outline on some paper and marked in the frames stations.

                              p1150168.jpg

                              This showed that I ought to be able to move the motor about 60mm further aft and this would be a useful transfer of weight. Reducing the shaft angle was a little bit more difficult due to the clearance need for the flywheel (useless piece of junk on an electric motor) and of course remembering to leave enough space for the starting cord. (another nostalgic piece of equipment) When it comes to final fitting I will had to consider the cockpit and this might limit the available change.

                              p1150169.jpg

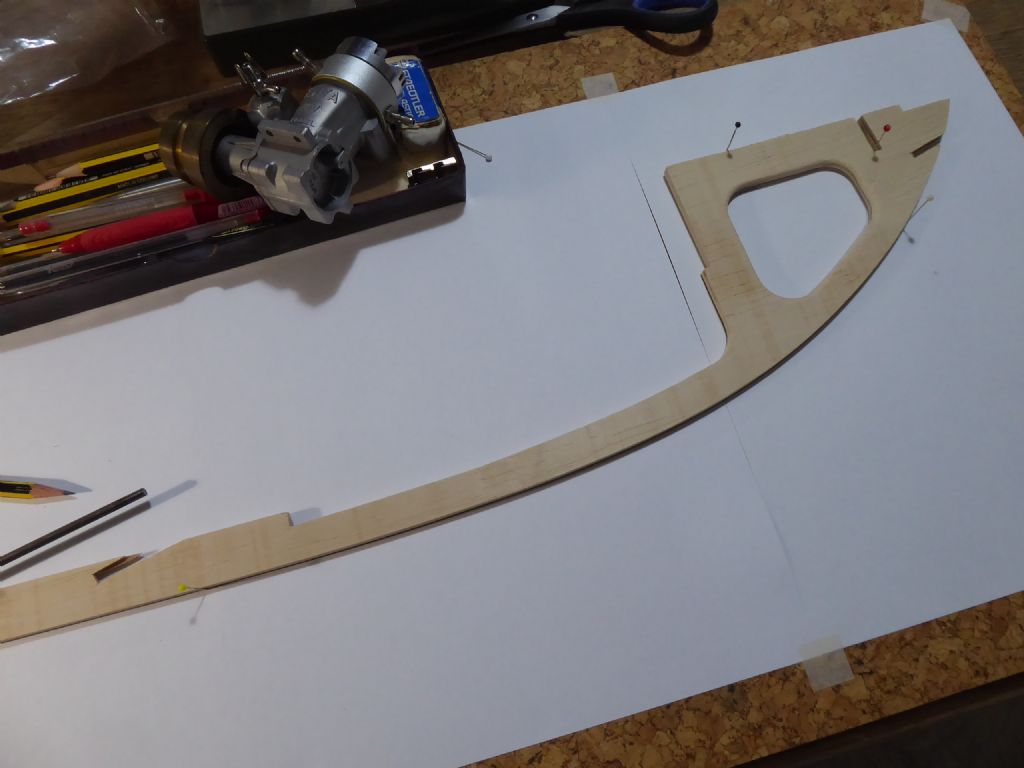
                              Here is the front end of the keel. I am unable to break my aircraft habit of removing wood wherever I think I can and that accounts for the big lightening hole at the bow. Again if I can reduced the build weigh at the bow, less to ballast at the stern and if I end up have to add weight to get to the waterline that can be my choice to experiment with and I can add the weight over the centre of buoyancy or close to.

                              There is another reason for opening up holes and that is that I don't like closed off voids. I prefer all areas of a boat to be able to ventilate and to be able to drain. This subject came up in another recent post. Another benefit is that it reduces the amount of sealing materials I will use and as everything will eventually be encapsulated in epoxy I should have a bit more left over for another model. Weight is any enemy of performance so if my waterline is not too far out I will be giving my slightly marginal motor a better chance.

                              Tim R

                              #88161
                              Chris Fellows
                              Participant
                                @chrisfellows72943

                                Hi Tim

                                Usual attention to detail and high standard of building.

                                Yes, I've read that the H31 can be a bit nose heavy, not only when static, but when coming off the plane. In my build I've moved the rudder back to the stern as per the full sized craft. My motor, as drawn, is towards the front of the cabin, but when test fitting I shall see if I can move it back a bit. I've got to order another prop shaft before I do that though.

                                Chris

                                #88162
                                Tim Rowe
                                Participant
                                  @timrowe83142

                                  Hi Chris

                                  The previous owner of the kit did do some collecting of parts. There is a shaft and tube (now too long), a couple of plastic propellers and a rudder assembly. Of everything I suspect I will only be able to use the rudder and I will need some advice on that when I get a bit more advanced.

                                  Like you, I think the rudder(s) in their proper places look much better on display. It would be interesting to know the reason for the forward rudders. I wonder if it is because it means the whole assembly can be under the hatch. That is not a big problem as it is easy to arrange sufficient access through the aft bulkhead supplied in the kit and if the boat is nicely open framed like yours then there is no problem at all.

                                  Tim R

                                  #88163
                                  Dave Milbourn
                                  Participant
                                    @davemilbourn48782

                                    To explain this quirk of its performance you need to look no further than Eddie's picture of the two hulls upside down on the board. Notice how narrow the hull is at the bow c/w amidships. On the plane the bow is quite high up out of the water but if you back off the power quickly then there's no damping effect at the front to prevent it from ducking inelegantly. The solution is to ease the power off gradually. This effect is even more noticeable where a medium-vee hull is flat across the bottom of the transom e.g. Vic Smeed's Twinkler.

                                    As regards the SLEC Huntsman @ 1/16 scale, if you lay out the motor, radio and battery pack as per the instructions then you won't need any ballast at the back. The effect of a small brushless motor that far forward is clearly not as significant in a lightweght hull as the 10cc I/C lump with flywheel and exhaust pipe is in the 1/8 scale version. The layout of the motor, shaft and rudder on the original big Huntsman kit was copied from Vic's 1/12 scale model. If you can't beat 'em…..

                                    Incidentally the prop shaft angle is 16° on the real thing and that doesn't seem to suffer the mythical 'nosedive syndrome' at full power. Alan Burnard was a genius and I'm in no position to argue with his designs!

                                    Dave M


                                    Edited By Dave Milbourn on 20/05/2020 11:59:08

                                    #88164
                                    Chris Fellows
                                    Participant
                                      @chrisfellows72943

                                      Hi Dave

                                      Yes, I thought the shape of the bow area was something to do with it, as it offers less support than the rest of the hull.

                                      As regards the real thing I think having two big motors set well back certainly helps! And I wonder how the power to weight ratio compares especially when using one or two powerful brushless motors?

                                      Folks do seem to be rather more on and off with the throttle on a model which isn't surprising in some situations.

                                      Chris

                                      #88165
                                      Tim Rowe
                                      Participant
                                        @timrowe83142

                                        The other thing to remember is that when you are going fast you are dragging a high energy wave behind you. If you come off the throttles too quickly that wave will catch up lifting the stern or in the case of outboards possibly swamping them. Worst case you sink. Next worst case you have some people in the cockpit or sunbathing on the aft deck who you have just got wet!

                                        Also not good for big engines. Throttle back slowly and non of this happens.

                                        Tim R

                                        #88166
                                        Dave Milbourn
                                        Participant
                                          @davemilbourn48782

                                          This is a slo-mo video of my 1/16 scale Swordsman, taken by Martin Davis at Wicksteed Park last year. The Huntsman is Colin's. If you check out the 'fast stop' at around 1:15 you'll see exactly what happens when you drop the power quickly, and don't forget that Swordsman is a lot beamier than Huntsman.

                                          Swordsman

                                          Dave M

                                          #88168
                                          Eddie Lancaster
                                          Participant
                                            @eddielancaster

                                            Hi. Dave, thanks for that link, Wicksteed, my home water, a distant memory now.

                                            Eddie.

                                            #88171
                                            Colin Bishop
                                            Moderator
                                              @colinbishop34627

                                              Interesting comments. I did find that my SLEC Huntsman had a distinctly bow down attitute when at rest whereas Dave's prototype with the same interior setup floated much more level. We couldn't quite work out wy altjhough it is possible I might have carved away more of the bow balsa blocks when shaping the hull forward flare. It looks better now with a bit of weight in the back and it doesn''t seem to noticeably affect the performance.

                                              With regard to Wicksteed Park I did read the other day that cars are now bing admitted so maybe boating is again possible. No doubt the club will have the latest info.

                                              Colin

                                              #88184
                                              Eddie Lancaster
                                              Participant
                                                @eddielancaster

                                                Hi, Colin, I had an email from Alan our secretary, last week, yes the park is open again but with no facilities and a restriction on the number of cars allowed in at any one time, as you know our shelter Is right by the footpath that runs around the lake so we could not keep two meters from other park users, anyway at the moment it is up-to the individual to decide wether to go boating or not.

                                                Regards.

                                                Eddie

                                                #88186
                                                Tim Rowe
                                                Participant
                                                  @timrowe83142

                                                  While on the topic of Eddie's thread about READING THE INSTRUCTIONS I spotted in mine that I should make sure the cockpit assembly fitted between bulkheads 6 and 7 so I thought it would be sensible to build the basic cockpit first so I could make sure. Besides which I had already spent far too much time pondering and was dying to stick some wood together.

                                                  p1150171.jpg

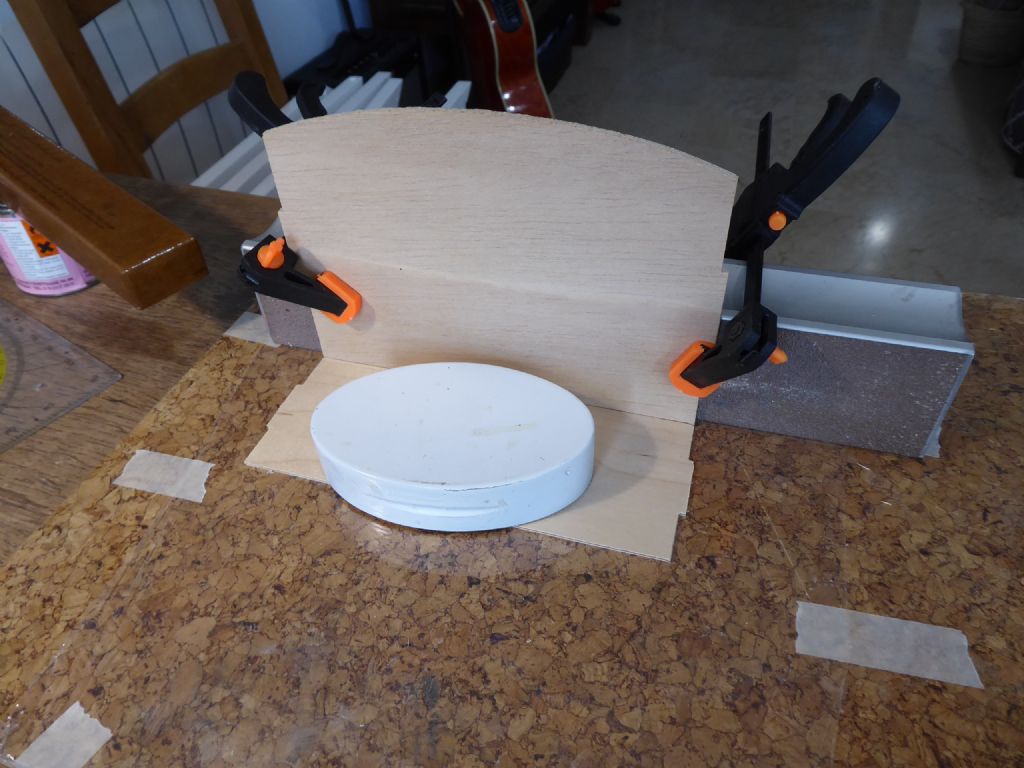
                                                  The cockpit is a mixture of lite ply and birch ply and all parts were quite twisted. Twisting is fine because it is only single plane curvature. It was easy therefore to jig the parts while the glue set using a home made lead weight to hold one piece flat on a building board and my long Permagrit to hold the other part straight and at right angles.

                                                  For anyone interested, the weight is lead and cast into an old aluminium sardine tin. After pouring (and cooling of course) I peeled off the aluminium, filled the odd few bumps with polyester filler, filed some grooves in the side to make it easy to pick up, painted white to stop me being in direct contact with the lead and finally stuck some 3mm MDF on the bottom to stop it marking anything it was used for weighting down. I have a few of these and they are really useful and more stable and dense than old 12v alarm batteries.

                                                  p1160252.jpg

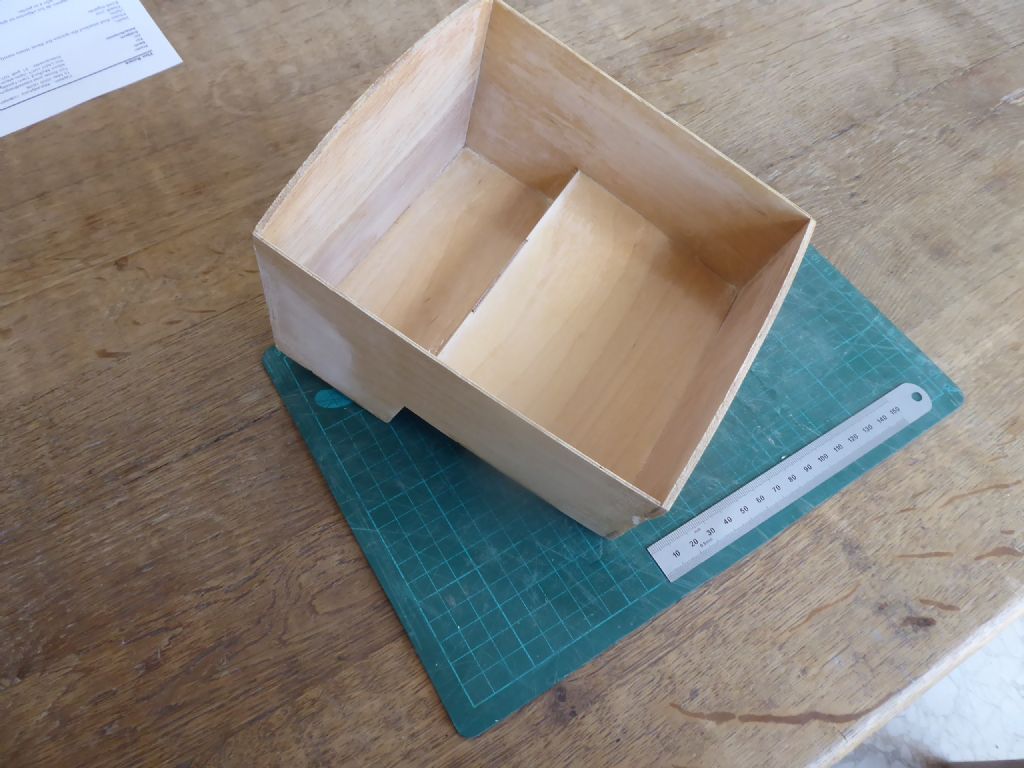
                                                  Here is the basic cockpit that I can now use to get the frame spacing spot on.

                                                  The cockpit is glued with West System epoxy and both surfaces of every join were coated so that even if the joints were not perfect (and they are not), there would be no exposed ply edges to soak up water. This theme will be carried right through the build so eventually all the structure will be fully encapsulated and waterproof. The advantage of epoxy is that you can pre-coat parts and then stick then together with more epoxy. If the parts were sealed or pre-coated with sanding sealer or other similar products there would be a weakness at all the joins. Epoxy doesn't grab like PVA or Aliphatic so it is more important to get the jigging correct, effective clamping essential and plenty of patience like minimum overnight setting. This is one of the reasons I am running the flying boat kit at the same time and both get worked on while Galileo's paint gets to dry.

                                                  Tim R

                                                  #88190
                                                  Ray Wood 3
                                                  Participant
                                                    @raywood3

                                                    Hi Tim,

                                                    When are we going to see the flying boat ??

                                                    You know you've lost it when your watching the 2016 Monaco grand prix @ 11.15PM !! I have 😄

                                                    Regards Ray

                                                    #88313
                                                    Tim Rowe
                                                    Participant
                                                      @timrowe83142

                                                      When I wear out my little drill chain drilling it may be wise to invest in a scroll saw – maybe

                                                      Continuing now with the bulkheads and making a lot of sawdust. On the plus side I am collecting some nice little bits of Lite ply for use elsewhere.
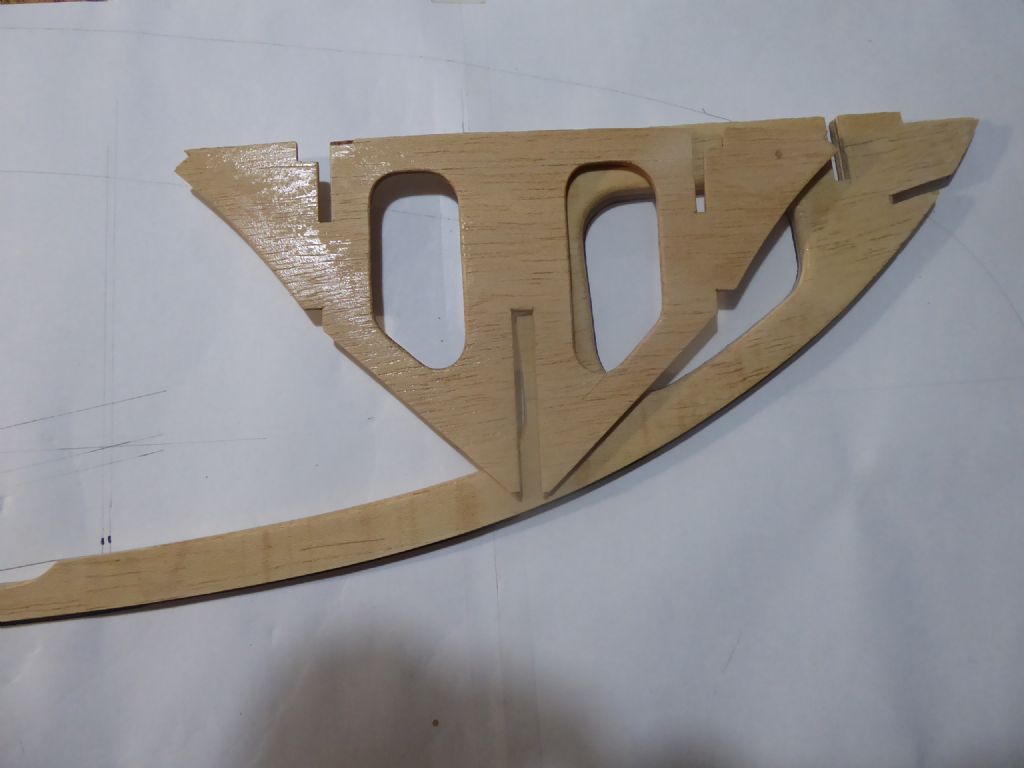
                                                      p1160227.jpg

                                                      Here is the most forward full frame. Like all of them, it is pre-coated with epoxy to seal it.
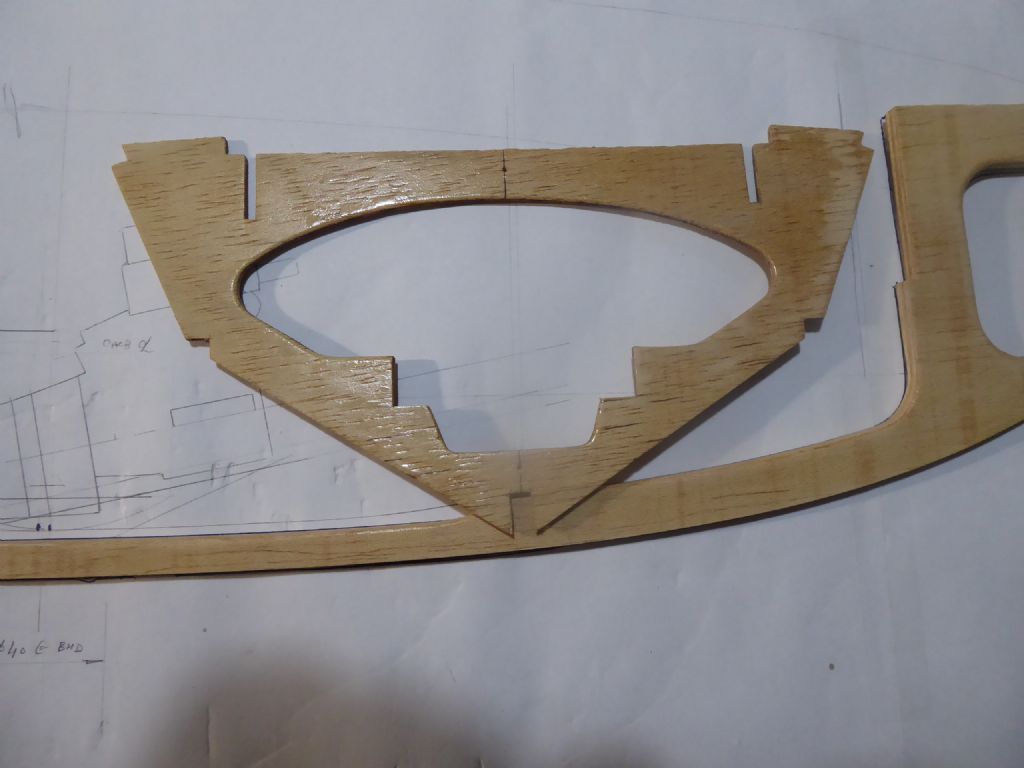
                                                      p1160228.jpg

                                                      Here is the bulkhead at the fore end of the engine compartment. Because I am moving the engine aft I cannot use the engine mount supplied. The notches take the fore ends of the engine bearers.
                                                      In the background you can see the drawing where I plotted the various levels for the new alignment. Time will tell and fingers crossed.
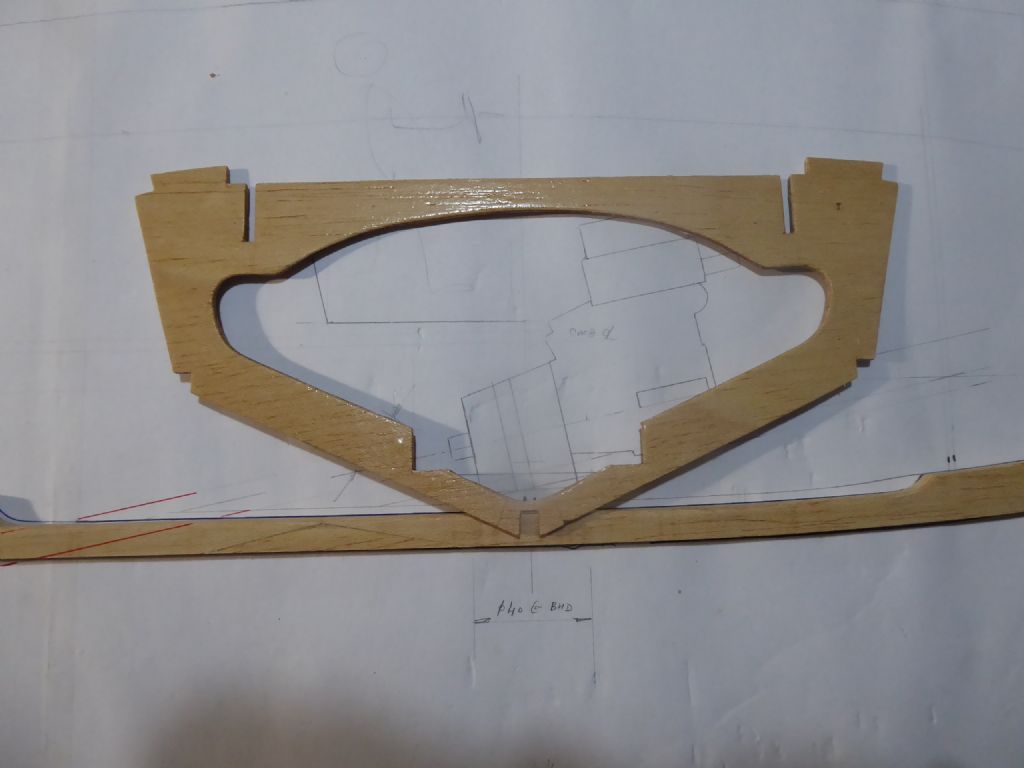
                                                      p1160229.jpg

                                                      This is the engine space aft bulkhead. Here I need the clearance for the flywheel and starting cord. I am cutting things as fine as I can here. There is not much wood above the keel but it will be fine when all glued up. Just hoping not to break it by being clumsy. The notches support the aft end of the engine bearers.
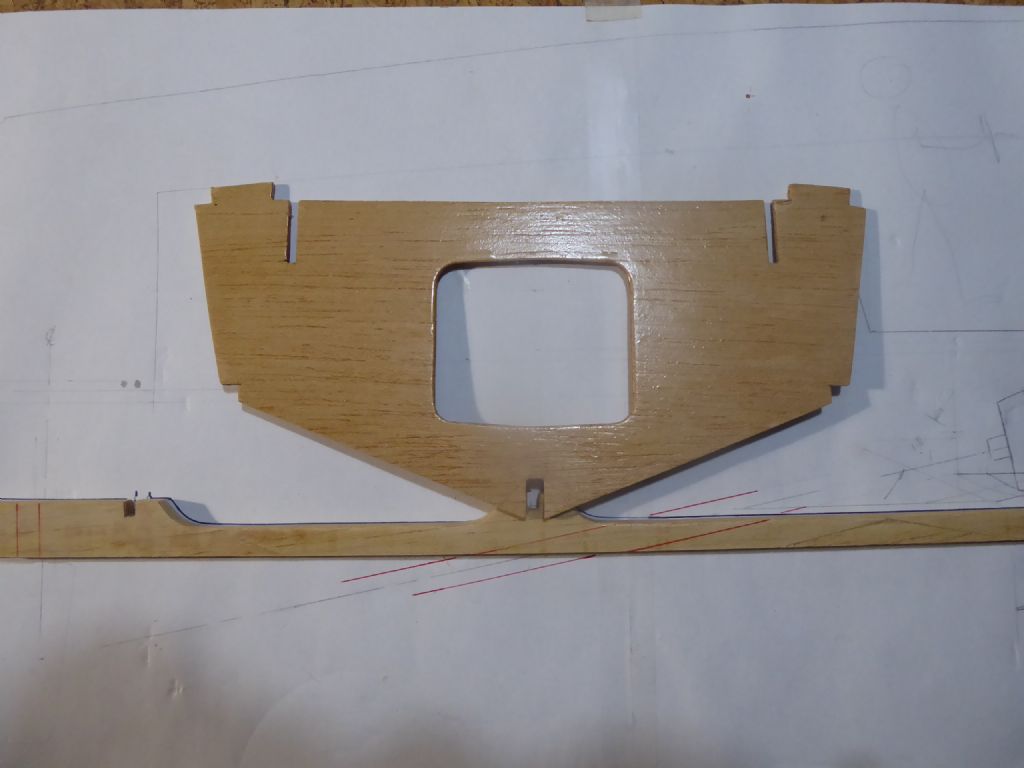
                                                      p1160230.jpg

                                                      This bulkhead supports the aft end of the fuel tank. When I have done a trial fit of all the equipment there will have to be a hole on the port side to take the exhaust hose.
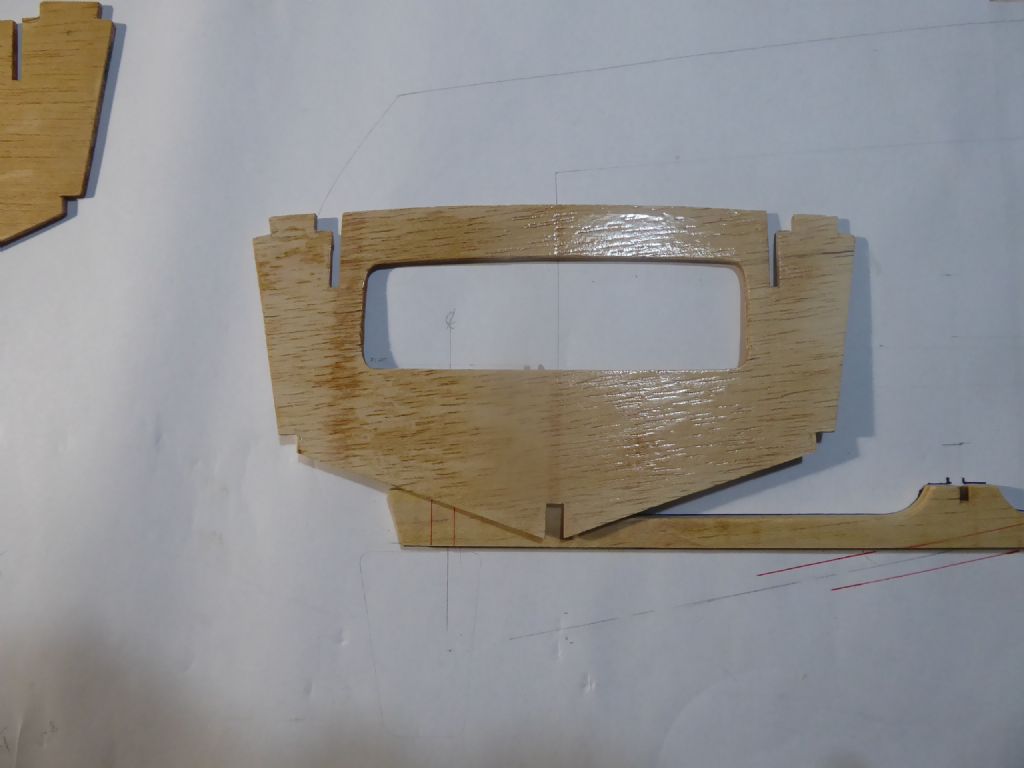
                                                      p1160231.jpg

                                                      Finally the aft bulkhead. Here the lower edge of the cut-out corresponds with the height of the servo arm for the steering. It may need a hole for the exhaust but I have not decided yet.

                                                      It is a lot of fun planning where the bits will go and balancing up the weight distribution as far as possible. Easier now and I can be more predictive thanks to DM and the drawings.

                                                      Tim R

                                                    Viewing 25 posts - 1 through 25 (of 39 total)
                                                    • Please log in to reply to this topic. Registering is free and easy using the links on the menu at the top of this page.

                                                    Code of conduct | Forum Help/FAQs

                                                    Advert

                                                    Latest Replies

                                                    Home Forums Build Blogs Topics

                                                    Viewing 25 topics - 1 through 25 (of 25 total)
                                                    Viewing 25 topics - 1 through 25 (of 25 total)

                                                    View full reply list.

                                                    Advert