The world's leading magazine for all model boating interests
Galileo – A resurrection
Galileo – A resurrection
Home › Forums › Sailing Models › Galileo – A resurrection
- This topic is empty.
-
AuthorPosts
-
10 March 2019 at 15:20 #81409
 Ray Wood 3Participant@raywood3
Hi Tim,
Are you going to use a plaster of Paris to form your moulds? I've been fortunate to use my Wild Duck mould twice now for my 30" sailing barge , I'm hoping to use it again for the cat, quite spectacular the first couple of times I cast the lead, as the plaster wasn't quite dry 😮
Regards Ray
10 March 2019 at 18:05 #81410Tim Rowe
Participant@timrowe83142Hi Ray
Yes I am using Plaster of Paris. Had a bit of fun finding it. In an article somewhere is saw the translations as "yeso de Paris" but when I hawked that expression around the shops I got some strange looks. The proper translation to Spanish is "escayola" which worked much better when I found out.
I have some sensitive scale and weigh the plaster after it has been moulded. Gentle warming over a radiator once the initial cure has taken place does speed things up but the plaster needs to cure, not dry, to get its full strength so rushing it doesn't help. The weight comes down quite rapidly at first and then after a couple of days, virtually stops. When there is no more weight loss I deem the mould to be dry and then add an extra day for luck. Usually four days to be on the safe side.
I am hoping to keep the mould so have built it a bit on the brick side.
Tim R
10 March 2019 at 22:30 #81416Tim Rowe
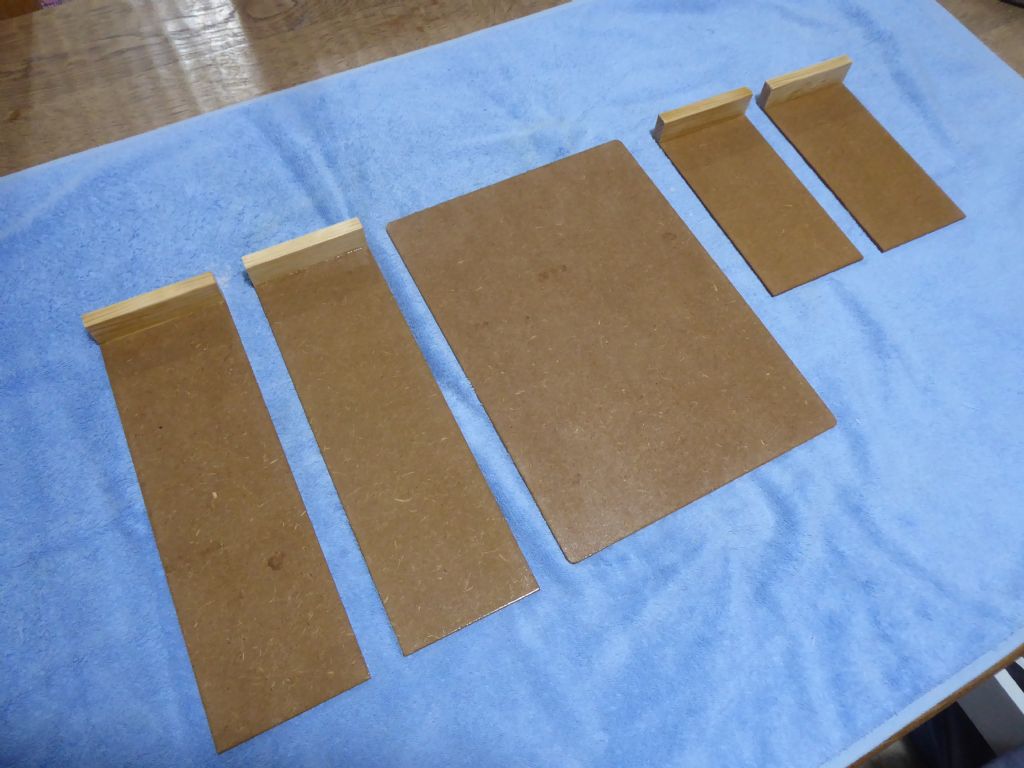
Participant@timrowe83142First I needed to make a mould box. The overall size was dictated by the largest casting I am likely to make and was settled on 300mm.
There are five pieces of 3mm MDF cut accurately into rectangles as shown above. Each of the four sides has a piece of planed pine again of rectangular cross section and accurately planed square and with the ends cut square to match the width of the MDF.
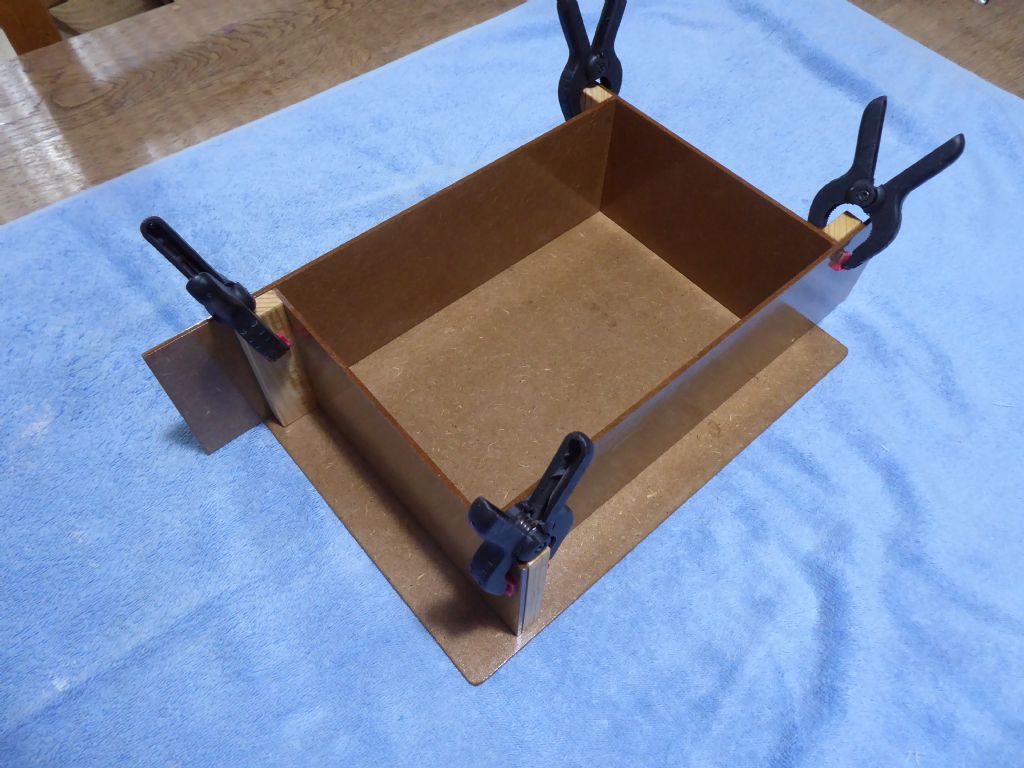
Here the mould is demonstrated in a large volume format.
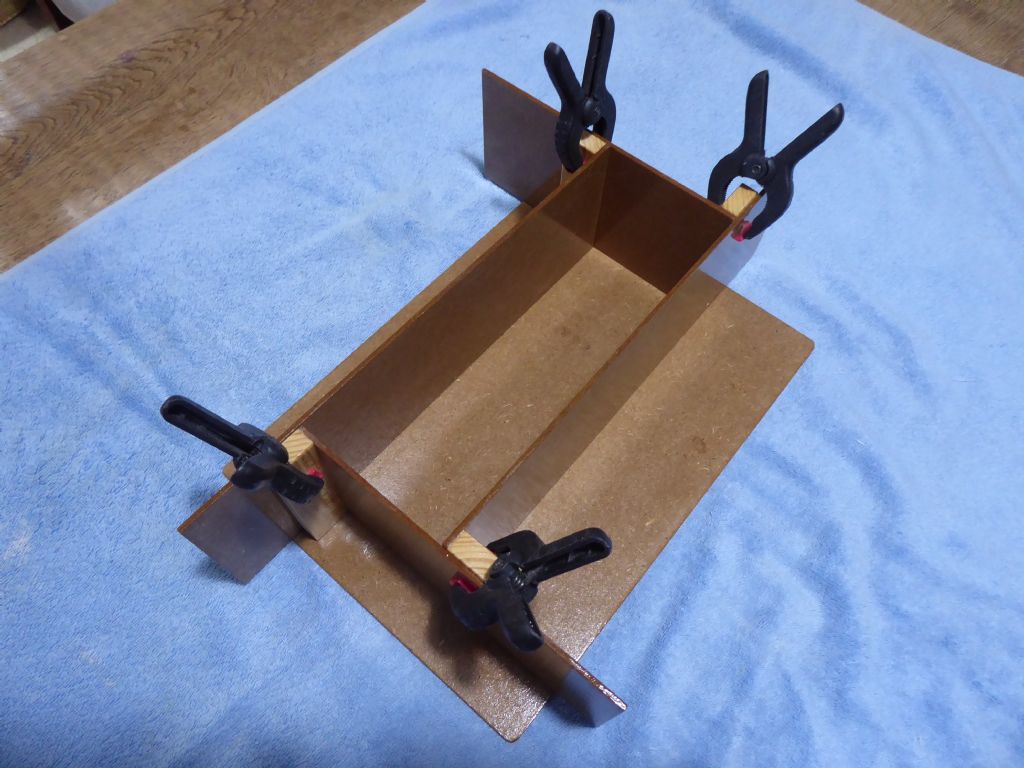
And here with the sides moved in to better suit the shape of the keel. The MDF has multiple coats of varnish to thorough seal the material. If MDF gets wet it is no longer MDF! The varnish was then flattened with 320 grit to a matt finish which holds the wax release much better. Here you can see how the clamps hold everything together and the square cuts hold all the parts in good alignment.
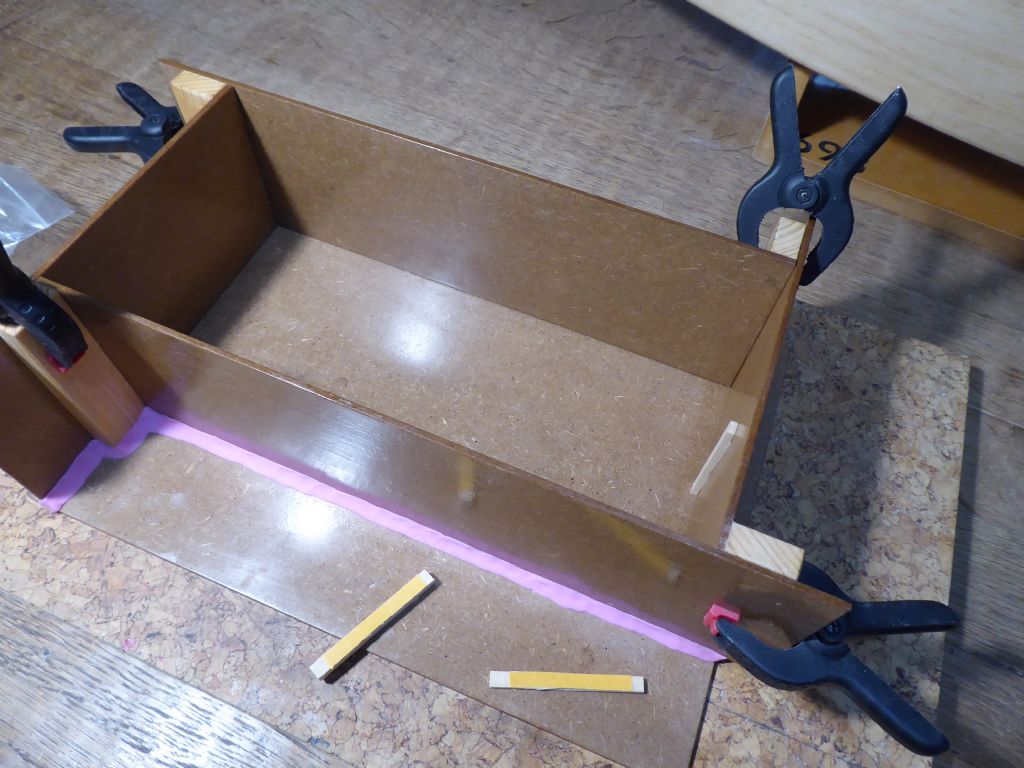
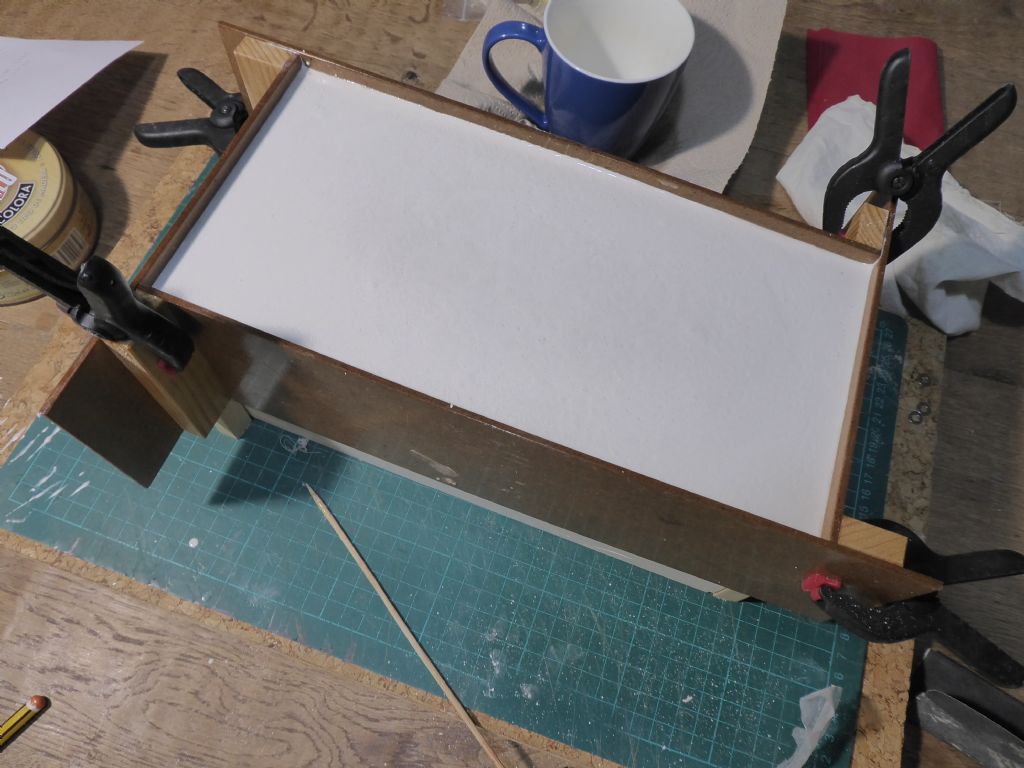
The plaster of Paris need to be made fairly runny. Double cream consistency seems to work quite well and it is always a bit a compromise between its ability to flow and ultimate strength. If made too thin it may crumble and break too easily. The pink stuff is Plasticene (Plastilina in Spanish) and is rolled out by hand and pushed into a fillet between the sides of the mould and the base board. This stops any leaks that might occur and also nicely retains the sides to stop them sliding around while the patter is loaded and the pouring of the plaster.
In use the sides are removed from the plaster as soon as the material is stable. Big blocks of plaster of Paris generate a fair amount of heat when curing and the moisture could find its way into any pores in the MDF despite the varnishing and waxing. Incredible but somehow is does. Removing the mould box early also means that any stray plaster can be washed off easily with water and any residues of Plasticene come off with a fresh coat of wax making them ready for storage and the next use, well protected.
Next step to place the pattern.
Tim R
12 March 2019 at 13:33 #81442Tim Rowe
Participant@timrowe83142A generous coat of wax was first put on the pattern. I am using ordinary furniture polish from a tin as this is what I have to hand. This is a low tech situation because I am not too bothered if the wax has any silicones. That would be a complete no-no for GRP moulding where I would use the best mould release wax I can get (Favourite is Mirroglaze).
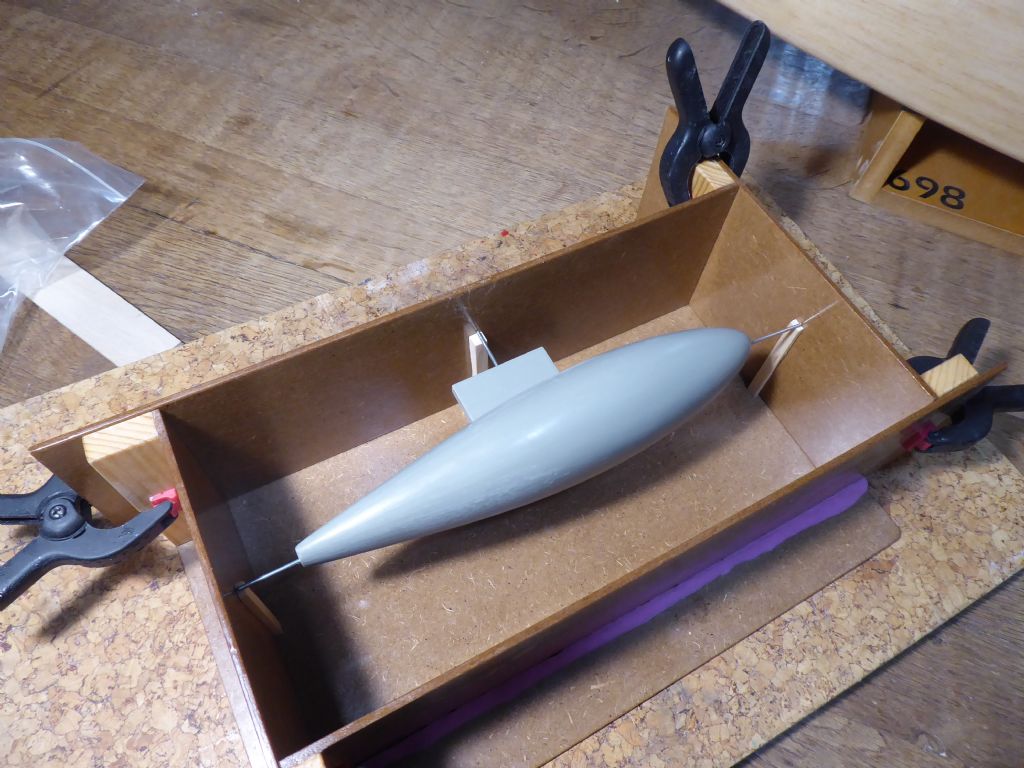
My early working days were in a foundry so I am going the whole hog and making a closed mould with the slot cast in plate to accept the aluminium alloy fin. Technically the MDF box is called a flask and here I am setting up for the bottom part of the mould which is called the drag.
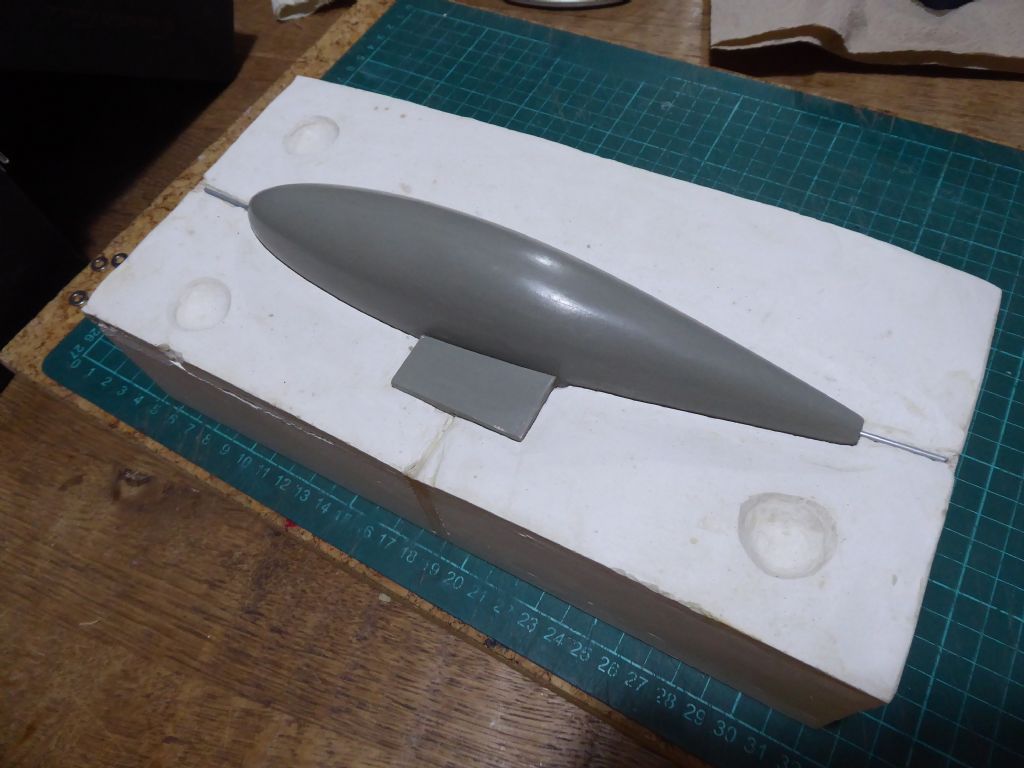
1.5mm piano wire was drilled and pushed into the bulb pattern at the front and rear exactly on the centerline. A third pin was pushed into the rectangular core print at the top of the photo. Thin strips of balsa were then stuck to the flask sides using double sided tape which sticks adequate to the waxed surface. The length of the strips was worked out to give a decent thickness of plaster under the pattern. The pattern is now suspended in the flask and to stop it floating on the plaster I put a weighted strip across the top that was shimmed out to just touch the top of the pattern.
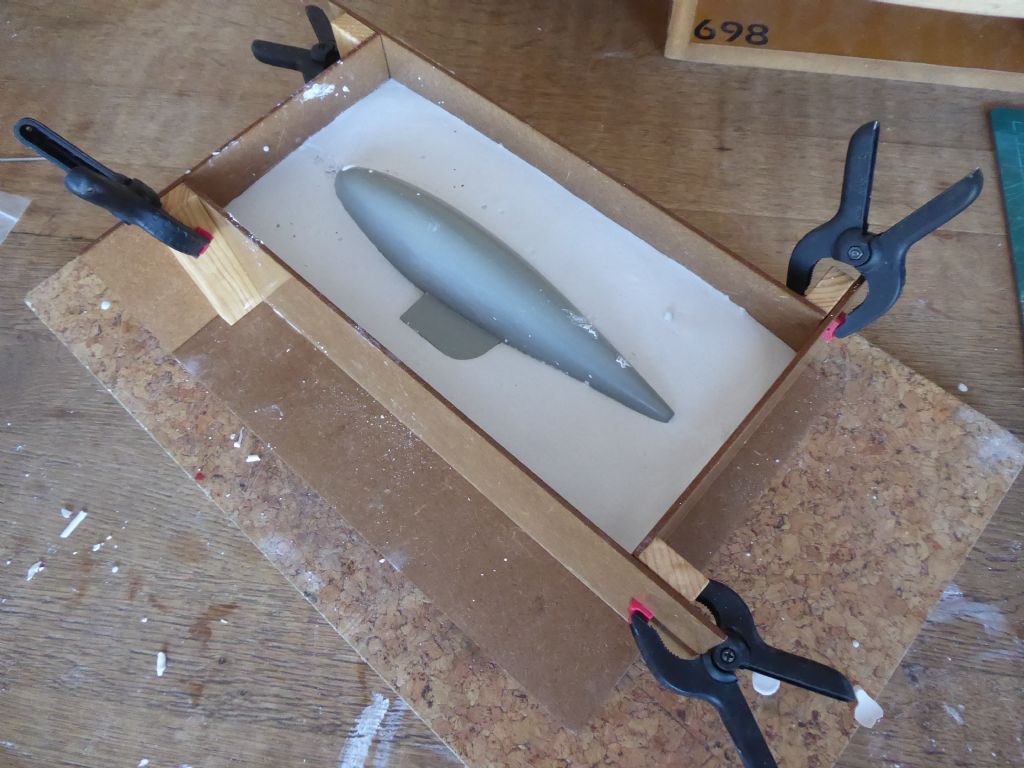
Here the plaster has been poured and the weighted strip was removed as soon as the plaster has set slightly. You will see that the plaster has been filled slightly above the centerline. This is important.
As soon as possible the flask was dismantled and at this stage the plaster is quite green and can be scraped quite easily.
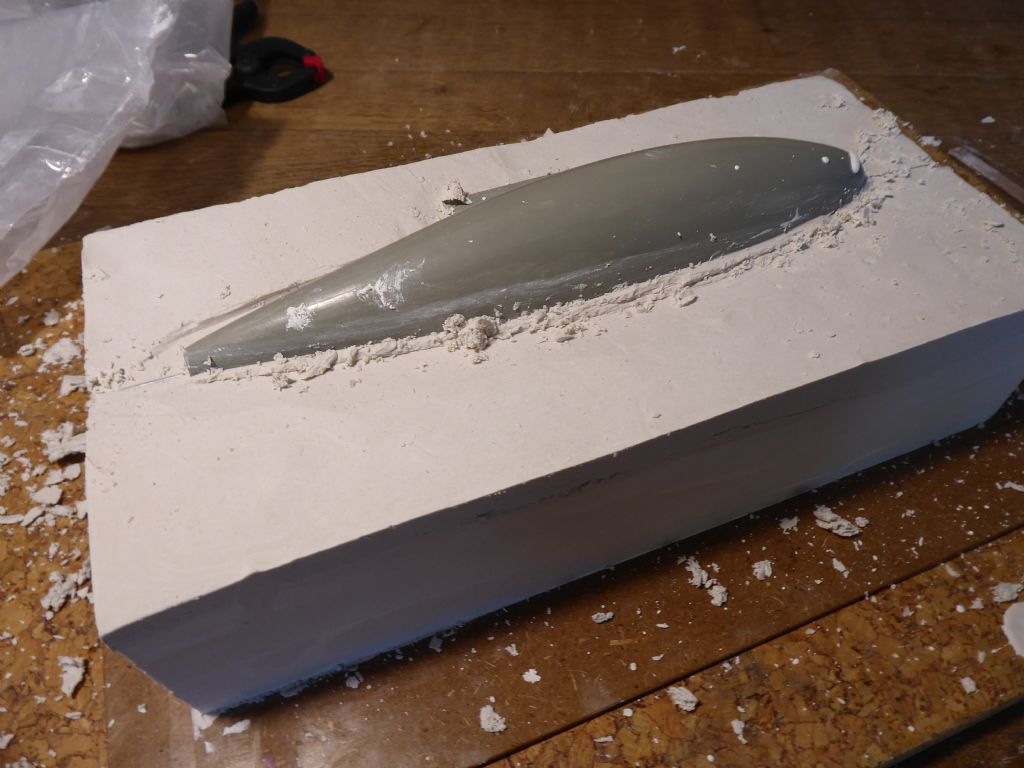
Here, using clay modelling tools I am carefully scraping away the excess plaster to get back down to the centerline. The steel pins act as a useful guide. If the flask was initially underfilled this would be a problem as without adding material, the top half of the mould would be undercut trapping the pattern in place.
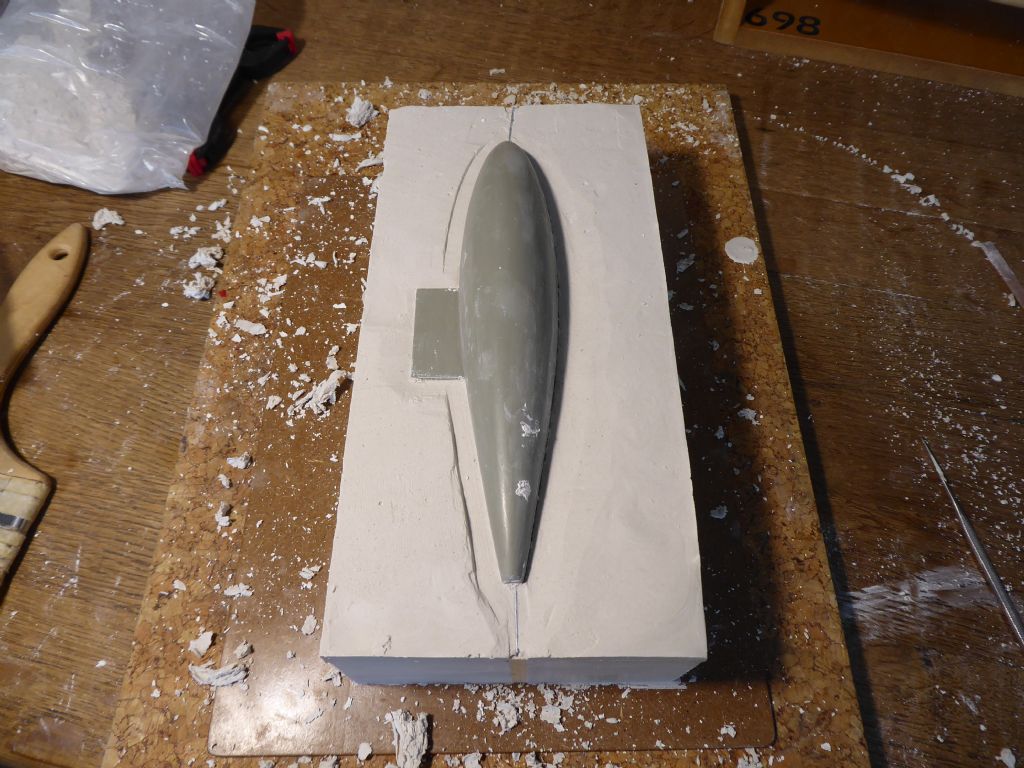
It is only necessary to get down to the centerline in the immediate vicinity of the pattern and the joint face does not have to be perfectly flat. In fact having some irregularity will help the top half to register correctly when the mould is finally assembled.
Here I am down to the centerline in a band about 10mm away from the pattern and the only additional work on this detail was to smooth out the hard line.
It pays to release the pattern as soon as possible as the plaster is still very damp and I don't want this to penetrate into the pattern making it swell and stick. It also makes cleaning the pattern much easier.
If the pattern is accurate with no undercuts and well waxed it should pop out very easily and then put to one side while the mould dries. Dry as a bone it has to be.
I poured this one on Sunday evening and the weight was slightly over the range of my scale at 3.5 kg. This morning it weighs 2.54 kg so nearly a litre of water has evaporated out already! Pretty amazing really.
Tim R
15 March 2019 at 16:02 #81480 Ray Wood 3Participant@raywood3
Hi Tim
Your precision work in preparation for the lead casting is amazing, I'm ashamed to say I'm fairly rough and ready with my keel bulbs, but that's why they invented P38 filler ? I guess you have handed moulds so you can cast the whole weight in one go, I normally cast 2 halves and bolt them together through the fin as with Wild Duck.
My 2 motor boats and the fishing boat are nearly complete so the Comanche 32 cat is next on the list

Regards Ray
15 March 2019 at 17:03 #81481Tim Rowe
Participant@timrowe83142Thank you for your comment Ray.
Time will tell but yes, it is a closed mould and I hope to get it quite accurate. The closed mould should get over the problem of shrinkage that occurs on the top of an open mould but I have used plenty of P38 in my time.
In the moulding shop some years ago I was building patterns and moulds for GRP work. Everyone had a nickname as you do in a workplace. The nickname for filler was Tet. My nickname as a result became Sir Tetley Tim and nothing to do with tea bags. I was lucky with my nick. Some did not get off so lightly!!
Looking forward to seeing the Cat.
Tim R
17 March 2019 at 13:56 #81506Tim Rowe
Participant@timrowe83142More progress on the keel casting.
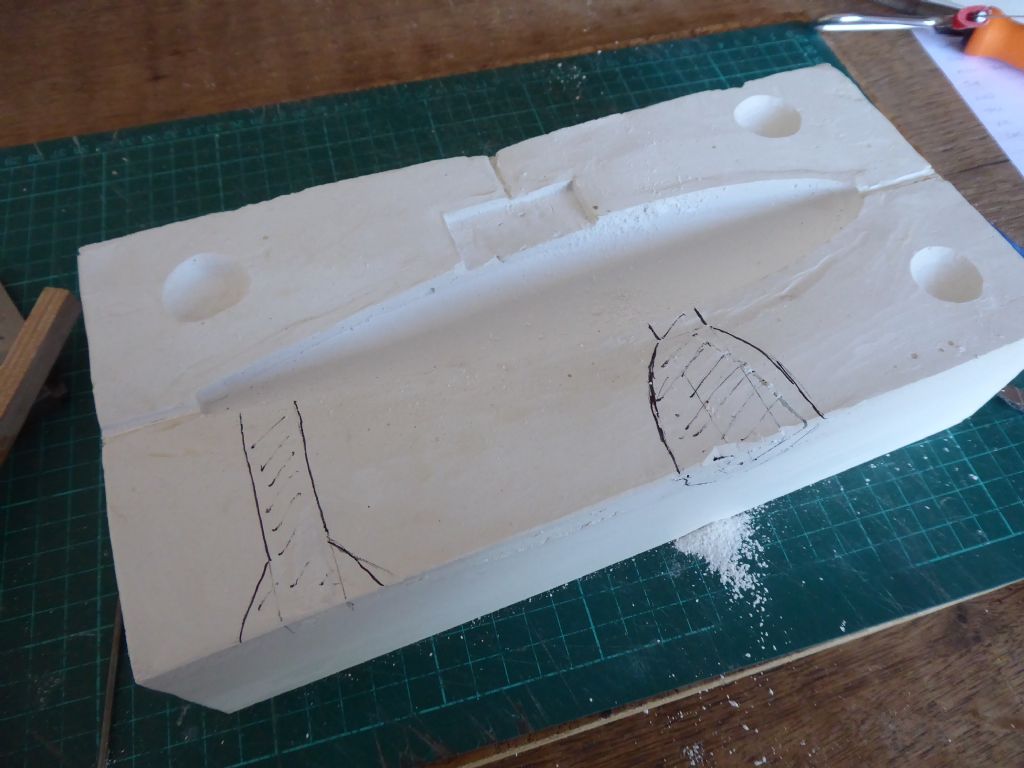
I have scooped out three hemispheres and these will turn into pegs on the top half of the mould (called the cope).
The joint face was given a generous coat of wax to ensure clean separation.
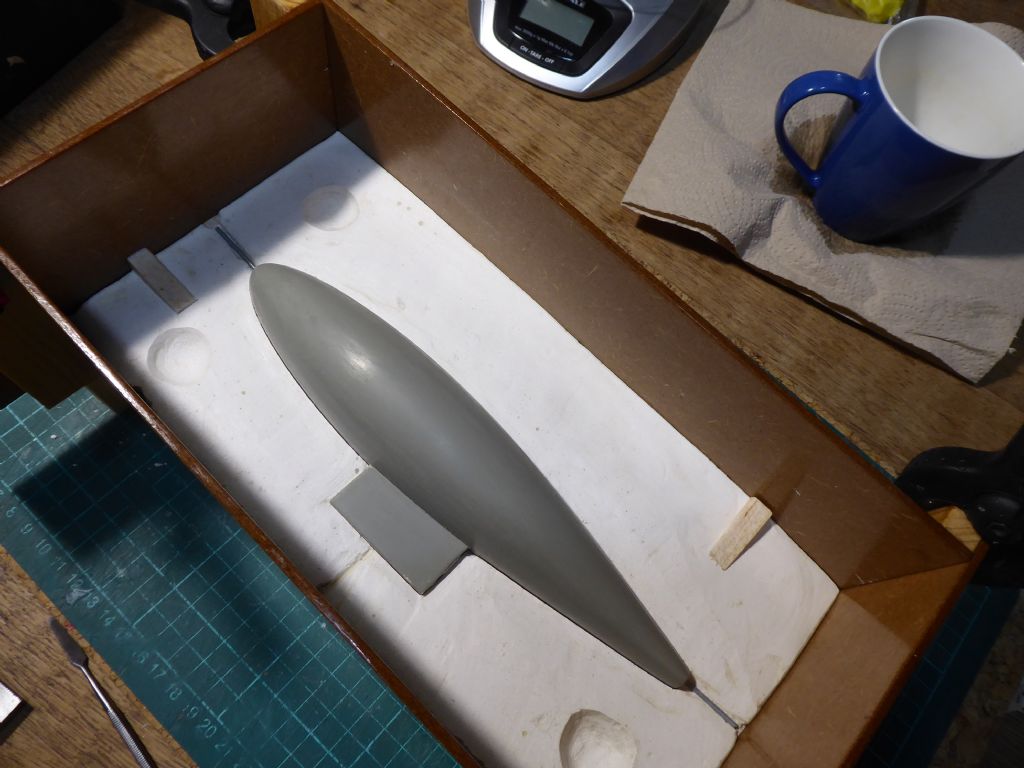
Now the pattern goes back in and the exposed part given another coat of wax for luck. The pins are retained at the fore and aft end but no longer necessary at the core print.
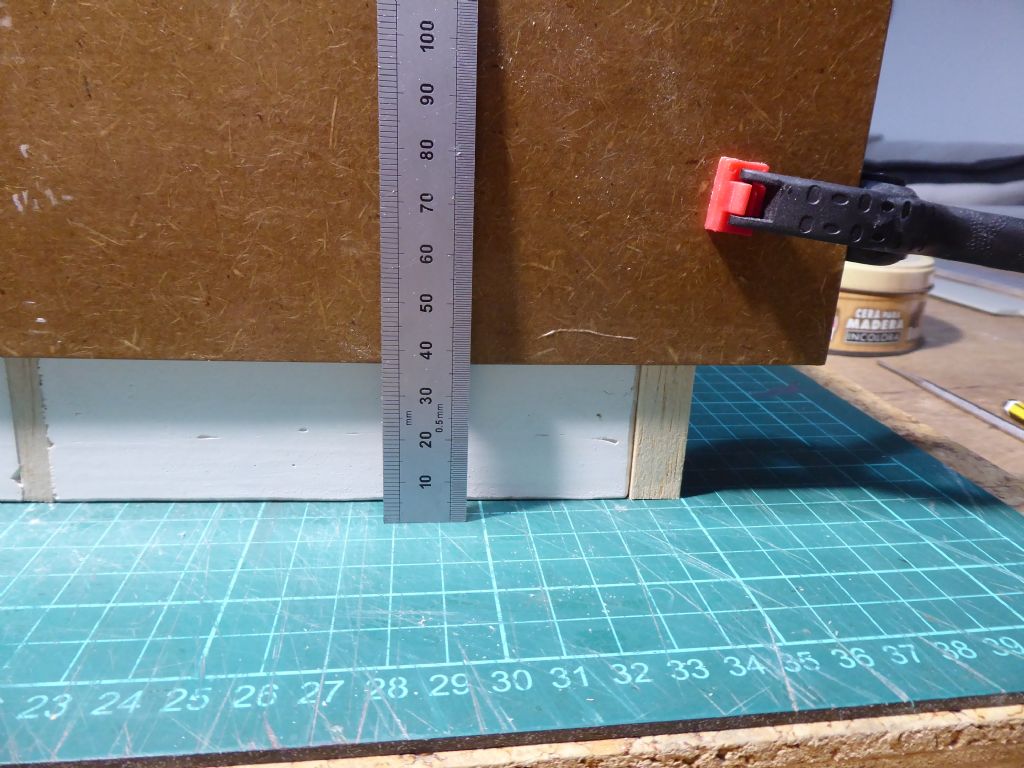
The MDF flask has to be jacked up to give a similar thickness to the cope.
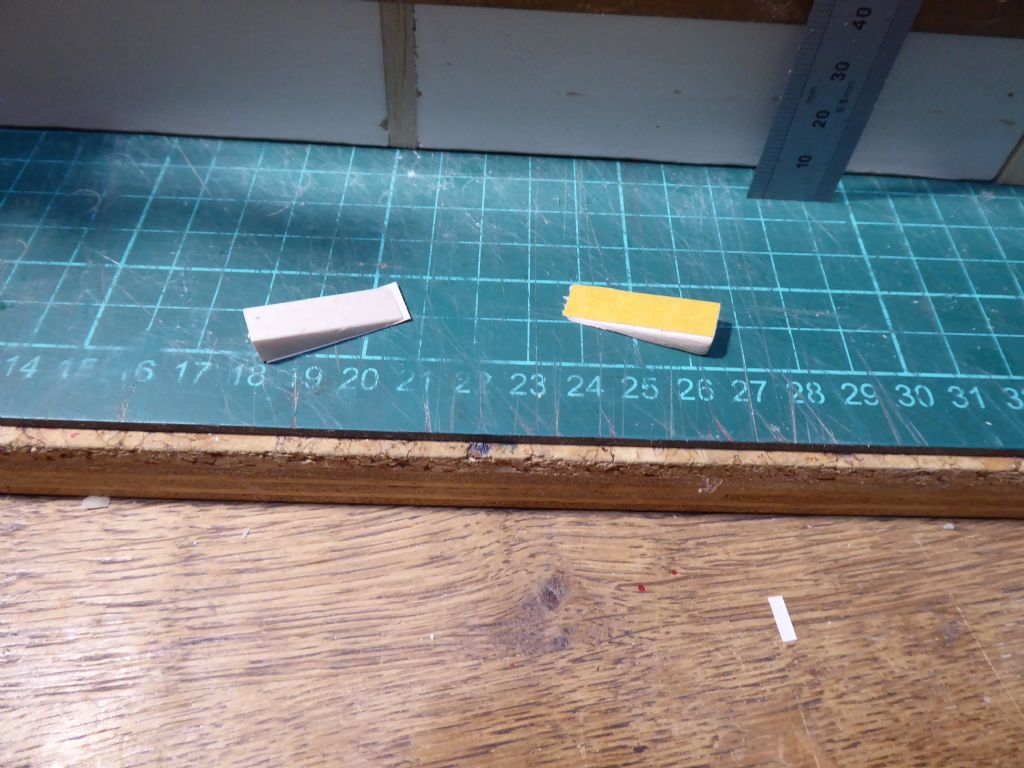
And a couple of soft balsa wedges made to give me a gap to work on if the two halves do want to stick.
The wedges stuck in place with some double sided tape.
And the cope is poured. This is much easier than the first part of the mould and any air bubbles tend to float away from the pattern. Even so it pays to pour a small amount over the pattern first and work it around with a brush before pouring the rest.
The two parts separated easily so the wedges weren't needed but better safe than sorry. Here I have marked out the runner and the riser. The runner is where the metal is introduced and the riser on the right is bigger and provides a reservoir of molten lead which feeds the casting while it solidifies. The runners and riser were marked out on the cope and drag and cut out using scrapes and course grit on a stick.
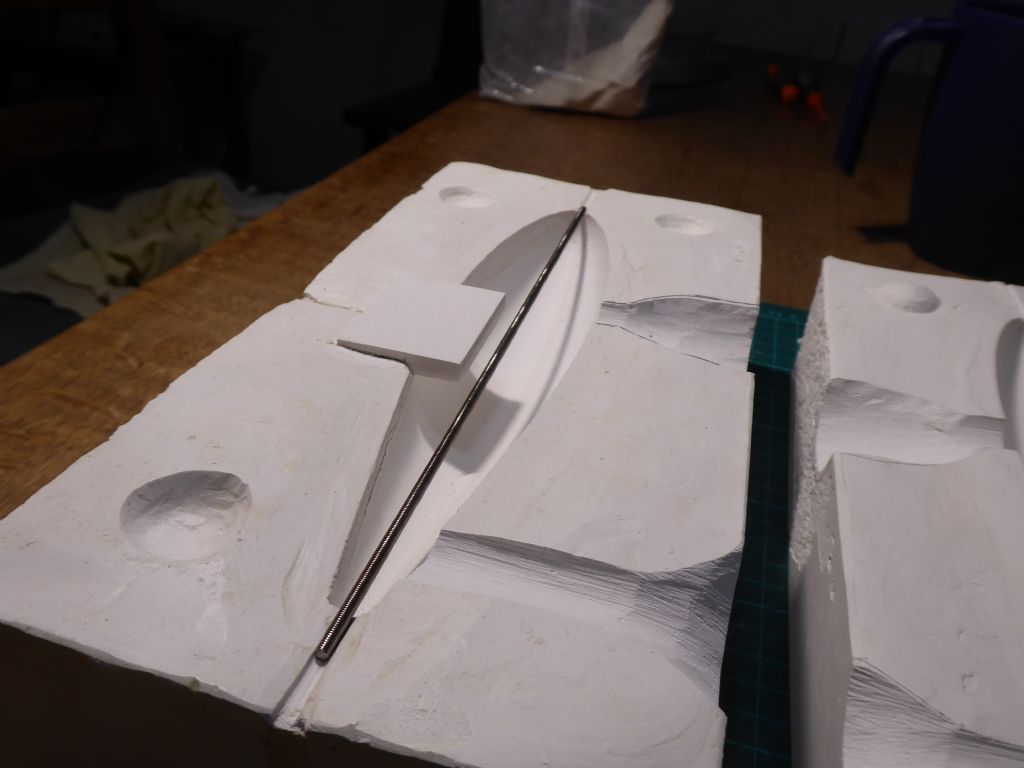
Here the mould is being assembled. The core is in place and this will make the slot in the bulb for the alloy fin. Saves a lot of drilling and filling. The core was cut out of a solid piece of plaster moulded in a small Pyrex dish (it releases easily) and sanded to be a good fit in the core print. Casting like this means I do not need a taper on the core. I also reckoned that the tongue of the core would crack during casting (it did) and therefore rather than causing a problem with the mould, I only need to cut out a new core if I make another keel.
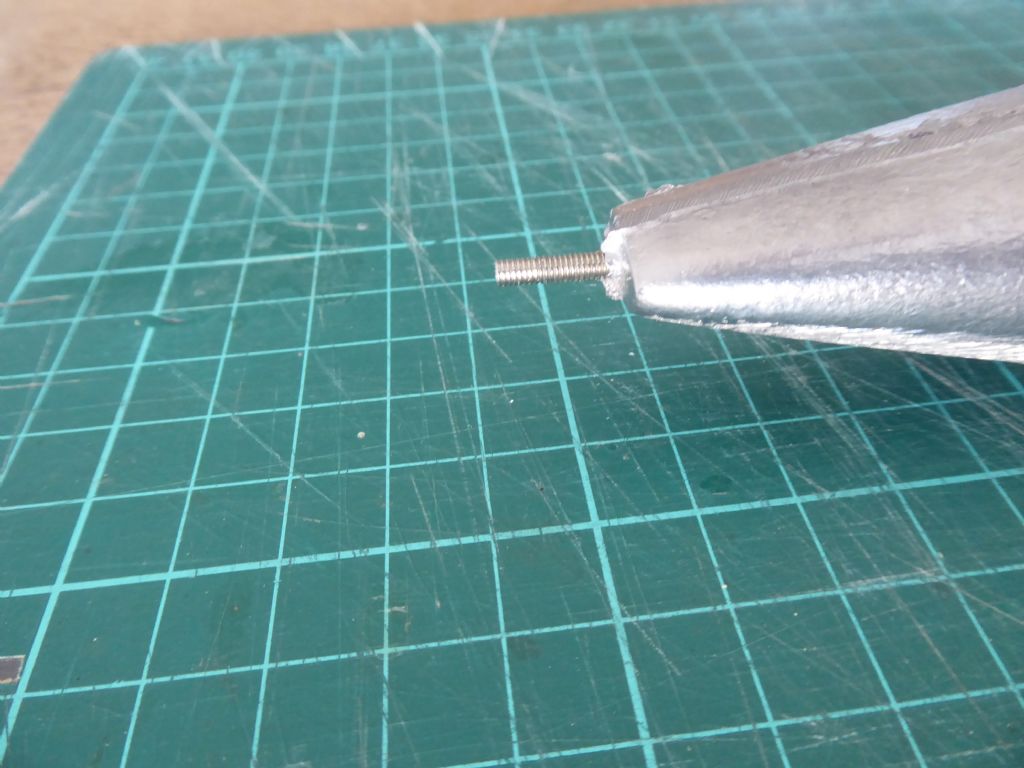
The stud is M3 Stainless steel. As lead is not very strong by itself, this will really stiffen up the lead particularly at the aft end where it tapers to a point.
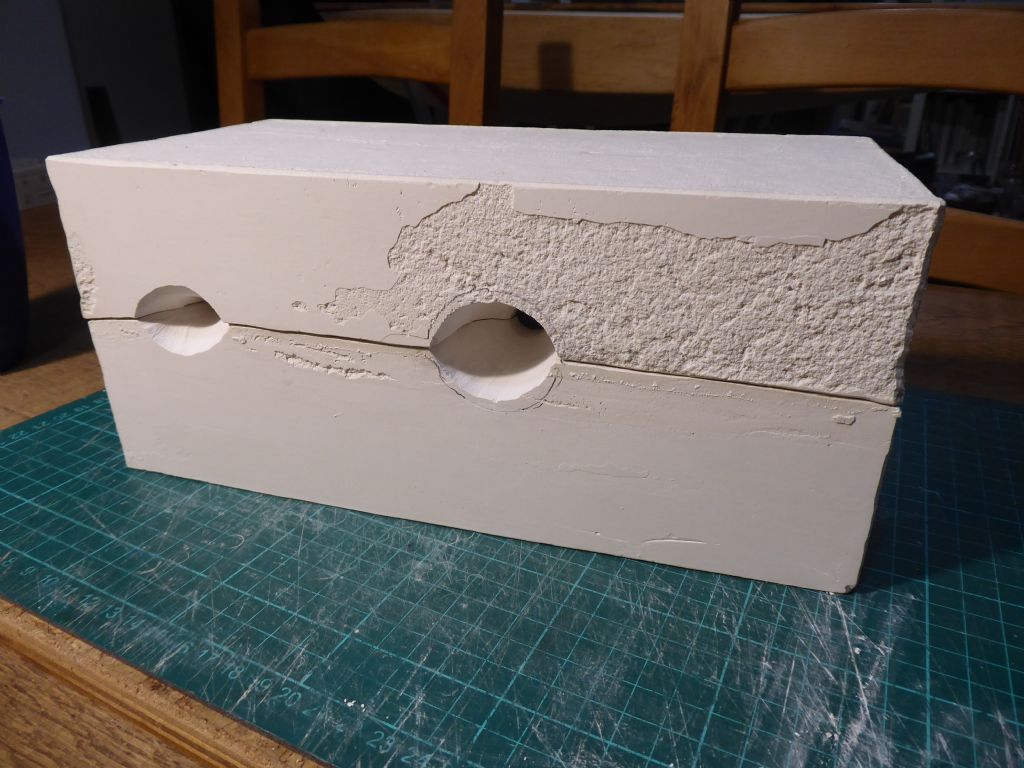
Here the mould is assembled showing the runner (left) and the riser (right). Obviously the mould is lying on its side and these will be on the top for pouring and the two halves lightly clamped.
Fingers crossed then.
Tim R
18 March 2019 at 08:08 #81518Tim Rowe
Participant@timrowe83142All the usual precautions taken when handling molten metal and both hands needed so no photos.
The mould was pre-heated in the oven (full permission granted) by gradually brining up the temperature to max 250 degrees C. The gradual rise in temperature in steps over about an hour was to avoid thermal shock (the plaster is quite string but very brittle) and also to give time for any moisture brought to the surface to boil off. The other positive effects of heating the mould are reduced risk of cold shuts. ie the metal solidifying before reaching the far corners and a vastly improved surface finish. The other technique to prevent cold shuts is to put the runner where the metal is introduced at the thinner end of the casting. This keeps the thin end hot and works very well.
I am always conscious of the possibility that the mould may crack and even though clamped together, the lead could run out all over the place. Not good, so I place moulds in an old roasting dish that would contain the spill if it happened.
Finally don't be tempted to open the mould too early. 2kg + of lead wrapped in insulating plaster takes a fair while o cool down so you don't want to have a casting with a solid shell and liquid core bursting on you. Secondly, as the lead cools it will shrink a bit so releasing should be fine. In fact it should fall out.
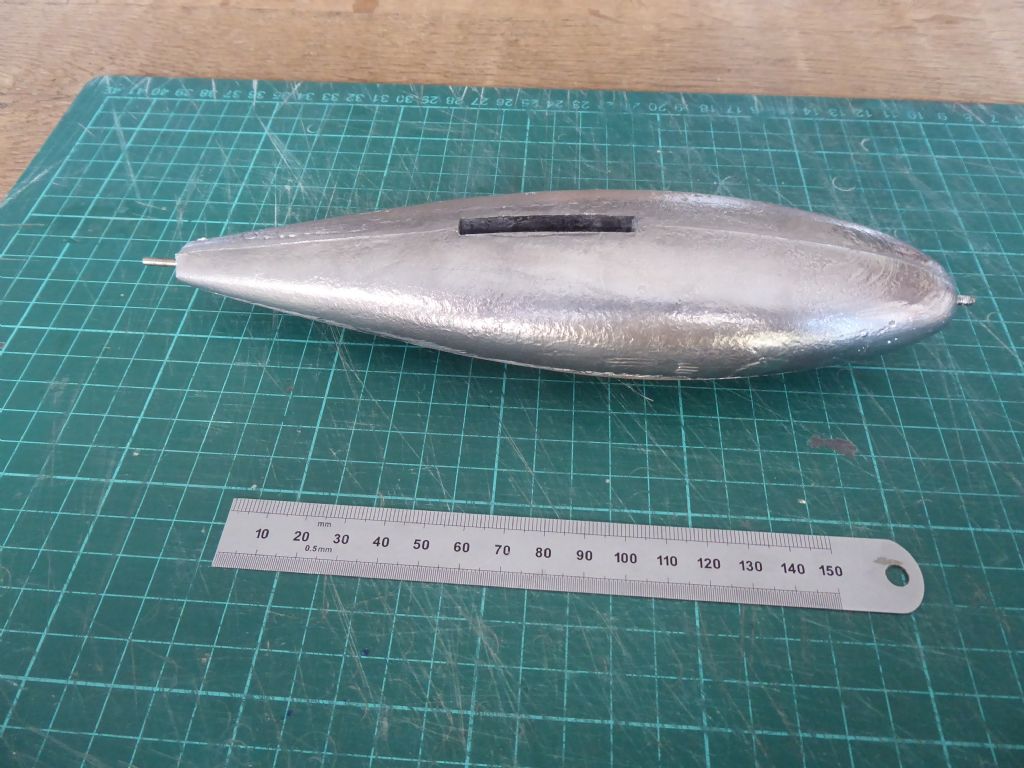
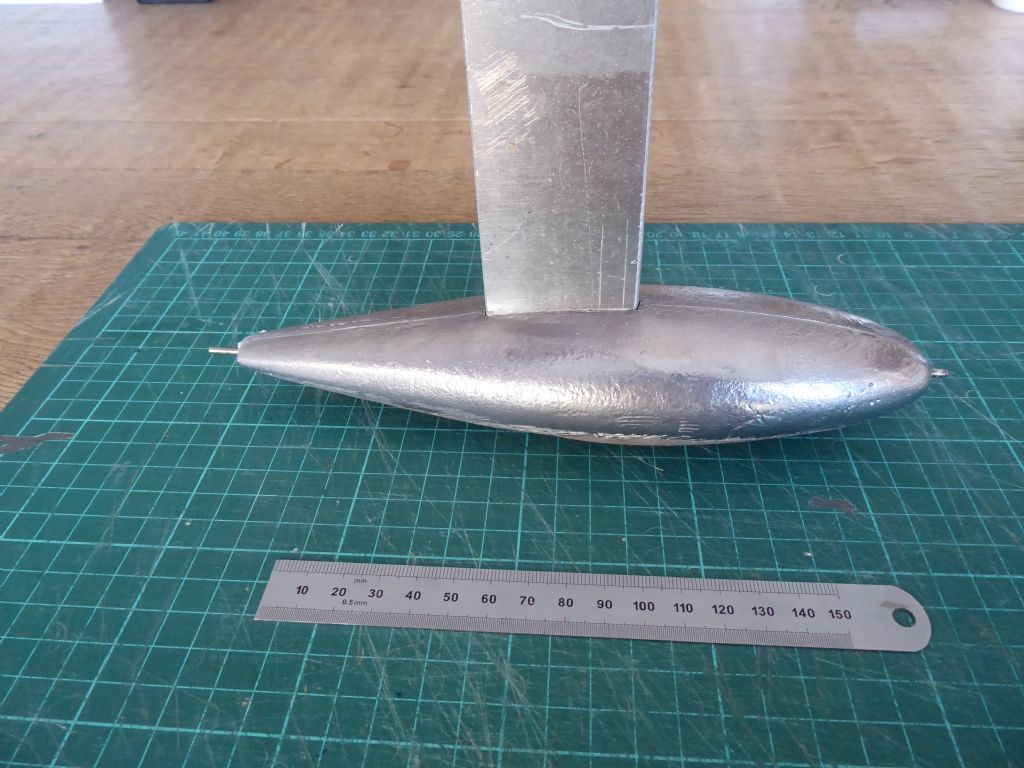
Finally, after quite a lot of work I have my bulb. The long journey was worth it and the lead from the original keel was used so reincarnated in a sense.
The cored slot worked a treat and when the small amount of flash was removed the allot fin dropped in a treat.
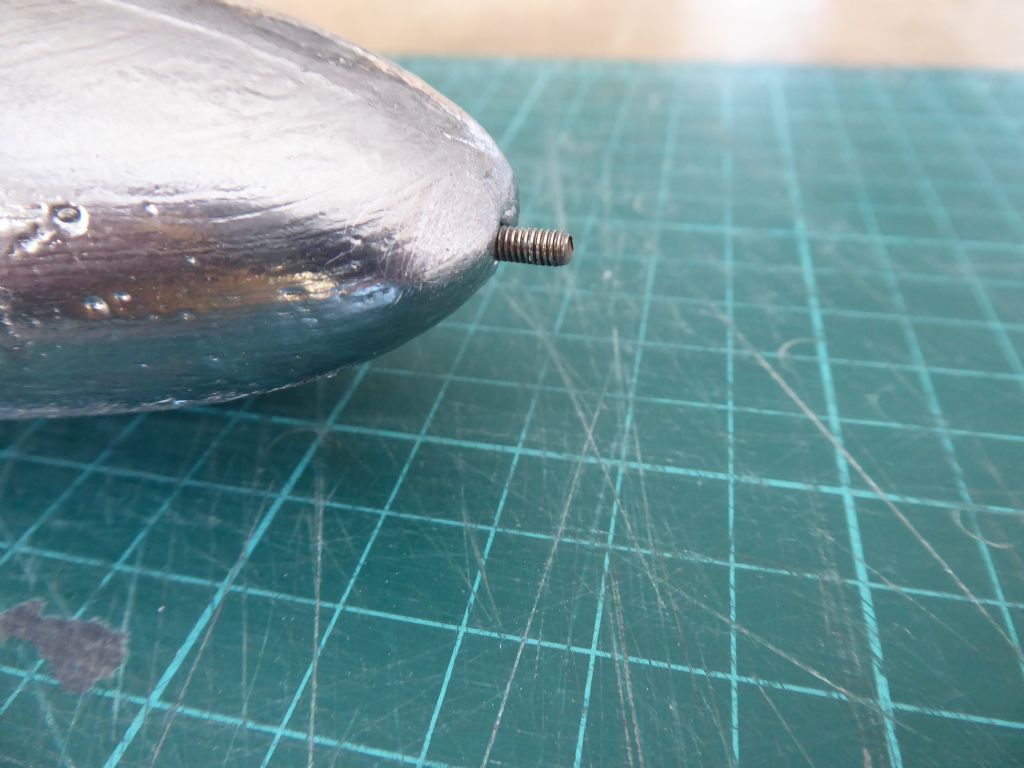
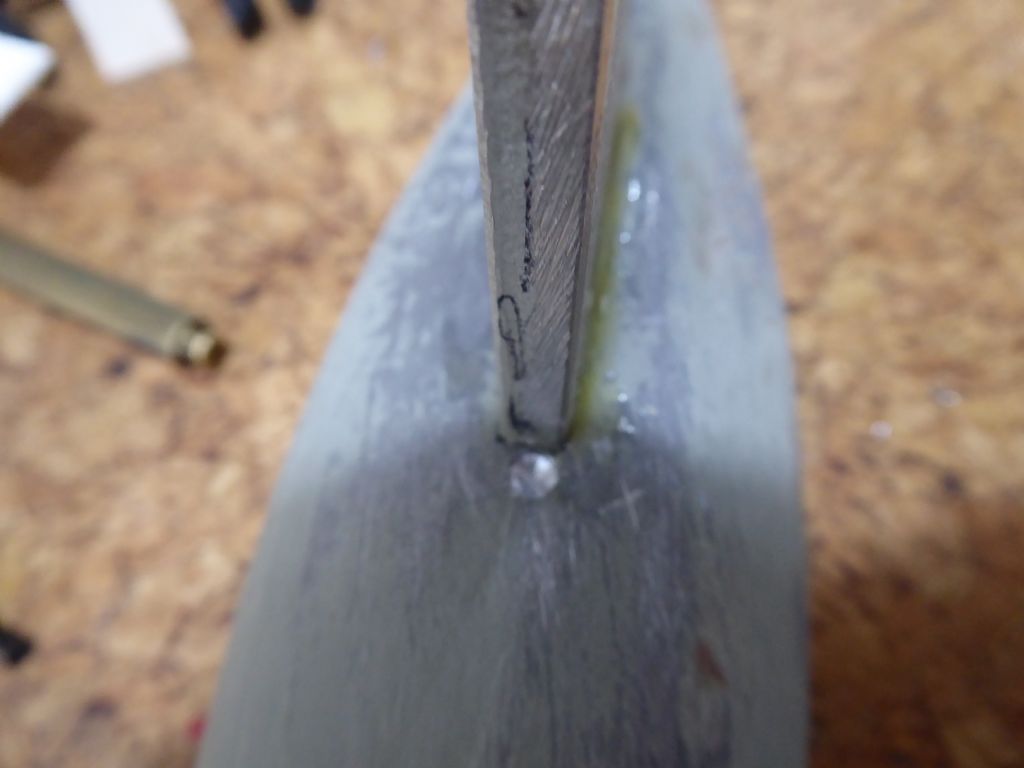
This pip of the stainless steel studding had to project into the mould to secure it while pouring and will be cut off and filed smooth.
At the tail end, rather than trying to cast the lead into a fine point it will be squared off (the angles were there to make sure it released) and I will make a brass tip, drilled and tapped for M3 and screwed on to make a hard point less vulnerable to damage. The brass will be retained with Loctite and then filed to the finished profile.
Finally the remnant of the old Tufnol keel was liberated by melting off the lead. There was only about 15mm of engagement but certainly the Araldite of the day did its job brilliantly. I won't bother using a bolt to fix the bulb to the alloy, just epoxy.
Tim R
18 March 2019 at 09:03 #81520 Chris FellowsParticipant@chrisfellows72943
Certainly worth the effort Tim, lovely job.
Chris
18 March 2019 at 17:17 #81534Tim Rowe
Participant@timrowe83142Thanks Chris.
I seem to have spent a lot of time off the boat and with this out of the way I can make some more progress on the boat itself.
Up to now I have been surprisingly one track (for me). I have lots of other projects staring at me and I am feeling the temptation. Quite often at this stage in a long build I look for a quickie, perhaps like a small aeroplane. There is some work to do on my IOM so maybe that will be a suitable diversion and I have half a eye on Ray's Wild Duck plan which he kindly gave me.
I am following with interest your numerous Fairey builds.
Tim R
18 March 2019 at 19:49 #81541 Ray Wood 3Participant@raywood3
Hi Tim,
That is far too pretty to get it wet 😀 are you going to cross drill and pin the bulb to the fin ? Is it good practice to fair the bulb into the fin from a hydro dynamic view for going faster ?? I do it thinking of a wing root fairing, but is it right !
Regards Ray
18 March 2019 at 20:31 #81543Tim Rowe
Participant@timrowe83142Hi Ray
Only the fish will see it when it gets wet. That is if they can keep up!!

I have fixed the bulb to the fin with epoxy only. It is quite a neat fit and going by the trouble I had (and failed) to get the old Tufnol fin out of the old bulb this will be going nowhere. I will of course eat my hat and confess if I leave the lead at the bottom of the harbor and the boat flat on its side!
You are right in the fairing. The fin will be faired where it joins with the hull and again at the join with the bulb. This is a working model and I am going for performance. The fairing will reduce drag exactly the same way as a wing root fairing and besides which, it should look good hopefully.
As we speak, the fin keel and bulb are getting married on the radiator under the auspices of Epoxy the vicar.
The next job is to increase the area because the aluminium is the structural part and will get totally encased. This part of the operation is being done by eye on the Peter Miller TLAR (That looks about right) and I think a more or less 50% increase is what I need.
Thank you for the interest.
Tim
19 March 2019 at 14:23 #81552 Ray Wood 3Participant@raywood3
Hi Tim,
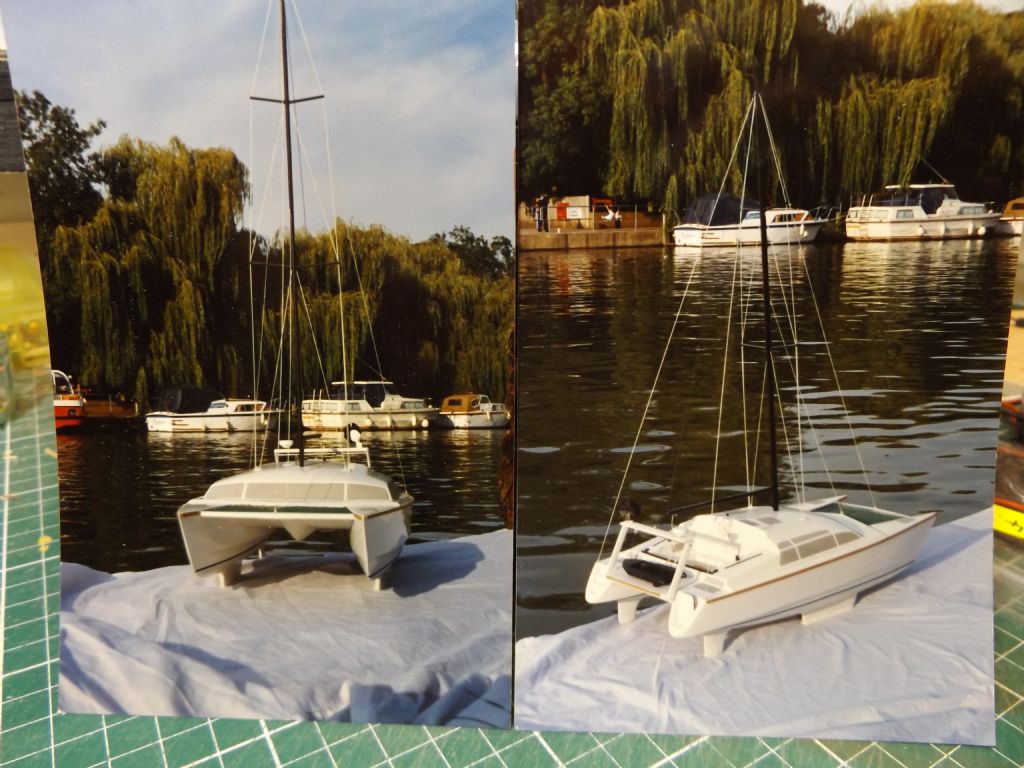
Well that didn't take long Ha Ha , this is model I made of the Comanche 32 at 3/4" to the foot, 20 years ago, for display at the Southampton Boat Show for my mate who has the fullsize moulds in his yard near me at Allington Maidstone. The re-styled updated cat never made it to the production stage, but I enjoyed making the plug for the hulls & deck / superstructure, she was then moulded in GRP and was a heavy as a brick
 Watch this space for the 32" version.19 March 2019 at 15:48 #81555
Tim Rowe
Participant@timrowe83142Hello Ray
A man with many and varied talents. The model is nice but I know it is no mean task to produce full sized plugs.
Interesting dynamics with cats re ballasting or super-light. I wonder how that translates into models? Will you have kind of slipping clutch on the sheet winch to prevent overpowering?
Will look out for your posts but don't forget to keep up with your aircraft.
Keep up the great work.
Tim R
19 March 2019 at 16:06 #81557 Ray Wood 3Participant@raywood3
Hi Tim,
Jack of all trades, master of very few
 my wife tells me the bathrooms not finished yet !! so many distractions, It looks ok to me.
Yes the making it sail, maybe the interesting part, In blue Styrofoam and depron we trust
 Oh and carbon fibre !
Regards Ray
Edited By Ray Wood 2 on 19/03/2019 16:08:00
23 March 2019 at 09:40 #81605Tim Rowe
Participant@timrowe83142The structural aluminium fin needs streamlining and a bit of an increase in area. I didn't make the aluminium at the full size as that would have meant a lot of hard work creating the profile and a lot of aluminium dust.
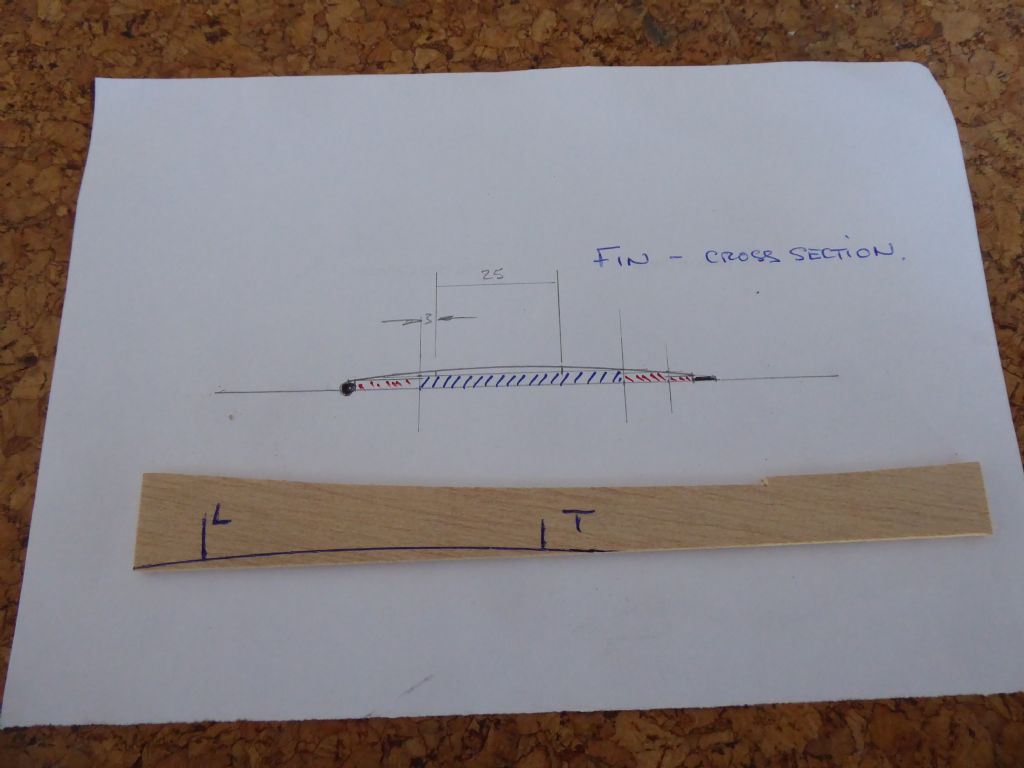
The first job was to mark out the cross section of the fin. The blue hatching is the aluminium, the red hatching are pine strips and the black bits at each end are carbon fibre. Using a suitable section of a French Curve I drew a line that touched the carbon fibre parts and just cleared the aluminium. The spaces in between will be filled.
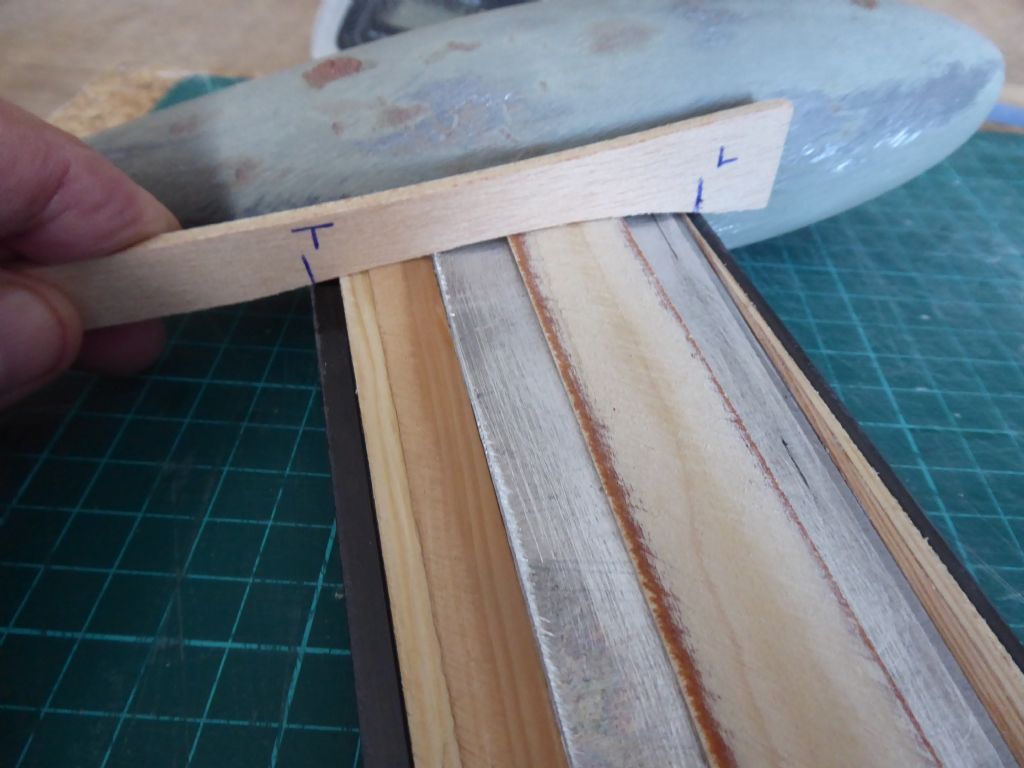
I transferred the line to a piece of scrap ply and marked the positions of the leading and trailing edges. The fin is slightly tapered so the template was made for the narrow section of the keel which means that I will stay clear of the aluminium at the widest section near the hull. The ply template now becomes a strickling board so I will be able to apply the filler generously in the first instance and scrape it while wet to the correct section.
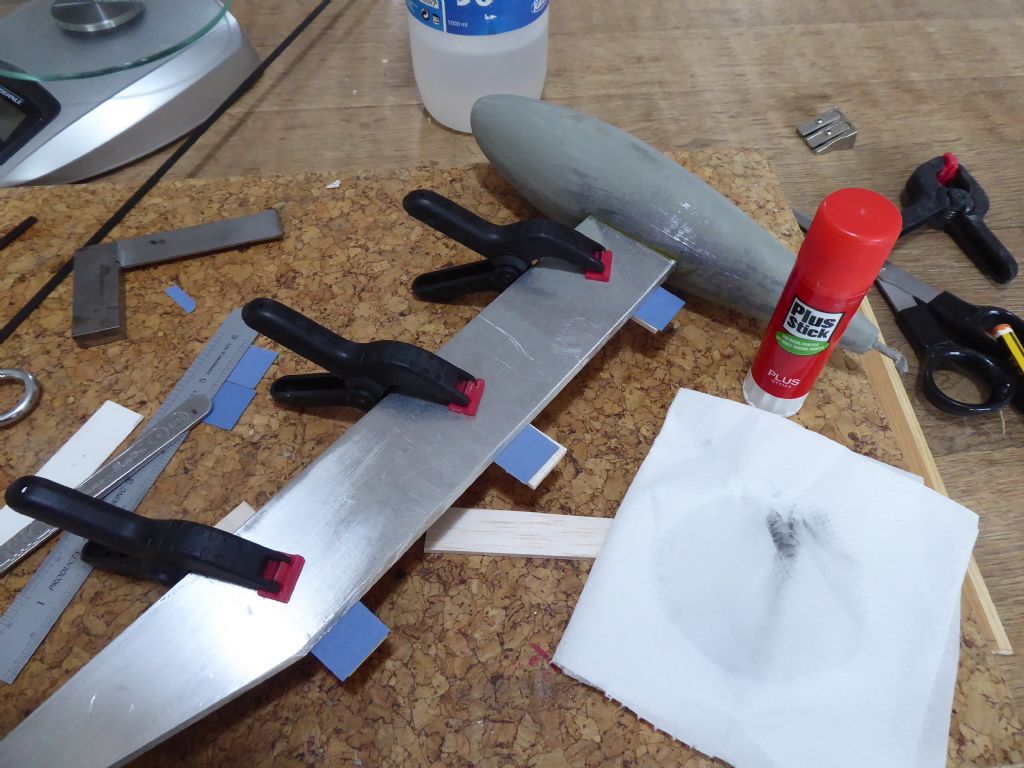
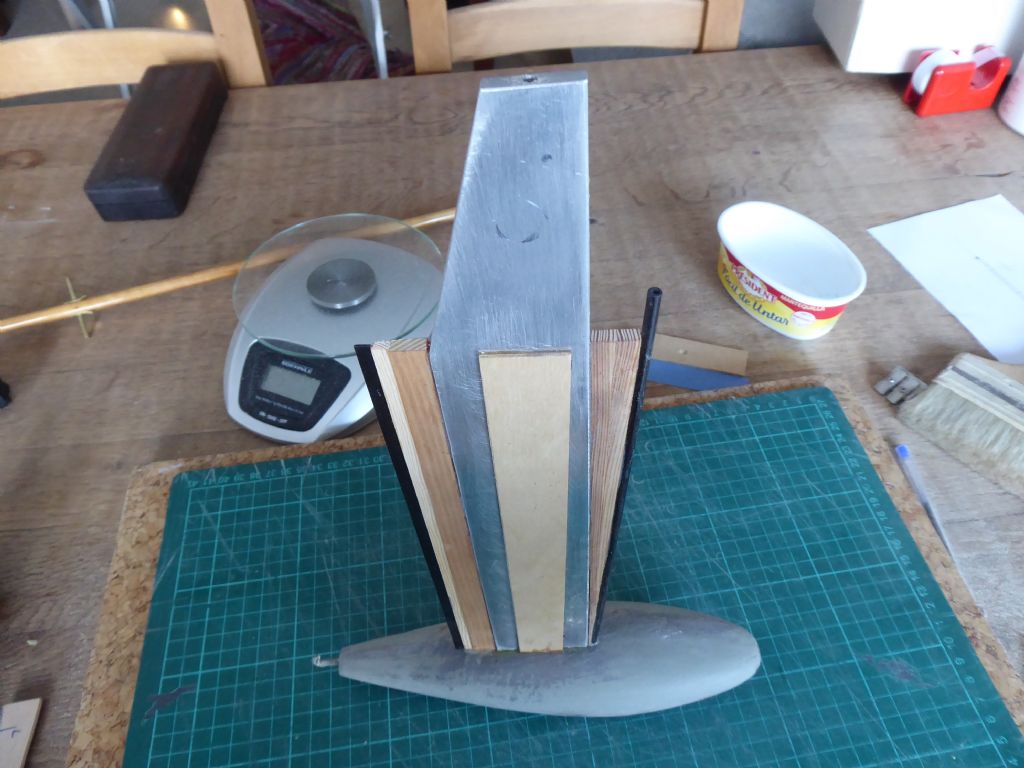
Here the fin is being prepared for the trailing edge wood. The fin is 6mm thick and the wood 5mm so I had to hunt around for something exactly 0.5 mm thick so the wood could be clamped on the centerline. Some blue card was perfect and lightly stuck in place with some Pritt Stick. The training edge of the finished fin will be vertical.
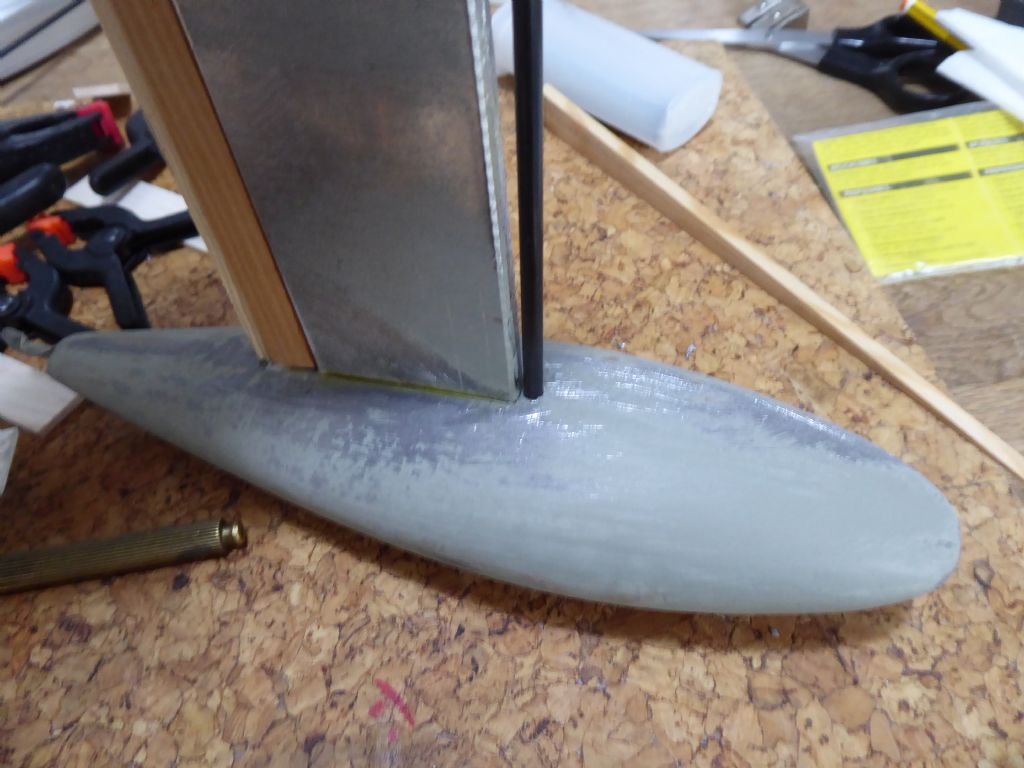
Here the trailing edge wood packing has been glued in place and at the fore end I am fixing some 4mm carbon rod that will be the round leading edge of the keel.
The bottom end of the carbon rod locates into a shallow hole drilled into the lead. This makes a useful jigging point.
More to follow.
Tim R
24 March 2019 at 10:55 #81610Tim Rowe
Participant@timrowe83142Keel continued
Here the sides are bulked out with some 1.5mm ply making the crude aerofoil with a series of steps to be blended out with filler.
Some initial sanding takes off the high spots and profiles the ply side pieces. This reduces the amount of filler that will be applied and makes the finish sanding quicker and easier. The profile gauge is used to tell me when to stop sanding.
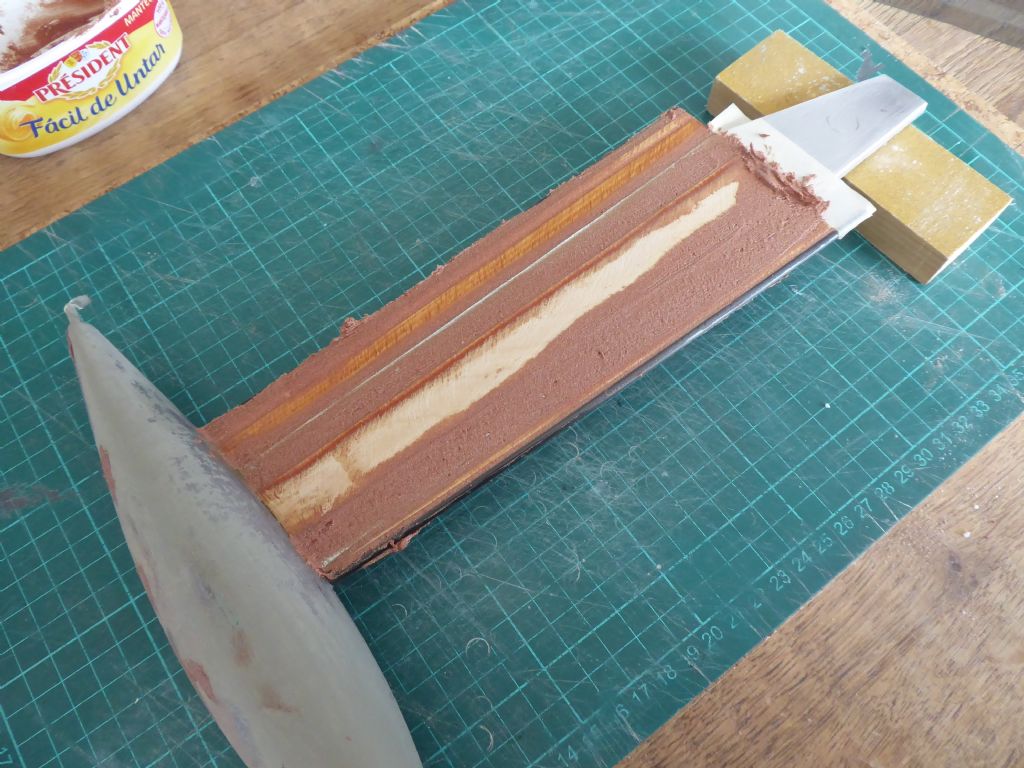
The first layer of filler has been applied and strickled off with the gauge. It will leave lines and a few hollows but that doesn't matter. It defines the basic shape and a second application of filler will fill those imperfections using the minimum amount of material. It is much easier to build the filler up in layers using less and less each time. On the third or fourth go it should only be dealing with pinholes and very minor defects. Putting on large blobs of filler makes a lot of hard work and is a recipe for loosing the desired shape.
My go-to filler is epoxy and micro balloons mixed to a stiff paste.
Tim R
31 March 2019 at 11:42 #81709Tim Rowe
Participant@timrowe83142It hasn't really taken me this long to make the keel. It's just I have not had so much time for posting.
A few more words here on sanding as there was a post a couple of weeks ago with some strong and opposed opinions. For shaping and painting I work from the rough side of a Permagrit which must be around 80 grit, then 180, 240 and finally 400. If the surface is going on to be polished this progresses to 800, 1200 and finally buffing with a compound.
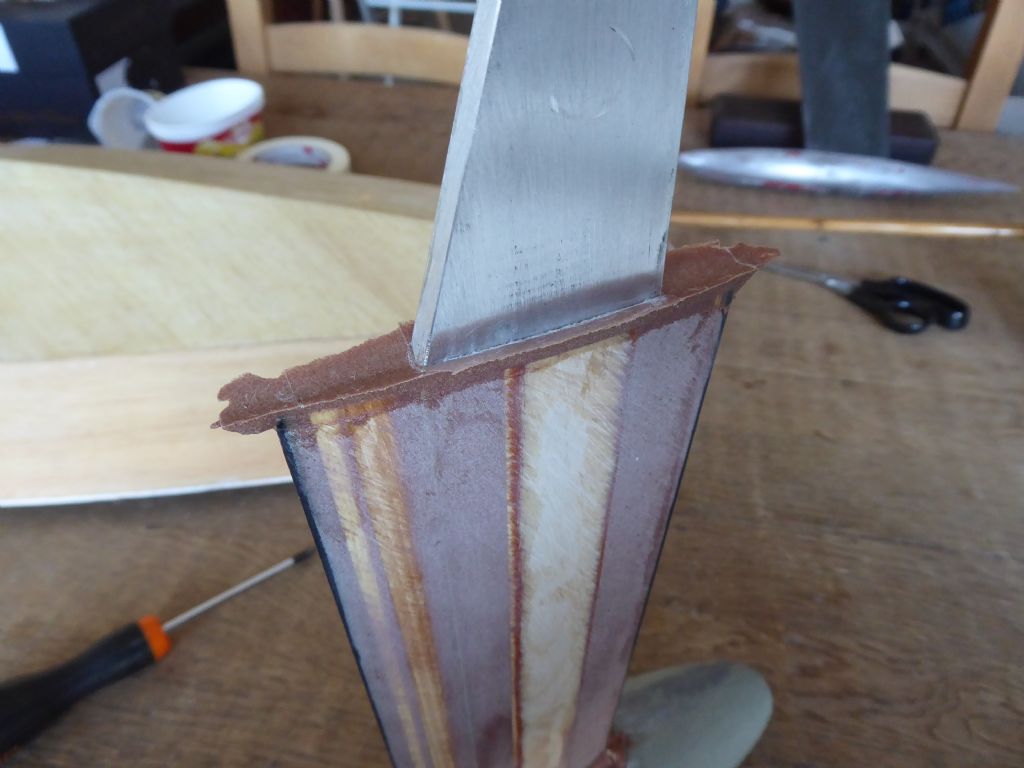
It is a mistake to start off with two fine a paper when roughing out the shape. All that tends to happen is that you follow the existing contours besides which it is overly hard word and time consuming. The coarse grits are to remove stock and get the basic profile in shape. It doesn't matter if you have or get a few low spots, you can always come back and fill them. What you don't want is high spots. In the photo above, the strickled surface was sanded with the Permagrit to remove any lumps. It has had a second application of filler in the low spots and lines from the strickling.
This is the third and final filler application and only a small amount is required which is very quickly sanded smooth. The guides for the datum are carbon fibre and lamination lines in the wood which should be straight and the same on both side of the fine. At this stage I am still using 180 grit on a block.
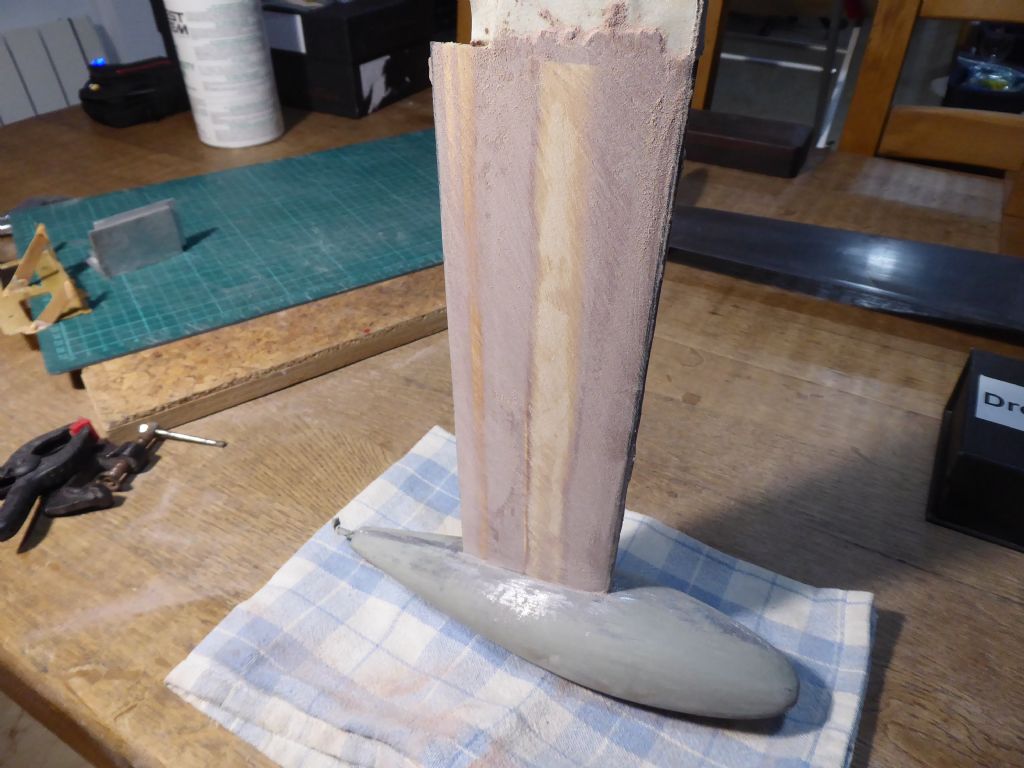
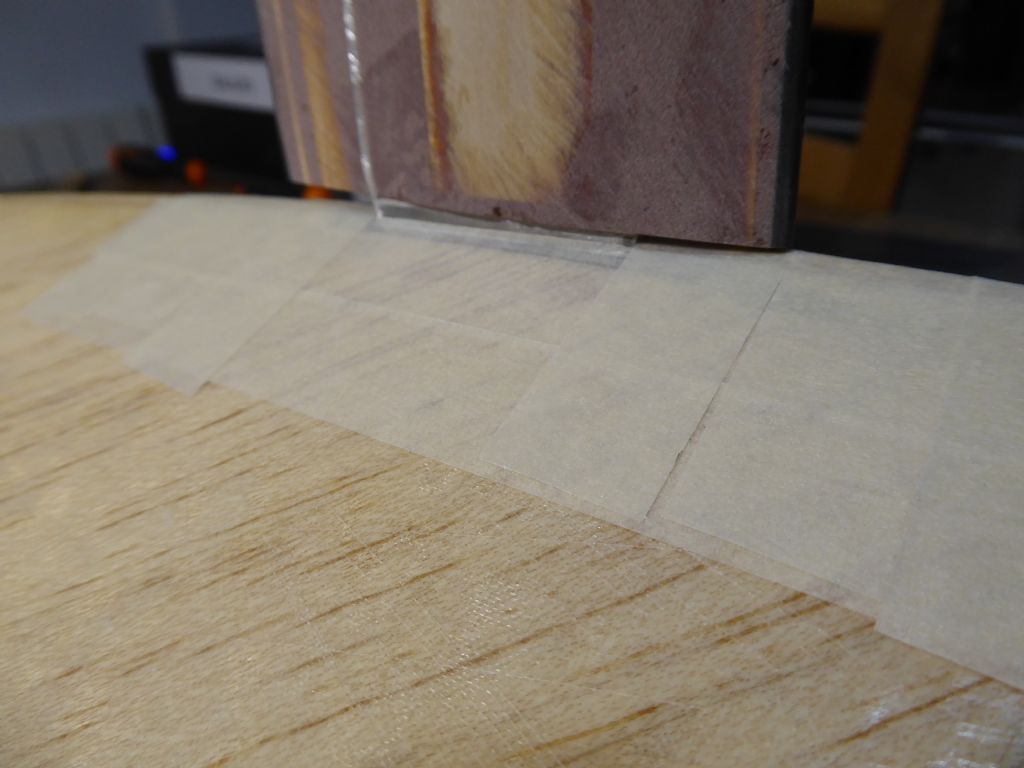
The fin is now fitted to the hull and fully tightened into the correct position. The gap is intentional in order to make a close fitting join with the hull using some more epoxy and micro-balloons. The areas around the slot is carefully masked. It would make me very unhappy to glue the fin to the hull after all this work to make it portable!
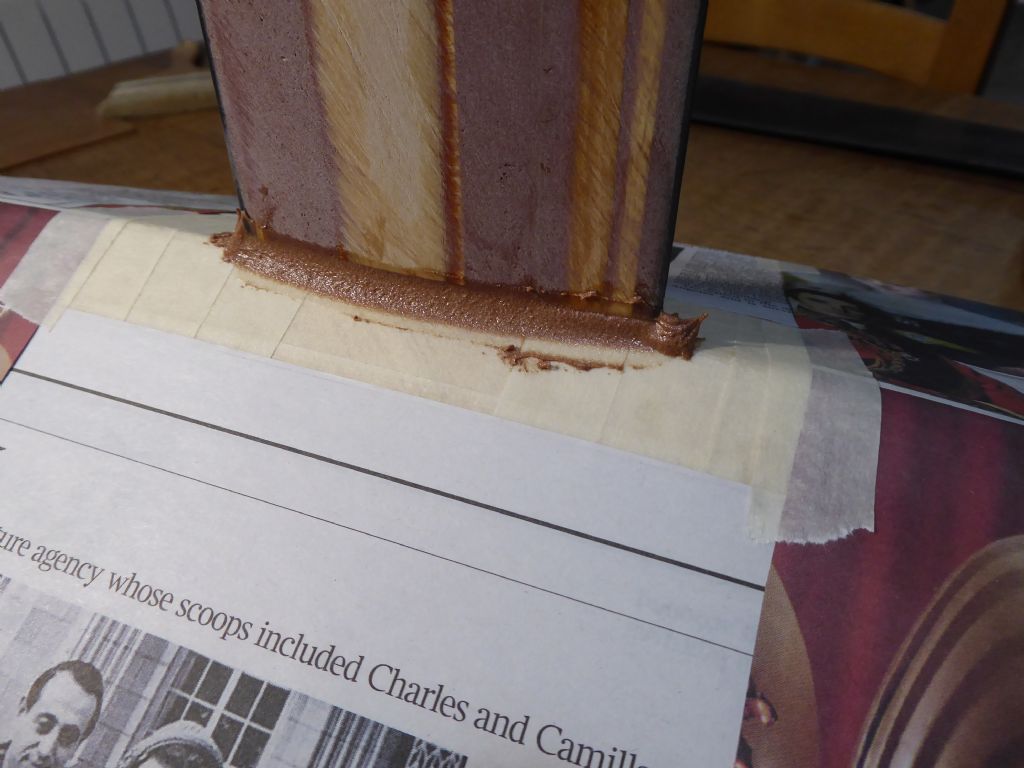
Here the filler is squeezed into the gap making sure there are no air pockets and then rounded out with the end of a wooden coffee stirrer. The lumps at each end are purposeful as it is impossible to get the filler symmetrical while it is wet.
Yes it did come out after a sharp tap and the top of the fin not has a radius where it meets the hull just need to be trimmed and dressed to a nice shape.
A similar radius was made where the fin joins the bulb.
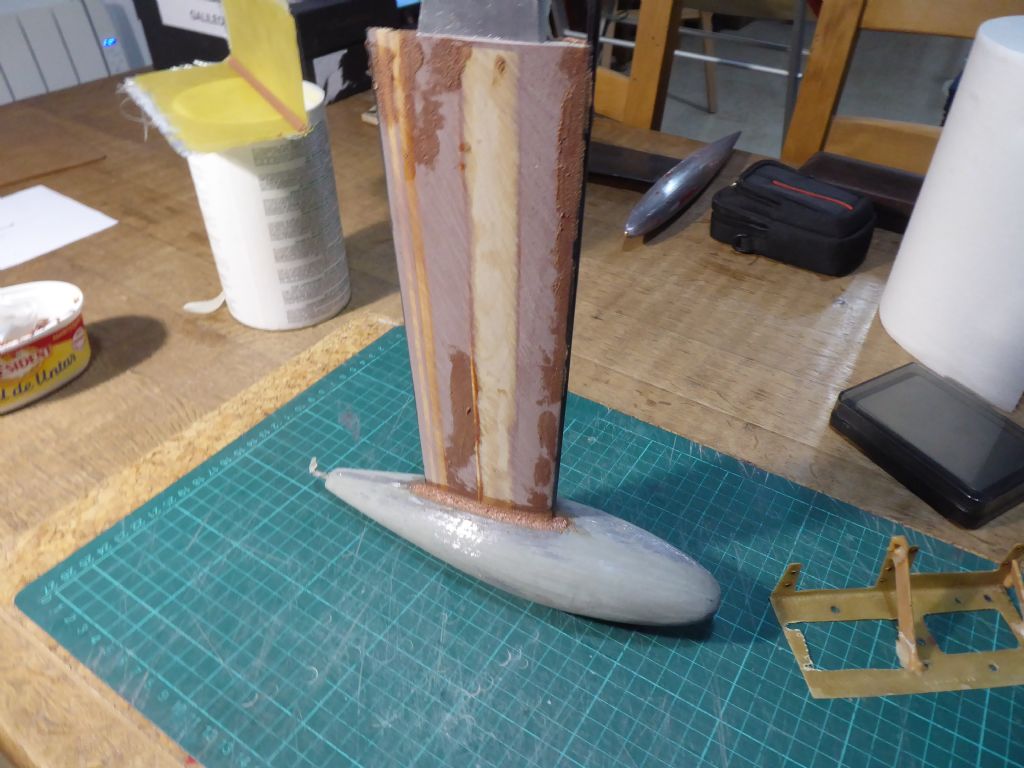
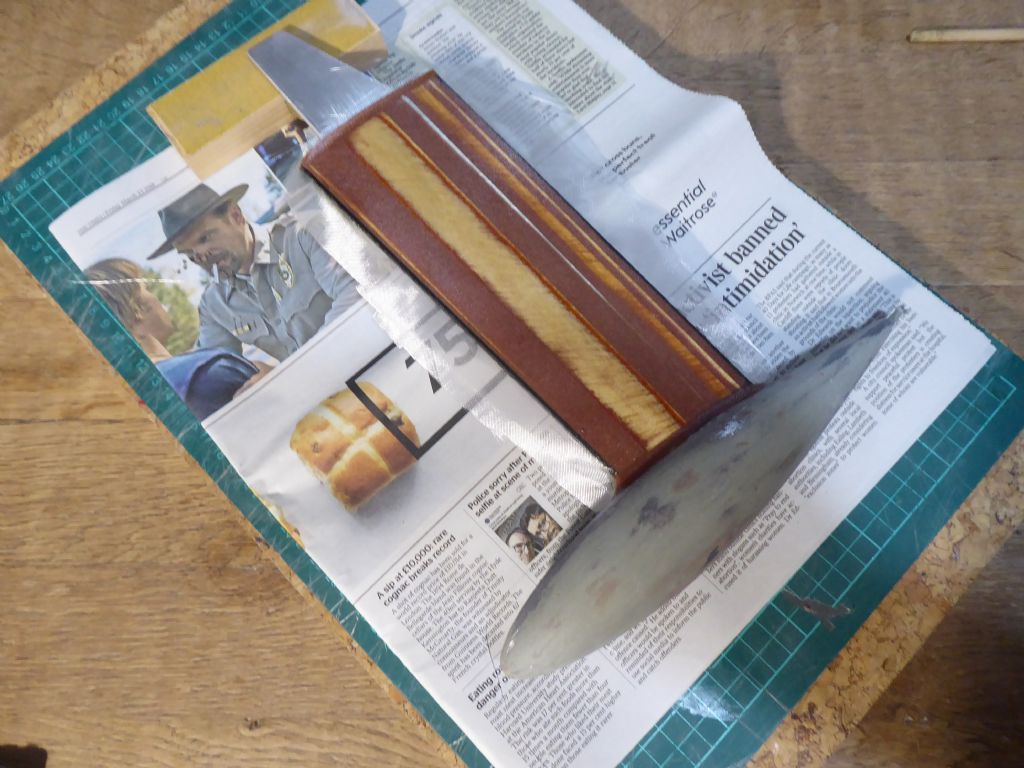
The fin has an aluminum core, carbon leading and trailing edges and wood packers. If the wood was ever to get wet through the smallest of cracks it would swell and cause all sort of problems so the fin was encapsulated with 25g /m2 glass cloth in epoxy. This also meant that I did not have to completely remove the scratch marks as all the finishing would be on top of the glass cloth which provides a uniform and stable base.
Finally in high build spray primer.
The keel on the right is from my Topiko IOM. The bulb weights are similar but the IOM has much more power due to the much increased draft and being all-carbon is very thin section.
Galileo is much beamier, has a shorter rig and I won't be sailing here in extreme conditions that the IOM has to put up with.Tim R
1 April 2019 at 11:52 #81716 Ray Wood 3Participant@raywood3
Hi Tim,
As I may have said before, much too pretty to get wet
 and they are still in primer!
I'm guessing the IOM racing is very popular in your harbour?
All the Best Ray
1 April 2019 at 16:31 #81718Tim Rowe
Participant@timrowe83142Hi Ray
Thank you as always for the comments. Probably due to some misdeeds in a past life but I happen to enjoy filling and fairing. Just need to make the brass tail when I am in a lathe mood.
I think we have somewhere around 35 IOMs in Mallorca and they race regularly throughout the year in various harbours and off beaches. There is a Balearic Championship and the Spanish Nationals have been held here a couple of times. The standard of the racing is very high.
I think mine still measures OK as I am being very careful not to change the weight during the refit. It does have a corrector weight so there is a little bit of leeway. I do however have to register the change of ownership to get my own certificate. I hope the sail number stays the same ESP 313.
Won't be long before I turn my attention to Wild Duck (do you know how many were built?) and I am sorely tempted to build one of your Thames barges. I bet racing them is huge fun. Are there class rules and what design would you recommend?
I am working hard to keep the momentum up on Galileo and did a bit more over the weekend.
Regards
Tim R
3 April 2019 at 11:51 #81730 Ray Wood 3Participant@raywood3
Hiya Tim,
I'm sure you would enjoy barge building, I have learned a lot about hand stitching bolt ropes on the sails, anybody who can master a sewing machine has my respect

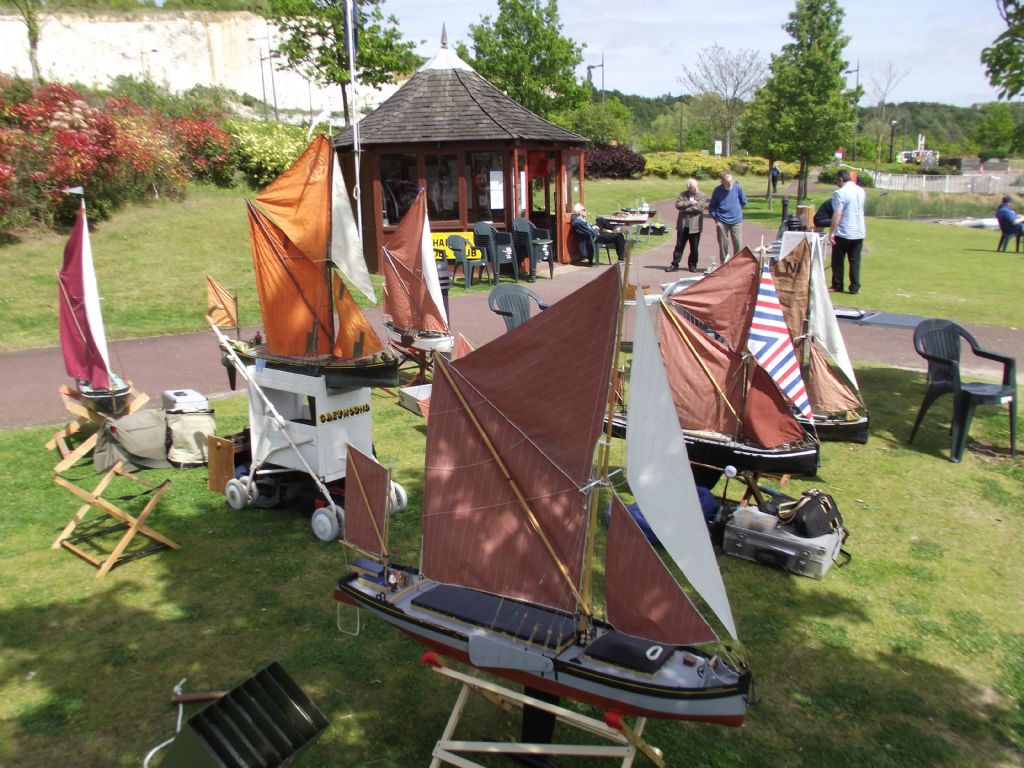
Only 3 different categories really raced by AMBO members in the last 4 years I've been racing.
30" – 1/32nd scale
42" – 1/24 scale Staysail
42" – 1/24 scale Bowsprit
Coastal Class for bigger say 45" barges (But this has all but died out recently)
The great thing about the rules are there are no other rules! except it should be a scale model of the type.( Not a dressed up Marblehead)
Normal sailing rules apply.
This does mean, the same skippers win most of the time, but gives the rest of us something to strive for, and like most racing position at and over the start line is key and a bit of luck.
The most complete set of drawings detailing the hull construction and fully detailed rig is Veronica designed by Richard Chesney, available from Sarik including CNC cut parts pack.
Edited By Ray Wood 2 on 03/04/2019 11:52:10
11 April 2019 at 09:03 #81831Tim Rowe
Participant@timrowe83142Hi Ray
Been doing a bit of barge research and it would have to be in the 30" size as I am seriously running out of space.
Getting something done on Galileo every day but working on the IOM in parallel has slowed things up a bit. My plan is to have them both ready at the same time but furiously saving up to place an order from SailsEtc for lots of stuff that I just can't seem to find here. This is probably the most frustrating modelling aspect of not living in the UK.
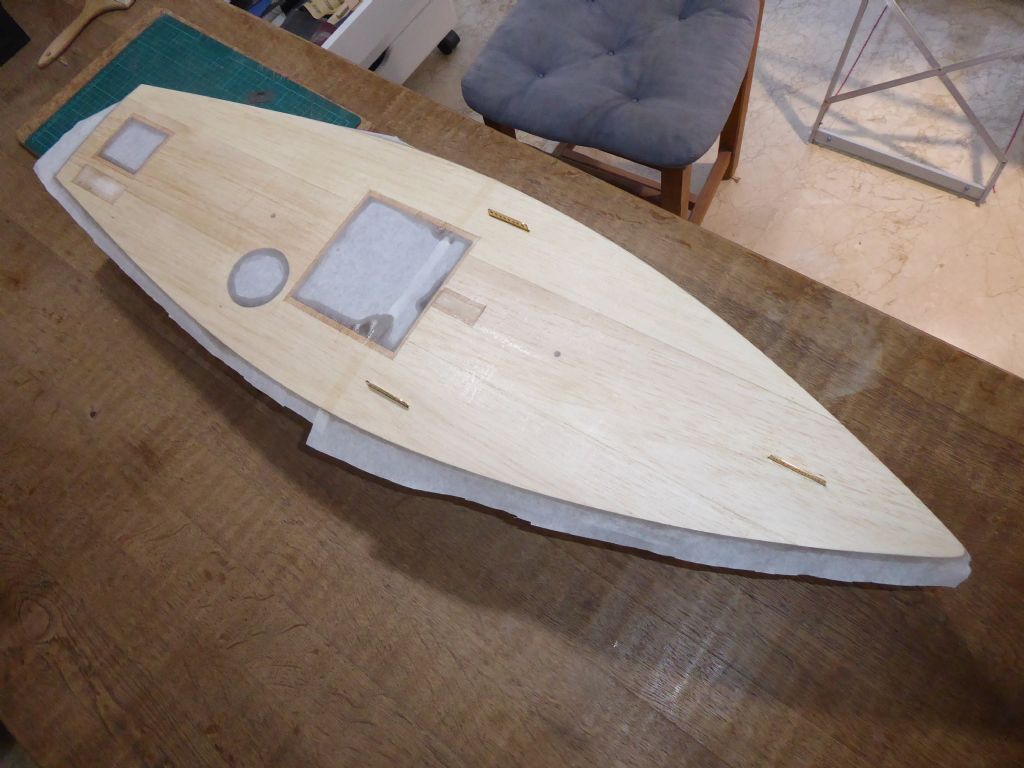
The sub deck came from three pieces of 3mm balsa. I bought these at the local model shop and carefully selected them for the same weight. The reason for this is the deck has gentle curves in two planes and has to be perfectly fair for the intended finish. Having equal weigh and grain characteristics ensures that they will sand uniformly. The mini-longboards were back in use.
After fairing and sanding smooth the deck was sheathed with tissue laid in epoxy resin. I hindsight I should have tried using the very fine glass cloth as it requires much less epoxy to fill the weave, It is difficult to handle though and I was concerned about getting the three chainplates lined up in the slots and without any bunching. I chickened out and used the tissue with is much more stable.
The downside was that the tissue would not wrap over the deck edge (which has to be as sharp as possible at this stage) and so it was trimmed with a razor blade and lightly sanded flush to the deck edge. This leaves the 3mm thickness of the balsa uncovered to I bonded a strip of the lightweight cloth all around the deck edge. This did give me a bit of extra work feathering in the edges but now the inside and outside of the hull is fully sheathed and encapsulated for water resistance and strength. The deck edge is nicely ding proof.
The hatches will remain closed with the tissue for as long as possible as there will be a lot of sanding dust to be kept out.
Tim R
12 April 2019 at 07:26 #81843 Ray Wood 3Participant@raywood3
Hi Tim,
Yes those inset chain plates would be a problem cutting woven glass cloth round, never tried using the tissue ! She is coming on nicely , have you tried Frank Parsons of Nylet for a quote for your sails ? I think he's on 5-6 weeks from order, I will go to him for the Comanche 32 sails in Dacron. Taken a day off to sort out our sailing dinghy on the beach at Pevensey, but it's turned cold again here with an easterly blowing 😯
Regards Ray
12 April 2019 at 11:03 #81848Tim Rowe
Participant@timrowe83142Hello Ray
The original sails were hand and machine sewn by myself and the main is still serviceable although with some stains that may or my not come out. The stitching has perished on the luff of the jib so it will get repaired with some double sided tape but this time with a wire in the luff pocket. The reincarnated Galileo will be quite a lot more powerful than the original with the extra draft and weight in the keel. I am determined therefore to have a go at making my own using the cambered block method and Mylar film. I have got Frank's catalogue and have previously been in touch with him.Tissue works really well as it is so easy to handle. I have got large stocks from the aero side and the inside of Galileo was completely lined with tissue before any framing was put in. It imparts a surprising amount of strength to balsa and hardens the surface for good ding resistance. Nowadays I only use ply where I have to. I find working with balsa much quicker and easier plus thin ply is expensive. Have a go and tell me what you think.
Easter is a bit early in my book for Easter sailing. Years ago I used to do cross channel races at Easter but always preferred the ones at Whitsun.
What are you up to build wise?
Tim R
12 April 2019 at 17:23 #81852 Ray Wood 3Participant@raywood3
Hi Tim,
Just finishing off Raven slope soarer film on the wings & tail & solartex on the fuselage, looks really old school retro 😊 going back in time, boatwise now looking seriously at the cat

Regards Ray
Edited By Ray Wood 2 on 12/04/2019 17:23:58
-
AuthorPosts
- Please log in to reply to this topic. Registering is free and easy using the links on the menu at the top of this page.
Code of conduct | Forum Help/FAQs
Latest Replies
Home › Forums › Sailing Models › Topics
-
- Topic
- Voices
- Posts
- Last Post
-
-
Fairey Huntsman 31
1
2
…
5
6
Started by:
 Chris Fellows
in: Build Blogs
- 14
- 139
-
7 hours, 11 minutes ago
 Chris Fellows
-
Fairey Faun
1
2
3
Started by:
 Chris Fellows
in: Build Blogs
- 7
- 58
-
7 hours, 33 minutes ago
 Chris Fellows
-
Vic Smeed’s Silver Mist
1
2
…
32
33
Started by:
Bob Abell 2 in: Scratch build
- 4
- 822
-
8 hours, 12 minutes ago
 Tony Hadley
-
Fairey Huntsman 28
1
2
…
7
8
Started by:
 Chris Fellows
in: Build Blogs
- 1
- 195
-
9 hours, 41 minutes ago
 Chris Fellows
-
Eezebilt RAF Fire Boat
Started by:
Tim Cooper in: Build Blogs
- 2
- 3
-
10 hours, 16 minutes ago
 Dave Reed
-
Feathered Friends
Started by:
 Chris Fellows
in: Soapbox
- 3
- 7
-
13 hours, 23 minutes ago
 Chris Fellows
-
4D Modelshop
Started by:
Keith Long in: Scratch build
- 6
- 7
-
13 hours, 51 minutes ago
 Chris Fellows
-
John Cobb’s Crusader
1
2
…
7
8
Started by:
 Paul T
in: Scratch build
- 1
- 192
-
1 day, 9 hours ago
 John W E
-
Complex Automata
Started by:
 Colin Bishop
in: Soapbox
- 1
- 1
-
2 days, 12 hours ago
 Colin Bishop
-
RAF Fireboat ID
Started by:
 Dave Reed
in: Collectors’ corner
- 8
- 24
-
3 days, 13 hours ago
Tim Cooper
-
TID steam tug 42″ – PN Thomas drawing enlarged
1
2
Started by:
 Ray Wood 3
in: Scratch build
- 8
- 33
-
4 days, 7 hours ago
 Richard Simpson
-
Lady of Skye (puffer)
1
2
Started by:
 mick east
in: Build Blogs
- 9
- 43
-
4 days, 17 hours ago
 Richard Simpson
-
Building a hull.
Started by:
 mick east
in: Scratch build
- 7
- 10
-
6 days, 16 hours ago
 Ray Wood 3
-
Todays Boating
1
2
…
210
211
Started by:
 ashley needham
in: All things floating
- 84
- 5,252
-
1 week ago
 Colin Bishop
-
Sea Rover Restoration
Started by:
harry smith 1 in: Collectors’ corner
- 4
- 10
-
1 week ago
 Richard Simpson
-
WORKSHOP LIGHTING
Started by:
 John W E
in: All things floating
- 9
- 18
-
1 week, 1 day ago
 Colin Bishop
-
Mayhem Website Down
Started by:
 Colin Bishop
in: All things floating
- 4
- 10
-
1 week, 4 days ago
 Colin Bishop
-
MAGGIE M trawler
Started by:
 sammyk
in: Buy/Sell or Trade
- 2
- 3
-
1 week, 4 days ago
 sammyk
-
meter
Started by:
 Alasdair Allan
in: All things floating
- 5
- 16
-
1 week, 6 days ago
 Chris Fellows
-
River Queen 2”- 1’.
Started by:
Richard B in: Steam powered models
- 5
- 7
-
2 weeks ago
Richard B
-
Deluxe Superphatic Glue.
Started by:
 Colin Bishop
in: All things floating
- 4
- 12
-
2 weeks ago
 Chris Fellows
-
How to add photos to your posts
Started by:
 Colin Bishop
in: Adding Images to Forum Posts
- 3
- 16
-
2 weeks ago
Len Morris 2
-
Cataract
Started by:
Bob Wilson in: Soapbox
- 2
- 4
-
2 weeks, 1 day ago
 Colin Bishop
-
The mighty tug Wattle
1
2
3
Started by:
 mick east
in: Build Blogs
- 10
- 61
-
2 weeks, 1 day ago
 Richard Simpson
-
Clyde Puffer Glenaray
1
2
3
Started by:
 Alasdair Allan
in: Build Blogs
- 6
- 57
-
2 weeks, 4 days ago
 Alasdair Allan
-
Fairey Huntsman 31
1
2
…
5
6
-


