Moonbeam – a novice’s attempt

Advert

Moonbeam – a novice’s attempt

Home Forums Sailing Models Moonbeam – a novice’s attempt

  • This topic is empty.
Viewing 25 posts - 1 through 25 (of 53 total)
  • Author
    Posts
  • #94447
    Andrew Biggs
    Participant
      @andrewbiggs29914

      My experience of building a model boat, is best described as "very limited". I did try sailing a RC Laser a few years ago but didn't really get on with the racing. I'll try and share a few photos here, illustrating some of the key points. Although Benjoman's thread shows a very impressive result and is a very useful source of advice and guidance.

      Advert
      #9715
      Andrew Biggs
      Participant
        @andrewbiggs29914
        #94448
        Andrew Biggs
        Participant
          @andrewbiggs29914

          moonbeam 1-1.jpg

          Its useful to pin the parts list on the wall as well, as the instructions refer to the part numbers, not part names.

          moonbeam 1-12.jpg

          I used West Epoxy and some filler to fix the beams in place. Be careful when sanding the deck edging strips, so not to damage the edge of the moulding – the instructions explain these edging strips need to be 1.5mm lower than the edge.

          moonbeam 1-13.jpg

          Its useful to cut the deck holes out and cut the bow area to shape. In that way its possible to ensure that the deck openings line up with the deck beams. Also it was possible to measure the deck to ensure the beam is the correct size at each point. I drilled the deck and support for the mast and used a short length of 12mm dowel to ensure the deck was placed correctly.

          moonbeam 1-10.jpg

          moonbeam 1-11.jpg

          #94449
          Colin Bishop
          Moderator
            @colinbishop34627

            Hi Andrew,

            Have you seen Dave Abbot's review here:

            **LINK**

            Colin

            #94450
            Andrew Biggs
            Participant
              @andrewbiggs29914

              Thanks Colin – his review was very helpful. There was another review I found, in Marine Modelling International, November 2008 by John Cox. I managed to pick up copies of both on eBay – I find its easier to read from paper rather than a screen !

              Am currently trying to get the rudder profile finished – the plastic is quite soft – might consider giving it a thin layer of glass tissue, before sanding smooth.

              #94500
              Andrew Biggs
              Participant
                @andrewbiggs29914

                Lessons learnt :

                Don't use to much solvent and leave this to dry/cure before trying to shape/profile the rudder. Solution, filler, wet n dry and then some primer – repeat !

                I know the middle picture looks like some kind of "lolly pop" !

                rudder.jpg

                Edited By Andrew Biggs on 30/03/2021 13:53:10

                Edited By Andrew Biggs on 30/03/2021 13:53:56

                #94660
                Andrew Biggs
                Participant
                  @andrewbiggs29914

                  moonbeam 2-4.jpg

                  moonbeam 2.jpg

                  moonbeam 2-2.jpg

                  moonbeam 2-5.jpg

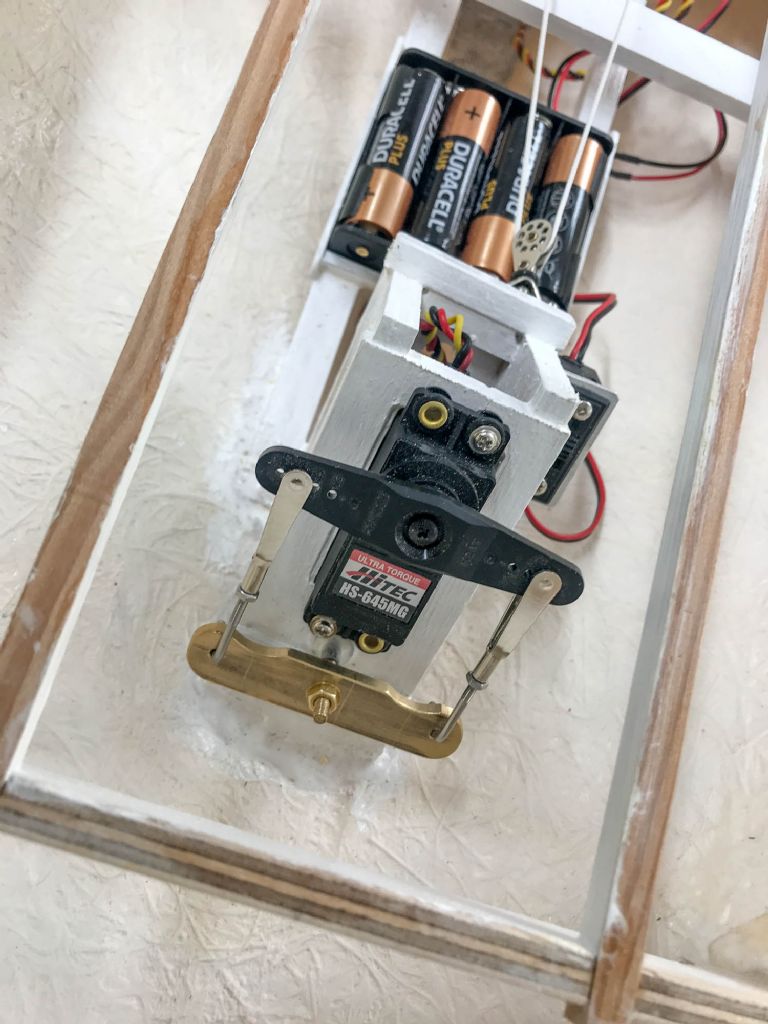
                  Getting the rudder fitted is not easy and once in, the design does not allow it to be removed. The instructions say solder the steering arm to the rudder, I hoping that by threading the rudder spindle and the arm, and then using two nuts and some locktite, will avoid the need for soldering.

                  The other thing that is clear and reading Benjoman's thread helps considerably, is that getting the winch and associated pullies relative height correct now is important. Like many things in life, make an early mistake/error it influences everything afterwards.

                  #95243
                  Andrew Biggs
                  Participant
                    @andrewbiggs29914

                    moonbeam 3.jpg

                    moonbeam 3-2.jpg

                    moonbeam 3-3.jpg

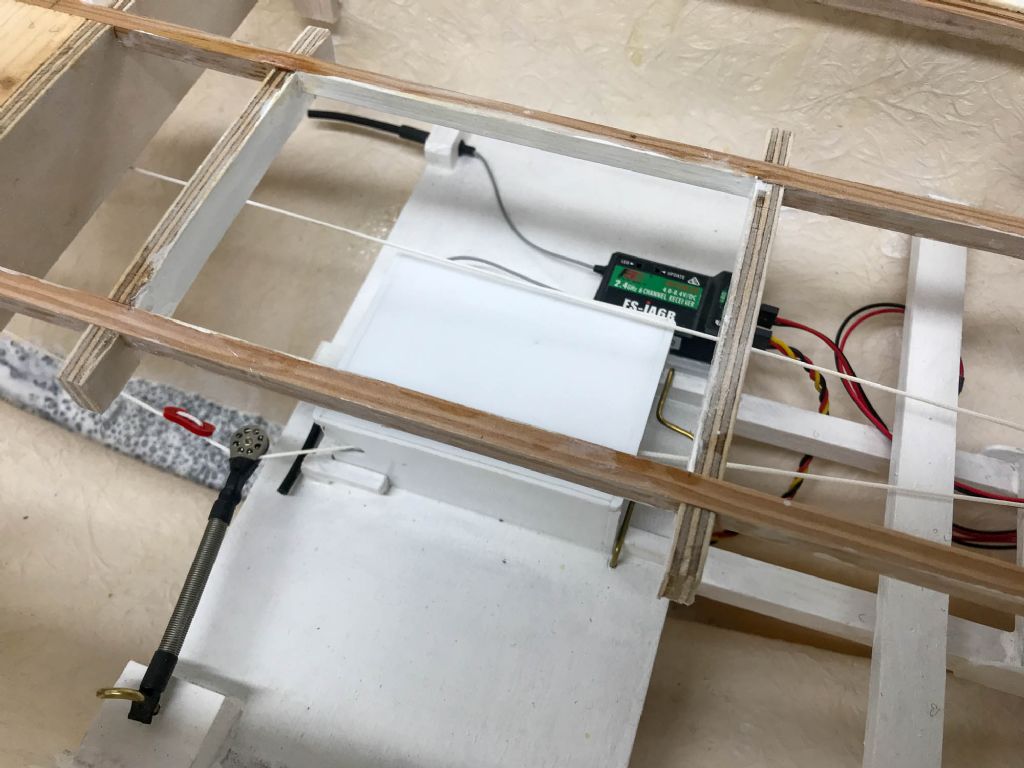
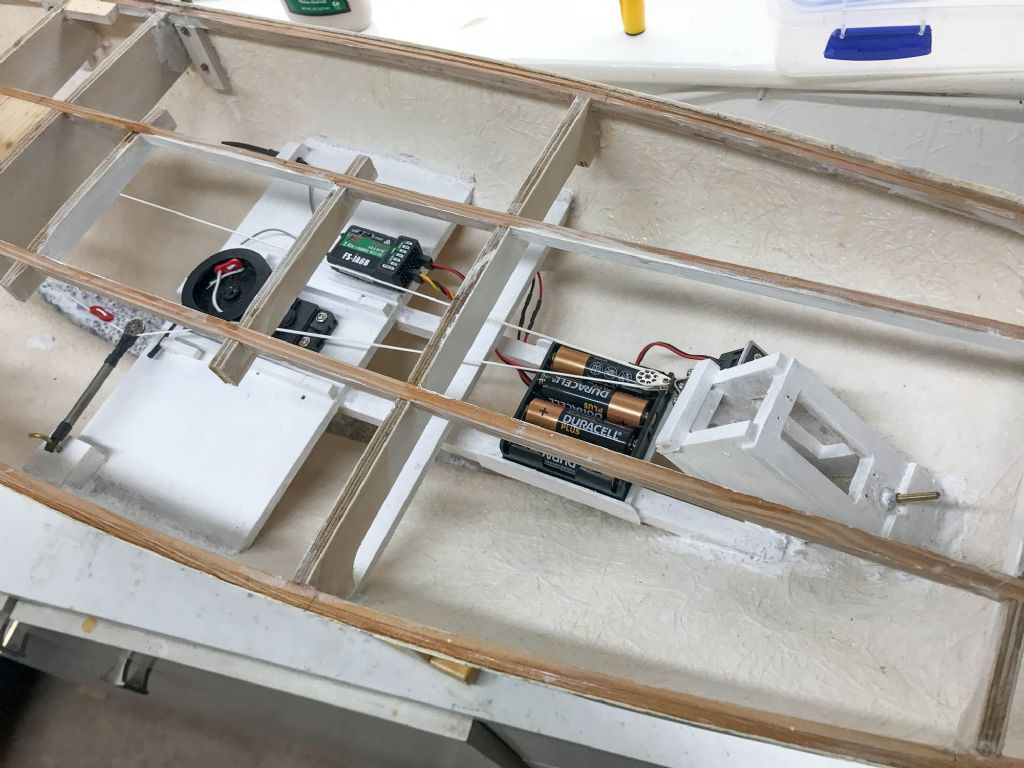
                    Tried an initial fitting of the winch and loop and realised that there needs to be be a way of keeping the loop in tension. This wasn't mentioned in the instructions but I did find references to it elsewhere. So had an experiment with an additional pulley and stainless spring, which seems to work. There was also some time spent considering how the receiver and batteries etc will be fitted.

                    Once the deck is on, access is quite tight so keep checking how things will be reached once its in place.

                    Edited By Andrew Biggs on 03/05/2021 13:16:08

                    #95252
                    Fred wooley
                    Participant
                      @fredwooley76212

                      Nice work so far One little observation and it is not a critism I see you have a continuous loop on the winch but there seems to be no provision for attatchement for the sheets to go to the sails…….Now on all my Yachts on this type of system what i have done is to simply create an overhand loop in the sail winch loop to attatch to

                      Dave

                      #95299
                      Andrew Biggs
                      Participant
                        @andrewbiggs29914

                        Hi dave.

                        Thanks, however this is just a temporary test to see if the spring idea would work. I’d thought of using a Bowsie or knotted loop to attach the sheets for the sails. I’ll give it some thought but was looking for an idea that gives the minimum opportunity for any chance of it catching.

                        #96295
                        Andrew Biggs
                        Participant
                          @andrewbiggs29914

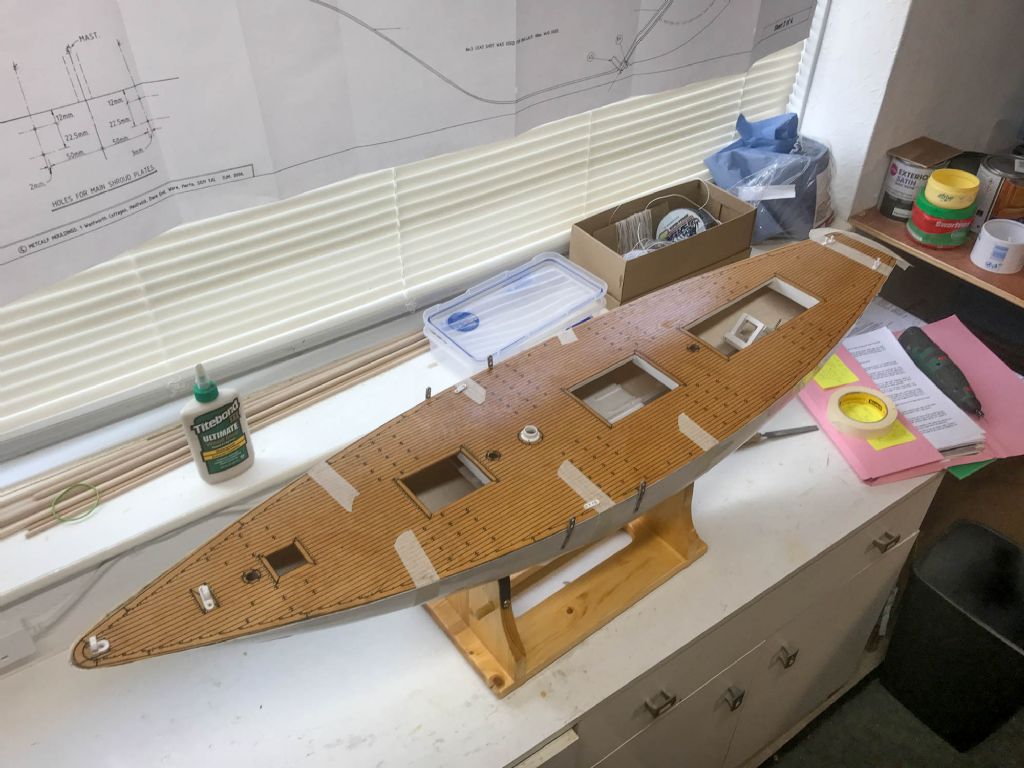
                          Id marked out the water, as described in the instructions and also added some masking tape at the bow & stern, this made it easier to see where the boat is sitting in the water. Added a little over 9lb of lead shot and poured in some West Epoxy to hold it all in place. It is suggested to have some extra removable ballast, that can be added later.

                          Had some reservations about trimming the deck – as you can't "trim in back on again". However, to make things easier I drilled the mast support and deck, then used a short length of dowel, so the deck was always placed in the same position and with some careful use of a David plane, the final fit is quite good. Have given it a coat of stain and two coats of thinned varnish. Have also been exploring which fittings will be screwed to the deck and have added blocks to the framework, with the aim of screwing the deck down where possible when it comes to gluing it in place – thus helping to hold it in place, while the glue/epoxy cures.

                          Fitting the RC equipment etc. – before the deck is finally fixed down.

                          moonbeam 4-3.jpgmoonbeam 4-2.jpgmoonbeam 4.jpg

                          #96296
                          Colin Bishop
                          Moderator
                            @colinbishop34627

                            Do make sure that anything you fit before the deck is screwed down can be removed in the future if necessary!

                            Colin

                            #96299
                            gecon
                            Participant
                              @gecon

                              Hi Andrew, I see that you are using a similar spring tension device to the one I'm trying in the Colin Archer build. I am trying to hide the R/C components below the deck edges which is a bit of a challenge.

                              I may be stating the obvious, and you have probably already noticed that the spring tensioner is not just to prevent the line sagging, but also to compensate for the difference in line length as it is wound on/wound off the upper and lower winch drum spools.

                              I have also thought that with the enclosed drums which I am using, it may be possible to simply have som slack in the line (if it doesn't snag on any internals) and the spring may not be needed at all.  Or have I overlooked some essential mechanics with this thought?

                              George

                              PS. drew up a quick sketch, slack lines to the drum will not produce the required effect!


                              Edited By gecon on 21/06/2021 10:02:57

                              #96309
                              Eddie Lancaster
                              Participant
                                @eddielancaster

                                Hi.George, is this what you are looking for?

                                img_1169.jpgimg_1168.jpg

                                A little pull out tray for the reciever.

                                img_1170.jpg

                                And another for the battery.

                                Regards.

                                Eddie.

                                Edited By Eddie Lancaster on 21/06/2021 13:59:03

                                #96310
                                Ray Wood 3
                                Participant
                                  @raywood3

                                  Hi Eddie,

                                  That is the best modelling idea I have seen this year, go to the top of the class

                                  Regards Ray

                                  #96314
                                  Andrew Biggs
                                  Participant
                                    @andrewbiggs29914

                                    Hi George

                                    thanks for the interest

                                    I’m far from experienced in model boating. I’ve made an “Emma” from bearospace, which uses an arm to control the sails. Impressed with your Colin Archer, not seen it before, or an enclosed winch. Keeping tension in the loop is obviously a common problem and notice some use an inline spring. Surprised there isn’t a commercially made spring, designed to suit.

                                    An opportunity for someone?

                                    #96315
                                    Eddie Lancaster
                                    Participant
                                      @eddielancaster

                                      Sorry Ray, but not my idea, it came from Gary Webb of Bearospaceindustries with one of his designs.

                                      Eddie.

                                      #96316
                                      Eddie Lancaster
                                      Participant
                                        @eddielancaster

                                        Sorry Ray, but not my idea, it came from Gary Webb of Bearospaceindustries with one of his designs.

                                        Eddie.

                                        #96318
                                        gecon
                                        Participant
                                          @gecon

                                          Hello again Andrew, I have in fact had some e-mail correspondance with 'Gringo Gary' of Bearospace regarding the tensioners on my Fisher 34 motorsailer. Here I used springs from CMB placed in-line. The one shown here is on the mainsail winch. The winches used in the Fisher have open drums.

                                          The spring and turning block on your Moonbeam looks just fine to me.

                                          20200820_165936.jpg

                                          I have also recently seen winches with built-in spring tension below the drum itself. So there are plenty of 'goodies' out there for those who like to spend as much cash as possible!

                                          Note my point that the spring is not just for tension but also to 'absorb' the changng line-length due to the incr/decrease in effective diameter of the the drum as it rotates….I think. Have only made two yachts myself so I'm not an expert either.smiley

                                          George

                                          #96319
                                          gecon
                                          Participant
                                            @gecon

                                            Sorry Andrew, but I did not at first realise that Eddie had sent photos of hidden R/C gear to me here.

                                            To Eddie I say, 'Nice work' on hiding the R/C AND keeping it accesibleyes The plan is to try to hide the R/C in the Colin Archer, inside benches and lockers. The receiver will go in the heads compartment I suspect!

                                            George

                                            #96350
                                            Andrew Biggs
                                            Participant
                                              @andrewbiggs29914

                                              moonbeam 5-5.jpgmoonbeam 5-4.jpgmoonbeam 5-2.jpgIts good to see other boats and how they have been made – most welcome

                                              Have added the sail winch and this seems to work, using a spring to keep the loop in tension. Am using a FykySky FS-i6, have set the end points to 70% and this gives around 400mm of travel, which is far greater than the recommended 300mm, so will reduce the end points some more. The plan is to use some bowies on the loop to attach the sheets to. The instructions suggest that the rudder spindle is soldered to the arm, but this seems a little permanent, so have decided to use two lock nuts and some Locktite. The brass arm is also threaded M3.

                                              It starting to feel things are getting permanent – as once the deck is on, things become much harder to modify. Have tried a dry fix, using some of the fittings which can be screwed down, helping to hold the deck in place, (along with some tape etc.) while the epoxy sets.

                                              Nothing is permanent yet !
                                              moonbeam 5-1.jpg

                                              #96362
                                              Steven S. 1
                                              Participant
                                                @stevens-1

                                                I add a permanent 6" extension lead to the bind port on my receivers to make it easier to insert the bind plug on most of my builds. Just in case I need to rebind the model at some later date.

                                                #96377
                                                Andrew Biggs
                                                Participant
                                                  @andrewbiggs29914

                                                  Thanks Steven – an excellent idea

                                                  Before I glue the deck down I'll have a practice removing things – the receiver is currently held in place by velcro.

                                                  #96726
                                                  Andrew Biggs
                                                  Participant
                                                    @andrewbiggs29914

                                                    Finished rigging the sail winch and after several checks, decided to glue down the deck. Using a few screws to hold it firmly in place, plus some masking tape. The screws will be removed and then used to hold some of the deck fittings in place. Used some West Epoxy to fix the deck in place. The underside of the deck had been varnished around where the beams are, the epoxy was then brushed onto both the underside of the deck and the top of the beams.

                                                    moonbeam july 21-1.jpg

                                                    moonbeam july 21-2.jpg

                                                    moonbeam july 21-3.jpg

                                                    moonbeam july 21-4.jpg

                                                    moonbeam july 21-5.jpg

                                                    The edge of the hull needed smoothing out, with some wet n dry and a couple of slight gaps along the gunwale filled with more epoxy. The deck was then masked, the blue tape is around 3mm in from the gunwale, so the hull colour (planned to be blue) will just roll over. Overall the deck did fit well.

                                                    moonbeam july 21-6.jpg

                                                    The hull was given a spray of white paint, in the area of the waterline. The water line was marked on as suggested in the instructions and then some 6mm masking tape used. The line was increased in thickness at the bow and stern, to prevent the optical illusion that the water line "droops". A dusting of white spray paint was then used to seal the edge. The plan is that below the waterline will be red and the top sides blue.

                                                    moonbeam july 21-7.jpg

                                                    #96911
                                                    Andrew Biggs
                                                    Participant
                                                      @andrewbiggs29914

                                                      The underside is Halfords red primer, which is a matt finish and gives the impression of antifouling. The top sides is Halfords Vauxhall Regatta Blue. Even being careful, I did manage to have some runs, which meant the use of some fine and wet n dry, followed by another spray. It's not perfect but acceptable, especially when seen from a distance while sailing on the water. The masking tape did work well, only a couple small dashes from the red primer getting on the waterline, which was easy to clean off.

                                                      moonbeam painted-1.jpg

                                                      moonbeam painted-2.jpg

                                                      moonbeam painted-3.jpg

                                                      moonbeam painted-4.jpg

                                                    Viewing 25 posts - 1 through 25 (of 53 total)
                                                    • Please log in to reply to this topic. Registering is free and easy using the links on the menu at the top of this page.

                                                    Code of conduct | Forum Help/FAQs

                                                    Advert

                                                    Latest Replies

                                                    Home Forums Sailing Models Topics

                                                    Viewing 25 topics - 1 through 25 (of 25 total)
                                                    Viewing 25 topics - 1 through 25 (of 25 total)

                                                    View full reply list.

                                                    Advert

                                                    Newsletter Sign-up