Flyvefisken

Advert

Flyvefisken

Home Forums Gallery Flyvefisken

  • This topic is empty.
Viewing 15 posts - 26 through 40 (of 40 total)
  • Author
    Posts
  • #18172
    John Hoffmans
    Participant
      @johnhoffmans55592
      @ christian: thank you for your kind words. I’m very interested in your work on both ‘the fighter’ and the flyvefisken so please keep posting your progress.
       
      @ Paul: Hello, i will keep posting updates. To me the build is also like reading a book without knowing the ending. It is my first build ever and i’m going through a steep learning curve. Every form of support and or advice is welcome in order to prevent me from failing.
       
      @ Kenneth: really nice of you to send the plans to christian. Did you finish the flyvefisken and if yes do you have any pictures?
       
      Wkr. John
      Advert
      #18177
      Leclercq CHRISTIAN
      Participant
        @leclercqchristian12971
        Good evening to all Here is 2 photos on the progress(promotion) of the VLM, the wooden hull(shell), a lot of work in the sanding, but the result(profit) is there

        #18178
        Leclercq CHRISTIAN
        Participant
          @leclercqchristian12971

          Good evening Ken Pour the VLM in France it needs to count 250 € with her(it) limps with chandlery, but for this boat I invested(surrounded) approximately 400 €, engines, lighting, sound-effects engineer of siren, I think I can launch him(it) by February 15th. The cabin is also wooden prédécoupé, weapons are in plastics molded and artillery in metal, lances missiles have the wooden body or it is necessary to stick the rings of manners regular. When I

          #18182
          John Hoffmans
          Participant
            @johnhoffmans55592
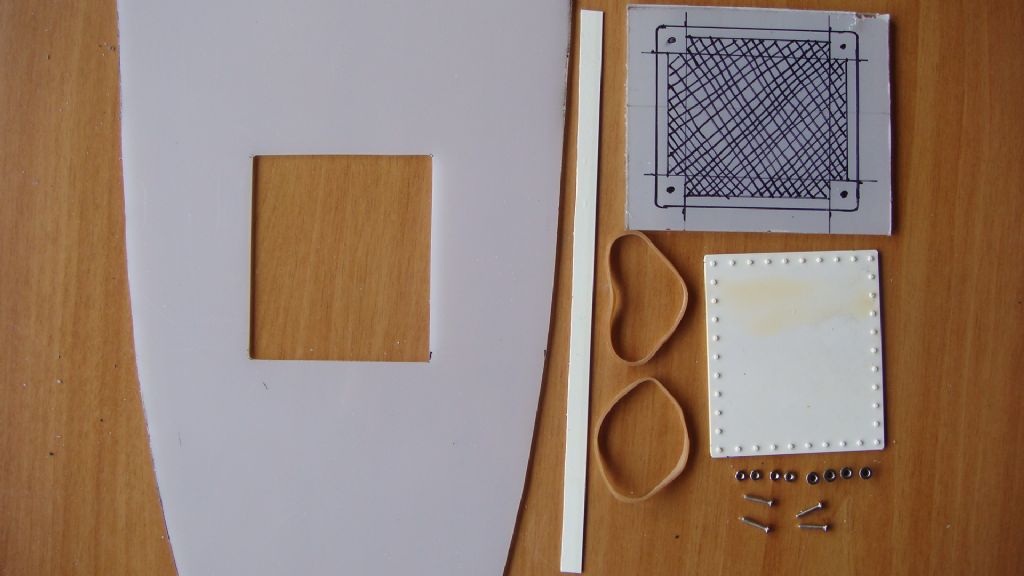
            Good afternoon, that’s looking good Christian. I myself finished fabrication of the front deck. The flyvefisken has a total of four large hatches in its decks. One in the front deck and three in the rear deck. In real life these hatches can contain several modules with different weapon systems depending on the role of the ship. (Mine sweeper, anti air defends, anti ship etc.). I have some really nice ideas about using these modules on the model but thats for later. I do have some design goals with the hatches:
             
            – They have to be removable but must be locked in place and not be able to fall out.
            – they have to be watertight (I’m paranoid about water getting into the hull)
            – they must lay flush to the deck (because it has to look good)
             
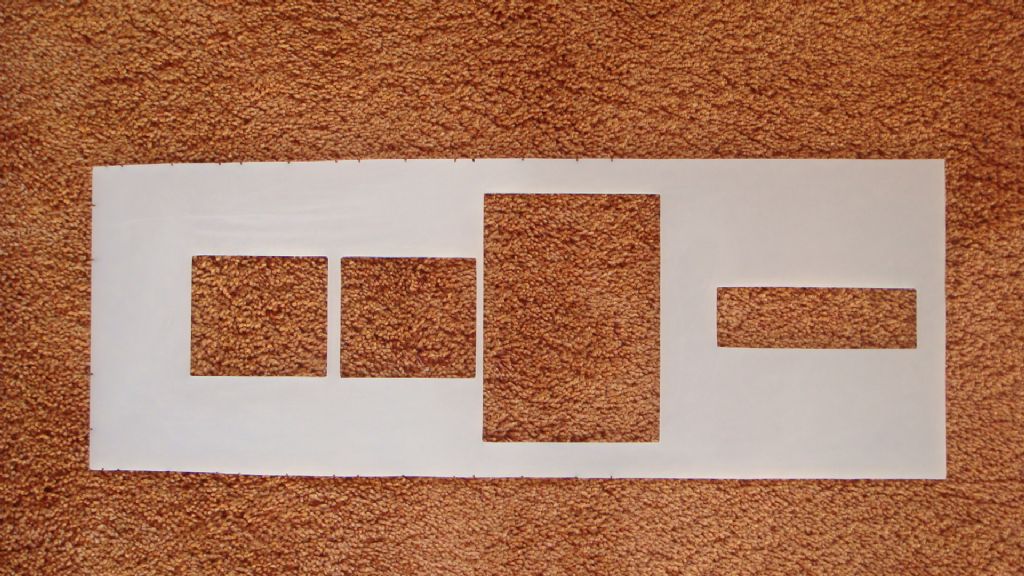
            So i thought about it and came up with a sloution. The picture below shows the materials i need in order to achieve the above goals. The next update i will post a picture of the installed hatch
             
            regards John
             

            #18186
            John Hoffmans
            Participant
              @johnhoffmans55592
              Good evening,
               
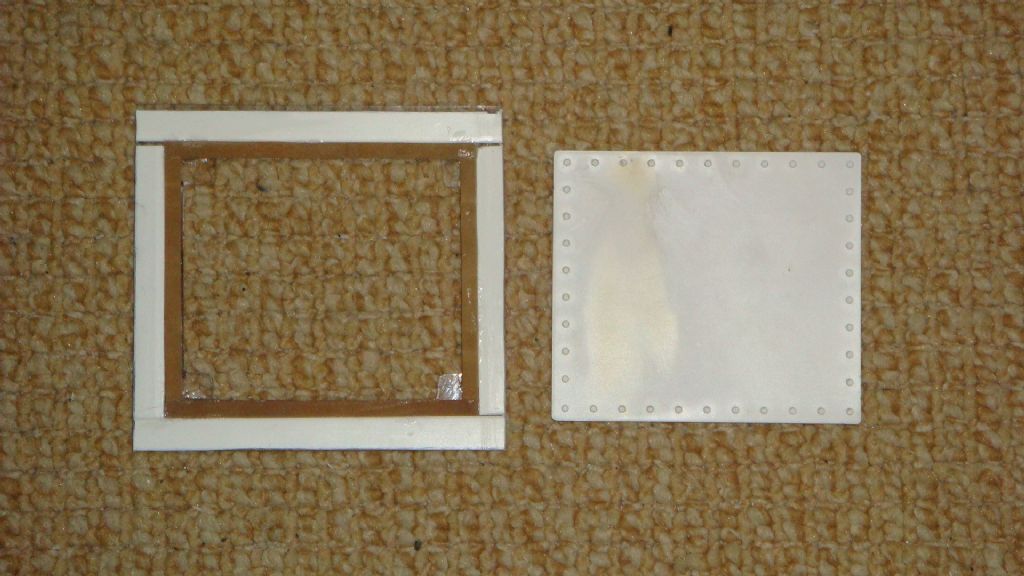
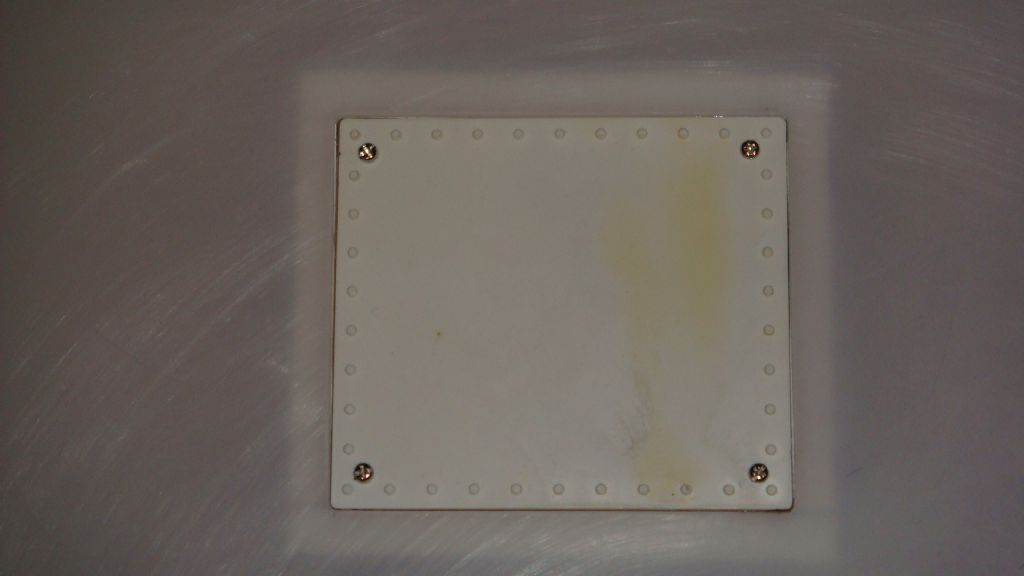
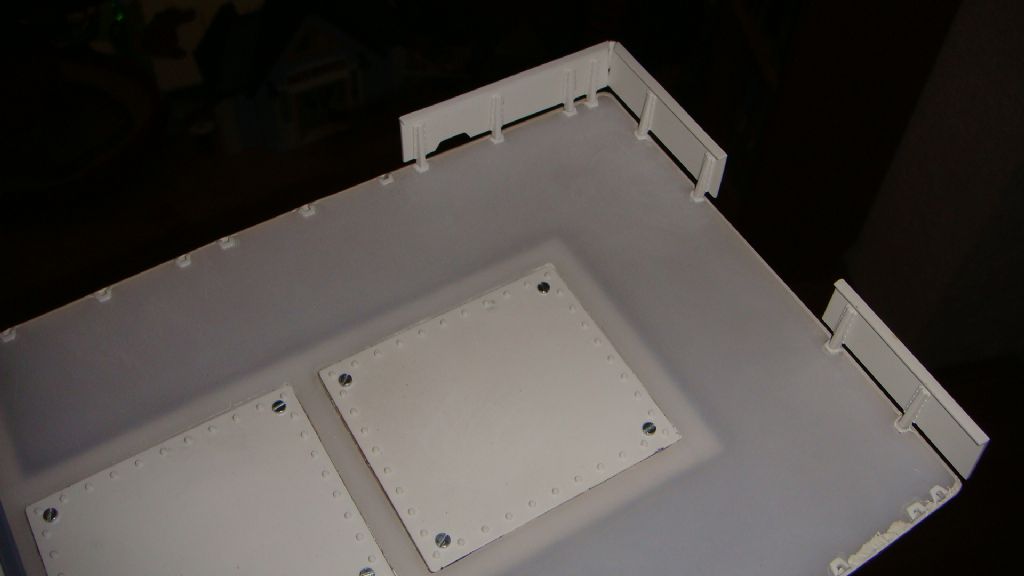
              In order to create the hatch i glued the rubber band to the base. The hatch cover is going to rest on the rubber band making it watertight. I constructed a plastic rim surrounding the band. This rin will be glued to the deck and ensures that the hatch cover is flush with the deck. (See picture below)
               

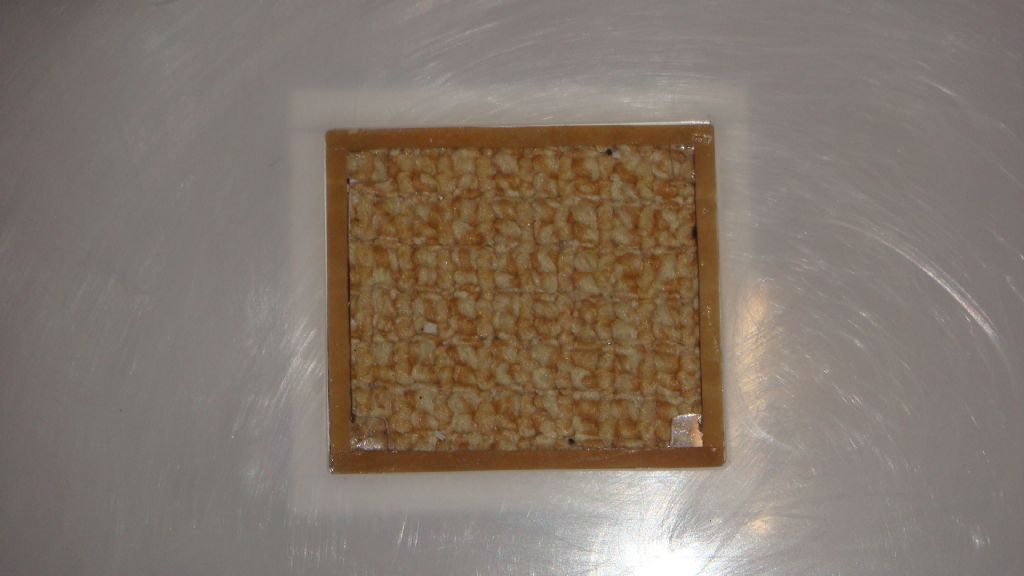
              The next picture shows the construction glued to the deck:


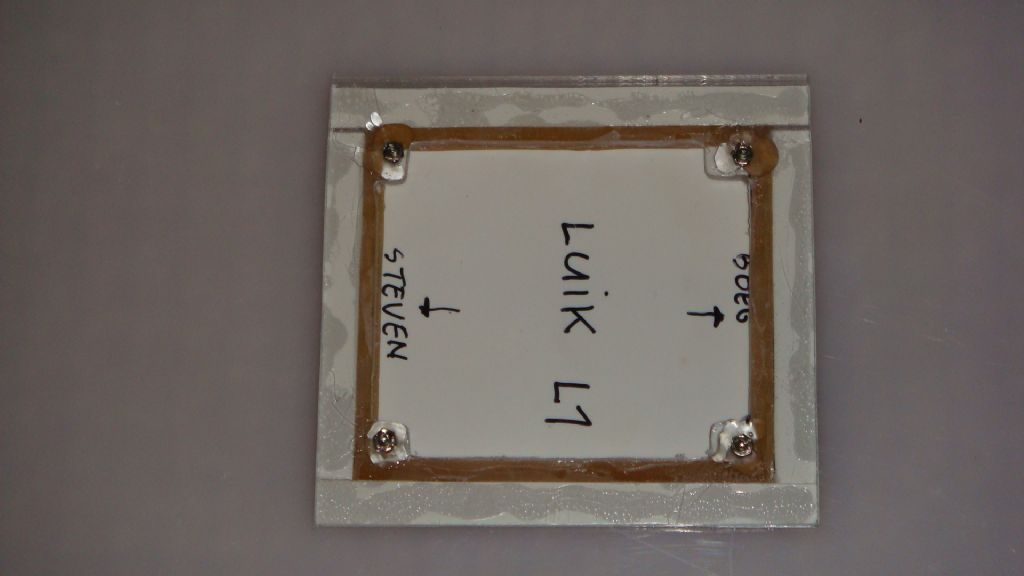
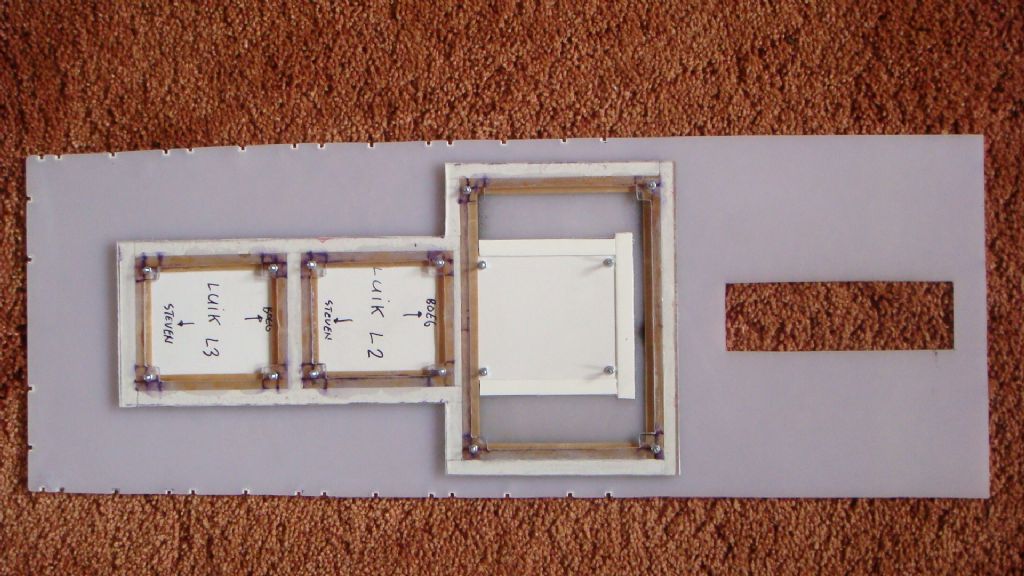
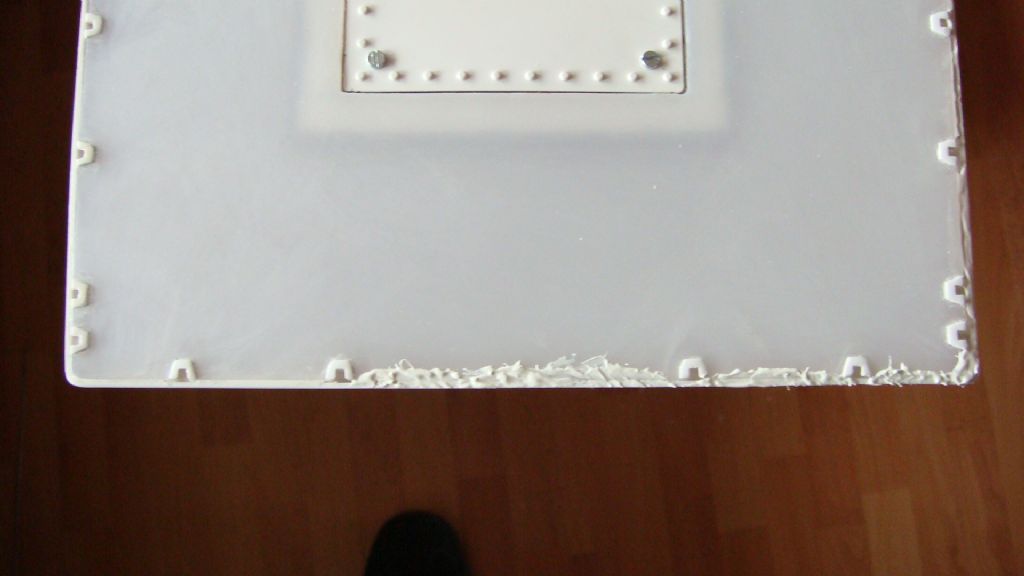
              In order to fasten the hatch cover i used small bolts. The next picture shows the bottom of the deck.


              And last but not least the upper side of the deck:


              The next week i will be finishing th erear deck including three more hatches.

               
              Regards John
              #18199
              kenneth gault
              Participant
                @kennethgault51984
                hi john
                i have not started my flyvefisken yet, hopefully later this year.  i have nearly finished an old linberg pt109 that i have converted to rc- twin water cooled speed 400 motors and a george turner models mtb.  when finished i have a canal boat to build (for the wife, too slow for me). and a half built robbe u47 converting to static dive with an engel 750 tank.  i have also got an old (origional versiom) wiesel to build.  hence i am not going to start a new project until i have ‘cleared the decks’.  when i do though i will plan and order running gear in advance and also using the wooden deck as a template remake them in plastic(HIPS), constructed to allow complete or almost complete removal   
                #18230
                John Hoffmans
                Participant
                  @johnhoffmans55592
                  hi kenneth
                   
                  Indeed a lot of projects to keep you busy this year. I’m not for a complete removal of the deck because I don’t like seams along the whole length of hull and deck. So i came up with the following solution:
                   
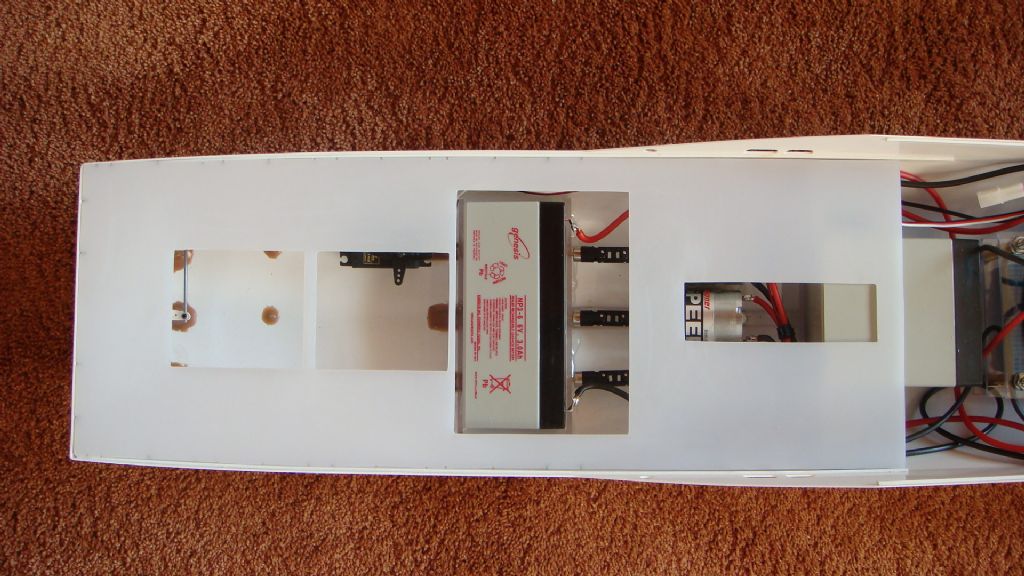
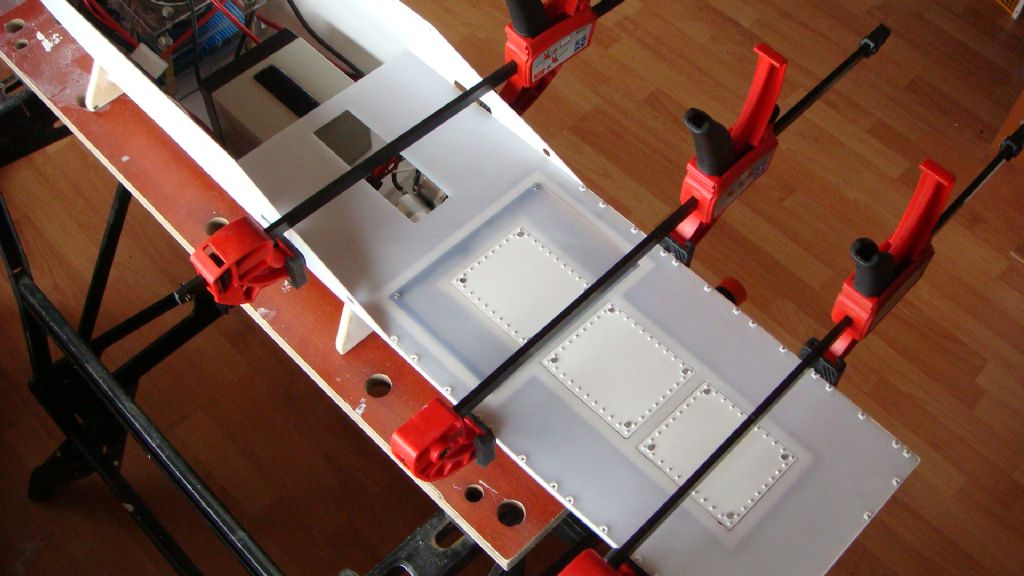
                  The large  allows access to battery,  motors and shaft attachements. This deck geives the hull also structural strengt once fastened. The next picture shows a dry fit of the deck. I want the space beneath the rear two hatches to be free in order to install future expansion modules. As you can see the rudder servo has to be moved further to the side.
                   

                  Regards John

                  #18672
                  John Hoffmans
                  Participant
                    @johnhoffmans55592
                    Hello,
                     
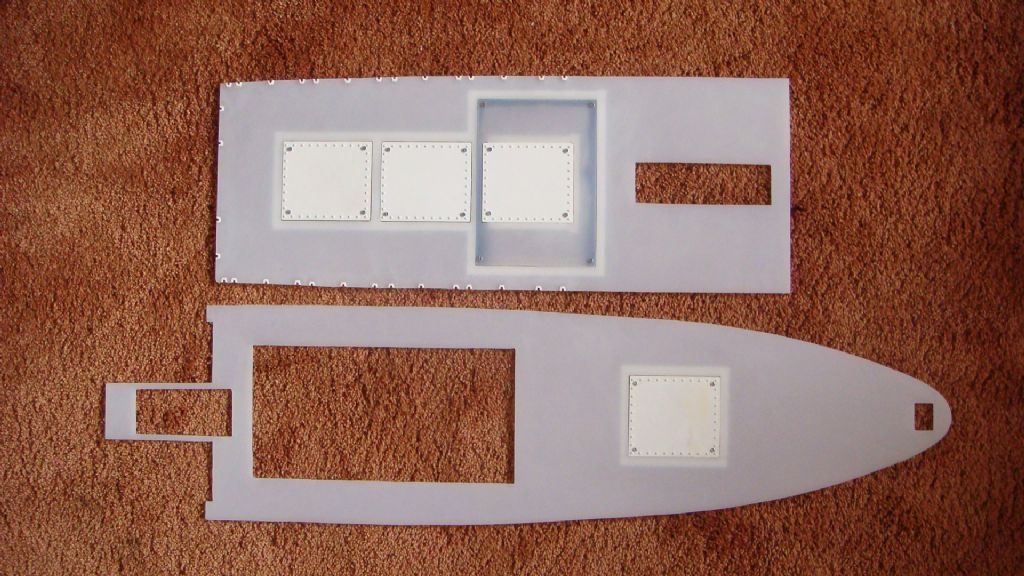
                    The decks are finished and are ready to be attached to the hull. Before i fasten the decks i have to install a rail system in the hull for the electronics module and move the rudder servo. Until the nexr update end here are some pictures of the progress:
                     
                    Both decks:
                     

                    Detailed picture of the rear deck (the small gaps on the sides are for the removable fence):


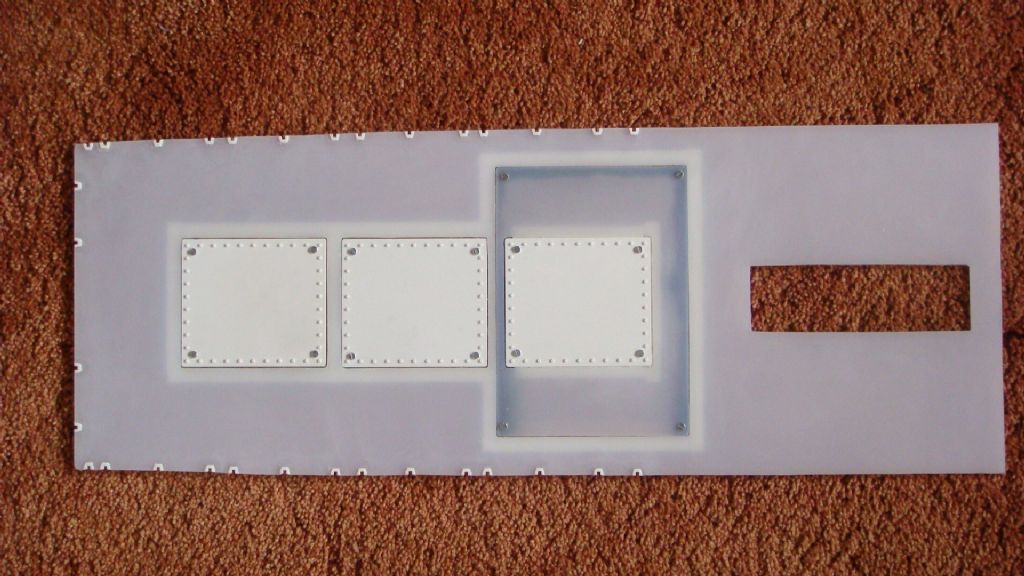
                    And the bottom of the rear deck:


                    Regards John

                    #19327
                    John Hoffmans
                    Participant
                      @johnhoffmans55592
                      Good evening,
                       
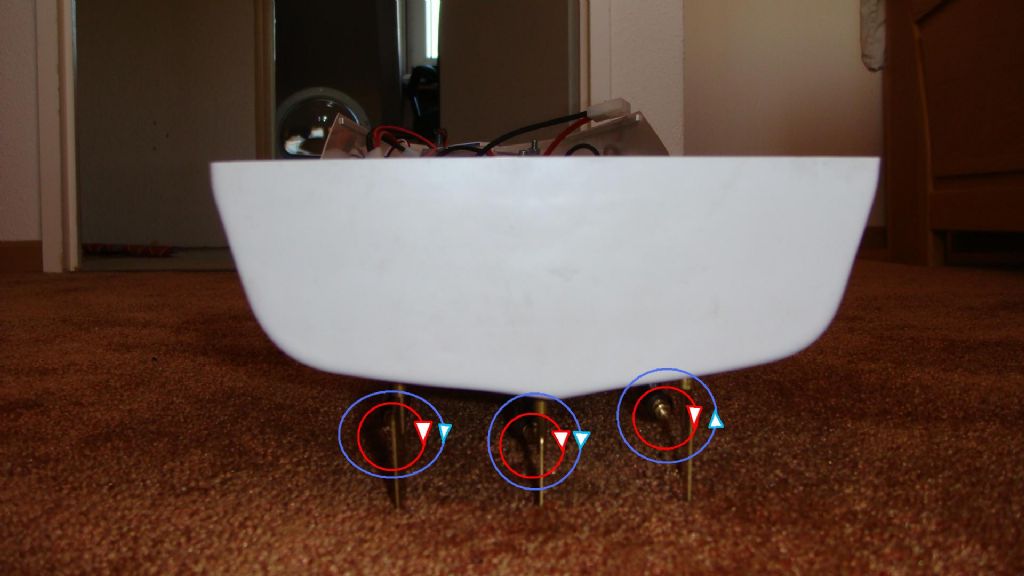
                      During the first test run of the boat i lost two of the three props. I wanted to buy new props via a web shop. On the site i stumbled onto an article regarding the turn direction of multiple props. After reading the article i realised i got it wrong and had to make a change. The picture below shows the initial turn direction (red) and the corrected turn direction (blue).
                       

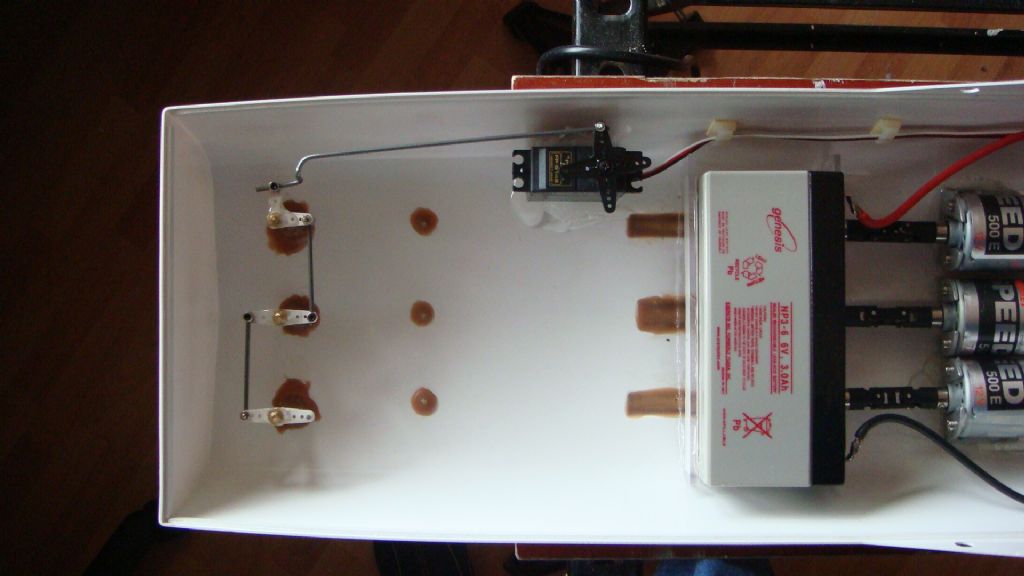
                      I moved the rudder servo in ordot to make room for future expansion modules. I also altered the rod connecting the rudders to the servo. This solved a mechanical problem i had. When applying full left rudder the steering could be inverted. It’s hard to explain how this could happen but at least it’s solved. See picture below for the new position of the servo and the adapted steering rod.


                      I´m pleased with the solution i came up with for fastening the batteries. I used

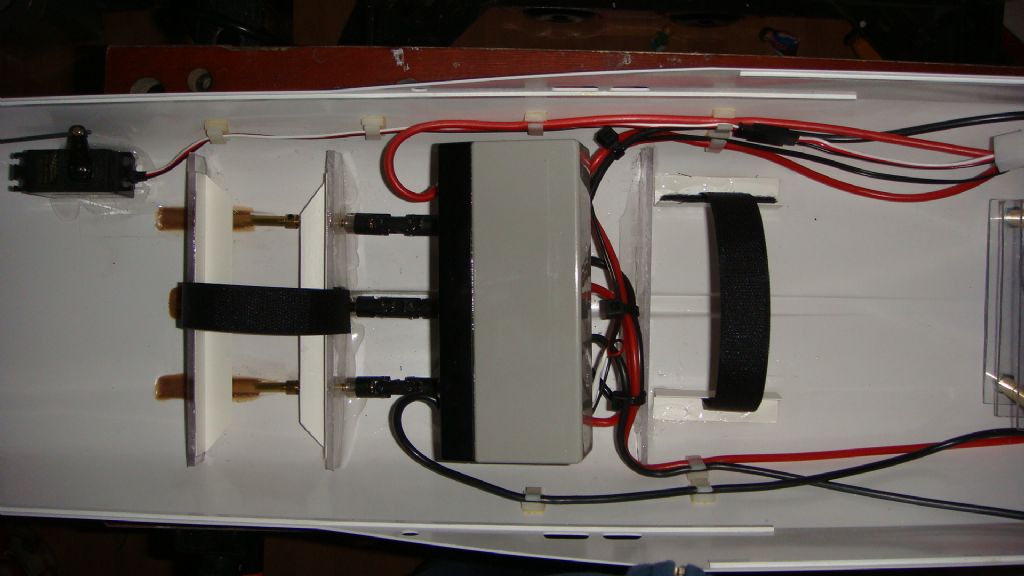
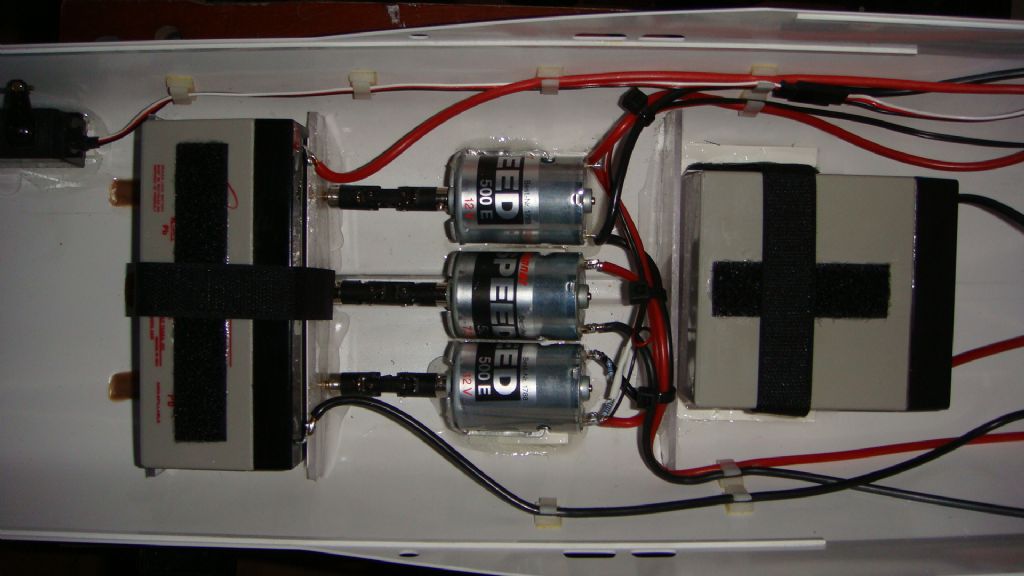
                      velcro tape (if this is correct english?) for this. I glued a strip on the batteries. The counter part i attaches to the hull. If i want to i can move the batteries in order to find the correct balance of the boat. The rear battery moves left-right and the front battery back-forth. The picture below shows the tape in the hull without the batteries.
                       

                      And the next picture with the batteries installed.


                      Next i will finaly attach the rear deck to the hull. This is a big milestone for me. Until the next update.

                       
                      Regards John


                      #19395
                      John Hoffmans
                      Participant
                        @johnhoffmans55592
                        Small update,
                         
                        I fastened the rear deck to he hull:
                         

                        After the 2-component glue hardened i started closing the seams with filler. When the filler dried there was a lot of sanding to be done. I really underestimated the time needed in order get a nice result from the sanding.


                        I also made a start with the fence. At first i wanted to make it removable but i decided to fix it to the hull. The chance of losing the fence when on the water was just to high.


                        Until the next update.
                        Regards John


                        #19738
                        kenneth gault
                        Participant
                          @kennethgault51984
                          Hi, i think i understand what you mean about the rudder set up, if a pivot point goes over centre things can work backwards or lock up ( in engineering certain joints are made so that they can be moved over centre to lock them).  The prop set up is also interesting, i think it is well known with experienced modellers, however if you buy a robbe s boat it has 3 right hand props, as you apply power it heels way over, turn like this and a prop lifts out of the water resulting in the boat suddenly straightening.  This was the first boat i built ( and it was a pig to build), fortunately an article on the internet prevented me making it this way, if i had read the article earlier about how bad a fit the front end was i would probably never have bought the kit.  On the home front my pt 109 is finished, the George Turner MTB just requires finishing touches. My Flyvefisken was taken out of the box last night, i have bought 3 speed 400 motors, but have already decided to use graupner prop shafts, though 4 mm they only have 6mm outers these will fit nicely into the supports without the extra tube bushing. 
                          Cheers  Ken   
                          #19772
                          John Hoffmans
                          Participant
                            @johnhoffmans55592
                            Hi, the way you describe it is exactly what happened. Because the deck is fastened now i hope i have constructed everything properly. The rudder thing i discovered only days before i was planning to fasten the deck. By the sound of it you are buidling really fast. I hope you enjoy constructing the flyvefisken just like i am. Maybe you can post some pictures of your current work? If you want i can also send some really detailed pictures of the real ship (i recieved some pictures from the danish navy. I’m also in correspondence with the navy with respect to the correct use of lights on the ship).
                             
                            On the subject of my own Flyvefisken: like i metioned before i’m saving space beneath the rear deck in order to fit  future expansion modules. The first one wil be a vertical launch system (VLS). This system is also used in the real world counterpart of the model. I’m also planning on making the system functional i.e. it wil be capable of launching 1:50 scale rockets. This will of course happen within all relevant legal and safety boundries (so please no discussion on this particular aspect of the missile system, i already did extensive research on the legal/safety thing and closed the topic).
                             
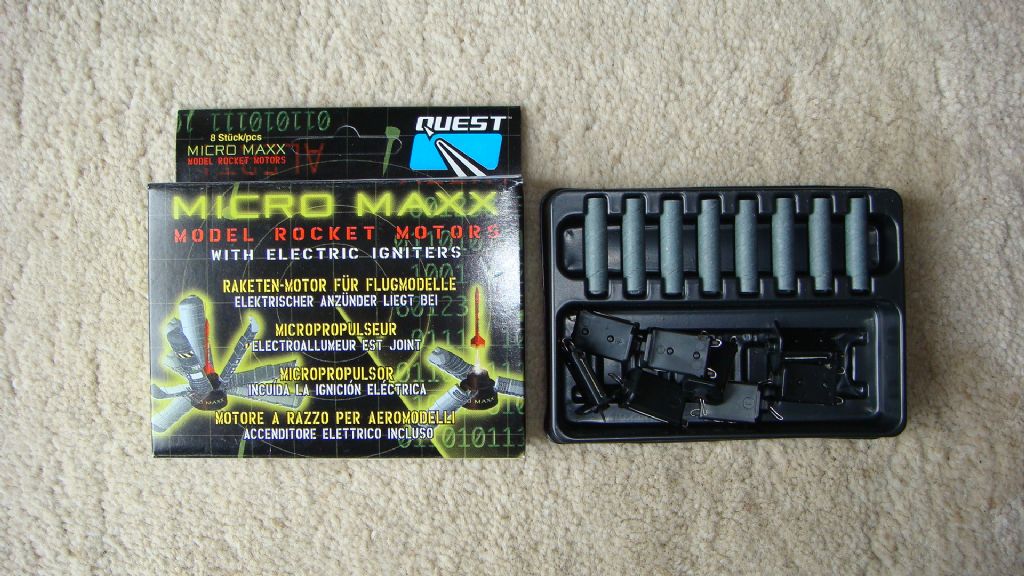
                            The rockets will be made of balsa wood. The mini rockets will be powered by mini solid fuel rocket engines and will be ignited electronic means (See picture below for engines and igniters). I will post the progress in this thread.
                             
                            Regards John
                            #20074
                            kenneth gault
                            Participant
                              @kennethgault51984
                              Hi John
                              Very interested in any info you have, i want to fit working lights so any info you have on colours will be very welcome.
                              Rockets sound interesting again would like to see methods, with my luck after months of building a rocket would ignite but fail to fire, resulting to a boat resembling a viking funeral.
                              I will have to learn how to post pictures, i do build slowly even when i have time to build, i will spend ages making sure the 3 shafts are parallel and inclined at the same angle.
                              when i fit the motors i am going to try to put a big one in the middle. outers will be on a speed controller, centre on a servo/microswith run from a y-lead.  This will be set to cut in on full forward, this will limit speed in reverse and reduce risk of swamping.
                              Whun i fit motors i have alredy fully secured the shafts, i then substitute the universal joint part of the coupling (the red bit) with an equal length of 11/32 outside diameter brass tube(i find the internal bore of this a snug fit onto the coulling ends.  Te motors are thus secured with effectively a solid link to the shaft (much better than aligning by eye), when the motors are secured in it is then just a matter of removing the shaft inner inserting the universal joint and then refitting the inner shaft ( but i do not grease it until after the hull has been sprayed.  
                              #37384
                              karel kestens 1
                              Participant
                                @karelkestens1

                                realy nice build, i have also bought on in second hand, it realy nice build so far … its a nice addition

                                very neat details you are adding john, great skills

                                #50395
                                Hasse Hasse
                                Participant
                                  @hassehasse71173

                                  Good day all people here

                                  Please I want help, I bought Billing Boats Danish patrol boat Flying Fish 1/50 scale kit but I have no Building plan or instrutection I will be very very very greatfull if any one can help me and sending this plan to me by Email or post and Im ready to pay any charge or coast to the plan or any Another charge,. Please excuse my weak English language, Im Swedish.

                                  Best Regards

                                  Hasse

                                Viewing 15 posts - 26 through 40 (of 40 total)
                                • Please log in to reply to this topic. Registering is free and easy using the links on the menu at the top of this page.

                                Code of conduct | Forum Help/FAQs

                                Advert

                                Latest Replies

                                Home Forums Gallery Topics

                                Viewing 25 topics - 1 through 25 (of 25 total)
                                Viewing 25 topics - 1 through 25 (of 25 total)

                                View full reply list.

                                Advert

                                Newsletter Sign-up