Prototype build of ELLIE

Advert

Prototype build of ELLIE

Home Forums Scratch build Prototype build of ELLIE

  • This topic is empty.
Viewing 25 posts - 1,351 through 1,375 (of 1,441 total)
  • Author
    Posts
  • #69872
    Dave Milbourn
    Participant
      @davemilbourn48782

      I don't know about 'justified' – it's only my opinion, John!

      A recommendation would only be for a unit which I've used myself. A suggestion depends on the model, the prop size, the motor voltage/current ratings and the voltage used. I can just about hazard a wild guess armed with that info!

      Dave M

      Advert
      #69877
      Dave Milbourn
      Participant
        @davemilbourn48782

        John

        I don't know how it escaped me (advancing senility maybe) but if you've installed what are essentially Speed 400 motors in a full-sized Ellie then you might have a bigger problem. These motors must be kept below 10A current and 7.2v. You can only do this by restricting the prop size to around 25mm diameter, and I doubt whether that would be enough to shove a three-foot marine ply model boat around at much more than snail speed. My Sea Spray (Ellie with twin motors) had two Speed 600ECO motors in it, running 35mm props, and that didn't have much of a turn of speed – about right for a sea-fishing day boat but no more. At the very least you've not left yourself with any spare power in case of trouble on the water.
        How do you feel about swapping the JP 400 motors for larger ones?

        Dave M

        #69887
        John O’C
        Participant
          @johnoc

          Hi Dave

          Slip of the brain from me!! The motors are 480's which I know is not a lot better but my thinking was Broads cruisers "Plod", or should I say all those we have hired do, and I had them in a drawer doing nothing!!

          I was in Stevie Webbsat Frodsham this morning buying some wood and asked one of the guys about controllers as they sold me the motors a couple of years ago. They sold me a pair of Logic Fusion Podium17T Sport.

          I have kept the propshaft angle fairly tight so it would need some surgery to get bigger motors in. Not impossible but messy. Having said that if it would make things a lot better I would do it as there is plenty of prop space.

          I will keep the controllers in the boxes for now.

          J

          #69888
          Dave Milbourn
          Participant
            @davemilbourn48782

            John

            JP Power 480's are electric flight motors and apparently turn at around 17,000RPM on 8.4v unloaded whereas the motors which I would use to 'plod' (Mabuchi 555) turn at about 5500RPM on 12v. They are also rated to 18v so you can increase the speed quite easily should you wish to.They'd have no trouble swinging 40-45mm 3 blade props whereas the 480s would need to be restricted to 25mm. I guess it depends on whether you want to take a chance with the 480 motors or make modifications to the boat at this stage. I can't make up your mind for you but I think you know where my inclination lies.
            I have used FUSION HAWK 18A and 30A brushless ESCs and they are just the ticket for that job, but I've no experience of the ones you've purchased. I'd fit the two 555's with an ACTion P94 Lite dual ESC/mixer.

            Dave M

            #69891
            John O’C
            Participant
              @johnoc

              Many thanks for all that Dave.

              I think I will experiment and maybe try a 6v battery on the 480's with the 25mm 3 blade props. I will get the net off the fish pond this week and see how it goes.
              Then I can always fall back on your suggestions.

              Cheers

              John

              #69892
              Paul T
              Participant
                @pault84577

                John

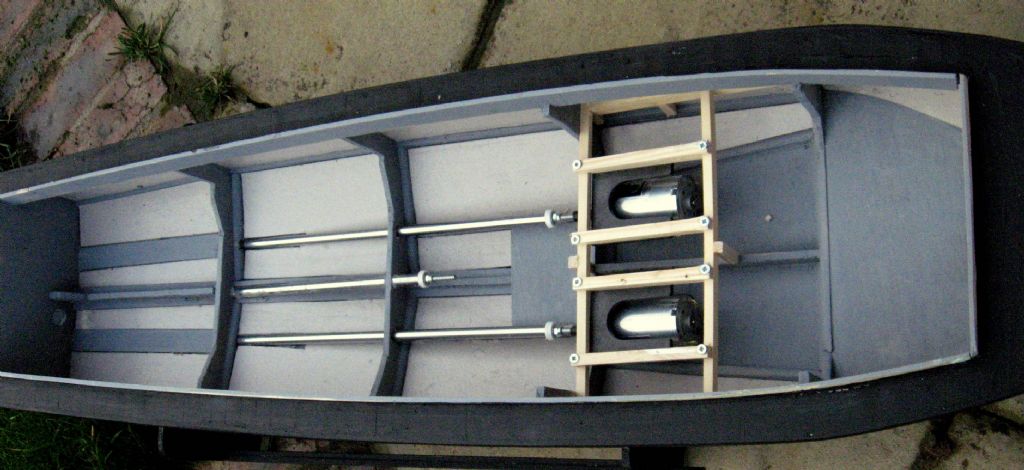
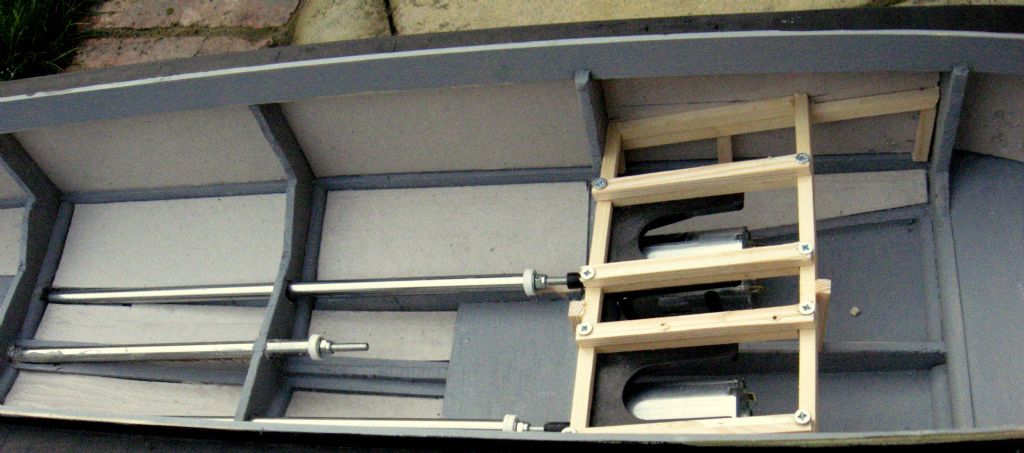
                When I built Red Leader, the MTB version of Ellie I squeezed in 3 motors and kept the shallow shaft angle by hanging two of the motors upside down.

                red leader 09.jpg

                red leader 10.jpg

                This allowed me to get the motors right down against the hull.

                What you might not have cottoned onto yet is that my design ideal of low angled propshafts isn't universally accepted especially by some of the more senior members of our group. This has led to some energetic discussions.

                Paul

                Edited By Paul T on 13/02/2017 19:09:30

                #69895
                Bob Abell 2
                Participant
                  @bobabell2

                  Paul

                  I remember it well

                  But since then, I think the way to go is via Timing Belts and you can achieve zero degrees prop shaft angle

                  Would zero degrees have much effect………Apart from letting the water in?

                  Bob

                  #69897
                  Dave Milbourn
                  Participant
                    @davemilbourn48782

                    Bob/Paul
                    In order to achieve zero degrees with a straight driveline in Ellie then either the props would have to be mounted on the transom or the motors would have to be mounted underneath the hull. As both are impractical then the only point at issue is how much of a compromise you are prepared to accept. I'm happy with the practicalities of my own designs.

                    John
                    Sounds like a practical idea.

                    Dave M

                    #69898
                    Paul T
                    Participant
                      @pault84577

                      Dave

                      Shall we dance again.

                      A slight change to a hull design by creating open bottomed tunnels for the propellers to sit in would enable zero degree shafts and position the propellers within a safe zone where the hull would protect them from damage.

                      However the Ellie design has the shafts at 2deg which is shallow enough to achieve 98% performance from the drive system.

                      Paul

                      #69901
                      Dave Milbourn
                      Participant
                        @davemilbourn48782

                        Shall we dance again.

                        There is a saying about irresistible forces and immovable objects, Paul – and I don't dance anyway. Your parcel is out for delivery as I write.

                        DM

                        #69909
                        Paul T
                        Participant
                          @pault84577

                          Hi Dave

                          My dancing days ended with Showaddywaddy and the school disco.

                          The parcel arrived in perfect condition but I had to use a thermal lance to cut through the packing tape.

                          Paul

                          Oddly enough the 'Irresistible forces and immovable objects' paradox is flawed, if there were an irresistible force then logically the immovable object can't exist and vice versa.

                          #69912
                          Dave Milbourn
                          Participant
                            @davemilbourn48782

                            Yeah….whatever.

                            #71541
                            John O’C
                            Participant
                              @johnoc

                              Hi Guys
                              Long time away but have still been plodding along.

                              Still trying to settle on a colour scheme so will have to get the airbrush going and do some testing. I have still to test the motor performance on my pond. Retirement is such busy time!!!

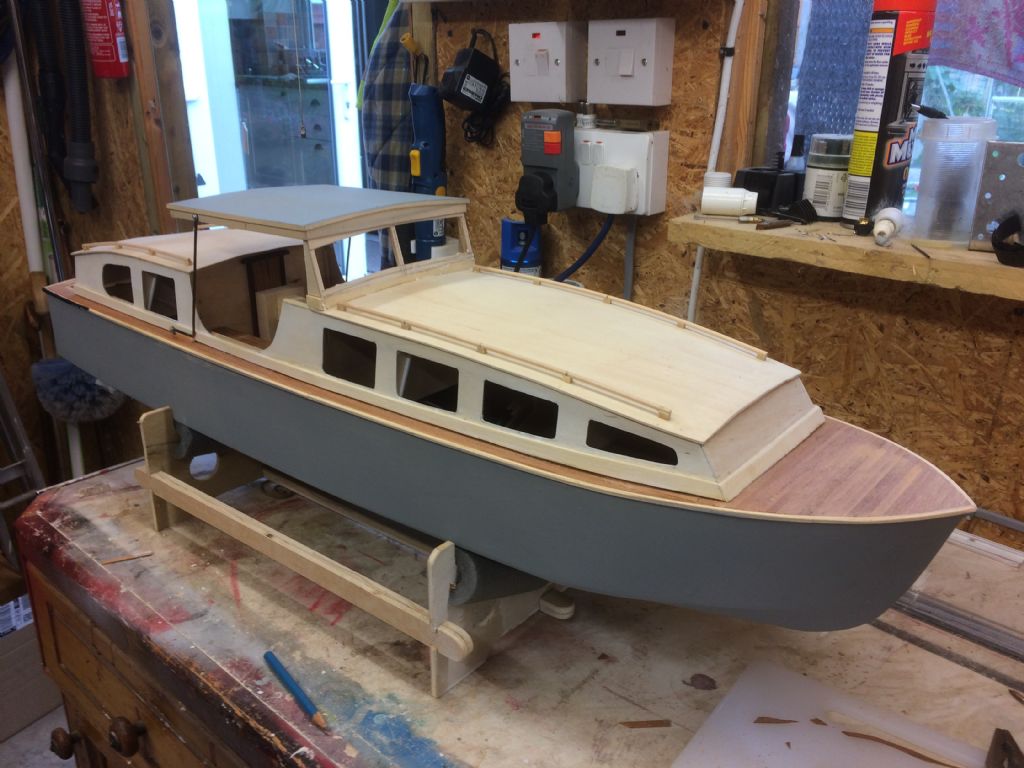
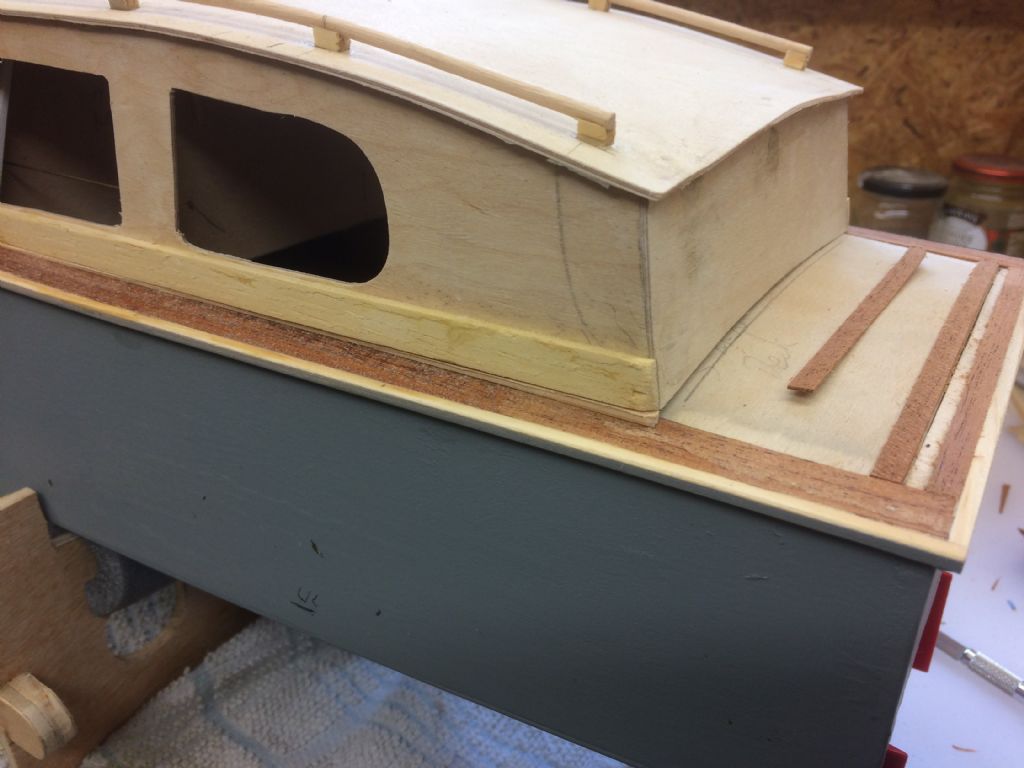
                              Spent time on the cockpit and the canopy and attempted my first deck planking.

                              img_1169.jpg

                              The planking looks OK, to me anyway!, and now I want varnish and seal it before I start splashing paint about. Yacht varnish if I remember correctly. Should get it today.

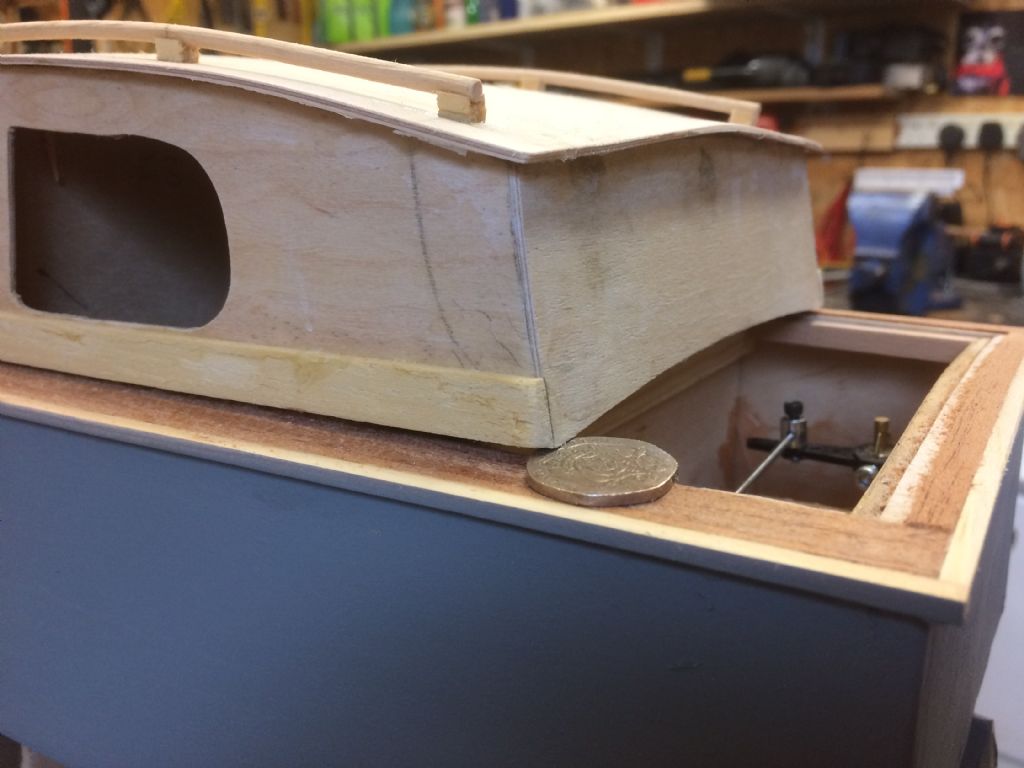
                              I have got a slight twist in the superstructure on the port stern from the cockpit back which is leaving a 2 – 3mm gap on the corner. May try the steamer and some weights to try and sort it. Alternatively I could find a neat way of fixing the hull and structure together. Any ideas?

                              Cheers

                              J

                              #71542
                              Bob Abell 2
                              Participant
                                @bobabell2

                                John

                                Show us the gap at the back please

                                I would soak the inside and twist it with weights

                                Will it twist by hand?

                                Bob

                                #71544
                                Bob Abell 2
                                Participant
                                  @bobabell2

                                  Hi John

                                  I forgot to mention that you are making a very nice job of the build

                                  The design of the model is a credit to Paul

                                  Bob

                                  #71545
                                  Paul T
                                  Participant
                                    @pault84577

                                    Hello John

                                    The model looks first class and your joinery skills do you credit.

                                    When I built the first prototype I also ended up with a slight longitudinal twist in the cabins which I sorted out by clamping the top firmly down onto the hull and steaming the entire superstructure.

                                    Paul

                                    #71547
                                    John O’C
                                    Participant
                                      @johnoc

                                      Bob / Paul
                                      Many thanks for the kind words. I am making some things up as I go along. The support of the canopy is based on something in my memory where there were just the 2 supports and being bent they throw the whole canopy onto the stern roof clearing the cockpit space totally. A few hours of trial and error and then cut and bend the coat hangers and flatten the ends for drilling.

                                      The bottom fixing of course fell on the opening window structure but have fudged it with the help of blocks on the deck to help with the support. Again vague memories that these blocks were used in real life. Or wishful thinking maybe!

                                      Bob, I will pop a picture of the gap on tomorrow.

                                      Paul, I will use some drill batteries for weight and try and steam it. My only concern is the planking when doing this unless I can do it off the hull. Bob is right, is that as usual, about the design being a credit to you. I for one am really enjoying the build and adding those little details that I remember.

                                      Must test those motors though.
                                      Take care
                                      J

                                      #71548
                                      Paul T
                                      Participant
                                        @pault84577

                                        John

                                        Thank you for your kind words, I like your version of the canopy supports and like you I have memories of this style being used on full size boats.

                                        If you are worried about the planking then clamp the superstructure to a piece of square timber or even the kitchen table.

                                        Paul

                                        Edited By Paul T on 23/06/2017 18:52:14

                                        #71553
                                        John O’C
                                        Participant
                                          @johnoc

                                          Morning All
                                          Tried to upload the gap photo's but it appears the page has done a runner. I will try again later.

                                          J

                                          #71554
                                          Dave Milbourn
                                          Participant
                                            @davemilbourn48782

                                            Kevin

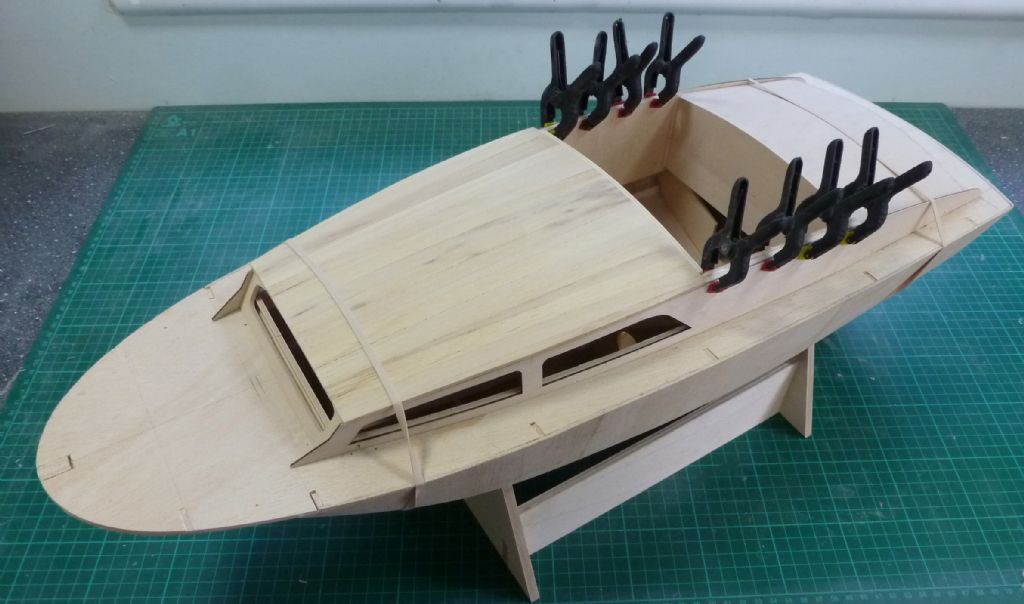
                                            To avoid twists in the superstructure you should always build it directly onto the hull. Use clingfilm or cheap clear tape to prevent the glue sticking the top to the hull and hold the top down with rubber bands while the assembly sets up.

                                            Dave M

                                            p1020591.jpg

                                            #71555
                                            John O’C
                                            Participant
                                              @johnoc

                                              You can see the gap here.
                                              A gentle pressure on the roof corner will make it sit down properly.

                                              Dave thanks for the advice and now thinking about it I may know what happened. I built as you described with the superstructure on the hull and the clingfilm etc' but I have fitted the lockers / seats while it was on the bench. Given the lack of force needed to sit it down I am sure this is where I went wrong so I may just rip them out and start again as they are just balsa block below the veneer. Or should I try steaming first?

                                              img_1172.jpg

                                              I finally got the controls rewired after initially buying the wrong ESC's, read cheap ones, and tested the motor / prop combination and it appears to work OK for a broads style cruiser. I will try a couple of slightly larger props to see the result though and I need to try it on a larger area of water to see how well the rudders actually work.

                                              Cheers

                                              J

                                              #71557
                                              Dave Milbourn
                                              Participant
                                                @davemilbourn48782

                                                John

                                                It's tubular sections which resist twisting/untwisting. If you look at my model above you can see that the top is two pretty rigid sections [front and rear cabins] with an open gap in between – the cockpit. At this stage you can twist the superstructure until both sections are flat down on the hull, but as soon as you join them with the cockpit floor then you make the whole thing one rigid section. That's why it's best to do what I have shown and hold the top down while you complete the open cockpit. In the case of your Ellie it might only be necessary to remove the stuff you've glued between the front and back sections, then strap the top down on the hull and refit the floor etc. Steaming is drastic but might be your only solution if the thing is badly twisted throughout.
                                                Fingers crossed here!

                                                Dave M

                                                #71560
                                                ashley needham
                                                Participant
                                                  @ashleyneedham69188

                                                  I have always built the superstructure on to the deck to ensure a good fit. I cant remember why exactly (being self-taught) but it always seemed to me to be the thing to do. No matter how careful I have been there always seem to be small differences from one side to another.

                                                  ​Getting the Toyboata square was tricky and at one stage I had a diagonal truss to square it up a bit, but thankfully after a few more internal supports had been added is came (almost) good.

                                                  ​As a bodger I could see that a strip of wood applied full length along the bottom , both sides, and sanded appropriately might do it.  OR can an additional stiffener be added to impart some twist?? Its very small, after all, considering the length of the cabin.

                                                  Ashley


                                                  Edited By ashley needham on 25/06/2017 08:28:38

                                                  #71571
                                                  John O’C
                                                  Participant
                                                    @johnoc

                                                    The internal brace might work Ashley as it moves into place easily but springs back even easier. Fitting it while keeping the structure right is the problem. I will try bracing the cabin area while it is on the hull which may allow me to then lift it off and add internal braces.

                                                    Alternatively bin it and start again or break it apart and see what I can do. Bracing first then!!!

                                                    Cheers

                                                    John

                                                    #71579
                                                    John O’C
                                                    Participant
                                                      @johnoc

                                                      Well??

                                                      Is this a bodge or what?

                                                      A piece of 3mm x 3mm sanded down and will be glued in.

                                                      From the number 9 bus, upper deck of course, you will never notice!!!!

                                                      I hope.

                                                      img_1176.jpg

                                                      Me thinks it may be so-so when it is glued in and painted.

                                                      Cheers once again
                                                      J

                                                    Viewing 25 posts - 1,351 through 1,375 (of 1,441 total)
                                                    • Please log in to reply to this topic. Registering is free and easy using the links on the menu at the top of this page.

                                                    Code of conduct | Forum Help/FAQs

                                                    Advert

                                                    Latest Replies

                                                    Home Forums Scratch build Topics

                                                    Viewing 25 topics - 1 through 25 (of 25 total)
                                                    Viewing 25 topics - 1 through 25 (of 25 total)

                                                    View full reply list.

                                                    Advert

                                                    Newsletter Sign-up