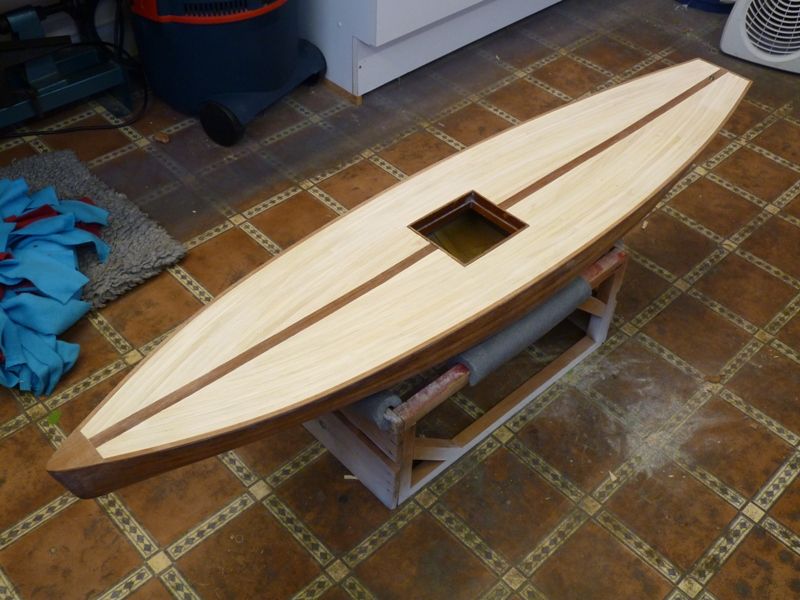
Bending Deck Planks

Advert

Bending Deck Planks

Home Forums All things floating Bending Deck Planks

  • This topic is empty.
Viewing 21 posts - 1 through 21 (of 21 total)
  • Author
    Posts
  • #75175
    Colin Bishop
    Moderator
      @colinbishop34627

      Can anyone suggest which is the best type of wood to use for deck planking when you want to bend the planks in a curve to follow the deck plan?

      The plank width will be about 3mm at the scale I am looking at (sorry to be mysterious like Ashley!).

      Square section might be one option to avoid distortion when you try to bend a flat plank sideways but it would be nice to use something like 3mm wide by 1.5mm thick.

      Depending on the curvature, some soaking or even steaming might be needed, around the bow for example but if the wood is pliable in the first place it will make the job easier.

      Colour isn't really a problem as I can stain to the shade I want.

      Colin

      Advert
      #4460
      Colin Bishop
      Moderator
        @colinbishop34627

        Best wood to use?

        #75177
        Paul T
        Participant
          @pault84577

          Colin

          It is virtually impossible to steam flat section timber of those dimensions without using excessively large amounts of vertical pressure to prevent the planks from twisting.

          My usual trick is to cut the curve planks from a large sheet of 1mm veneer.

          Paul

          #75178
          Colin Bishop
          Moderator
            @colinbishop34627

            Paul, that's rather what I was afraid of and why I asked for advice Cutting from veneer is an option but the grain would be running incorrectly if you show it. Maybe square section is the way to go, it might be possible to disguise the thickness with the gunwhale toe rail.

            Thanks for the input

            Colin

            #75179
            Banjoman
            Participant
              @banjoman

              Colin,

              Another option would be to laminate the wood and then cut a thin slices of ready-patterned veneer on a bandsaw – see Ron Rees' articles Away With Fairies (**LINK**) and Messing About With Diana (**LINK**) for more details …

              Mattias

              #75180
              Colin Bishop
              Moderator
                @colinbishop34627

                An additional thought – perhaps use square section and then rub down the finished deck to give a camber which would improve the realism as the actual deck will be flat..

                That might work OK, I have a Proxxon finishing sander to keep things even.

                Colin

                #75181
                Paul T
                Participant
                  @pault84577

                  Colin

                  Which timber are you thinking of using?

                  #75182
                  Colin Bishop
                  Moderator
                    @colinbishop34627

                    That's what I'm asking Paul. I would think maybe lime or obeche – something pliable compared with hardwood strip like walnut or mahogany.

                    Colin

                    #75187
                    Gareth Jones
                    Participant
                      @garethjones79649

                      Colin,

                      Coincidentally we are attempting something similar to your decking request this very afternoon. Elizabeth is restoring a Marblehead yacht with a rather scruffy deck and decided she wanted to have a go at curved deck planks notched into a kingplank. She has done straight deck planks in the past and we have jointly done inked curved planks on a couple of painted decks.

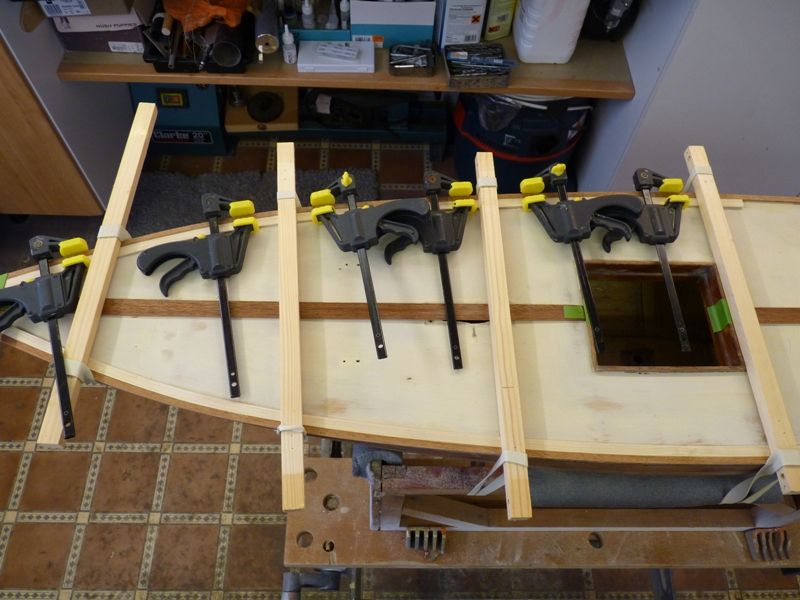
                      We started with a mahogany edge plank 5 mm wide and 2 mm thick. This was stuck on with superglue. We were able to fit a few clamps across the deck from the mast hole and centre hatch which gave us an edge to work to. Using 2 pairs of hands we were able to get the edge plank glued down flush with the edge of the deck.

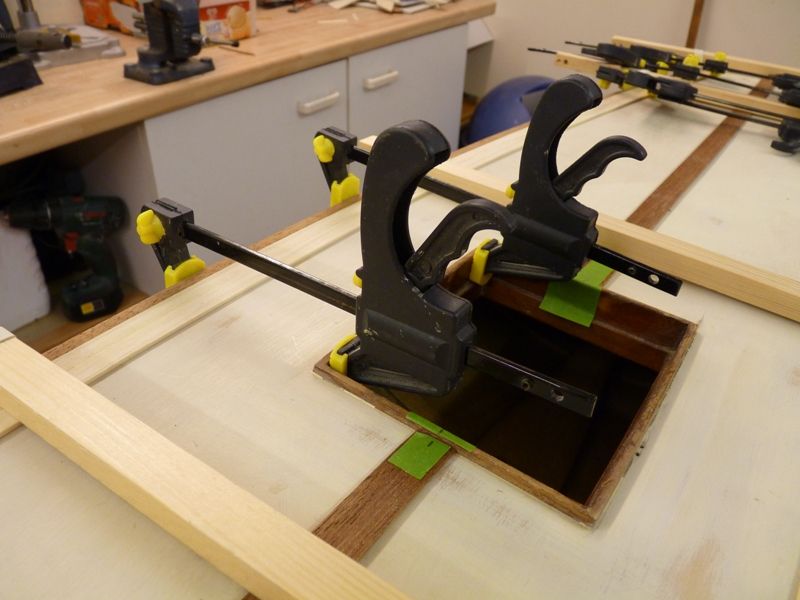
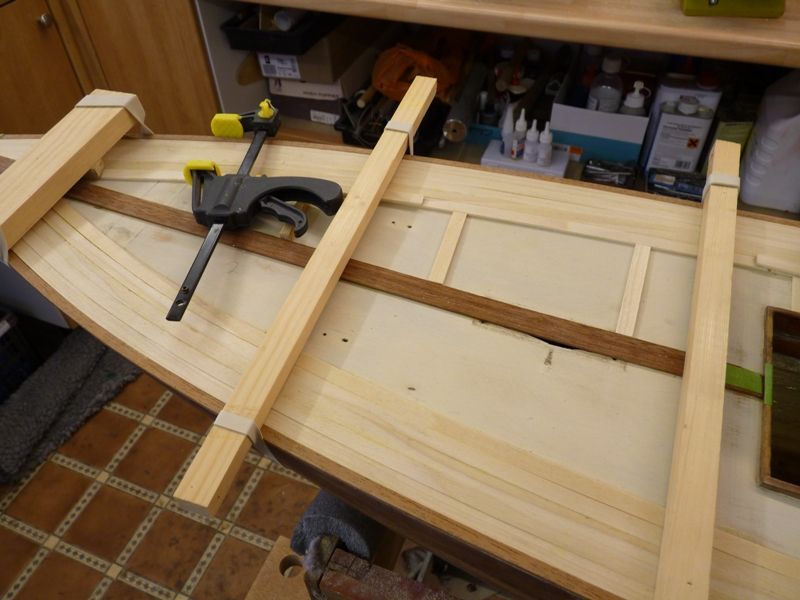
                      The main deck planks are 8 mm x 2 mm lime. We have managed to get the first one on each side at the front of the hull using battens held down on the deck with large rubber bands to stop the planks lifting and twisting. The lime planks have been lightly clamped up against the mahogany edge using some clamps as shown below. We are using aliphatic resin to glue the lime down.

                      plank bending 2.jpg

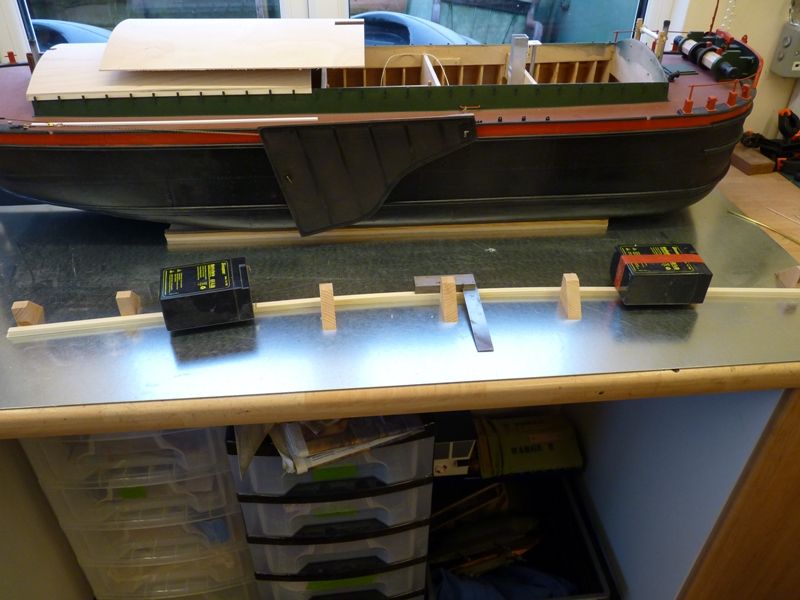
                      For subsequent planks we are attempting to pre-bend them by clamping them up overnight on the bench using some magnetic blocks and a piece of steel sheet we bought at the Blackpool show. How effective in creating a permanent bend this will be remains to be seen but the magnetic blocks work well on what is their first outing in the workshop. I will let you know more as it progresses.

                      plank bending 1.jpg

                      The kingplank is 15 mm mahogany and has been temporarily stuck down with small sections of double sided tape. We hope to do the notching by adapting Banjoman's method as used on his Moonbeam, where he had straight planks notched into the curved edge plank. I suspect that will be a real b****r of a job to do neatly without breaking or splitting the planks but time will tell.

                      Gareth

                      #75190
                      Colin Bishop
                      Moderator
                        @colinbishop34627

                        Thanks to all so far!

                        Gareth, that's interesting but I agree you probably have a job and a half on there! I can get away with a simplified kingplank for my project which is near scale so not so much joggling. At the moment, as I said earlier, I am inclining to using 3mmx3mm strip and feathering it off at the sides once firmly glued. What could possibly go wrong?!

                        Colin

                        #75194
                        John W E
                        Participant
                          @johnwe

                          hi there Colin

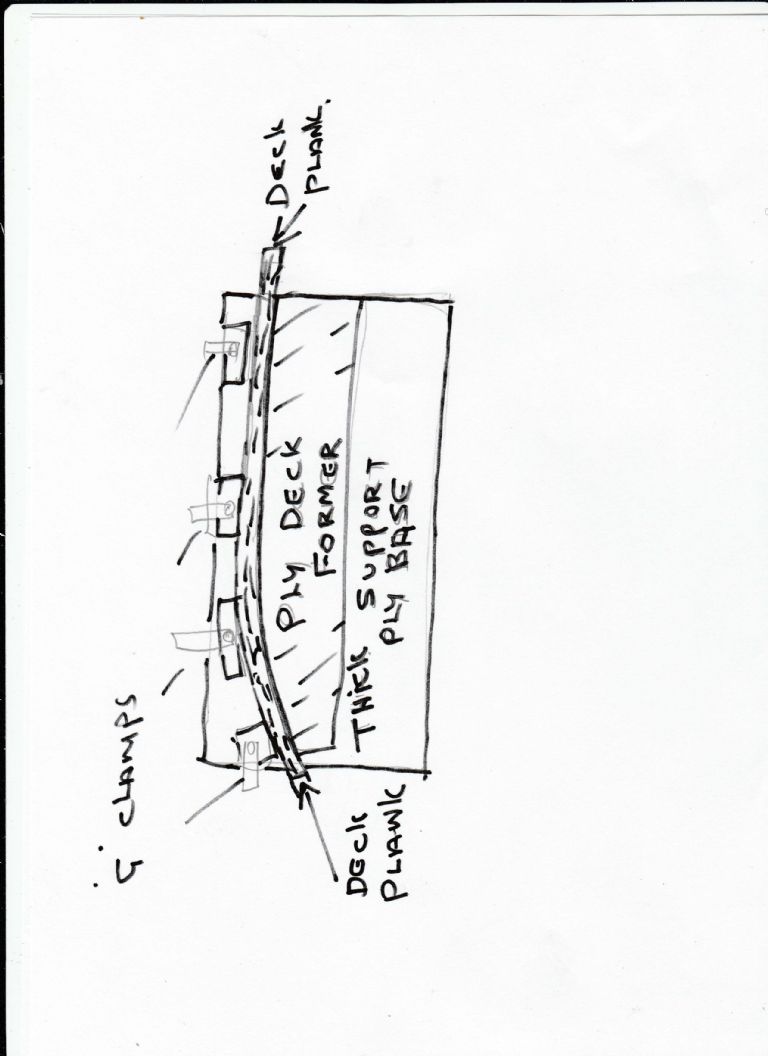
                          the deck planks I used for HMS Exeter build and a few of the fishing boats, I obtained from Jotika – they can supply a variety of materials/timber in varying sizes. I used 0.5 thick x 3mm (I think it was lime) for the decks of the warship. For the decks of the fishing boats I used a wider plank 5mm wide x 0.5 mm thick. I made a simple jig up out of scrap plywood half inch thick for the base of the jig and for the actual piece that was to form the actual bend of the plank I used a thinner piece of plywood roughly quarter of an inch. This was glued and screwed on top of the base plywood towards the edge. I wet the plank in warm water and moulded it around the radius of the template and then held it in place with clamps until dry. I am attempting to attach a bit of a sketch but no so successful at the moment due to the fact this old modeller has just purchased a new computer with the new Windows 10 on. My computer doesn't like me anymore hek.jpg

                          #75195
                          Paul T
                          Participant
                            @pault84577

                            Colin

                            Given the sizes of plank / strip that you wish to steam I would suggest the following easily available hardwoods.

                            Yew is the best to steam, Sycamore and Chestnut are also very easy to work with followed by Ash, Beech and Cherry.

                            Oak can be steam bent with care but it tends to split in thin section so I use a domestic pressure cooker to ensure the steam gets into every pore.

                            Hope this helps with the 'project'

                            Paul

                            #75196
                            John W E
                            Participant
                              @johnwe

                              just as a side note Colin you will find when the deck planks have dried out and are released from the jig, they will spring a bit. I overcame this problem when I actually glued the deck plank to the model – I held it in place with dress making pins until the glue had dried on the plank. This seemed to do the trick.

                              John

                              #75197
                              Tim Rowe
                              Participant
                                @timrowe83142

                                Colin

                                ​Deck planks are rarely if ever steamed but normally follow the line of the deck edge until the curve becomes too great at which point they are either joggled or tapered.
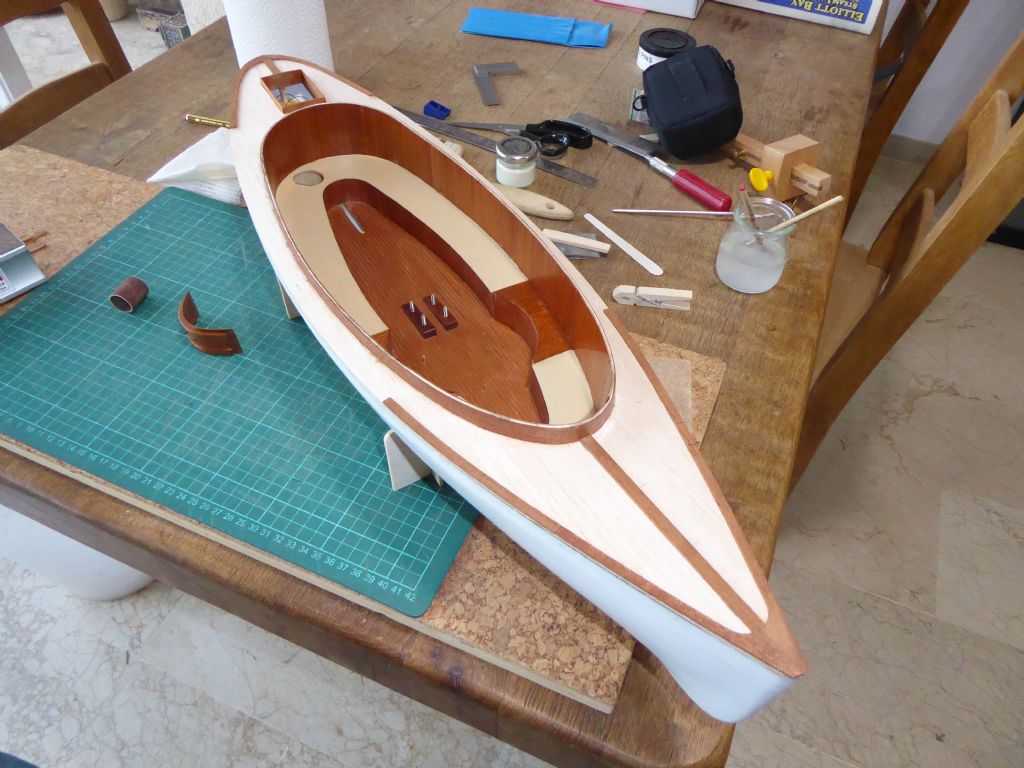
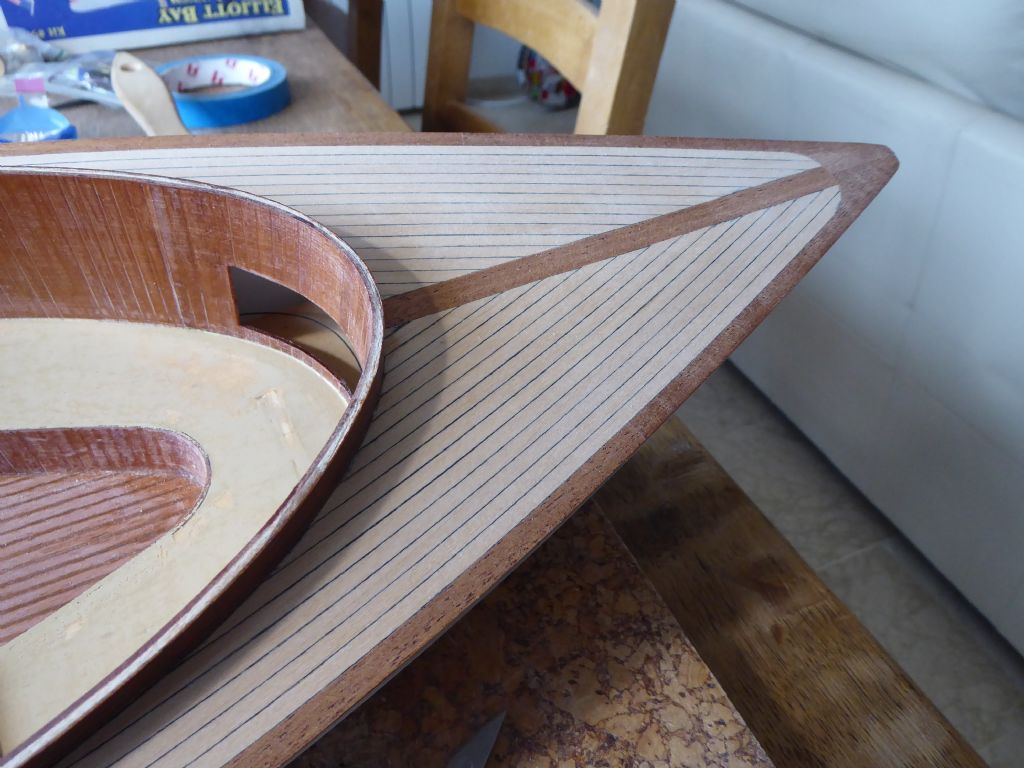
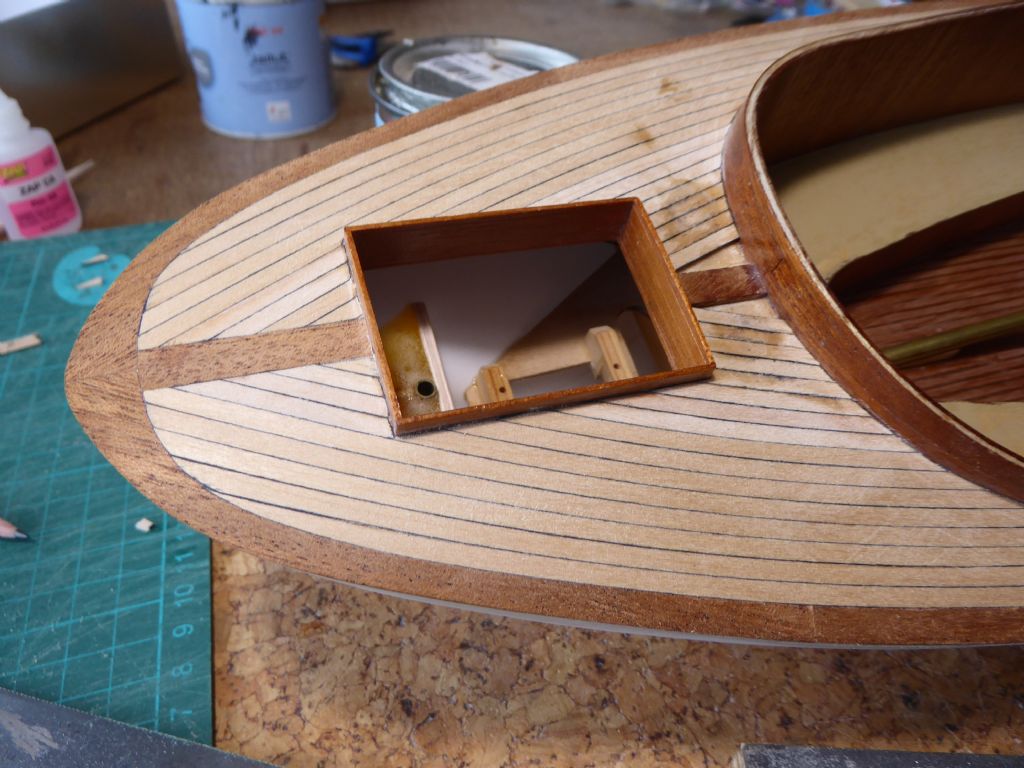
                                ​I am building a Midwest kit Elliott Bat Steamer and decided to throw away the vacuum formed deck and make my own. The sub-deck is medium hard balsa that creates a nice fair surface and something to glue onto. The covering boards and the king plank are mahogany.

                                p1010738.jpg

                                As it happens the planks are 3 x 1.5 mm Lime bought as standard from a model shop. Most of them were slightly bent so I used that in my favour. I cut the planks to length and shaped the ends having decided at which point there had to be a taper. (I discounted joggling at this scale as being to fussy and would horrid unless perfect)

                                ​Starting from the deck edge, each plank was sprung into place and secured with a dab of thin / rapid cyano. The balsa was very effective at wicking the glue under the plank. There was no problem at all springing the planks over most of the length but the stern has a fairly tight radius so the planks were run out in a taper.

                                p1030334.jpg

                                The seams are painted and you can see the planks run right up to the bow.

                                p1030335.jpg

                                At the stern I got most of the way but you can see how the taper works. This section was not quite finished with a couple of very short sections to fit. You can see the traces of the cyano forward of the hatch coaming and the cyano also made the acrylic black paint run slightly but a light sanding sorted that out.

                                ​I wouldn't steam deck planks as any curve that tight would look unnatural.

                                Tim

                                #75199
                                Colin Bishop
                                Moderator
                                  @colinbishop34627

                                  Tim, thank you – that is pretty much the effect I was wanting to achieve. It looks really good. Thank you.

                                  Colin

                                  #75235
                                  Byron Rees…(Ron)
                                  Participant
                                    @byronrees-ron

                                    Hi Colin,

                                    First of all thanks to Banjoman for the mention of my methods for planking. Now I know you (Colin) has access to all these but for those who don't and may be interested here's a short summary of perhaps the easiest way to do this type of planking.

                                    Firstly, nearly every single hardwood out there will bend easily with this method, so get the actual wood you want to replicate and if you have terrible trouble, I'm sure I can find you some bits (I have tons of the stuff)

                                    Teak and mahogany etc will make a lovely deck, so here goes. Cut a piece of chosen hardwood, or lime or whatever into 3mm strips about 25mm or so wide. I use artists black card (Black right through) and cut this into the same size strips as well. You need enough so that when they are all put side by side they cover the width of the are to be covered.

                                    Take a template of the decks outside curve and transfer it to a chunk of 4 x 2 or bigger softwood a bit longer than the deck. Cut this down the line so you have two chunky pieces for the clamp. It also helps if it is a couple of inches longer than your decks.

                                    Cover the softwood clamp with strips of polythene bag, use a staple gun but not on the clamp faces. This stops it all sticking to the clamp.

                                    Get every 'G' cramp you've got ready, cover your flat work area with polythene and then steam all the hardwood in a steamer (Wickes Wallpaper stripper and a bit of pipe) or block off a bit of down pipe and fill with boiling water and stand up with the wood strips in for an hour.

                                    Wear latex gloves. Start to layer one piece of hardwood and one piece of coloured card into the clamp using either Polyurethane wood glue (Gorilla) or Aliphatic Resin Glue, Layer these up (a cut down radiator roller works well here) till you have enough to cover the width of the deck. You need to work quickly!. The Gorilla glue will start to foam in contact with moisture in about 10 minutes!!!

                                    Place the second half of the clamp on top and lay it on its side. Start clamping the strips into a curve, pushing them down level as you go. You can't have too many clamps here, so no gaps hopefully. Clamp both sides really tight to stop it sliding and slipping.(Use a spanner if you have to)

                                    Leave it all to dry for at least overnight.. A warm area is best as well.

                                    Once dry, remove the clamps and you should have a curved lamination of wood and card. Trim off excess glue on one side to get a flat surface. Use a piece of white melamine to increase the height of your fence, hopefully on a bandsaw. Set cut width to about 2mm and slice the curved block across the laminations as many times as you can.

                                    You should get enough good strips to choose from plus fill in pieces for the fore and stern decks. Glue down in place with weights till stuck and sand them smooth afterwards on the top only. Finish to taste with clear.

                                    Different coloured card can be used for dark or light caulking depending on how old the original ship was.

                                    Do deck capping strips after sanding the outside edges to overlap the deck to hull joint.

                                    Hope this is easy to understand. PM me if you need wood or more into.

                                    Cheers………..Ron. PS. Look at Banjomans links above.

                                    #75411
                                    Colin Bishop
                                    Moderator
                                      @colinbishop34627

                                      Thanks Ron, lots of food for thought there. And thanks for the offer of wood, much appreciated.

                                      With regard to the colour I am a bit tempted to replicate weathered teak whihj has a silvery grey colour and is frequently seen on pleasure boats. It is possible to get white ash wood dye which might do the job.

                                      Anyway, thanks for everyone's comments, really valuable.

                                      Better build the boat first though!

                                      Colin

                                      #75413
                                      Gareth Jones
                                      Participant
                                        @garethjones79649

                                        Colin,

                                        Just to add to my earlier post here is a photo showing how we used a couple of clamps at the centre hatch (and another at the mast aperture) to create an edge against which we could hold the outermost mahogany plank.

                                        plank bending 3.jpg

                                        Whether this would be possible on your model remains to be seen.

                                        Planking has progressed on Daredevil and Elizabeth has 5 planks on each side now, plus the edge one. Having seen the earlier post by Tim Rowe, Elizabeth decided discretion was the better part of valour and decided not to joggle all the curved planks into the centre king plank. The king plank has therefore been glued in place and it is now easier to bend the planks into position using wedges rather than clamps as shown below.

                                        plank bending 4.jpg

                                        I don't think we would attempt planking a deck this way with anything wider than 8 mm or it would be too stiff, or anything thinner than 2 mm or there would be no edge to pull or push the plank sideways with.

                                        Gareth

                                        Edited By Gareth Jones on 26/01/2018 18:12:15

                                        #75418
                                        Banjoman
                                        Participant
                                          @banjoman

                                          Colin,

                                          The Woodrack (a company that sells very nice model timbers indeed!) say on their website that Tulipwood (aka American Poplar) is "frequently used to simulate sun-bleached Teak decks" (**LINK**).

                                          I don't now that I've ever seen Tulipwood for real, so have no personal knowledge, but at least the claim is there …

                                          Mattias

                                          #75419
                                          Colin Bishop
                                          Moderator
                                            @colinbishop34627

                                            Thanks Mattias,

                                            I need to bear in mind that I am building a review model for Model Boats here and not constructing a family heirloom so I need to strike a balance. A fancy deck is essentially an addition to the kit as supplied so I need to be realistic in respect of what a typical customer might achieve as a bit of embellishment.

                                            Colin

                                            #75551
                                            Gareth Jones
                                            Participant
                                              @garethjones79649

                                              The planking of Daredevil is now complete, the next job for Elizabeth is sanding it down.

                                              plank bending 5.jpg

                                              Gareth

                                            Viewing 21 posts - 1 through 21 (of 21 total)
                                            • Please log in to reply to this topic. Registering is free and easy using the links on the menu at the top of this page.

                                            Code of conduct | Forum Help/FAQs

                                            Advert

                                            Latest Replies

                                            Home Forums All things floating Topics

                                            Viewing 25 topics - 1 through 25 (of 25 total)
                                            Viewing 25 topics - 1 through 25 (of 25 total)

                                            View full reply list.

                                            Advert

                                            Newsletter Sign-up