Prototype build of ELLIE

Advert

Prototype build of ELLIE

Home Forums Scratch build Prototype build of ELLIE

  • This topic is empty.
Viewing 25 posts - 801 through 825 (of 1,441 total)
  • Author
    Posts
  • #44821
    Peter Fitness
    Participant
      @peterfitness34857

      I can't wait to see the maiden voyage photos, Bob.

      Dave, Australia is a very big country, a fact often not appreciated by many. As I mentioned, we are 2000km from Hobart, to the south, but also 2000km from Cairns, to the north! Sydney to Perth by road is about 4000km.

      It's worth looking at this web site, if you're interested **LINK**

      Peter.

      Advert
      #44829
      Dave Milbourn
      Participant
        @davemilbourn48782

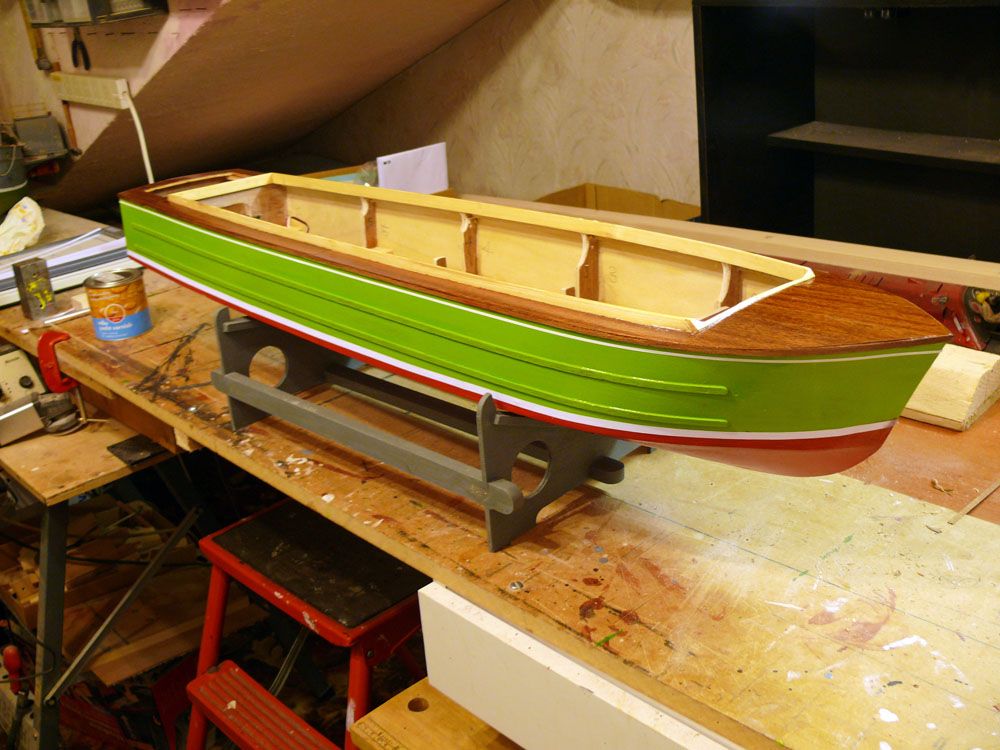
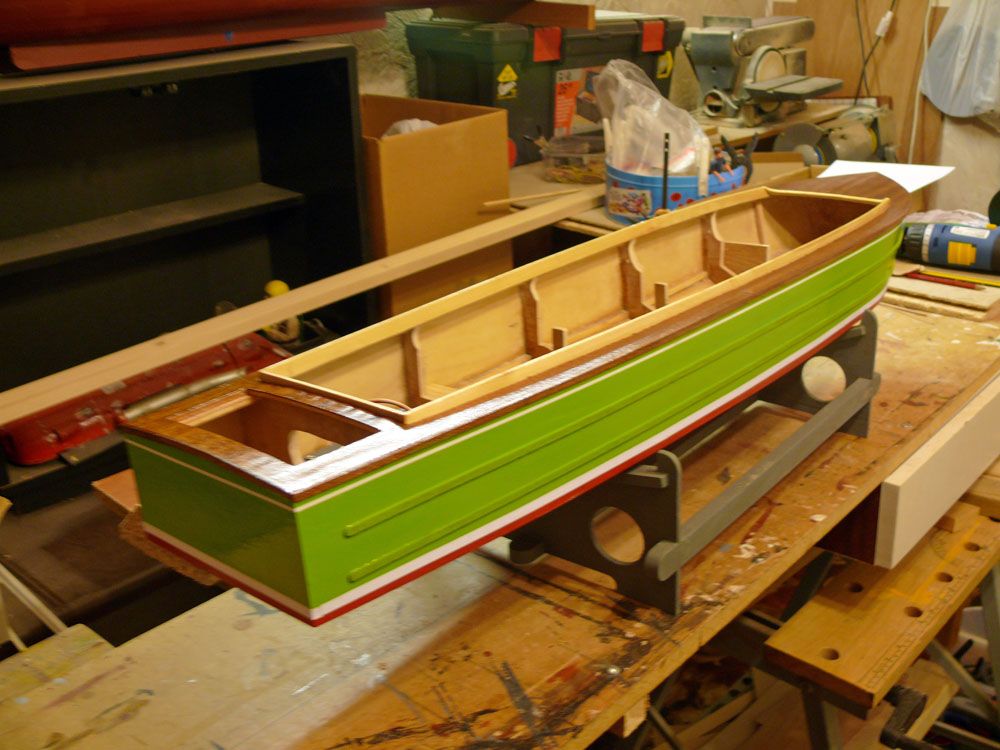
        Sea Spray thus far. Next job is rear deck hatch, followed by rudders and servo. After that it's more gloop inside to waterproof the hull, then fit the motors, couplings, props and radio.

        ellie 72a.jpg

        ellie 73a.jpg

        ellie 74a.jpg

        Edited By Dave Milbourn on 05/11/2013 12:53:11

        #44832
        Ian Gardner
        Participant
          @iangardner62867

          She looks splendid, Dave! Very nice finish and colour scheme. Tell us about those window frames. What are they made of? They look very good indeed.

          Can't wait to see the action shots.

          Ian

          #44833
          Paul T
          Participant
            @pault84577

            Dave

            The blue and white looks lovely and has totally changed the look of the model.

            I might make the cabin windows a little bigger and increase the rake to the angle of the forward window panel. What are your thoughts now that you have built it?

            Paul

            #44834
            Dave Milbourn
            Participant
              @davemilbourn48782

              Ian
              The window frames are 0.5mm styrene sheet. I cut the window glazed panels exactly to fit the apertures from clear sheet, then make a cut-out the same shape but 1.5mm smaller all round in the white plastic sheet. The clear panels are glued centrally over the cutout with RC Modellers Craft Glue. When dry I cut the white plastic out 1.5mm outside the shape of the clear panels to give a 3mm-wide frame. It also gives a 1.5mm "step" all round to glue into the cabin sides. I then mask and paint the frames and finally glue them in place with the same stuff, applied undiluted with a fine paint brush.

              The model was finished using EzeKote and lightweight fibreglass cloth, followed by several more coats of EzeKote and a good rub down with 400 silicon-carbide paper. Then on to the Halfords rattle cans for the primers and gloss colours. The ply deck is just stained with Light Teak woodstain followed by umpteen coats of thinned Rustins Clear Satin Polyurethane and progressively finer wet-and-dry paper.

              Paul
              I'd agree to both of your suggestions, although the for'd cabin windows look a bit low largely because of the thickness of the planking I used for the roof (4.5mm), All I need now are some suggestions as to what deck fittings I should add and what on earth I'm going to fill that ruddy great big cockpit-well area with! I reckon the scale as about 1/12 to 1/16th – right?

              Dave M

              #44835
              Paul T
              Participant
                @pault84577

                Dave

                Fill it with seats, fishing gear, bait bins.

                Never bother with setting a scale but if pushed I would say 1/16th is close to the mark

                The whole reason behind the huge open space is to show other modellers how inventive you can be at getting all of the gear in without breaking into the cockpit area.

                Paul

                #44836
                Dave Milbourn
                Participant
                  @davemilbourn48782

                  The whole reason behind the huge open space is to show other modellers how inventive you can be at getting all of the gear in without breaking into the cockpit area.

                  Paul

                  You veritable swine, Moriarty!

                  #44837
                  Bob Abell 2
                  Participant
                    @bobabell2

                    Nicely built model Dave

                    The waterline clashing with rubbing strip, looks a bit strange?……..But very nicely done all the same!

                    The cavernous cockpit will take some filling!, what about blanking it off with a nice polished wall and doorway?

                    Bob

                    #44838
                    Colin Bishop
                    Moderator
                      @colinbishop34627

                      Bob's idea of blanking off the after end of the cockpit is a good one. On one side you can have the door into the cabin then on the right hand side you could mount a nice varnished ship's wheel with some instrumentation on the bulkhead and a nice comfy helmsman's seat just behind.

                      In the cockpit itself a central table (with champagne bottle) and some benches along the sides would complete the look.

                      Colin

                      #44839
                      Dave Milbourn
                      Participant
                        @davemilbourn48782

                        Thanks, Colin – I'll mull that one over.

                        Dave M

                        #44845
                        Dave_P
                        Participant
                          @dave_p

                          Very nice indeed. Got to love the wood deck finish.

                          #44848
                          Peter Fitness
                          Participant
                            @peterfitness34857

                            Sea Spray looks great, Dave, and like Ian and Paul I also love the colour scheme.

                            Peter.

                            #44849
                            Dave Milbourn
                            Participant
                              @davemilbourn48782

                              The waterline clashing with rubbing strip, looks a bit strange?

                              Bob
                              There is no other way of doing the job and still maintaining the level of the waterline (see the side view – it's dead straight and level). The protruding strip in question is actually a spray rail – the 'rubbing strip' is the wooden one around the edge of the deck. See how Fairey Marine used to do it in just about any of the pictures here **LINK**

                              DM

                              #44850
                              Bob Abell 2
                              Participant
                                @bobabell2

                                Fairey Nuff, Dave!

                                Can't argue with that, having seen the pictures

                                I prefer to see an upward curve at the bows……..and this is normal on some boats

                                I wonder what decides the difference?……….Some expert out there, will no doubt, write in and inform us

                                Bob

                                #44851
                                Ian Gardner
                                Participant
                                  @iangardner62867

                                  Thanks Dave, for your explanation of how you did your frames- very convincing.

                                  I must say on all hard chine boats I have built, I have brought the waterline up at the bow parallel to the spray strip-simply because it's easier than masking across the strip. I have often noticed clinker built hulls have the same idea- but it may be a cop out! Each to his own though.

                                  Ian

                                  #44855
                                  mike farrell
                                  Participant
                                    @mikefarrell21522

                                    Love the window frames and envy the finish .Tried several times without satisfactory result ..Usually end up painting them with aluminium paint with a shading of black to highlight the outline .Recently found a local with a laser cutter and hope to get Him to make them for me .Like the finish and thanks Dave for the excellent article in the recent mag, more please

                                    Michaelwink

                                    #44871
                                    Paul T
                                    Participant
                                      @pault84577

                                      Dear All

                                      Everything is just about completed and all being well the plans will ready for general issue this weekend.

                                      Paul

                                      #44874
                                      Peter Fitness
                                      Participant
                                        @peterfitness34857

                                        I'm looking forward to that.

                                        Peter.

                                        #44876
                                        Bob Abell 2
                                        Participant
                                          @bobabell2

                                          Hello Paul

                                          We wish you and the project all the best for the future

                                          Will you illustrate once again, how the sales system works, please

                                          Bob

                                          #44880
                                          Paul T
                                          Participant
                                            @pault84577

                                            Hi Bob

                                            The designs are being donated to Parkinson's UK and all funds raised go directly to the charity.

                                            Simply log onto http://www.justgiving.com/Model-Boat-Fundraiser-ParkinsonsUK

                                            Simply make a donation (minimum £5) and then email me at [email protected] with confirmation of which email address you would like the plans sending.

                                            Don't forget that these plans are all downloaded direct to your computer in PDF format and that you will have to print them off yourself. To make things easy all of the plans have been designed to be printed on any domestic A4 size printer.

                                            Paul

                                            Edited By Paul T on 08/11/2013 17:03:58

                                            #44882
                                            Bob Abell 2
                                            Participant
                                              @bobabell2

                                              Thank you, Paul………Are the plans ready now?

                                              Latest WIP pictures………Painting and striping finished at last

                                              stripes.jpg

                                              stripes rear.jpg

                                              And another coat of varnish of course!

                                              Still got the cabin side walls and windows to finish off yet

                                              And obtain a few chrome fittings

                                              Bob

                                              #44884
                                              Paul T
                                              Participant
                                                @pault84577

                                                Bob

                                                The plans are all checked and ready to go Jane is proof reading the instructions and checking them against the drawings so everything should be ready sometime this weekend.

                                                Meanwhile Jane says that she really likes your version and that the paint job is looking great.

                                                Paul

                                                #44886
                                                Colin Bishop
                                                Moderator
                                                  @colinbishop34627

                                                  Bob,

                                                  That white line really does enhance the colour scheme.

                                                  Colin

                                                  #44887
                                                  Bob Abell 2
                                                  Participant
                                                    @bobabell2

                                                    OK, Paul

                                                    Got a customer already, but he can`t sort the pc side of it out…..So, I am ordering it

                                                    And no doubt….Printing it too!

                                                    Thank Jane, please for her kind comments

                                                    Colin

                                                    I`m pleased you like the colour scheme and lining…..Many thanks

                                                    I agree, it looks very pretty

                                                    Bob

                                                    #44888
                                                    Paul T
                                                    Participant
                                                      @pault84577

                                                      To explain how the download works

                                                      The fundraising part of this project is very simple and ALL of the money raised goes directly to Parkinson's UK, I don't touch the money as its all dealt with by the Just Giving website.

                                                      If you make a donation simply copy/paste the receipt to an email and send it to me at model-boat-fundraising.co.uk and I will send a set of drawings / instructions back to you.

                                                      The drawings and instructions will be emailed as a PDF which can be easily opened in Adobe Reader the drawings are all 1:1 scale and can be printed so that they can be used as templates.

                                                      Please note that I don't spend all of my time on the computer so the emailing of the drawings might take up to 12 hours.(I tend to sleep a lot these days)

                                                      I will try to answer any questions relating to the design, build or alterations to the design.

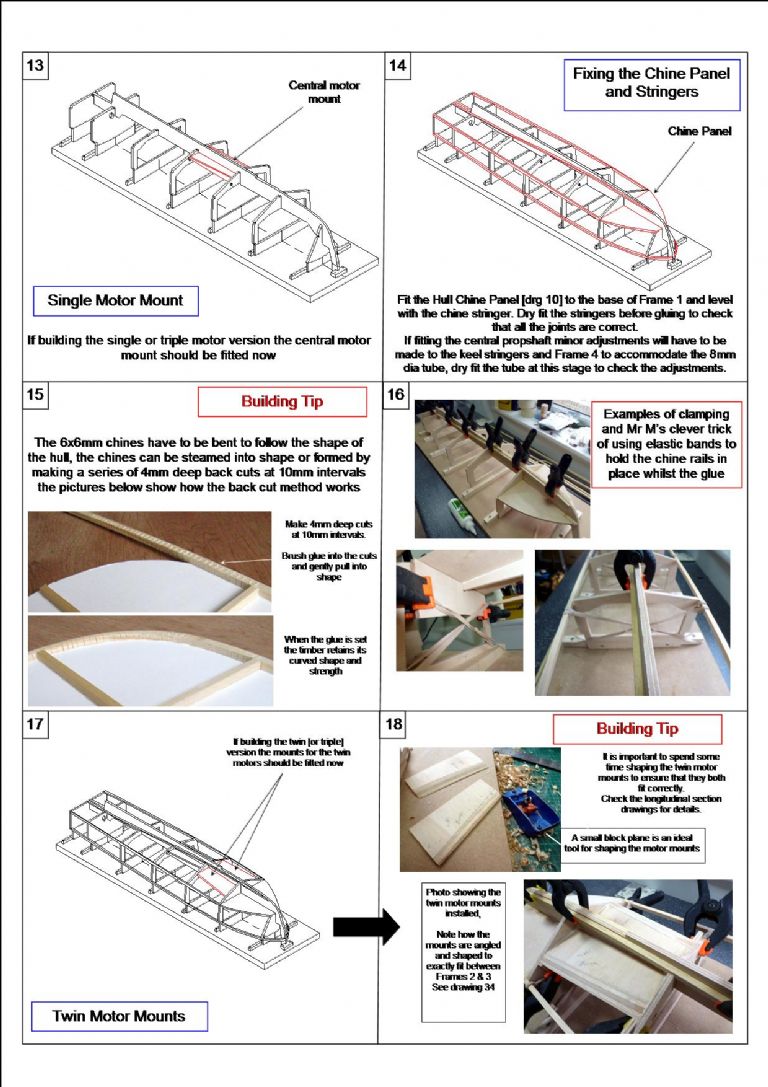
                                                      The instructions are easy to follow
                                                      ellie building instructions.jpg

                                                      The instructions are a combination of diagrams and photographs, thanks DM, that go step by step through the build and explain the difference between the three different types and skill levels. If people get stuck they can always visit Bobs build diary and see how an expert does it.


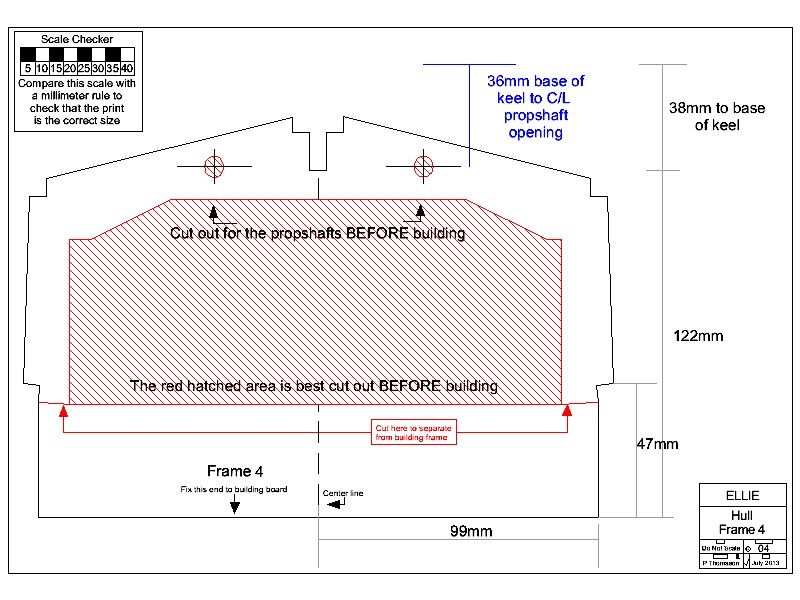
                                                      The design has been especially drawn to fit on A4 sized paper and can be printed on any domestic printer. Each part has been drawn on a separate sheet at 1:1 scale and so can be used as a template for cutting out.
                                                      ellie drg 4.jpg

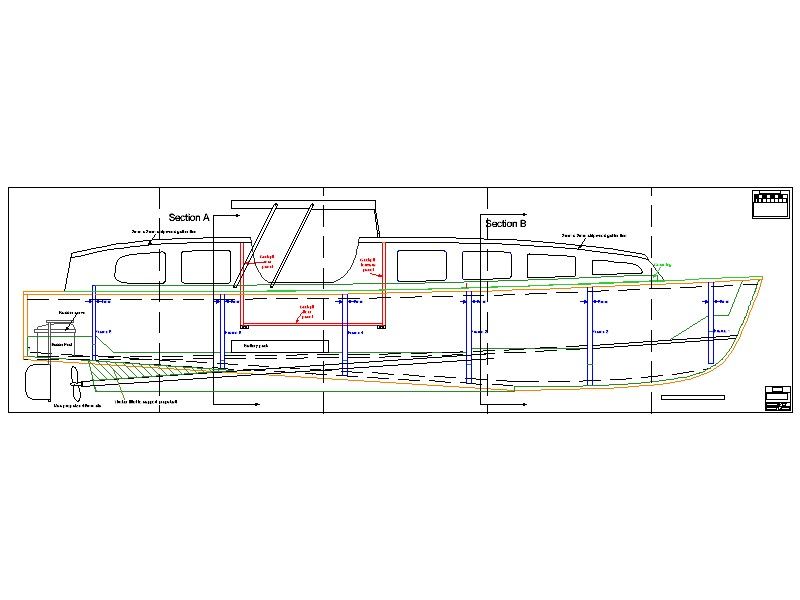
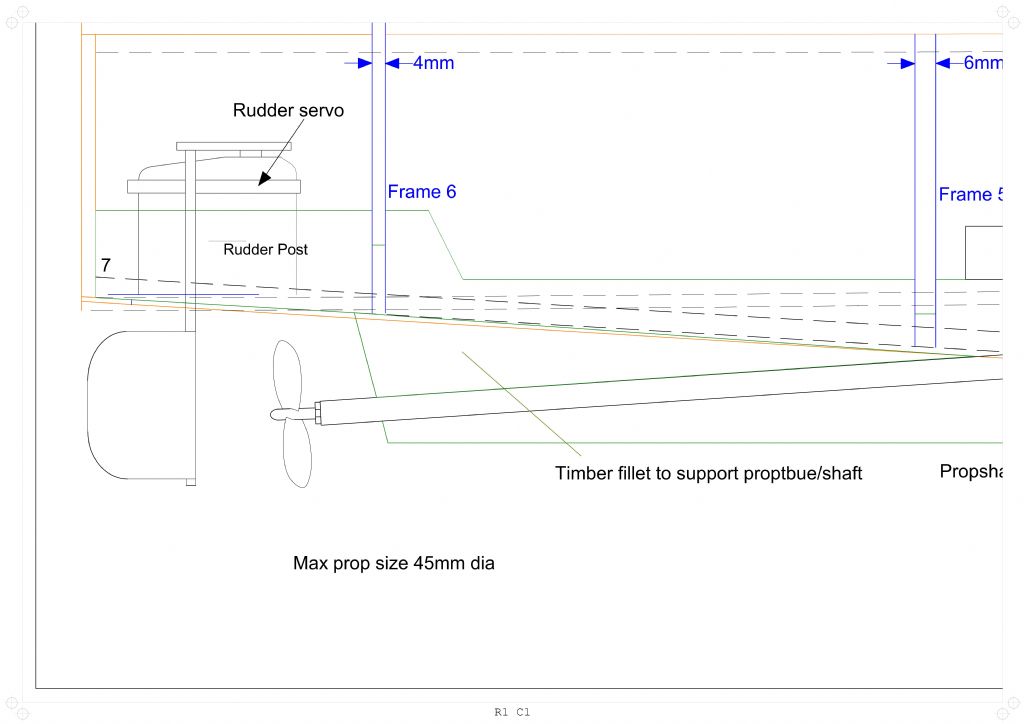
                                                      Where drawings are larger than a single sheet of A4 paper, like the cross section below, the download is split into A4 sections that are simply printed, trimmed and stuck together.

                                                      This image shows how the drawing is split into A4 sheets
                                                      ellie drawing buildup.jpg

                                                      Each of the sheets has location and trimming marks to make joining the drawing together easy as can be seen on the edges of this image.
                                                      ellie pdf section.jpg

                                                      Paul

                                                      Edited By Paul T on 08/11/2013 19:45:10

                                                    Viewing 25 posts - 801 through 825 (of 1,441 total)
                                                    • Please log in to reply to this topic. Registering is free and easy using the links on the menu at the top of this page.

                                                    Code of conduct | Forum Help/FAQs

                                                    Advert

                                                    Latest Replies

                                                    Home Forums Scratch build Topics

                                                    Viewing 25 topics - 1 through 25 (of 25 total)
                                                    Viewing 25 topics - 1 through 25 (of 25 total)

                                                    View full reply list.

                                                    Advert

                                                    Newsletter Sign-up