Ekranoplan

Advert

Ekranoplan

Home Forums News and Feedback Ekranoplan

  • This topic is empty.
Viewing 25 posts - 1 through 25 (of 55 total)
  • Author
    Posts
  • #32024
    Jeremy
    Participant
      @jeremy15845
      I was fascinated by Ashley Needham’s feature on the Orlyonuk A90 and would love to have a go at it. Is there any chance of Model Boats publishing the enlarged drawings used by Ashley. I would be happy tp pay for a set. Some additional information, in particular the profile of the wings and tail plane and details of the battery used, would be very helpful.
      Jeremy
      Advert
      #8382
      Jeremy
      Participant
        @jeremy15845

        Plans wanted

        #32026
        Paul Freshney
        Participant
          @paulfreshney24971
          Hi Jeremy
           
          Sorry this will not be possible.
           
          Ashley used drawings taken from the internet and then photocopied and enlarged them to suit himself and for his own model.
           
          If MyHobbyStore want to use other peoples’ drawings for commercial purposes then we have to a) pay for them and b) they invariably have to be redrawn by professional illustrators to be suitable for sale to model makers with a range of skills..
           
          Ashley checks this forum from time to time and might therefore post the internet link, to enable you to get the plans he used for yourself from the internet.
           
          Hope this helps explain the situation.
           
          Paul Freshney – Editor.


          #32032
          Jeremy
          Participant
            @jeremy15845
            Hi Paul
            Fair enough – thanks. I may still have a go!
            Regards
            Jeremy
            #32036
            Jeremy
            Participant
              @jeremy15845
              Hi Paul
              An internet search came up with the drawings shown below. Now to get them enlarged.

              Regards
              Jeremy

              #32046
              ashley needham
              Participant
                @ashleyneedham69188
                Jeremy.
                 
                Weight is the key issue here. I built mine as a box section as you need a certain amount of buoyancy, and also a flat bottom gives you the most lift .
                 
                I am not sure you could get the model to skim as it is supposed to without some design changes, and there is an incredible trim change when applying power, due to the leverage of the high motor.
                 
                i did consider at one stage putting a ducted fan unit in the nose, so it would blow under the wings and assist separation, but the practicalities of stopping the nose just sucking up water are too great!
                 
                Using an 11.1V LiPo it is ridiculously fast and leaves the water in the blink of an eye whereupon you lose control…
                 
                Notice the wings are at the bottom of the fuselage…this would create an amazing suction on a model …hmmm..on the other hand , with a LiPo…..?
                 
                The wings need to float properly or else the model will just tip over..high c of g..the drawing has them very thin. I set mine upwards as if they were level there is the chance upon deceleration they will dig in and all of a sudden you have a submarine.
                 
                Ashley
                 
                Ashley
                #32047
                ashley needham
                Participant
                  @ashleyneedham69188
                  Sorry..The battery was a bog standard 9.6v AA 2600MaHr pack, the park motor was a 3700Kv unit inrunner, and I used a 5.5″ X 3 prop. The Park will take a LiPo 11.1v and I tried a 2200MaHr battery for takeoff.
                   
                  A longer Park unit (40mm as opposed to 30mm) unit is available for more oomph for a larger model .
                   
                  Ashley
                  #32055
                  Jeremy
                  Participant
                    @jeremy15845
                    Hi Ashley
                     
                    Thanks for the tips and hardware details. I read your article carefully and appreciate the deviations from the scale drawings. I note the point about the wings being able to float. How much thicker did you make them than the scale profile at the thickest point of the sections (I will be building to the same size as you did)? I thought of filling any void in the fuselage and the wings with expanded polystyrene to aid buoyancy in the event of disaster. However, you have set a target weight and I will try to keep to it. One final hardware question – what ESC did you use?
                     
                    I still have to complete my Chris Craft 19″ racer so the Orlyonok will be a project for the winter. I can’t think of a better way to fill the long evenings.
                     
                    Jeremy
                    #32058
                    ashley needham
                    Participant
                      @ashleyneedham69188
                      jeremy. will look uo the ESC, however it was just an aircraft one they had in the shop!
                       
                      Offhand I cant remember how thick the wings were…will check up. IF I was making this again i might make the wings out of the blue foam, as this would be very easy and you would get a nice smooth finish, and cover it in very lightweight fibreglass cloth and “eze-kote” water based resin…I have just used some on a boat, and it seems ok. It would strengthen the wings up no end. I bore in mind the mishaps that happen on the water, and so the wings I think need to be a bit beefy and the attachment to the body need to be up to the job as well. The wing end plates have been sanded down to almnost their drawing size, as the wings float…they need to float or the thing will just capsize.
                       
                      The wing roots on Shorty are showing some cracking already !! The filler fillets on the Ecranoplan should help in this respect.
                       
                      I had intended to use the motor bracket fixing bolt to be able to adjust the incidence of the motor, as this might help the trim changing bisness, but couldnt be bothered at the end of the day.May be a good idea if you were making one.
                       
                      Not shown is the skeg, a simple fixed fin like a rudder a couple of inches in from the rear. Without this it was impossible to hold any sort of straight line. It is about 1 1/2 inches long/deep…but could possibly be cut down a bit, I didnt get that far in the experimental stage.
                       
                      Ashley
                      #32060
                      Jeremy
                      Participant
                        @jeremy15845
                        Thanks again Ashley. There’s nothing like learning from the experience (and expertise) of others.
                         
                        I like the idea of using blue foam for the wings – I have tonnes of the stuff to practice on. I am using 2 oz fibre glass cloth and Z-Poxy finishing resin on my Chris Craft. I could get 1 oz or even 0.6 oz for lighter weight for the A90 but is there any advantage is using “eze-kote” over Z-poxy?
                         
                        As far as the strength of the wing mounting goes, I wonder if the location of the battery would allow for mounting pegs to go through the hull and into the wings on either side. Otherwise, gluing with epoxy to the side of the hull will have to do.
                         
                        Points noted about the adjustable bracket and the skeg.
                         
                        Jeremy
                        #32064
                        ashley needham
                        Participant
                          @ashleyneedham69188
                          Wing roots 22mm to 18mm thickness at the tips
                          ESC;- Overlander batteries “Tornado gold”, I think it was a 20A one.
                           
                          Battery sits roughly at the rear of the wing, perhaps going past this by an inch or so,but there is lots of room to move the bits around. Dowel wing “beams” could be used with little inmpact on battery placement I recon. Funnily enough, I brought a flat pack 9.6V battery, and this sits diagonally in the fuselage…I bought it in this configuration so it would fit in the rocket launcher tank I have..If I had made the fuselage 5mm wider it might just lay flat !! however i dont think it makes much difference.. A LiPo would be smaller and lighter of course. I get a good 30mins running around and zooming about on the battery, at least.
                           
                          There is a small cut-up just under the forward jet nozzles, and these kick up spray and i would blend the nose into the body a bit more smoothly underneath .
                           
                          Not used Z-poxy, and have only just got some eze-cote !! the eze is very thin though, and the first layer of 0.6oz mat has gone down on me boat a treat. Got to be careful what you use on foam of course.
                           
                          Ashley
                          #32067
                          Bob Abell 2
                          Participant
                            @bobabell2

                            Well done, Ashley

                            Having not read all the messages, Did you fit ailerons, elevator and rudder controls?
                            Would have been great fun controlling the craft at the airborne stage!

                            Bob

                            #32069
                            ashley needham
                            Participant
                              @ashleyneedham69188
                              Bob, no, because technically then it would have been an aircraft and I would have not been legal to use it on 27meg!! BUT I think that it would be very difficult to have balanced it up for flight in any event due to the weird shape. The whole thing was simplified for “production” reasons as a fun model and so the aerodynamic surfaces are all to pot etc etc.
                               
                              It has air air rudder, but my poor 2 channel set would be unable to cope with more controls.
                              Besides which I can`t fly a model `plane so taking off might be a bit tricky..actually the taking off is o.k,,,its the remaining level that may be a bit tricky!
                               
                              Ashley
                              #32601
                              Jeremy
                              Participant
                                @jeremy15845
                                Ashley
                                 
                                Construction just started. As you suggested, the square box was the easy bit. I have a thought on which I would appreciate your view. Rather than a fixed skeg, might it be better to install a rudder and rely on this to turn the ‘boat’ rather than on the tail fin? Using the fin, I imagine that one has to be going at some speed to effect a turn. Installation of a water rudder might also be simpler. What do you think?
                                 
                                Jeremy
                                #32602
                                ashley needham
                                Participant
                                  @ashleyneedham69188
                                  Jeremy. The air rudder works just fine, even at low speeds, all you have to do is apply power to get some air over the rudder.
                                   
                                  HOWEVER. A water rudder may well work much better and allow flying in more windy conditions, as well as being much easier to make. the rear tail rudder could then be simply fixed and you wouldnt have to faff around with the hinge arrangement. I would put the rudder fairly well to the rear. Not having any propwash over this, you may need to experiment with rudder shapes an sizes. Shorty ended up with quite a big rudder, certainly much larger than if it had a water prop. I would leave the tail fin hollow and not put any tail rudder in place until trying this….just in case ??
                                   
                                  I only used an air rudder as two of the other “flying boats” I have use water rudders and so I simply wanted to try this method instead.
                                   
                                  Dont forget to NOT FIX anything inside the hull until after you are satisfied with the performance, as trim and c of g are fairly critical. You could use hot glue to fix the servo in as this can be unstuck fairly easy until the final position is found. I would also not have a fixed battery tray either , but a strip of velcro, so the nose attitude can be adjusted on the day, ie the nose can be down for flat water but needs to poke up a bit if its windy and there are a few waves about.
                                  I have used an insert from an electrical strip connector (the brass bit with two screws in) to provide easy adjustment for a servo rod, use piano wire and overlap the ends, use the connector to join the overlapping bits, and its dead easy to lengthen or shorten the effective rod length, until it is time to fix everything in place.
                                   
                                  Ashley
                                   
                                  I
                                  #32604
                                  Jeremy
                                  Participant
                                    @jeremy15845
                                    Thanks Ashley – I will go with the water rudder and note the need to be able to move things around. I have gone with the 5mm wider hull to allow the battery to lie flat.
                                     
                                    Jeremy
                                    #32627
                                    Jeremy
                                    Participant
                                      @jeremy15845
                                      Ashley
                                       
                                      Box section completed and work just started on shaping the nose section. Two questions if I may.
                                      1. The floor of the box section rises smoothly towards the tail. On the prototype, there is a rear step, I imagine to act as a planing point prior to take off. Did you incorporate this in the model?
                                      2. Did you cover the whole model in fibreglass cloth and resin? In an earlier posting, you recommended this for styrofoam wings.
                                      Thanks again for all your help.
                                       
                                      Jeremy
                                      #32632
                                      ashley needham
                                      Participant
                                        @ashleyneedham69188
                                        Jeremy. the step is there to assist breakaway when taking off as you say, but the model was not meant to take off and this feature simply adds drag, so I didnt bother to incorporate it.
                                         
                                        In any event, with a Lipo it doesnt seem to make that much difference to the taking off bit !! so i would simply have the bottom smooth.
                                         
                                        Didnt glass the `plane, as didnt know about Eze-cote then !! I would certainly have covered the nose section and wing ends foam in Eze-cote and light glass cloth , as the foam is very soft. It is very easy to use, this stuff, and very fine, so I would probably cover the nose, fuselage and wings in the glass, all in one go so as not to have any filling in of cloth end steps to contend with.
                                         
                                        With regards to the engine cover, this is a bit crude but is very easy to fit/unfit in case of engine repairs. A rounded end would look better to the cowl, and a slightly thinner alloy bracket might allow a fully circular cowl to be fitted to improve the looks a bit.
                                         
                                        Ashley
                                        #32647
                                        Jeremy
                                        Participant
                                          @jeremy15845
                                          Ashley
                                           
                                          I will seal the model with fibreglass cloth and Eze-cote. Would you also recommend strengthening the styrofoam with acrylic varnish (as in your article) or was this before you discovered Eze-coat?
                                           
                                          Water rudder assembly and battery tray fitted. Nose section formed (to be attached using Gorilla glue) and tail fin under construction. Photos in a build log which I will update as I go along.
                                           
                                          Jeremy
                                          #32652
                                          ashley needham
                                          Participant
                                            @ashleyneedham69188
                                            Jeremy. This was before I discovered eze-cote. The foam is very soft and I would have eze/glass the whole lot had I known.
                                             
                                            Ashley
                                            #32653
                                            ashley needham
                                            Participant
                                              @ashleyneedham69188
                                              Jeremy, have just looked at your photos of the build…I had a bit of deja-vue !!
                                               
                                              I went really really slowly shaping the nose section, as taking too much off is nigh on impossible to correct. I used some incredibly light, white filler to fill the foam bits. It may be balsa filler, not sure.. it is very soft and ideal for all those scratches and dings you put in before the final hardening.
                                               
                                              Also, do not coat the foam with eze or whatever until you are absolutely finished with the shaping, as its diffficult to sand through the hardened layer without over doing it on the soft stuff, if you see where I am coming from.
                                               
                                              The nose would look a tiny bit better, on reflection, if the front jet inlets were dug out just a few millimetres, to give that “hole “look . Bit tricky though!
                                               
                                              Are you going to use a reversing ESC? So far I have not had too much cause to regret not having a reversing facility, but you never know. Having a water rudder yours would steer a bit in reverse, Mine wouldnt of course, but it would be a useful brake.
                                               
                                              Ashley
                                              #32658
                                              ashley needham
                                              Participant
                                                @ashleyneedham69188
                                                Jeremy, If you would like to pm me with your e-mail address I could send you a few interesting pictures of the monster, hitherto unseen!
                                                 
                                                Ashley
                                                #32666
                                                ashley needham
                                                Participant
                                                  @ashleyneedham69188
                                                  I did originally plan to have two props, stacked up so that from the side it would look like the contra-rotating prop that should be fitted on the real craft. One would need, I think, two props, say 4 inches, and with a shallow pitch so as not to overload the motor.
                                                   
                                                  The trouble is finding a) a prop adaptor deep enough to hold two props, and b) the right sorts of prop! Graupner do, and offhand I cant think what they were called, some very very thin high-speed electric pylon-racer types which appeared to be suitable, in three blades as well, but one I tried vibrated a bit, and on its own did not appear to offer any performance advantage over the 5.5″ x 3 I eventually used.
                                                   
                                                  The smaller 4.5″ x 4.5 pitch props I had looked great with their extreme twist, but sadly again vibrated. On some of the props I picked up the hole was visibly eccentric to the boss.
                                                  I have about 7 or 8 props laying about, unsuitable for one reason or another. however, it is just possible some of them might perform better at much higher revs, as per using the 11.1V LiPo. So complicated! at least small props are relatively cheap, unlike brass boat props.
                                                   
                                                  Ashley.
                                                  #32667
                                                  ashley needham
                                                  Participant
                                                    @ashleyneedham69188
                                                    I did originally plan to have two props, stacked up so that from the side it would look like the contra-rotating prop that should be fitted on the real craft. One would need, I think, two props, say 4 inches, and with a shallow pitch so as not to overload the motor.
                                                     
                                                    The trouble is finding a) a prop adaptor deep enough to hold two props, and b) the right sorts of prop! Graupner do, and offhand I cant think what they were called, some very very thin high-speed electric pylon-racer types which appeared to be suitable, in three blades as well, but one I tried vibrated a bit, and on its own did not appear to offer any performance advantage over the 5.5″ x 3 I eventually used.
                                                     
                                                    The smaller 4.5″ x 4.5 pitch props I had looked great with their extreme twist, but sadly again vibrated. On some of the props I picked up the hole was visibly eccentric to the boss.
                                                    I have about 7 or 8 props laying about, unsuitable for one reason or another. however, it is just possible some of them might perform better at much higher revs, as per using the 11.1V LiPo. So complicated! at least small props are relatively cheap, unlike brass boat props.
                                                     
                                                    Ashley.
                                                    #32711
                                                    Jeremy
                                                    Participant
                                                      @jeremy15845
                                                      Ashley
                                                       
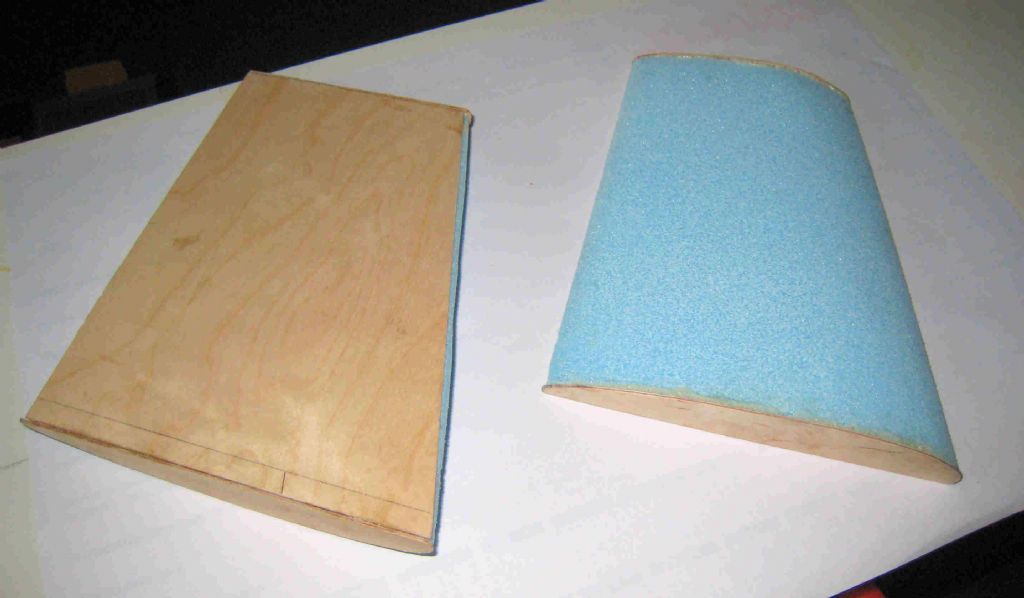
                                                      Wings made from blue foam with a 1mm ply underside and ribs at either end. You arrived at the optimum location for the wings by trial and error. May I ask where you finally landed up in terms of distance (mm) from the bottom of the hull to the underside of the wing at the leading and trailing edges. My model may be slightly heavier, water rudder, larger servo and a 5mm wider body. However, with the wider body, the waterline may turn out to be much the same as yours.
                                                       
                                                       
                                                      Jeremy

                                                    Viewing 25 posts - 1 through 25 (of 55 total)
                                                    • Please log in to reply to this topic. Registering is free and easy using the links on the menu at the top of this page.

                                                    Code of conduct | Forum Help/FAQs

                                                    Advert

                                                    Latest Replies

                                                    Home Forums News and Feedback Topics

                                                    Viewing 25 topics - 1 through 25 (of 25 total)
                                                    Viewing 25 topics - 1 through 25 (of 25 total)

                                                    View full reply list.

                                                    Advert

                                                    Newsletter Sign-up