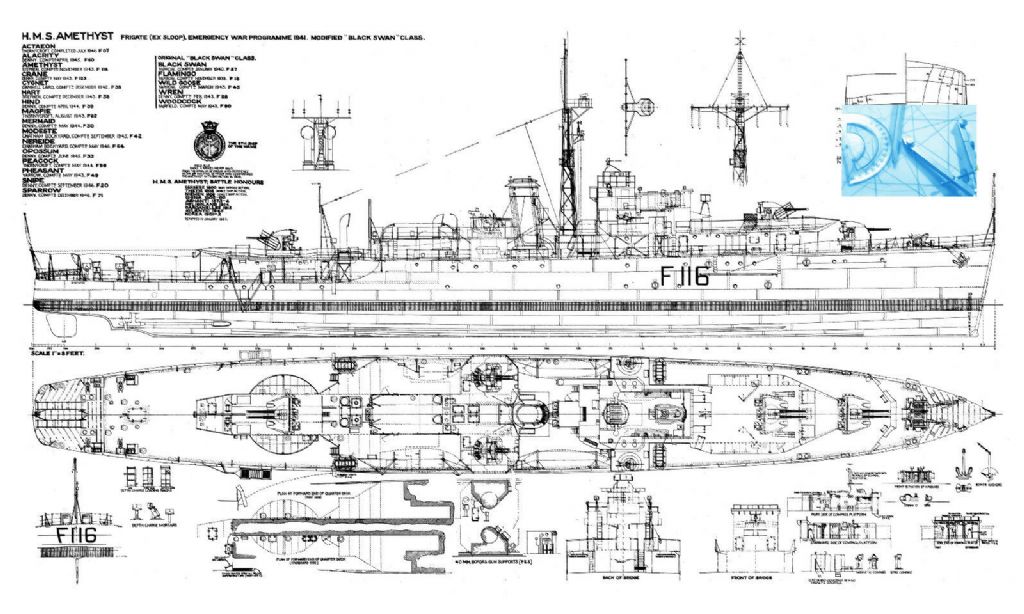
Amethyst cross sectional drawings.

Advert

Amethyst cross sectional drawings.

Home Forums Building Kits Amethyst cross sectional drawings.

  • This topic is empty.
Viewing 16 posts - 1 through 16 (of 16 total)
  • Author
    Posts
  • #83578
    Peter Brown 19
    Participant
      @peterbrown19

      Hello folks,

      I am new to this forum and was hoping that someone could help me out.

      I have acquired what appears to be a complete Deans Marine model of the Amethyst but, unfortunately, the previous owner had stored it badly and I believe that the GRP hull is malformed and also made a mess of cutting out the main deck.

      I can get past the main deck problem as I can scan the plan to make a template but the plans do not include a cross sectional drawing of the hull as it came with a pre-formed GRP item.

      I wonder if some kind soul has a copy of the cross sectional plan of the hull in order that I may check it.

      Advert
      #6313
      Peter Brown 19
      Participant
        @peterbrown19

        cross sectional drawings to check the grp hull.

        #83589
        Colin Bishop
        Moderator
          @colinbishop34627

          Hi Peter,

          Welcome to the Forum. You don't say whether the kit is the original or updated version but I'm guessing the former.

          It is unlikely that you will easily find any drawings of the hull cross sections as applicble to the kit.

          However, it is not uncommon for GRP hulls to distort after removal from the mould if internal supports have not been added. Commonly this shows up as the sides bending inwards and sometimes the line of the keel, which should be flat develops some concavity.

          Usually this can be put right though. You do need an accurate deck piece and I would suggest making a new one out of 1.5mm birch ply. The shape of the deck will determine the shape of the upper part of the hull and if you pull out any bending of the bottom you should end up with the correct shape for the hull.

          I have found that the best way to go about this is to use a hairdryer which will make the moulding more flexible. Some heavy weights inside, insulated from the bottom with a length of wood will help straighten it. You may need a few applications of heat but the hull should then 'set' in its new position. As far as the top is concerned you need to heat the hull sufficently to be able to force the deck into place and again, it will more or less set in position when it cools.

          It is a good idea to glue in some short pieces of wood, say 20mm long, at intervals just below where the deck shoudl sit to ensure it is level all round. When the hull has set you can supplement them with longer pieces between them.

          It is likely that when you have reset the top of th hull it will still tend to spring in a bit when the deck is removed but you shoud be able to simply pull the sides apart sufficiently to get the deck back in when you are ready to fit it.

          Hope this helps,

          Colin

          #83590
          Peter Brown 19
          Participant
            @peterbrown19

            Hello Colin,

            thank you very much for your reply to my post.

            I should imagine that the kit is quite old as the plans have faded considerably in places.

            I appreciate that I may not find a cross sectional plan published by Deans Marine but I did come across one for another build on a Google search for Amethyst images which had the cross sections not been obliterated I could have scaled it up to suit the 'Deans' hull.

            I have tried to insert a copy of the picture into the post but to no avail.

            Thank you for the work around and I may well make the decks from ply as you suggest

            #83591
            Colin Bishop
            Moderator
              @colinbishop34627

              Peter,

              Even if you do find the cross sections you are unlikely to be able to significantly alter the shape of the moulding beyond what the moulder intended. The suggestions I made above should do this.

              Don't be tempted to use ply thicker than 1.5mm as it will be too heavy.

              Re pictures, there is an a Topic and post explaining how to do this at the top of the Forum section. This site uses bespoke software so direct insertion isn't possible and you need to create an album first.

              **LINK**

              Colin

              #83599
              Peter Brown 19
              Participant
                @peterbrown19

                Hello Colin.

                I think that I have created an album and uploaded a copy of a plan that I came across which originally had the cross sectional drawing in the top right hand corner but it has been obliterated.

                If anyone recognises the plan, perhaps they can send me a scanned copy of that particular section.

                Many thanks in advance.model-ship-plans-1-96-scale-37-frigate-hms-_57.jpg

                #83602
                Colin Bishop
                Moderator
                  @colinbishop34627

                  Hi Peter,

                  The drawing you are looking at is by Norman Ough. The Brunel Institute in Bristol holdes the Norman Ough collection but copies are not currently for sale although they can be inspected. Somebody on EBay is selling copies though, probably reproduced from the original magazine article and offered for sale as a digital file.

                  64AAOSwTuJYv0dt”>https://www.ebay.co.uk/itm/Model-Boat-Drawings-Scale-1-96-WW-II-H-M-S-Amethyst-Build-Display-or-R-C/302973966770?hash=item468aa7d9b2:g64AAOSwTuJYv0dt

                  Sarik Hobbies sell the Vic Smeed design in their collection which also includes a body plan.

                  **LINK**

                  Whether either of these will match the hull in your posesssion rather depends on which drawings Deans used as a basis for the kit. Neither Norman Ough nor Vic Smeed are likely to have used the original plans which are probably still held by the National Maritime Museum. I suspect you would find that they differ in some respects from each other and from your GRP hull.

                  Colin

                  #83606
                  Chris Fellows
                  Participant
                    @chrisfellows72943

                    As well as following Colin's method for improving the shape of the hull if you really want to introduce a former as well you are really going to have to make it by a bit of trial and error. You have the width and depth as starting points and you can then sketch the shape of the hull between those points and cut it out of stiff card and see what the fit is like. Then draw it out a bit wider where required to realign the hull and then cut out in ply and see if it fits and pushes the hull to the correct shape. If not quite right do again until it is and you are happy with the result.

                    Chris

                    #83610
                    Peter Brown 19
                    Participant
                      @peterbrown19

                      Thank you Chris and Colin.

                      If I could get the cross sections, I could try them for fit vertically (centre deck to keel) and, if necessary average them out which would, at least, give me a symmetrical hull.

                      I can build a deck former once I have the dimensions using CAD and run a spline between them to give me a smooth transition.

                      #83614
                      Ray Wood 3
                      Participant
                        @raywood3

                        Hi Peter,

                        How distorted is your hull? a photo for us would help to see how serious it is 😀

                        Regards Ray

                        #83615
                        Peter Brown 19
                        Participant
                          @peterbrown19

                          The distortion is not insurmountable but there is a noticeable difference in symmetry along the two top edges. I believe that it was stored on its side with a weight of some kind on top of it and one side has taken a 'set' which could probably pull out but I would need to check the symmetry of both sides as I intend it to be a sailing model and if it is in anyway banana shaped, it will behave like a gondola.

                          #83627
                          Francis Macnaughton
                          Participant
                            @francismacnaughton39461

                            I managed to find my copy of the recent book on Norman Ough's plans and models but it doesn't provide a view of his Amethyst plan. In any case, as already advised by others, I would be unsurprised if there was some difference between the cross sections of the original Deans offering and the actual Amethyst as relatively small models such as this benefit from a bit of extra draught to improve stability. It seems likely that the worst distortion would be along the least supported section – ie the deck edge – and the underwater parts of the hull would be fairly resilient to being bent out of shape. I would suggest cutting out in fairly thick ply or balsa (perhaps 6mm) your best interpretation of what the plan of the deck should be and push it into place and hold it there with some rubber bands then assess how true the hull looks by eye, particularly looking to see if there has been any bending of the keel line. If it looks OK I really would suggest that is probably good enough to work with – after all I would expect that the original master was assessed for trueness by the same method back when it was first carved and sanded!

                            #83628
                            Peter Brown 19
                            Participant
                              @peterbrown19

                              Thanks very much Francis.

                              I will give that a try.

                              #83629
                              Colin Bishop
                              Moderator
                                @colinbishop34627

                                I agree with Francis, the deck shape is probably the best template for getting the hull back into shape but you will probably need the hair dryer treatment to get it in and to set the hull with it in place. If that works you can fit a more lightweight deck as I have previously described.

                                Colin

                                Edited By Colin Bishop on 28/08/2019 11:32:30

                                #83664
                                Francis Macnaughton
                                Participant
                                  @francismacnaughton39461

                                  I see the latest book of WW2 warship plans from the NMM is for the Black Swan class and a pretty good buy at the current offer and should give you all the sections you could want and lots besides!

                                  **LINK**

                                  #83707
                                  Peter Brown 19
                                  Participant
                                    @peterbrown19

                                    Thanks for the reply Francis

                                    I have ordered the book

                                  Viewing 16 posts - 1 through 16 (of 16 total)
                                  • Please log in to reply to this topic. Registering is free and easy using the links on the menu at the top of this page.

                                  Code of conduct | Forum Help/FAQs

                                  Advert

                                  Latest Replies

                                  Home Forums Building Kits Topics

                                  Viewing 25 topics - 1 through 25 (of 25 total)
                                  Viewing 25 topics - 1 through 25 (of 25 total)

                                  View full reply list.

                                  Advert

                                  Newsletter Sign-up