My Triton Build

Advert

My Triton Build

Home Forums Beginners My Triton Build

  • This topic is empty.
Viewing 25 posts - 1 through 25 (of 75 total)
  • Author
    Posts
  • #57535
    Andy C
    Participant
      @andyc56856

      So, I finally have found time to build something for myself. After building bunk beds for dolls and feeders for the birds. The feeders where actually built by my two children and one is not quite finished, but it is me time.

      I decided having read the threads from Dodgy and Diede that I would try one of the Eezebilts. The Triton looks quite cool, so plans downloaded and away we went.

      Stuck on you 2

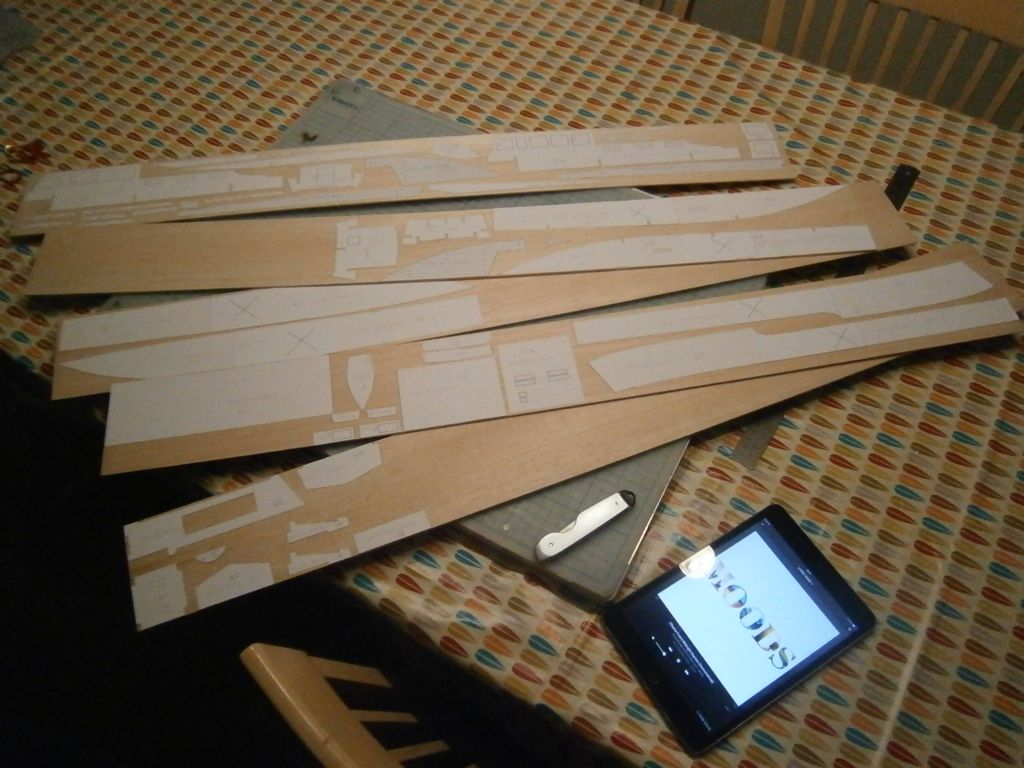
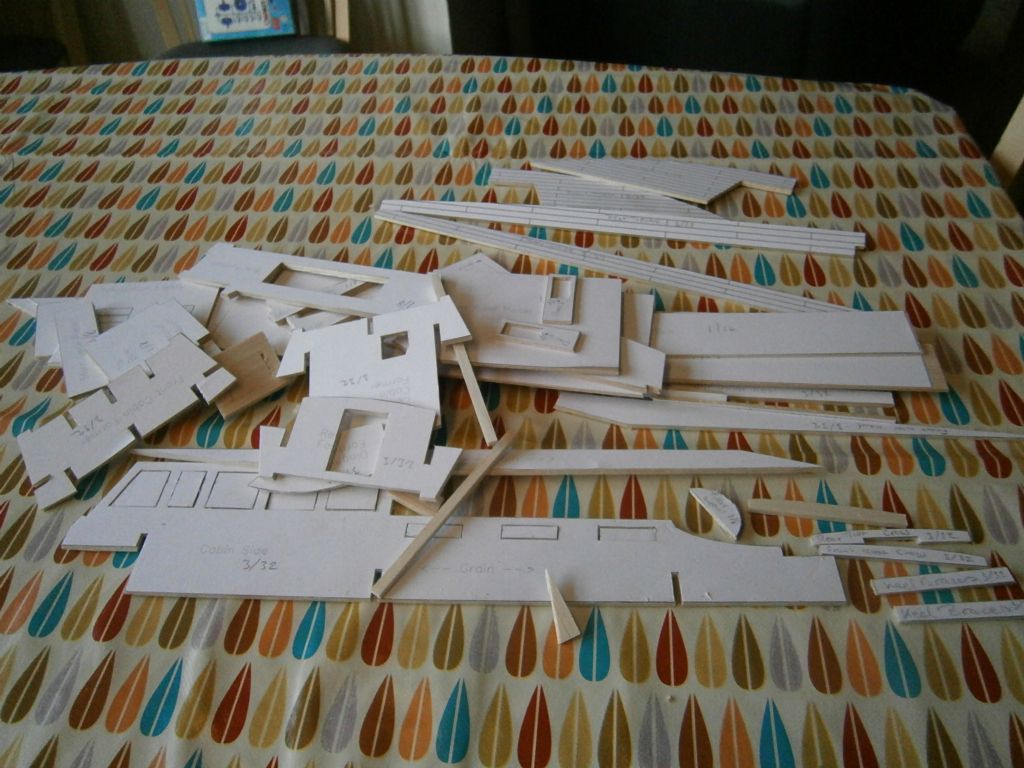
      So above are the plans printed and stuck to the balsa. Next comes the laborious task of cutting them all out. Boy is this bit boring. But we finally ended up with a load of bits.

      Bits and Pieces

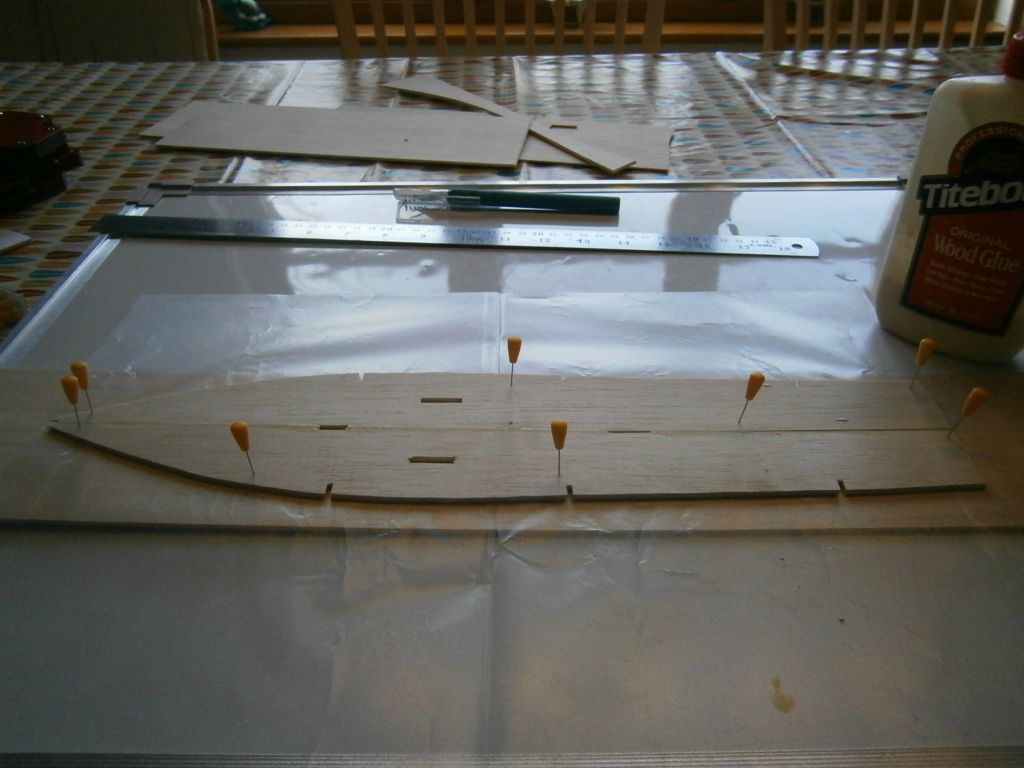
      So following the instructions closely, they are not very comprehensive, but that is OK it was a long time ago. I started at the bottom.

      Now we are cooking

      After allowing to dry, next came the frame formers and a cabin side to hold it all together.

      p4090016.jpg

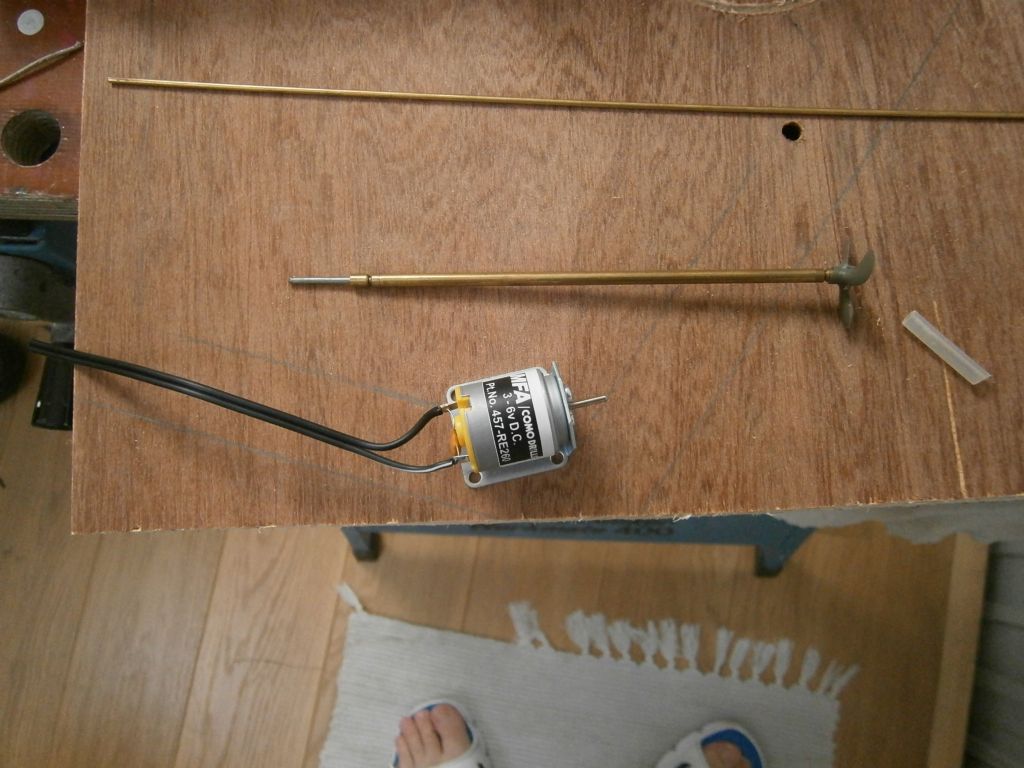
      And that is where I am at now. I have toyed with the idea of a small brushless motor, but given that there is not much room in there for ESC, motor, batteries and servos etc, I sort of came to a stop. After a quick thread chat with Dodgy Geezer I am now going to make a small rudder following his excellent instructions. I have printed the page with the shape and now need time to put it in practice. After a visit to Mick Charles models, I came away with the required brass plate and rod / tube ready to give it a go. While I was there he asked about motors and that brought up a discussion about brushless, but he actually suggested a different approach. So I now have a MFA 457RE260 motor which runs at 3- 6v and a Mtronics micro 10 speed controller to go with it. The battery pack is a 6v Nimh 1600mAh 5 cell pack. Not sure I have a charger for this one, but that is for later.

      Cheers for now

      Andy

      Advert
      #2476
      Andy C
      Participant
        @andyc56856

        My build of an Eezebilt Triton

        #57538
        Dodgy Geezer 1
        Participant
          @dodgygeezer1

          Next comes the laborious task of cutting them all out. Boy is this bit boring. But we finally ended up with a load of bits.

          Ah, well – it was the best we could do. But at least you can console yourself that you now have the equivalent of a £60-odd kit – that's how much an original would cost you off ebay…

          he asked about motors and that brought up a discussion about brushless, but he actually suggested a different approach. So I now have a MFA 457RE260 motor which runs at 3- 6v

          Yes – these boats were never designed to have high-powered motors in them – they didn't exist in 1960! So the hull is a displacement one – not designed for planing. Indeed, they were not designed for radio at all – you are right to pick the biggest, which is really only just big enough to take a radio. You may find that it's worth buying a micro servo because a standard one will be hard to fit in…

          Is your battery pack a set of standard AAs, or one of these, which are 2/3 AA, and weigh about 3/4 of a full AA pack?

          **LINK**

          Saving weight is a good idea in a small ship.

          If you want to use a brushless in a faster boat, you could look at one of the planing hulls from the 50+ series – the Crash Tender, PT-Boat or Sea Princess – for a second build. They use exactly the same techniques as the originals, but are bigger. Remember, the original EeZebilts were designed for beginners to learn the art, and then to be sailed uncontrolled on a small pond….

          #57539
          Andy C
          Participant
            @andyc56856

            Yes, that battery looks the same. I have a micro servo so may try that. I have actually got the plans for the 50+ series, so maybe next. I have so many plans and not enough time. Will finish this one and then see what happens next.

            #57546
            Dodgy Geezer 1
            Participant
              @dodgygeezer1

              I've put up a brief couple of pages on making a typical EeZeBilt 50+ rudder suitable for radio control – that was not really covered properly by the website before. Find them at:

              **LINK**

              #57549
              Andy C
              Participant
                @andyc56856

                Hi dodgy


                You must let us in on your real name, not right calling you dodgy each time. But thanks for the link.

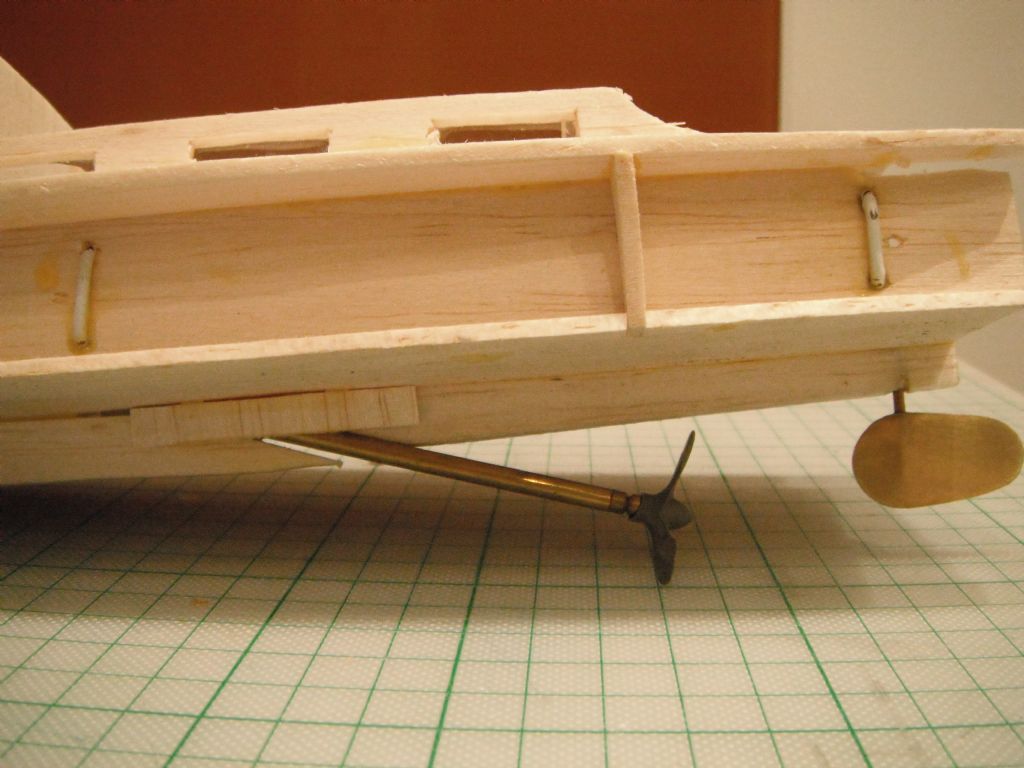
                Here is a pic of the drive line that is going to be used as per previous post.

                Running Gear

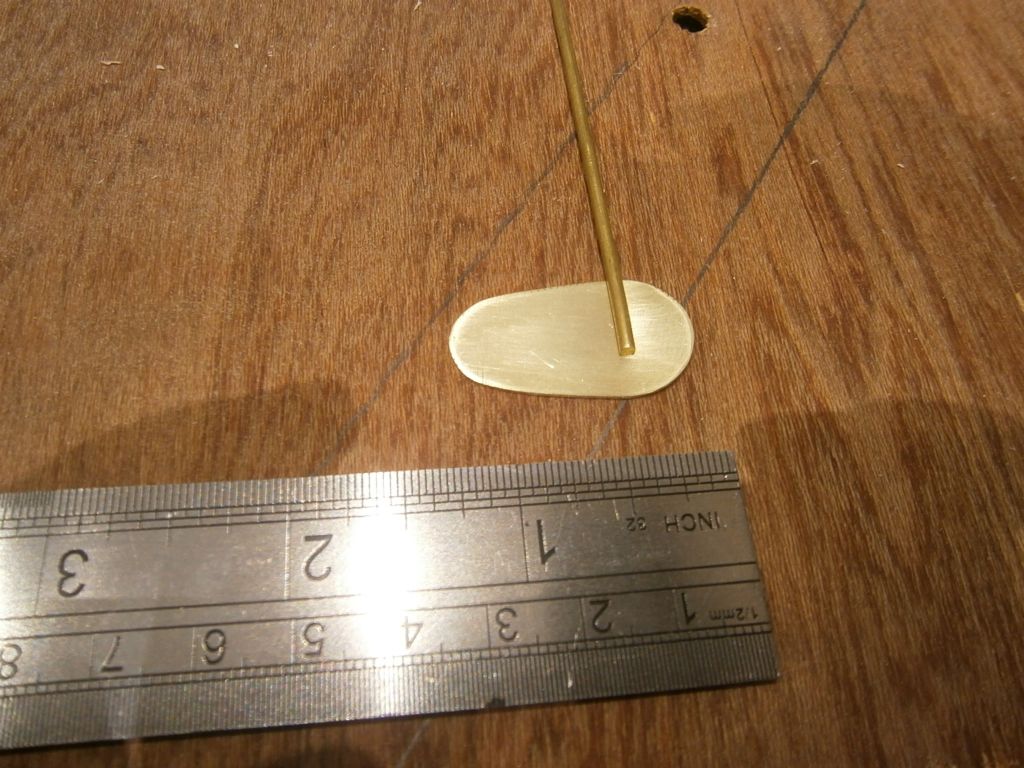
                I had a go at putting the rudder together tonight. Here is the rudder cut and shaped from the brass sheet. With the rod to be attached.

                Rudder prep

                As you can see the rudder is only an inch and a bit long, (technical term), so quite small, but then so is Triton.

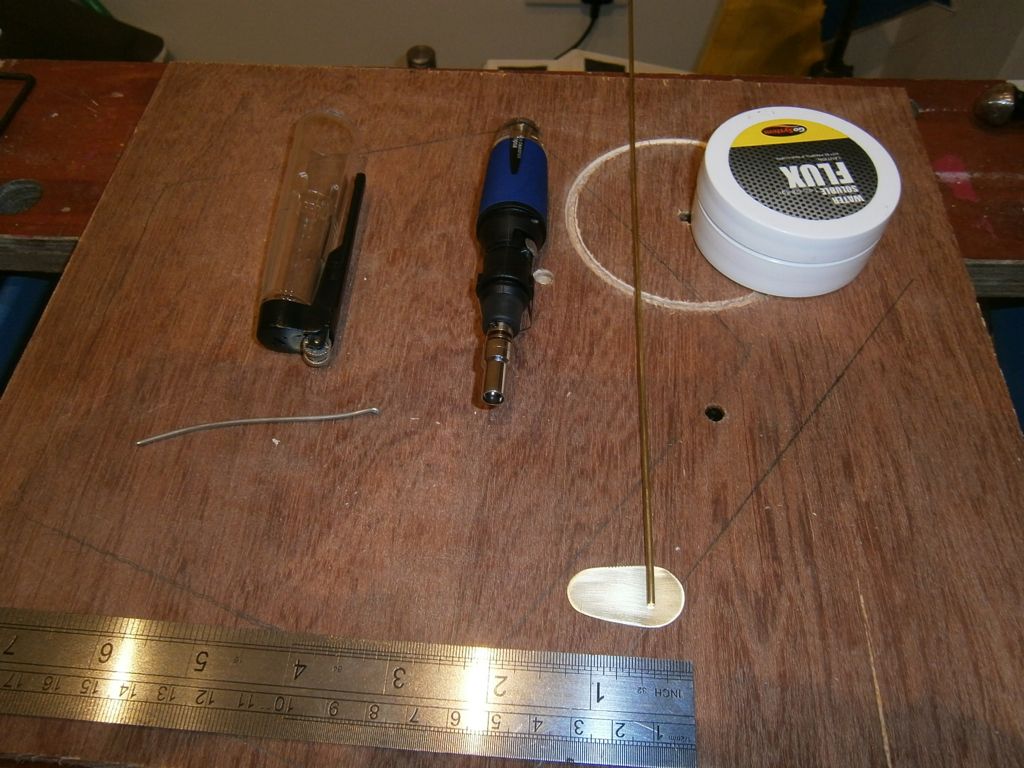
                Here are the tools to be used,

                Ready to solder

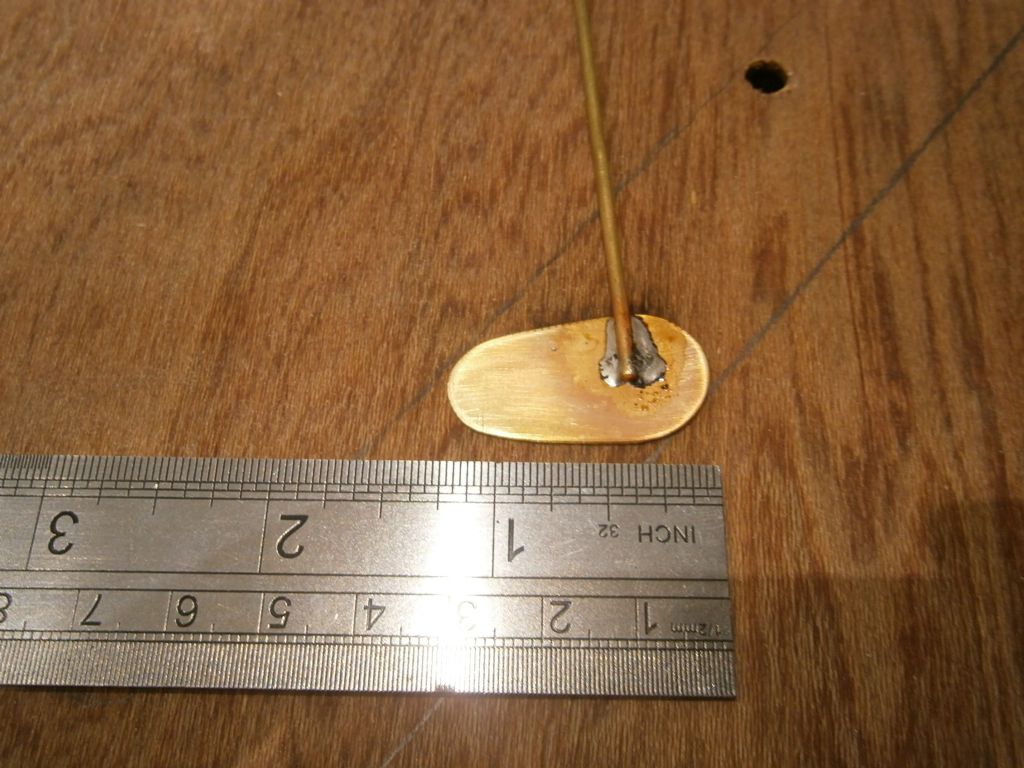
                That was fun, here is the soldered article.

                Rudder Nora I did it

                A little too much solder, but hey it was my first time, so be gentle. Given it a bit of a clean up and filed the rod a bit flatter, given the rudder a bit of a buff with very fine wet / dry. Must say it looks quite good.


                Now then. Did I ever tell you I hate Balsa. Well I HATE balsa. Too soft and easy to break. Fitting the front windows broke the side tabs where the rear / side deck fits. Never mind a bit of glue and no one will notice. Except I just told you. Oh well.

                On with the build tomorrow. although Dodgy I do have a question. The rudder on this thing looks quite tough to actually fit. I am going to need to put a scrap bit of balsa under the rear deck piece before the transom is fitted, but how is the rudder tube fitted through the hull bottom sheets? do you fit the rudder tube and then the hull sheets or fit the hull sheets and try to drill out a hole for the tube?

                Cheers

                Andy


                Edited By Andy C on 01/05/2015 21:22:47

                Edited By Andy C on 01/05/2015 21:24:04

                #57551
                ashley needham
                Participant
                  @ashleyneedham69188

                  Andy. I would not bother filing away the excess solder., It is streamlining the joint! !

                  The motor mount should accept a couple of stronger MFA motors if it were that you wanted a bit more go, although as the geezer says, the boats would have been fitted with weedy motors originally! Speed 280`s are my motor of choice when it comes to feistyness in a small package. They may be a bit strong for this sort of craft.

                  I do not know what the SP is on Ezies is but I would build and then simply drill a hole through for the rudder tube. The rudder tube, as shown on the website, has a little brass square on the end to take up drill damage but in any case an application of epoxy will cure any ills,

                  Just as an aside, balsa as you say is soft stuff and I prefer to make holes with a very slim and sharp rat-tail file rather than try to drill out holes. Cant be used for, say, propshaft long holes, but is ok for rudder tubes and so on.

                  Ashley

                  #57552
                  Andy C
                  Participant
                    @andyc56856

                    Thanks Ashley. At this point it is just getting used to building and installing the driveline stuff that I am after. Speed around the pond is not necessarily required. All good experience. Making the slot bigger for the prop and aligning the motor is next job on the list.

                    Cheers

                    Andy

                    #57554
                    Dodgy Geezer 1
                    Participant
                      @dodgygeezer1

                      The rudder on this thing looks quite tough to actually fit. I am going to need to put a scrap bit of balsa under the rear deck piece before the transom is fitted, but how is the rudder tube fitted through the hull bottom sheets? do you fit the rudder tube and then the hull sheets or fit the hull sheets and try to drill out a hole for the tube?

                      It's probably easier to do the drive train and rudder before the hull sheeting. You can be more accurate going through the keel. As Ashley says, you can use a thin needle file – though I tend to use a dental burr running at high revs – that will cut even soft balsa very accurately without any collateral damage…

                      But the key point about the rudder is – how are you going to connect it to the servo? These original eezebilts were not designed for radio control, and have no obvious place to conceal a servo and push-rods. The original rudder tube just goes right up through the deck, and then the shaft is bent over to form the tiller, which is a spring fit onto a balsa pressure plate.

                      Have you thought of where you are going to put the servo? If you don't want it out in the open, one thing you could do is run a 'closed-loop' system as illustrated here:

                      **LINK**

                      Spool to the bottom of this page to see a possible installation….

                      Edited By Dodgy Geezer on 02/05/2015 00:21:20

                      #57556
                      Dodgy Geezer 1
                      Participant
                        @dodgygeezer1

                        At this point it is just getting used to building and installing the driveline stuff that I am after…. All good experience….

                        This is exactly what the EeZeBilts were originally designed for. Balsa can be a bit soft (remember to buy some harder grade next time!) but it is simple to cut, alter and repair at any stage of the build (and mend later, should you need to!). The boat is small, so you don't need a special working area. You get experience with all sorts of new techniques, like soldering….and the whole build is (or should be!) cheap, so you're not spending a lot on a new hobby you may end up dropping… and you get a real boat-shaped boat at the end of it.

                        And when you get down to the pool, the boat you put in will be all yours – unlike a ready-to-run item you will know every joint, see how it performs, and, after a while, wonder if you could make something a bit better…..

                        #57557
                        ashley needham
                        Participant
                          @ashleyneedham69188

                          Just had a look at the closed loop tiller method. Like it, ingenious.

                          I have used an aircraft style flexible sleeved control lines successfully as this enables servos to be mounted in a convenient place whils having a long servo contol rod run. In this case however given the miniature size of the boat even this may be a bit bulky.

                          The bit on the same page regarding aircraft ESC is also a timely reminder that these are all likely going to be set for Lipo, as the default battery choice and running them "as is" with a Nimh battery produces interesting results and also leads, as stated, to no not using up all the battery power. I would certainly check that the unit can be set to permanently armed (as the article) or a program card can be obtained for it when looking for a brushless esc.

                          Hindsight is a wonderful things but I have three types of brushless ESC in my craft, two have program cards, the other not. I have gone over now to the JpPro range of esc, the program card of which is so easy to use it defies belief. By and by I will change everything over to these and not have any mismatch issues.

                          Ashley


                          Edited By ashley needham on 02/05/2015 10:31:44

                          #57561
                          Dodgy Geezer 1
                          Participant
                            @dodgygeezer1

                            In this case however given the miniature size of the boat even this may be a bit bulky.


                            Hard to think of anything smaller!

                            Here is an installation on a Terrier, which is about half the size of the Triton. It's worked reliably for years (looks it!). Assembly, as you can see, is a bit like watchmaking, but:

                            1 – it is small and light

                            2 – it means there is no requirement for a pushrod down the centreline of the boat – and these small EeZebilts are packed!

                            3 – It's cheap (standard EeZeBilt requirement)

                            img_1594.jpg

                            img_1599.jpg

                            img_3145.jpg


                            Edited By Dodgy Geezer on 02/05/2015 11:47:18

                            #57573
                            ashley needham
                            Participant
                              @ashleyneedham69188

                              What happens if the string breaks???!!! Ashley

                              #57576
                              Dodgy Geezer 1
                              Participant
                                @dodgygeezer1
                                Posted by ashley needham on 03/05/2015 08:47:06:

                                What happens if the string breaks???!!! Ashley

                                See the spec on the website. It's Dacron fishing trace. I recall that I had trouble cutting it! And the Dacron mesh accepts superglue very well to seal the knots.

                                It's run like this for about 15 years now – used less in recent years, I must admit. But I would have no hesitation about putting the boat out tomorrow. The balsa will crumble before the Dacron! Though you do need a smooth, strong surface for the 'bends' – vide the brass tube used above.

                                Of course, replacement and maintenance of ANY linkage requires access – and one general design issue for these little boats is the difficulty in sealing a multitude of small hatches (particularly with 1/2" of freeboard!). The 'Plastic Fantastic' mob tend to remove the deck as one piece – but a few of the EeZeBilts end up with the rudder linkage permanently enclosed. The Beaver is another one – and the PT-Boat has a servo mounted on a platform and slid into the enclosed stern…

                                #57577
                                Dodgy Geezer 1
                                Participant
                                  @dodgygeezer1
                                  Posted by Dodgy Geezer on 03/05/2015 11:27:08:

                                  Posted by ashley needham on 03/05/2015 08:47:06:

                                  What happens if the string breaks???!!! Ashley

                                  See the spec on the website. It's Dacron fishing trace. I recall that I had trouble cutting it! And the Dacron mesh accepts superglue very well to seal the knots.

                                  It's run like this for about 15 years now – used less in recent years, I must admit. But I would have no hesitation about putting the boat out tomorrow. The balsa will crumble before the Dacron! Though you do need a smooth, strong surface for the 'bends' – vide the brass tube used above.

                                  Of course, replacement and maintenance of ANY linkage requires access – and one general design issue for these little boats is the difficulty in sealing a multitude of small hatches (particularly with 1/2" of freeboard!). The 'Plastic Fantastic' mob tend to remove the deck as one piece – but a few of the EeZeBilts end up with the rudder linkage permanently enclosed. The Beaver is another one – and the PT-Boat has a servo mounted on a platform and slid into the enclosed stern.

                                  As an aside, I note that, if Andy elects to use this form of linkage, the Triton design means that the rudder connection would be easily accessible….

                                  #57578
                                  Dodgy Geezer 1
                                  Participant
                                    @dodgygeezer1

                                    Whoops! How did I end up with two copies? Mods – please remove the first one…

                                    #57579
                                    Andy C
                                    Participant
                                      @andyc56856

                                      AndyHi DG.

                                      Looking at the amount of space down the side of Triton, I am not sure I would be able to mount the posts. Will post up a pic, looking from above, so you can see what I mean. I think I have to build a tray that fits in the rear cabin and have some electrics underneath a some on top. Will post few pics later.

                                      Cheers

                                      #57586
                                      Dodgy Geezer 1
                                      Participant
                                        @dodgygeezer1

                                        Looking at the amount of space down the side of Triton, I am not sure I would be able to mount the posts.

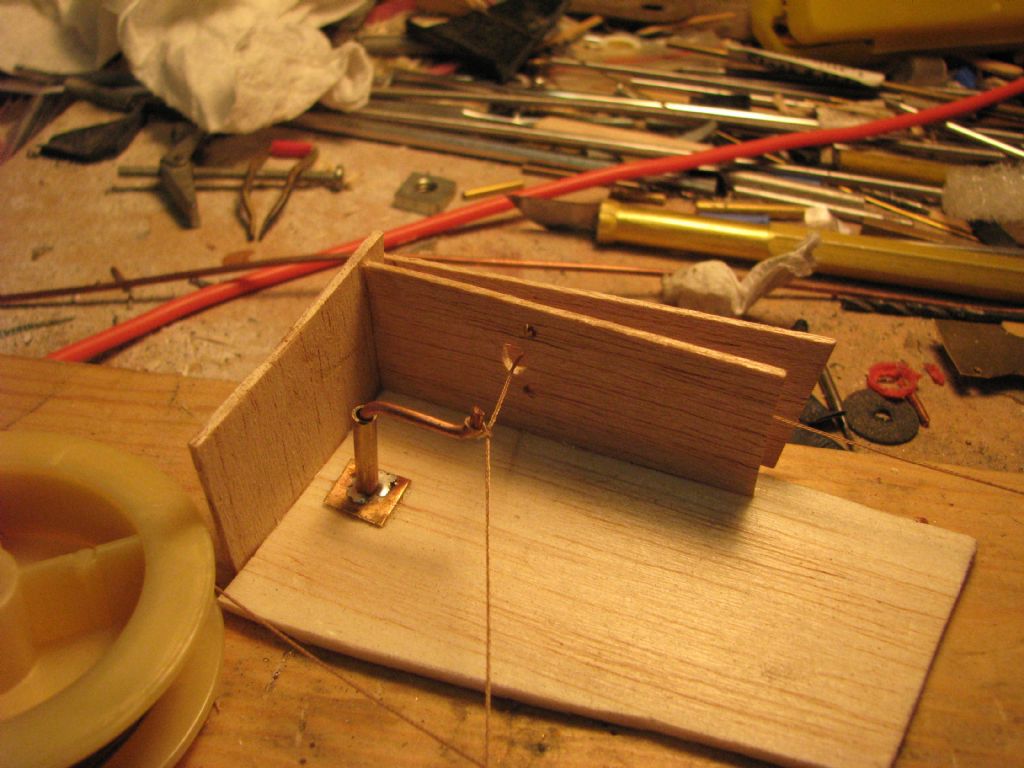
                                        I see your concern. The posts are quite wide – they are freestanding posts on a demonstration/test rig I set up when I was developing the idea. The Terrier has very little room as well, and that actually uses a small bit of copper wire (household 13amp) attached to the side of the inner frame.

                                        It's a bit hard to describe precisely. I will make a simulation of the stern of a Triton and provide some pictures. You will see that , at the limit, the only space that is needed is space for the thread (Carp Dacron Trace, 8lb):

                                        img_1600.jpg

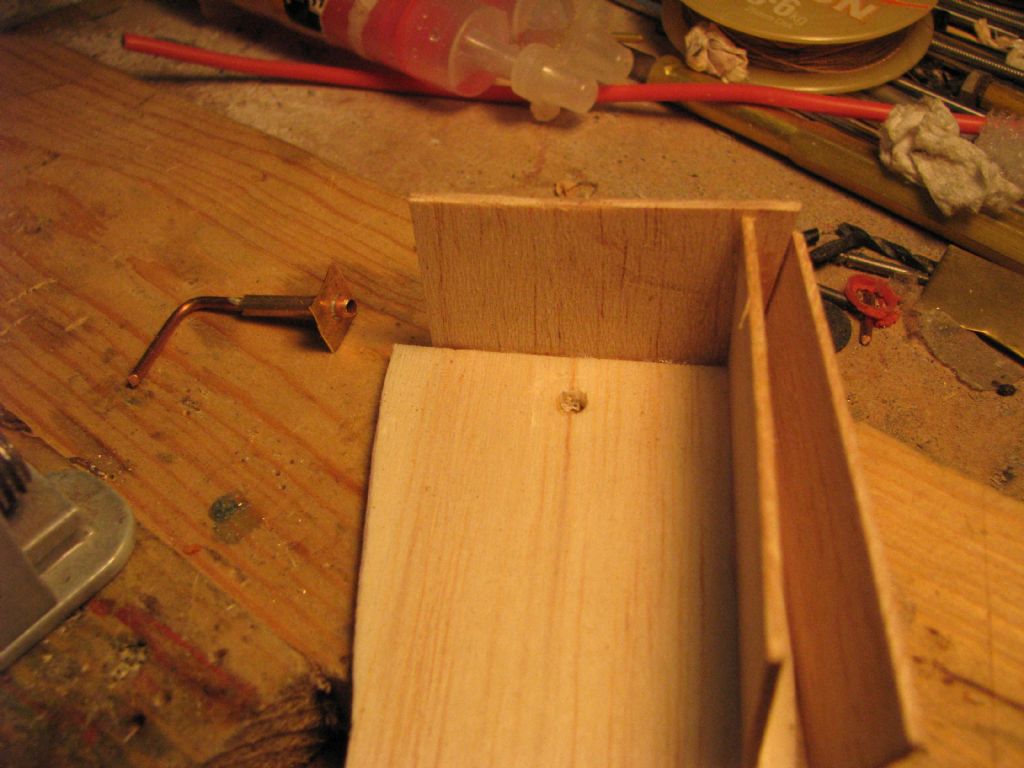
                                        A quick emulation of the Triton stern. Note the Rudder tube with a little patch soldered to it, to help the glue hold it in place…


                                        img_1602.jpg

                                        First, we drill 3 holes as indicated. I made the middle one too big…..


                                        img_1603.jpg

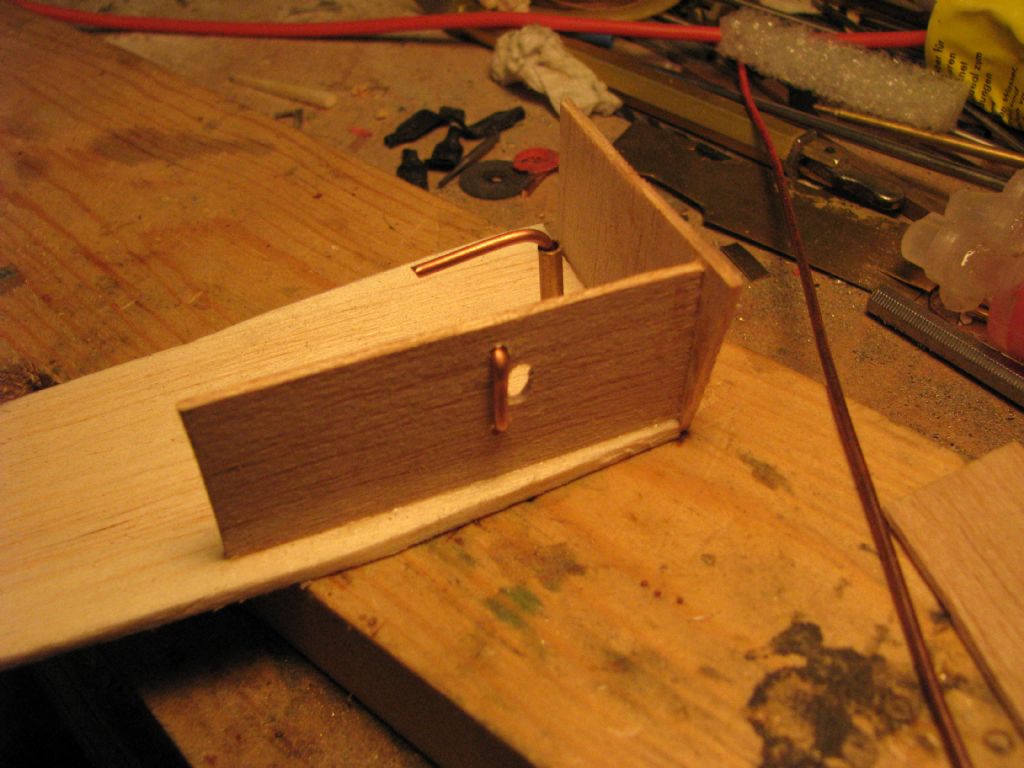
                                        A short length of copper wire is bent to fit in the holes, and glued there…


                                        img_1605.jpg

                                        Now the Dacron trace runs easily on the copper wire, and doesn't cut into the balsa. Note the upturn on the tiller arm, to stop the thread running off the end if the glue fails. I didn't bother to glue this demo, of course. If you look closely at the Terrier pictures, you will see the two little holes, top and bottom, where the copper runner is mounted behind the balsa. You do the same at the other end, where the thread comes out of the wall to connect to the servo.

                                        Since the original EeZeBilts have very little space for a central push-rod, but most have this 'twin side-wall', this is a very handy technique for connecting the rudder servo to the rudder…


                                        Edited By Dodgy Geezer on 03/05/2015 15:10:42

                                        #57590
                                        Andy C
                                        Participant
                                          @andyc56856

                                          Now I get it. I will have look at what I have so far, and see what I can do. Thanks for the pictures it makes much more sense now.

                                          Cheers

                                          Andy

                                          #57931
                                          Andy C
                                          Participant
                                            @andyc56856

                                            OK, it's been a while but managed to get a bit of build time in. Mainly in dribs and drabs, but any build time is good time. So what have I managed to do so far. Well I am glad you asked.

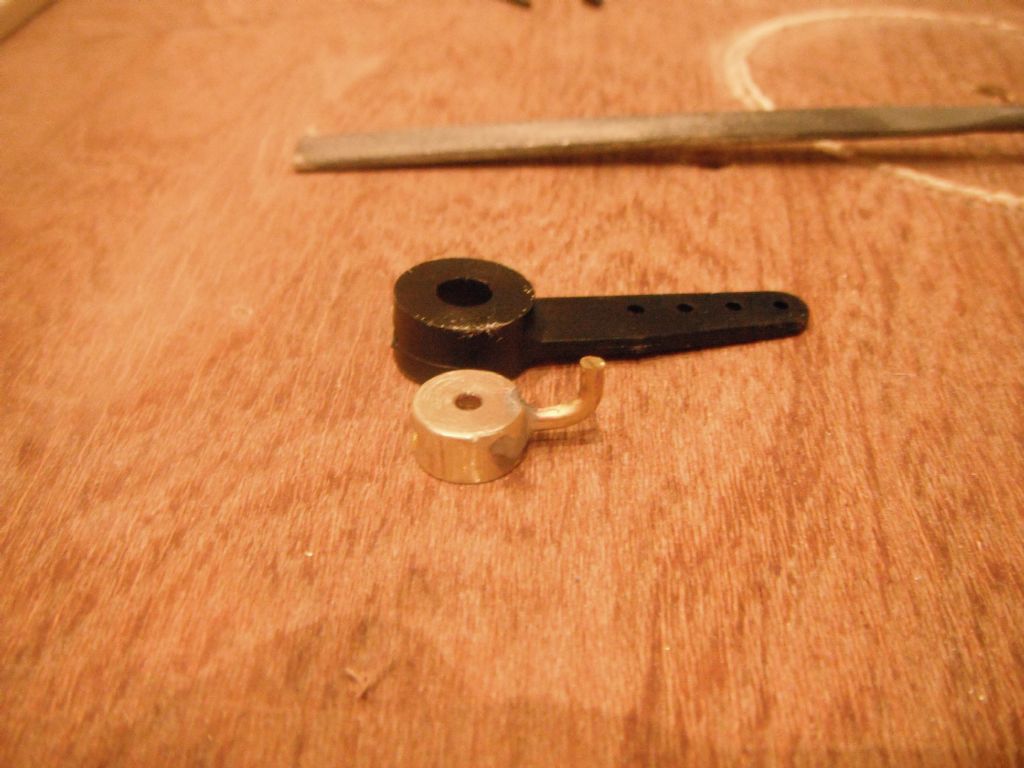
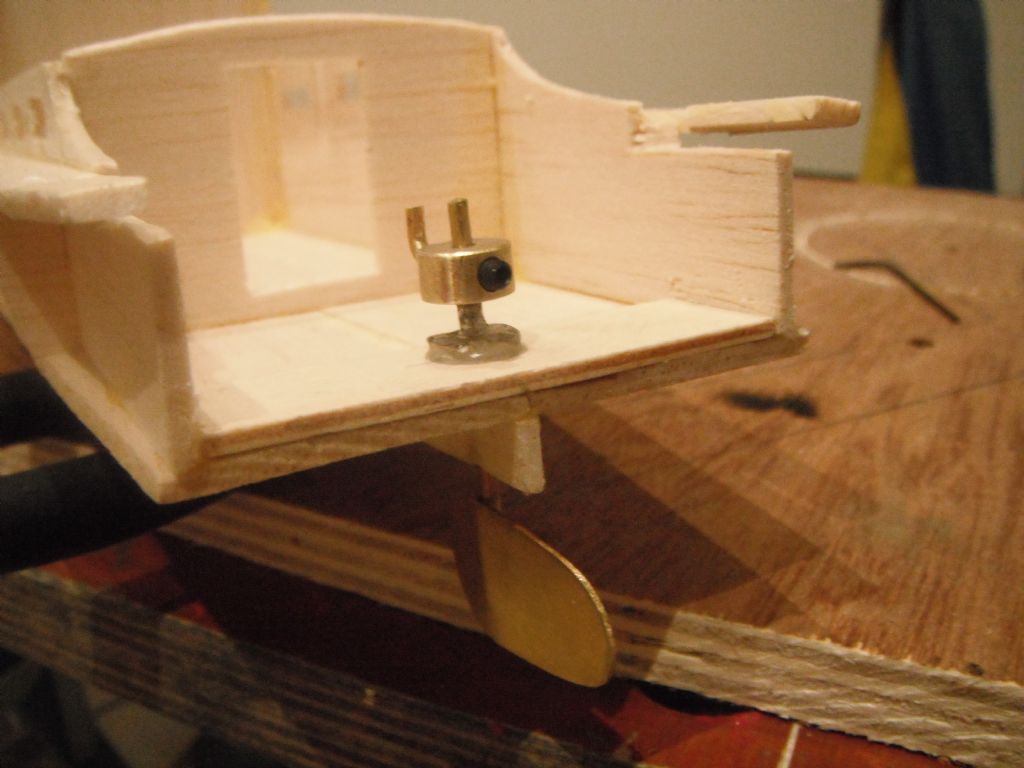
                                            After soldering the rudder, how hard can this be, I decided to give the rudder arm a go. So, found a long plastic arm, way to long, which had a brass insert and grub screw to fix it to the servo. Great off came the plastic bit, bent some brass rod to shape and soldering torch out.

                                            dscf0629.jpg

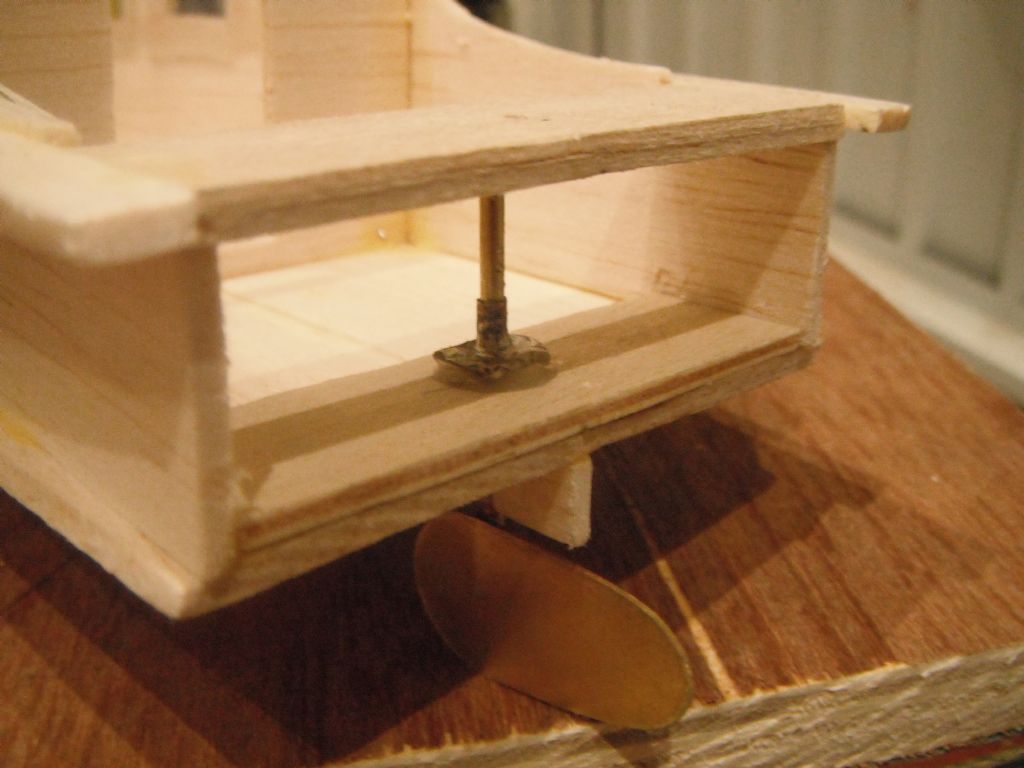
                                            See this soldering lark is easy, should do it more often. So now I have a a rudder and arm, now need a rudder stern tube to put it in.

                                            dscf0631.jpg

                                            This is a spade terminal usually used to make electrical connections, with the spade cut off and drilled to the size of the rudder tube, soldered on and epoxied in place. Here it is all in place.  Those eagle eyed amongst you will notice I had to strategically remove the rear deck plate.  God I hate Balsa, but it is easy to cut out bits and redo.

                                            dscf0641.jpg


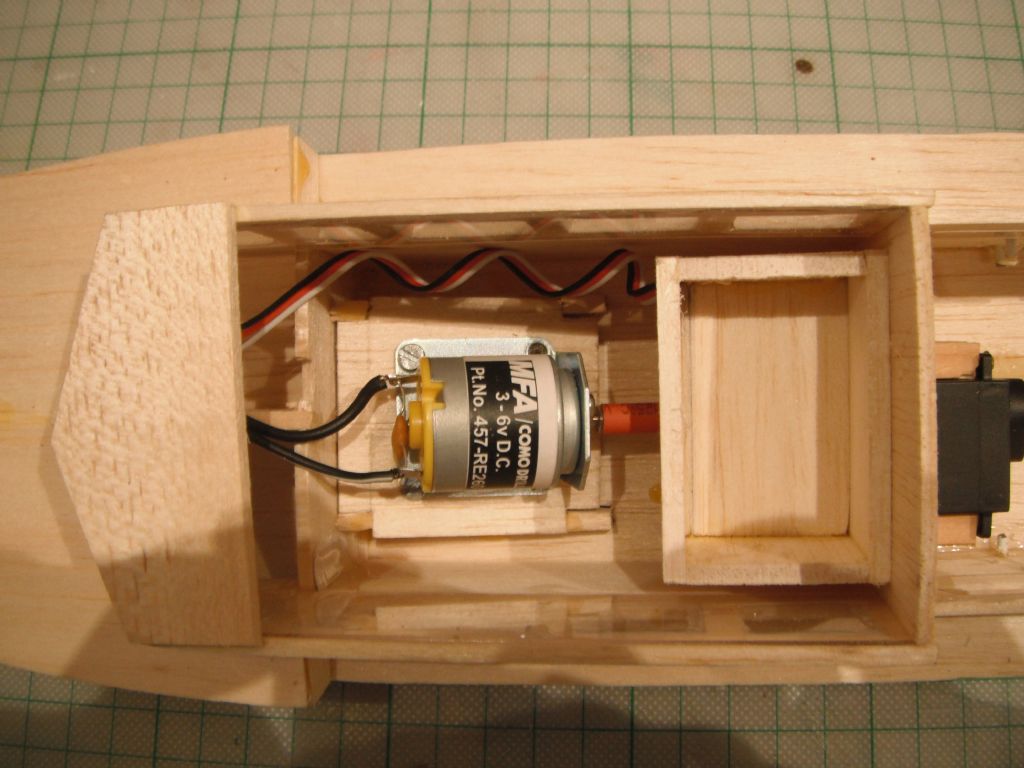
                                            Next on to the motor mount. Mounting plate with nuts epoxied in place ready to take the nuts to hold the motor down.

                                            dscf0645.jpg

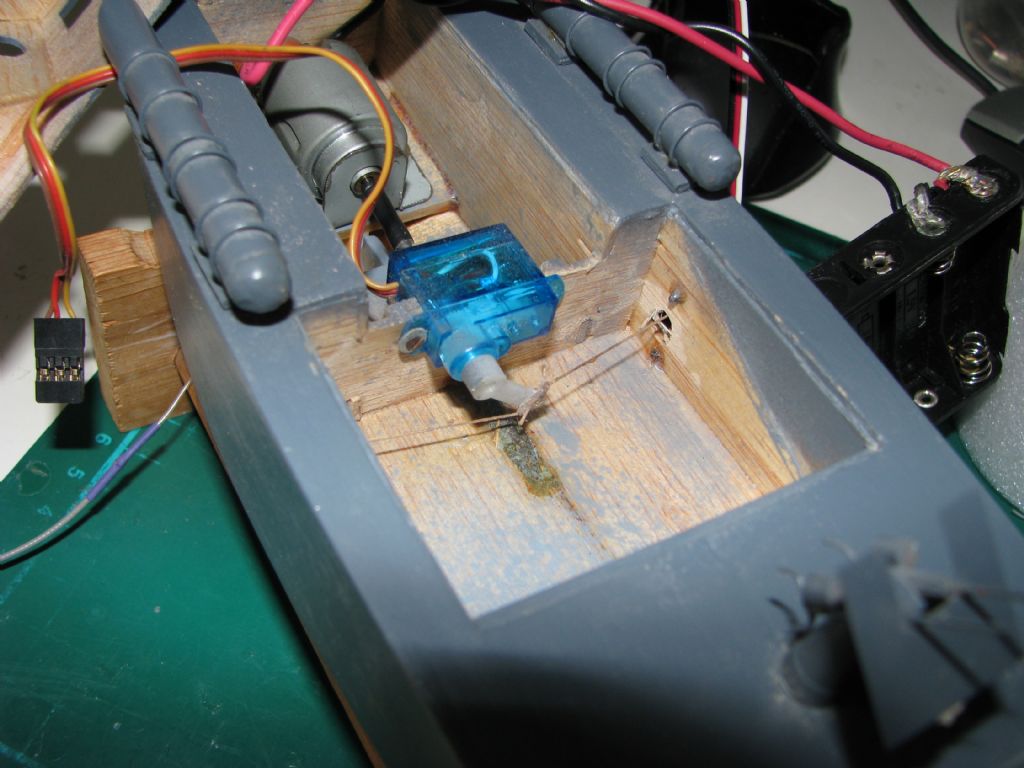
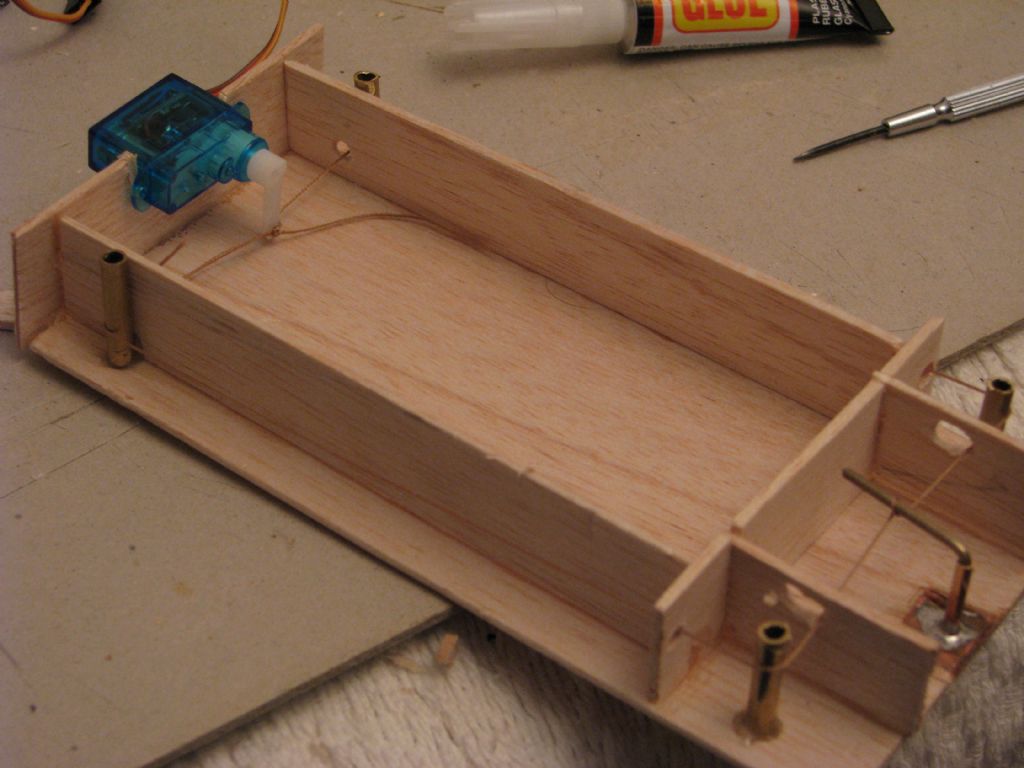
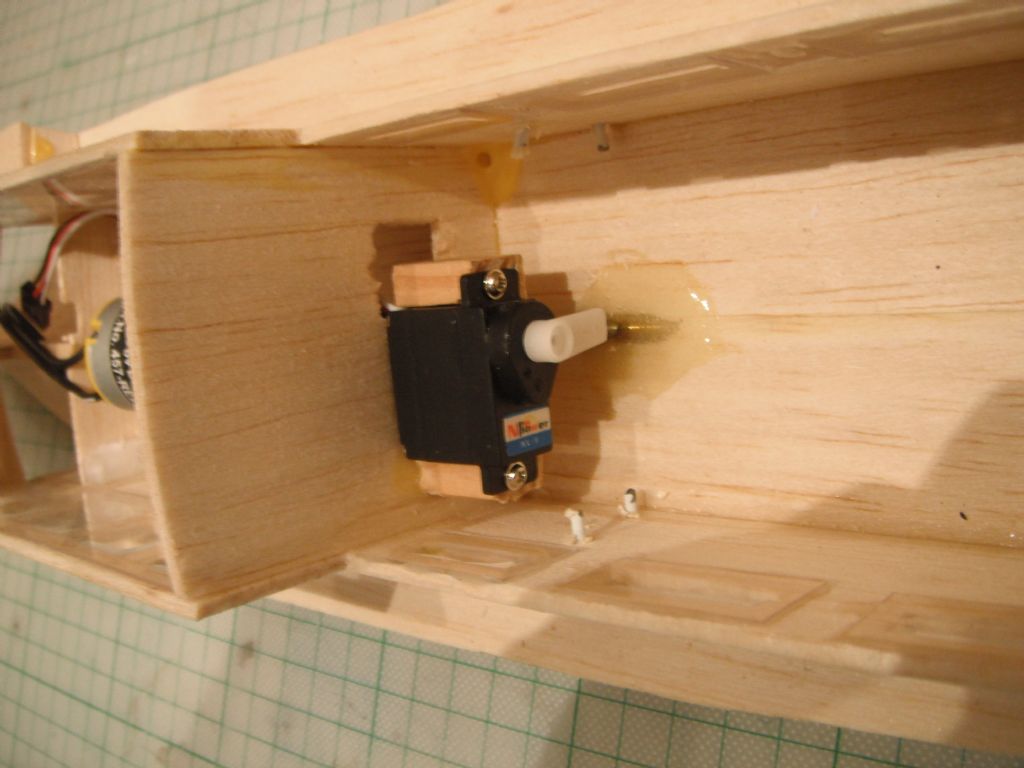
                                            With the motor in place it is on to the rest of the electrics and rudder mechanism. So, a box to hold the receiver was built and attached to the bulkhead, and a mount for the rudder servo built and glued in place.

                                            dscf0647.jpg

                                            dscf0649.jpg

                                            The white things poking through the side are the runners for the rudder servo pulley system,

                                            dscf0650.jpg

                                            Above you can see them glued in place, they will be enclosed inside the hull sides. Thanks Diede, should work a treat. Now just have to string it up and test it.


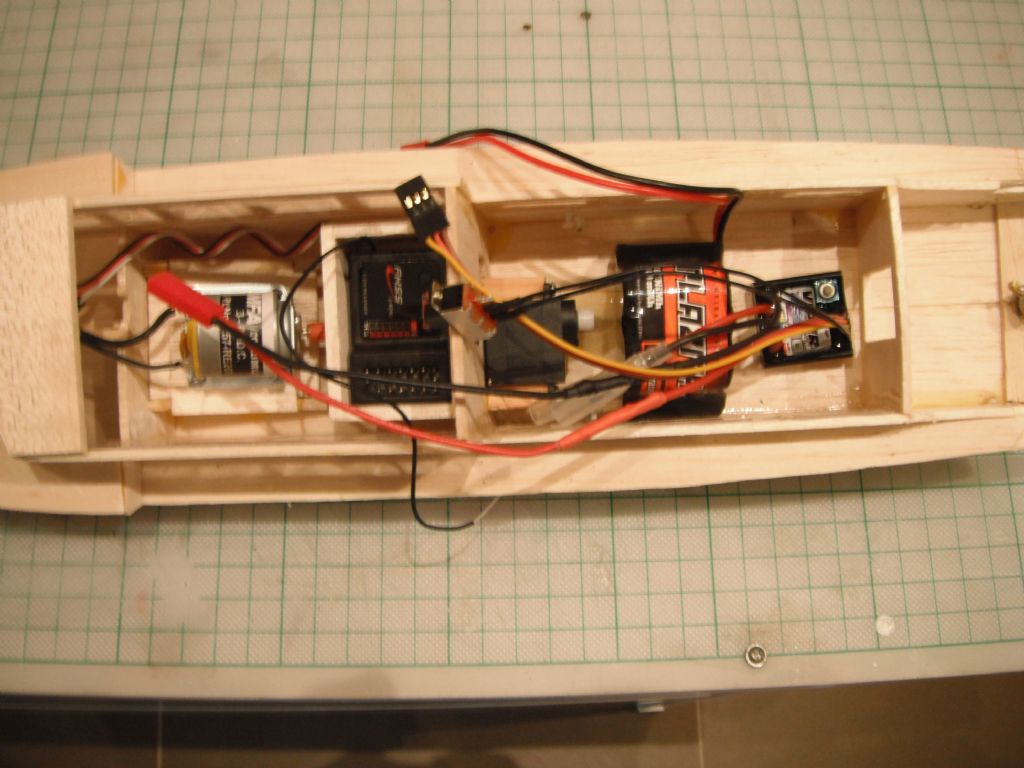
                                            Had a test fit of the battery, receiver and ESC.  It is really tight for space in here.

                                            dscf0652.jpg


                                            Night for now.

                                            Andy


                                            Edited By Andy C on 22/05/2015 22:43:47

                                            Edited By Andy C on 22/05/2015 22:45:23

                                            #57942
                                            Andy C
                                            Participant
                                              @andyc56856

                                              Ok, so question. Once I run the fishing line round, is it one long run or two separate runs. One each side. How tightly should it be strung and what is the best knot to use. Ok so that is four questions. Any help appreciated.

                                              Andy

                                              #57968
                                              Dodgy Geezer 1
                                              Participant
                                                @dodgygeezer1

                                                Once I run the fishing line round, is it one long run or two separate runs. One each side. How tightly should it be strung and what is the best knot to use. Ok so that is four questions….

                                                How it works for you, of course, but this link (scroll to the bottom) says how I did it.

                                                **LINK**

                                                I ran a single length of this lovely floppy dacron trace (not monofilament nylon!) from the servo arm, round the 'sliders', one loop around the tiller and back to the servo arm via the other side 'sliders'. I knotted both ends to the servo arm and put a dab of superglue on them.

                                                Now the trace was a bit loose. So I swung the tiller arm to one side until the trace was almost falling off, and put another loop around the tiller arm. I kept doing this until the trace was quite tight, though easy for the servo to move. Then I centred the servo, centred the tiller arm – the loops simply run round the arm – and when I was happy put a drop of superglue on the tiller arm loops. That freezes everything in a perfectly central position. Thereafter, if I'm unhappy with the rudder centering, I adjust it via the transmitter trim….

                                                #57981
                                                Andy C
                                                Participant
                                                  @andyc56856

                                                  So had some time in between family cycle ride and local village fair to string the rudder assembly. Well, it works, surprised myself. Only had the monofilament fishing line but used a couple of fancy knots, double Davy on the servo end and a marlinspike on the rudder end. Not too tight, but tested it and happy to say it actually works. Would take a photo, but cannot reply see the fishing line very well.

                                                  Next is on to the motor wires to be connected to the esc, think I will stick with the mtronics military cro, as it has reverse.

                                                  Cheers Andy

                                                  #58006
                                                  Dodgy Geezer 1
                                                  Participant
                                                    @dodgygeezer1

                                                    Not too tight, but tested it and happy to say it actually works…

                                                    If you use the Dacron trace it will be easy to tension by adding extra loops around the tiller and that will make the link very positive. I think monofilament may be harder to tension, and harder to secure to the tiller – but that is not so important if you have access to the tiller arm as you will have with the Triton…

                                                    #58454
                                                    Andy C
                                                    Participant
                                                      @andyc56856

                                                      Right Progress report time

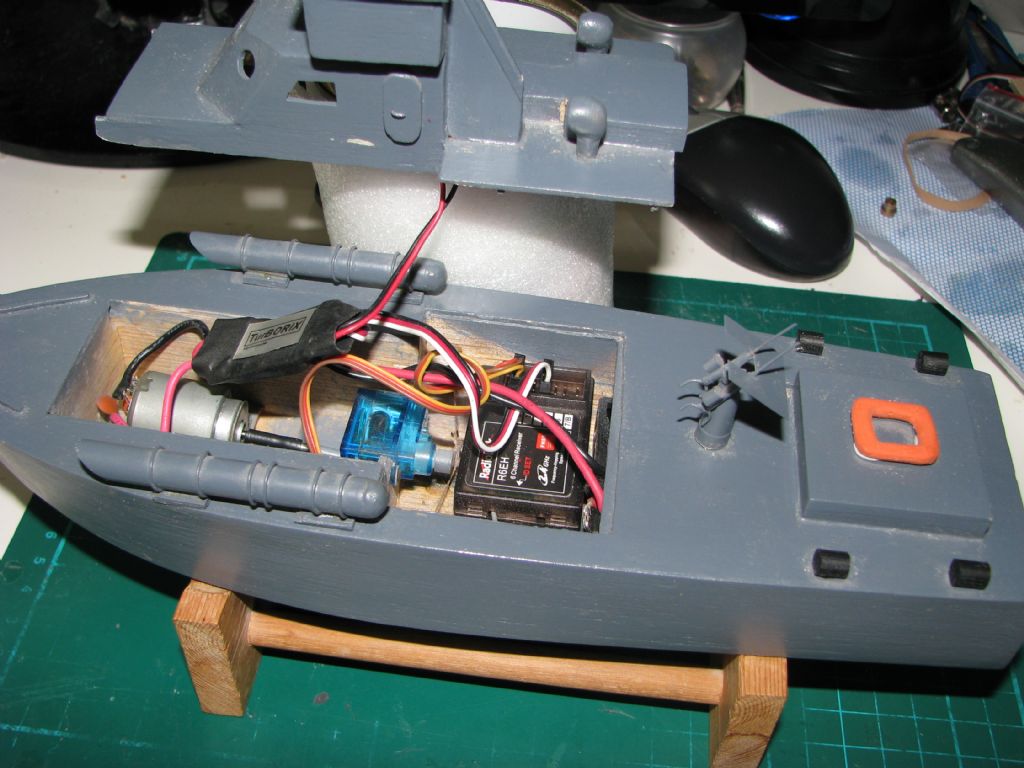
                                                      Ok, had a rethink on layout. Micro Viper sits quite nicely on top of the receiver, is this a good idea? Will it get too hot?? Not sure???
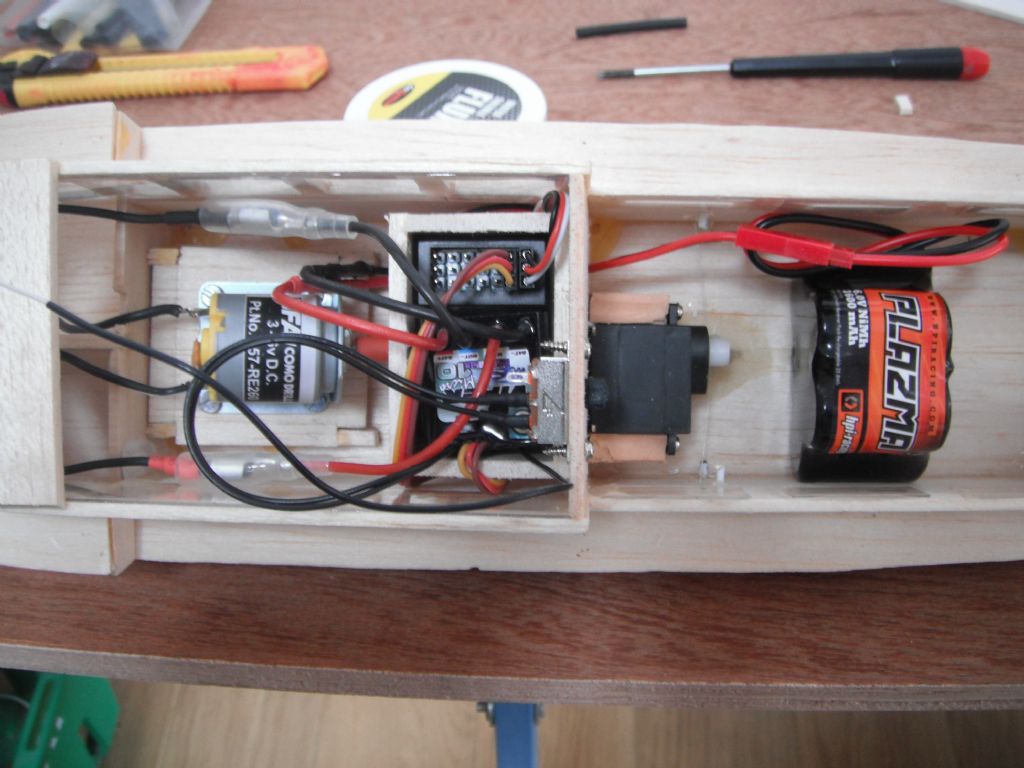
                                                      New Layout

                                                      Next up skinning the thing. Sides first, bit of a gap at the bow. Sort that out later.
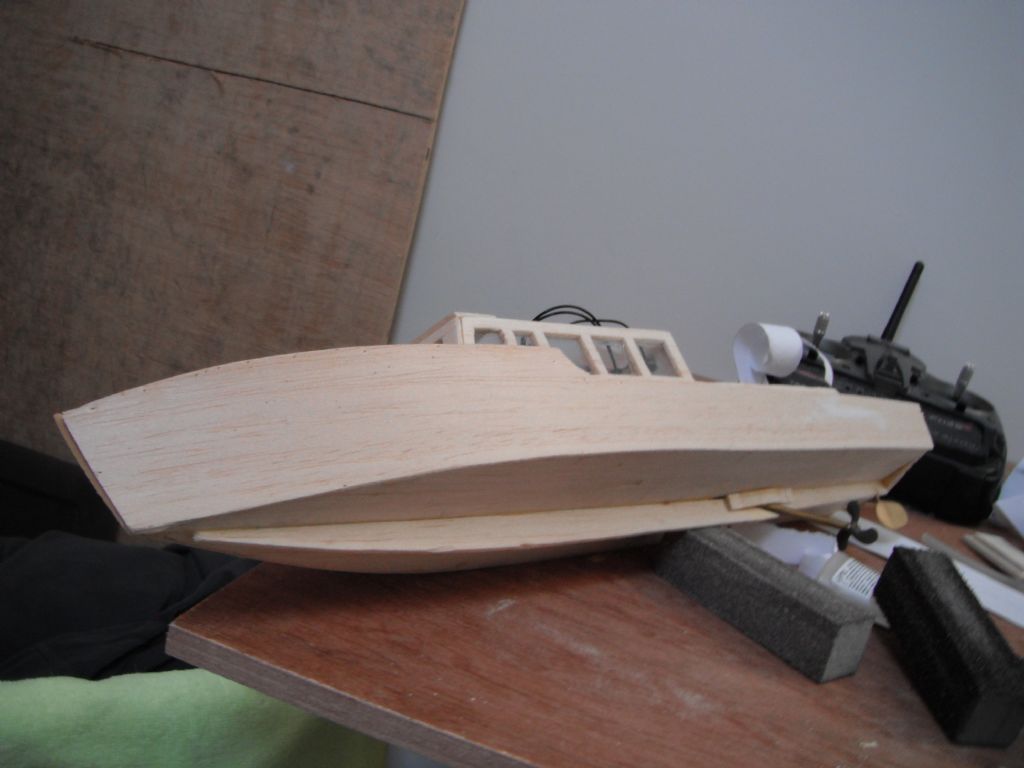
                                                      Sides on

                                                      You remember I had that trouble with access to the rudder assembly, well, sorted now. Cut a hatch in the back didn't I. Now just need a hatch.
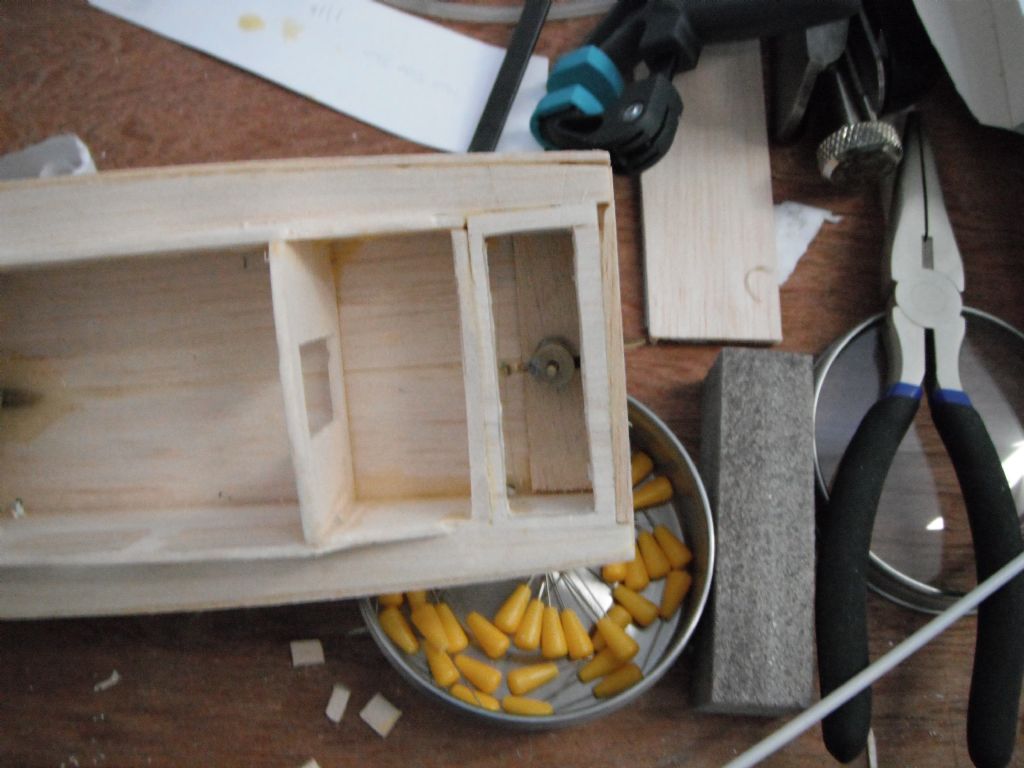
                                                      Oops again

                                                      Oh look. A hatch, glued a piece of balsa slightly oversize onto the piece that came out of the hole. I know what you're think, is it blurry or is it my eyes. It's your eyes, just kidding, waterproof camera with a really hard shutter button. Does it get adorned with stuff, painted a different colour? Who knows.
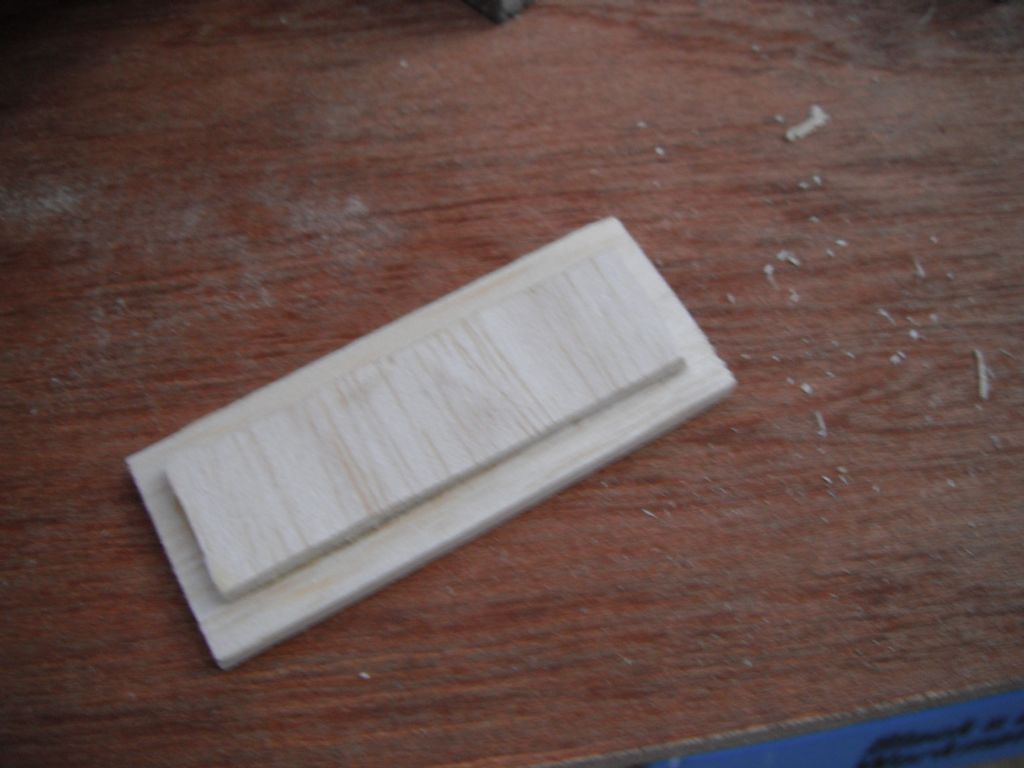
                                                      Rear Hatch

                                                      Hatch in place, fits quite tight actually, if a little wonky. Precision, not on this one, still learning. Have to watch painting it, as it might not fit after.
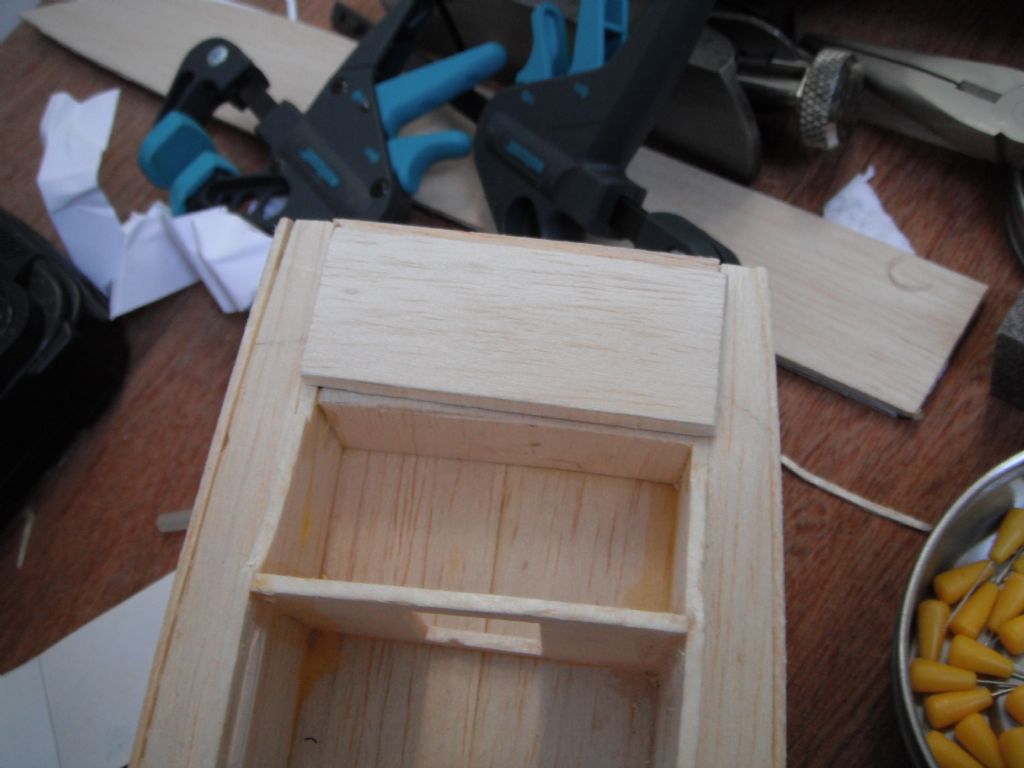
                                                      Hatch in Place

                                                      Now for hull bottom skins. Tricky to fit these as they needed a bit of cutting out at the propshaft and rudder tube. Looking a bit like a hedgehog with all the pins in it, but holds them in place while the glue cures. Now to the problem with the glue. I use Titebond II, which is yellow. Dries really hard and is not very forgiving. What do other people use, I have seen some using normal wood PVA, blue or green, but is there a real preference?
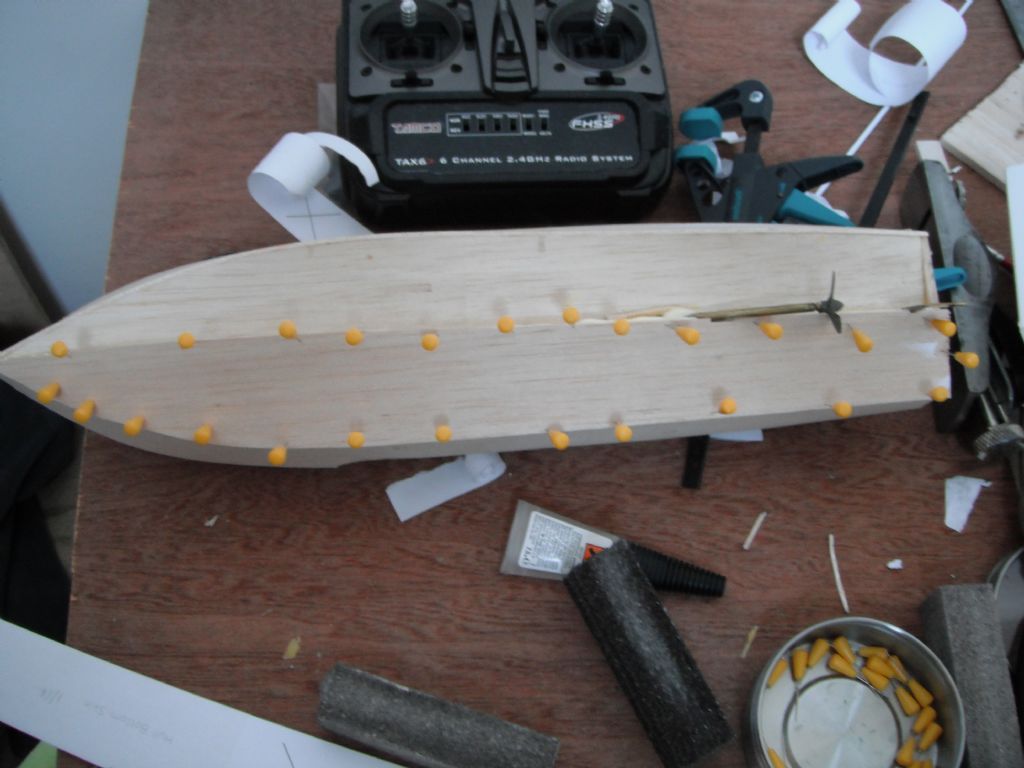
                                                      Bottom Skins 2

                                                      Glue dry, pins removed. she looks like a boat now. You can just see Goblin in the back ground, awaiting new sails and a paint touch up. Isobel has chosen a new colour for the top half, but more on that in the Goblin thread.

                                                      Back to Triton.  Need to fit the outer keels, front and rear. Now we will see if it is all square and in line. Well not far off, Keel is slightly off, but a bit of fiddling about straightens it up, a bit.
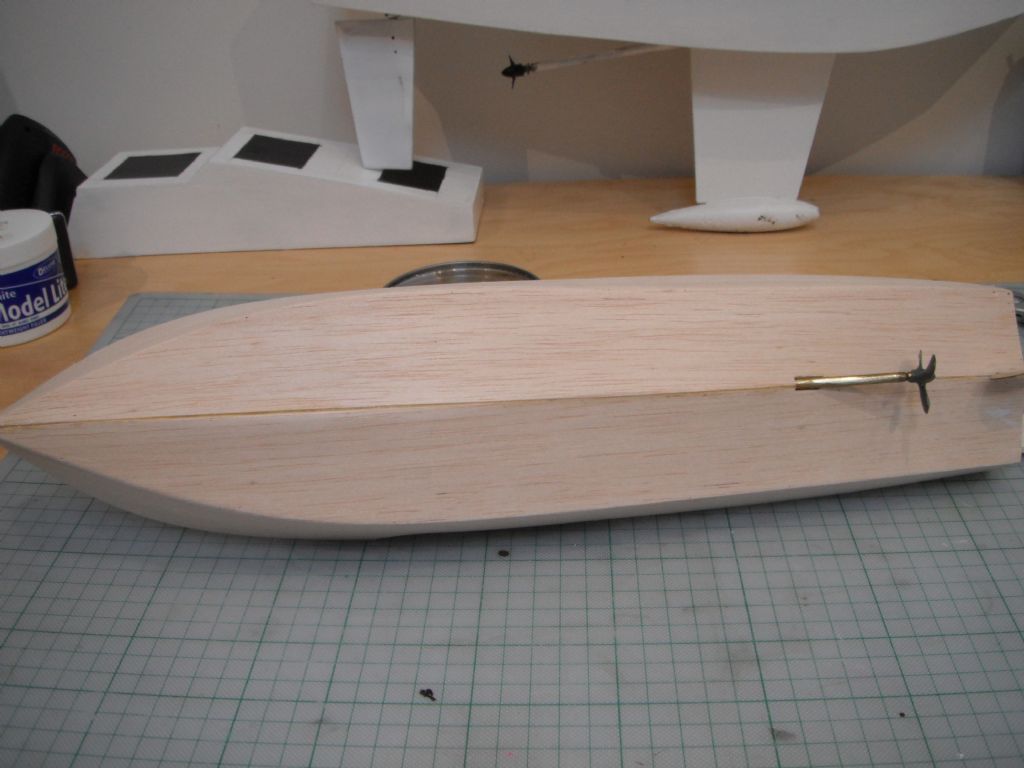
                                                      Prep to rub down

                                                      Now for the filling and rubbing down before the next stage, sealing and painting. The gap at the bow is bigger than I originally thought. I have some Deluxe Materials White Model Lite filler. Thought it would be better than the twin tailed lightning from across the pond. Oh, don't start that again, wot me.
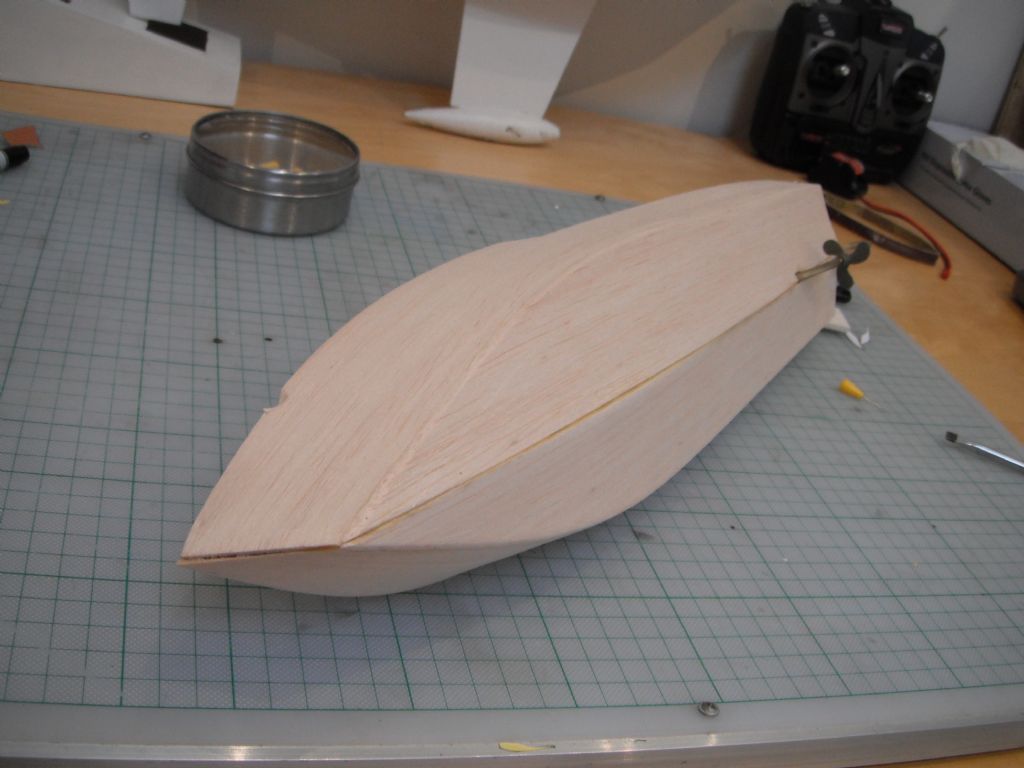
                                                      Rub down in Progress

                                                      You may not know this "but I HATE Balsa", have I mentioned that. Well as you can see, I dropped it whilst filling the pin holes etc. Not to worry a bit of P38, no that is not right, Lite filler will sort it out. I hope.
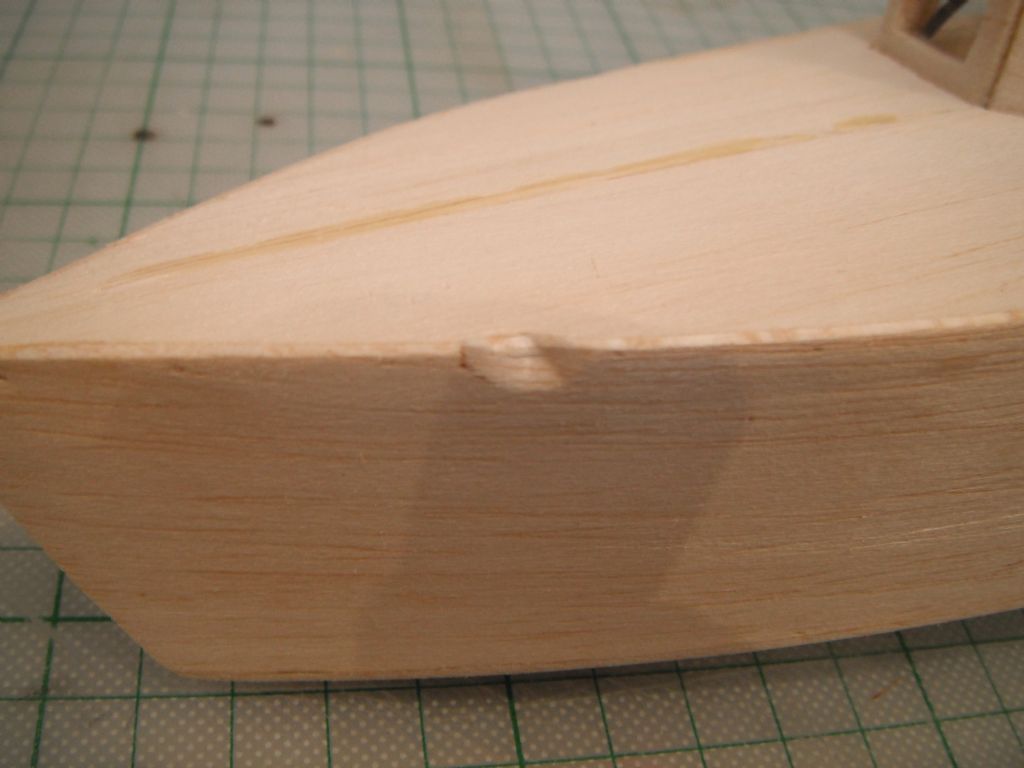
                                                      DINK, Oh no.

                                                      so what is next I hear you ask. You did ask didn't you. Now that reminds me, Tom listens to a Story book going to bed, The Boxcar Children, know it? Nor did I until we bought some. Well it is American and there is a young lad that keeps saying won't in all the wrong places and it sparked a debate about the use of the apostrophe and where you can use it. Don't worry I am getting there. Anyway Didn't came up, and as you know it is short for did not, so can you use it in the sentence above? "You did ask did not you".

                                                      Anyway back to the build. Triton is now in the shop after a quick shopping trip to buy some cellulose thinners for the sanding sealer, now thinned 50/50 and painted on. Need to rub it down and may put another coat on before tissue and dope stage.

                                                      Well that is enough rambling from me, left the kettle on didn't I. (Really that again)

                                                      Andy

                                                      Edited By Andy C on 16/06/2015 17:46:01

                                                      Edited By Andy C on 16/06/2015 17:48:17

                                                      Edited By Andy C on 16/06/2015 17:48:55

                                                      Edited By Andy C on 16/06/2015 17:50:48

                                                    Viewing 25 posts - 1 through 25 (of 75 total)
                                                    • Please log in to reply to this topic. Registering is free and easy using the links on the menu at the top of this page.

                                                    Code of conduct | Forum Help/FAQs

                                                    Advert

                                                    Latest Replies

                                                    Home Forums Beginners Topics

                                                    Viewing 25 topics - 1 through 25 (of 25 total)
                                                    Viewing 25 topics - 1 through 25 (of 25 total)

                                                    View full reply list.

                                                    Advert

                                                    Newsletter Sign-up