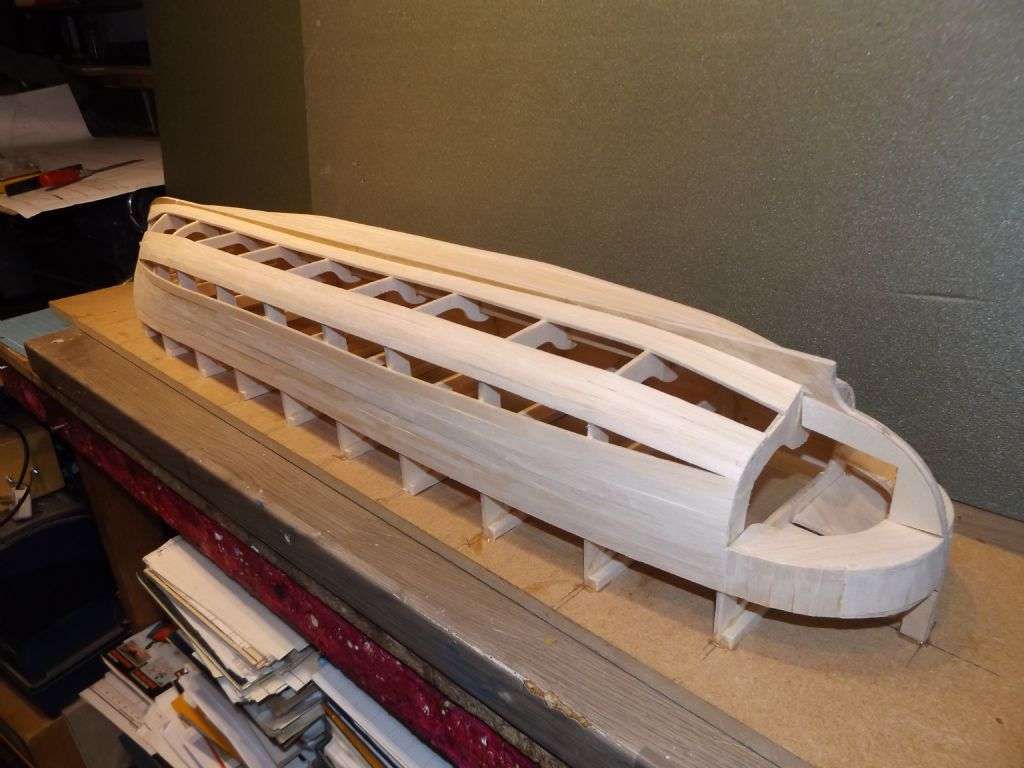
Planking the Billings Colin Archer 728 hull.

Advert

Planking the Billings Colin Archer 728 hull.

Home Forums Building Kits Planking the Billings Colin Archer 728 hull.

Viewing 23 posts - 1 through 23 (of 23 total)
  • Author
    Posts
  • #124331
    Johannes Jones
    Participant
      @johannesjones12331

      Hi. I’m in the process of building Billings Colin Archer 728, and I’m about to start planking the hull. I’m not sure whether the planks should follow curvature of the deck (bow to stern: I expect there’s a nautical word for this, but i don’t know what it is), or should the planks lie straight, or should I start at the keel and work upwards. There’s nothing that stands out to me as something I could use as a datum.

      In general, this boat has so far been straightforward to build, with all laser-cut parts fitting together nicely, and allowance seems to have been made for the removal of charred wood along the cut edges. Not every kit manufacturer does that in my experience, which leads to sloppy fit of parts. Of course, that might just be me being overenthusiastic with the sanding.

      But, going back to my problem, the instructions offer no advice on how the hull planking should lie or what, if anything, should be used as a datum.

      Any clarification of this point would be appreciated.

      Thanks,

      John Jones

      Advert
      #124332
      Fred Ellis 1
      Participant
        @fredellis1

        Hi John

        I have never done a plank on frame boat so can not give you the right answer to your question, some one with a better knowledge will come along

        What I would say is have a look on Youtube, I have just put in How to plank a model boat hull and the first one to come was https://www.youtube.com/watch?v=aaZt1qER_-E

        Hope this is of some help

        Fred

        #124334
        Ray Wood 3
        Participant
          @raywood3

          Hi John,

          Definitely plank from the deck line to the keel 🙂

          Pretty topsides are most important.

          Regards  RayOB 3

          #124338
          Johannes Jones
          Participant
            @johannesjones12331

            Hi Fred, just watched the first of that series of videos. I can see how that will work, as the model in the video also has a deck line that’s curved. Thanks very much.

            Ray, I suspected that I’d have to start from the deck, but this is where my problem lies: should the first plank follow the curvature of the deck (stem to stern), or should it lie straight? I think from watching Fred’s link, the plank should be allowed to lie naturally, without trying to force it to follow the curvature of the deck. I’ve planked one Billings boat in the past, the Dragen, but that deck lies flat, IIRC, so this problem didn’t come up, and, therefore, I had no problem planking it. I foolishly assumed that all hulls would be as easy to plank. Hey ho. Now I see why people write books on the subject.

            Also, your comment about the topsides looking prettiest because they’re the visible part of the hull makes sense.

            Thanks for your comments.

            Thank you both.

            John

            #124590
            gecon
            Participant
              @gecon

              Hi John,

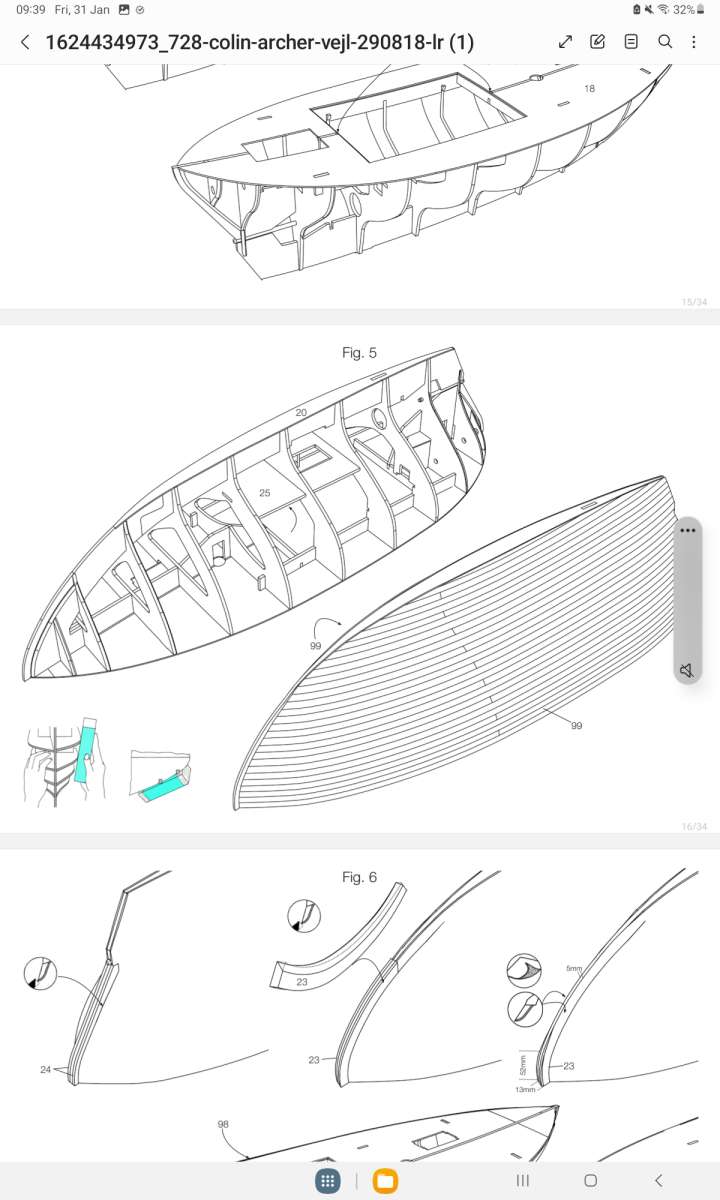
              The drawing nr (5) on the instructions for the 738 Colin Archer RS1 clearly show that the top plank follows the top line of the hull. One can also see that the planks at the keel are shaped to fit.

              Regards,

              George

              #124594
              gecon
              Participant
                @gecon

                Screenshot_20250131_093910_Samsung Notes

                #124596
                Johannes Jones
                Participant
                  @johannesjones12331

                  Sorry George, for the delay in replying; even though I was logged in, I kept getting a message telling me to log in to reply, but was unable to.

                  I’m obviously aware of Fig. 5, but I don’t think I can put any credence in a drawing. If I was to take theses diagrams literally, I would have had to fit the cockpit for Fig. 5, then remove it again to comply with Fig. 6. 🙂 Also, there’s no sign of tapering in Fig. 5, and based on my admittedly limited experience of planking, I doubt very much that the planking would be as neat and straight as the drawing shows if the planks weren’t tapered. Another thing the drawing doesn’t show is the pronounced curvature of the deck from front to rear (sheer?) which was the cause of my uncertainty. I’m thinking that if I curve the first plank to fit that deck line, I’ll have to curve all the subsequent planks to suit, which I think would be a major faff.

                  I could be wrong and you could tell me that you’ve planked the Colin Archer and it came out exactly like the drawing. If that’s the case, I apologise.

                  I’m happy that I’ve worked out how I’m going to tackle the planking. I’m going to use the same method as I did with the Dragen, which came out very nicely.

                  Thanks for your input though,

                  John

                  #124597
                  Colin Bishop
                  Moderator
                    @colinbishop34627

                    I also thought the diagram was a triumph of hope over reality! But unless you need to show the planking on the finished model then there shouldn’t much need of individual tapering on the longer planks

                    One recommended method which I found worked well on my Greek Fishing boat is to lay the first planks along the deckline, conforming to the sheer. Once it becomes difficult to twist subsequent planks to butt against the one above then just let the plank find it’s own line along the frames leaving long triangular spaces at bow and stern.

                    Also start planking from the keel upwards in the same way. Where there are long thin gaps it is easy to insert tapered ‘stealer’ planks into them.

                    The only mistake I made was to use planks which were slightly too wide and less easy to conform to the frame shape across their width. thinner ones would have been quite a bit easier.

                    Any remaining gaps can be accommodated with filler and the whole hull sanded smooth.

                    Not best joinery practice but it saves a lot of time and works well for a painted hull.

                    Colin


                    #124599
                    Johannes Jones
                    Participant
                      @johannesjones12331

                      Hi Colin. That’s exactly what I did with the Dragen, and what I’ve decided to do with the Colin Archer. The result on the Dragen was very tidy, and as both it and the Colin Archer will be glassed, I see  no downside. Thanks for confirming me in my decision. Makes me feel much better about it.

                      John

                      #124600
                      Johannes Jones
                      Participant
                        @johannesjones12331

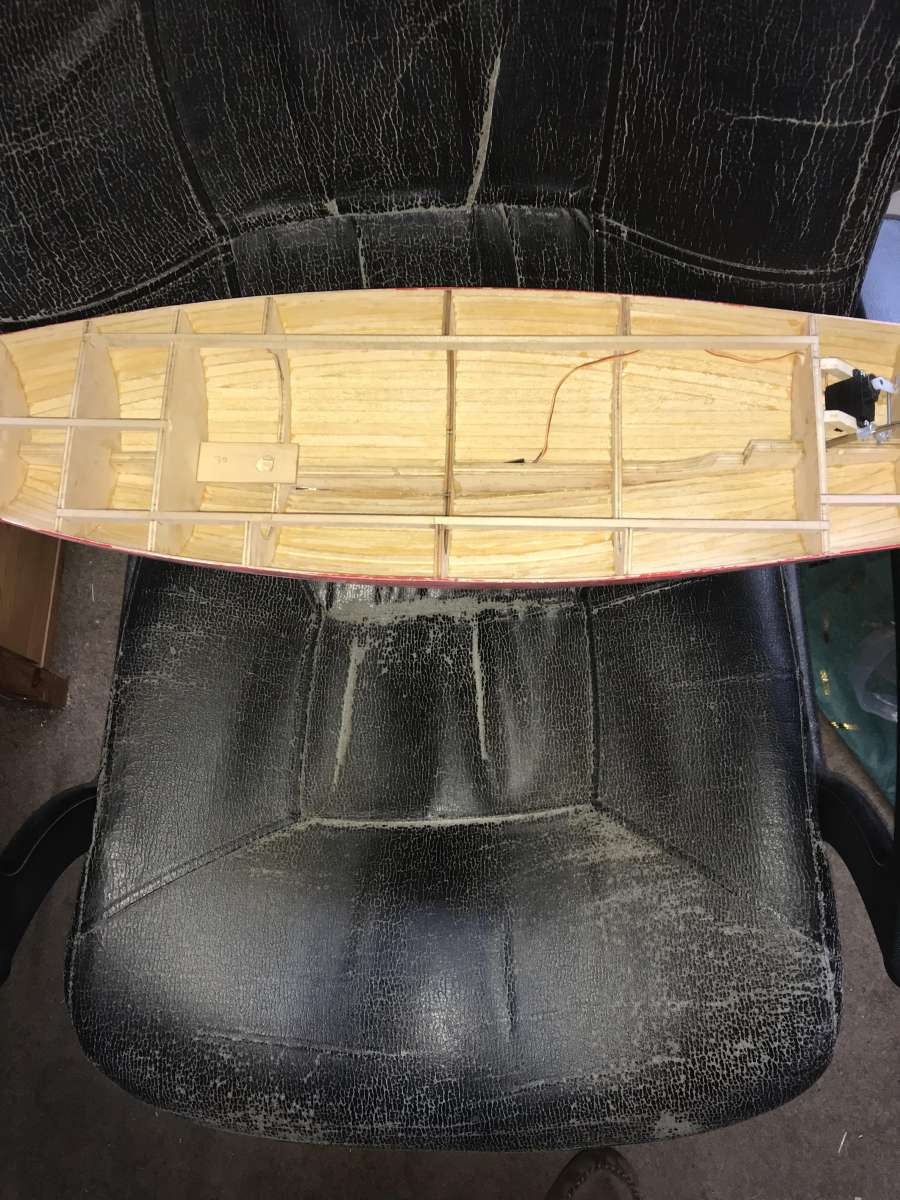
                        dragen3This is how the Dragen came out. Not bad for a first attempt, I thought. And I didn’t do any of that tapering until it became necessary to close tapered gaps. Just kept planking until the planks didn’t want to curve anymore, then started up from the keel. I found it much easier than I’d anticipated.

                        So this is how I’ve decided to do my Colin Archer. The hull will be painted, so I don’t think it matters how I achieve the planking.

                        Thanks everybody for your comments and suggestions.

                        John

                        #124601
                        Chris Fellows
                        Participant
                          @chrisfellows72943

                          Hi John – I hope that my first attempts at planking come out as well as yours.

                          What type and size of timber are you using?

                          Chris

                          #124603
                          Johannes Jones
                          Participant
                            @johannesjones12331

                            You’re very kind.

                            I used what was in the kit. I’ll have a dig around and see what i can find. The Dragen planks 1.8 x 7mm obechi. The Colin Archer planks are 2 x 10mm obechi.

                            I can’t in all honesty say I found the planking difficult; I sanded a slight angle on the edge that was going to butt up against previously fitted planks, and that was about it. If you look very carefully at the planking on the Dragen, you will see on one side that there’s a single plank to which I’ve added an extra plank along part of the inside. This was because I tried to curve a plank further than it was willing to go and it bulged out a bit after I’d fitted it, not much, but I was concerned that when I sanded the hull, that plank would be too thin, so I added an extra layer of plank inside the hull to give it a bit of support. Other than that, no problems. Left me wondering what all the fuss was about.

                            That last sentence could be construed as tempting fate, I realise and I may yet find out what all the fuss is about. 🙂 I don’t think the extra 0.2mm of thickness and 3mm of width are going to be a problem, except possibly around the stern of the Colin Archer as it’s quite blunt-ended. We shall see.

                            John

                            #124642
                            gecon
                            Participant
                              @gecon

                              Hi John, my Colin Archer kit was the ‘528’ with an ABS hull. So I did not plank the hull. I agree that one cannot be sure that the drawings allways show the precise construction method.  I cannot remember inaccuracies on any of the drawings in my kit apart from the shape of the ‘cat heads’. Although I DO remember being rather frustrated (often) over a near total absence of construction text.

                              Look forward to seeing future photos of your progress.

                              George

                              #124645
                              Johannes Jones
                              Participant
                                @johannesjones12331

                                Hi George,

                                Ah yes, the “instructions”. Utterly useless. They might as well read,”Using the materials provided in the box, build the ship.”

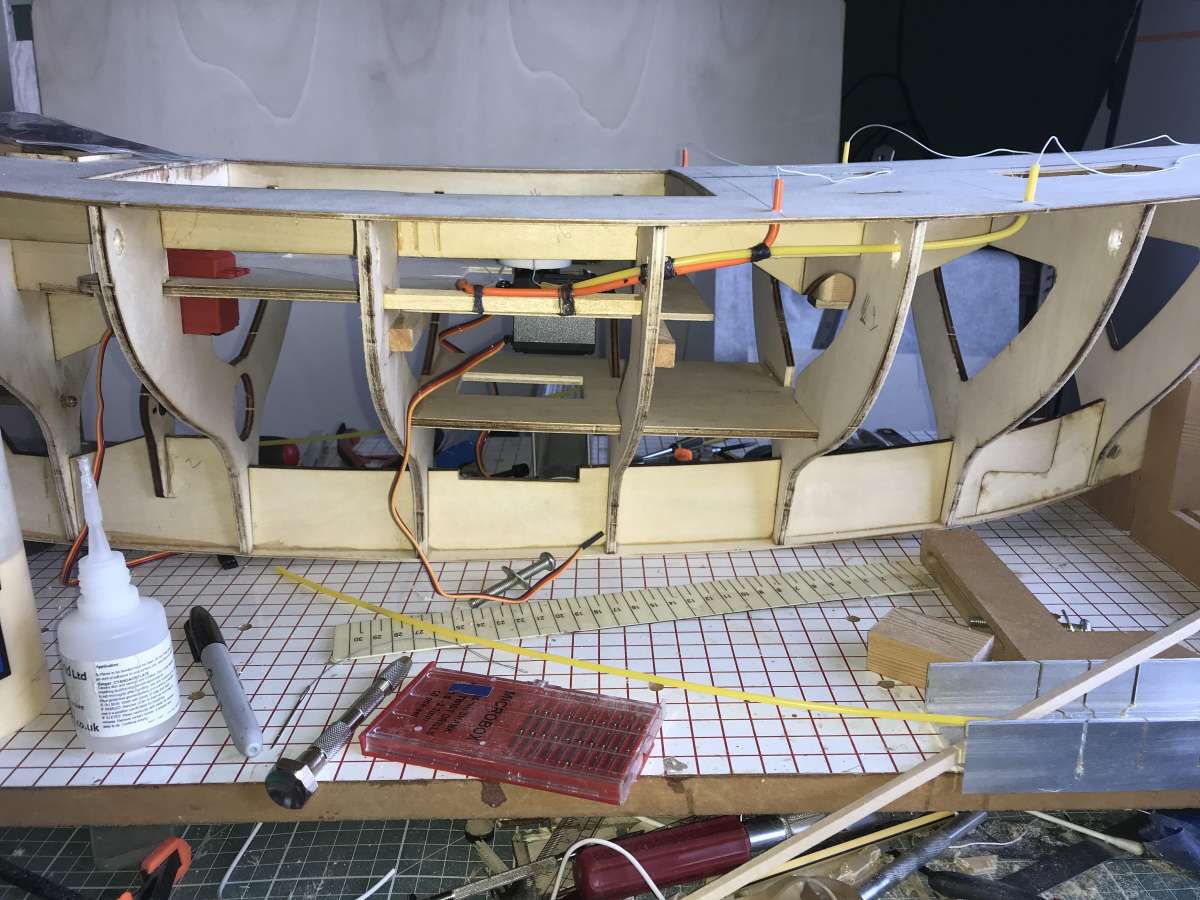
                                Had the plastic hulled version still been available, I’d probably have bought it, but I think I’ll derive greater satisfaction from building the wooden hull. Assuming I manage to finish it, of course. Talking about inadequate instructions, I’ve just finished sorting out the sheets for the jib and foresail (not certain if those are the correct names: the sails ahead of the mainmast.) Wasn’t as difficult as I’d expected. I used the plastic tubing that normally used for elevator and rudder control in RC planes. If you imsert the inner (to keep the outer from collapsing), then heat the outer with boiling water, you can bend it to quite small radii (radiuses?), although there’s less friction if you keep the bends fairly open. The inner’s not much use for anything after you’ve used  it a few times, though. I do like having plenty of space in which to work.

                                The (jocular) comment I made regarding the cockpit (again, don’t know if that’s the right name; just seemed appropriate) is true: in the upper illustration of Fig. 5, it is clearly visible; in the lower left illustration, it’s equally clearly not there. This may give you some idea of how closely I’ve examined the illustrations in the absence of useful instructions.

                                I’ve made up my mind about how I’m going to plank the hull. Not 100% confident whether or not it’ll work, but I’ll be using water-resistant glue, so worst case scenario, I’ll be able to remove the planks if necessary.

                                Finally, just for your interest, a photo of how I used the plastic tubing to get the sheets from sail to servo with the minimum hassle. I used orange and yellow because that’s what I had, but for simplicity, the orange tubes go to one servo and yellow servos to the other. The bindings are just polyester thread soaked in CA (after binding).

                                Sorry if I’ve gone on a bit; it’s a failing of mine. BTW, if you’re wondering what the 10mm holes in the bulkheads are for, I used miniature G cramps to hold the deck down while gluing it and the holes are for somewhere to put the lower jaw.

                                Cheers,

                                Johncontrols
                                 

                                #124646
                                Chris Fellows
                                Participant
                                  @chrisfellows72943

                                  Thanks John, that’s useful.

                                  With my previous builds I was apprehensive on a number of occasions about tackling some things for the first time which then turned out not to be as bad as I’d feared and I hope that planking will be the same!

                                  At least I’m painting my hulls so P38 can always come to my rescue!

                                  Chris

                                  #124649
                                  Johannes Jones
                                  Participant
                                    @johannesjones12331

                                    I don’t know how confident I come across as (is that a sentence?), but re. the planking, definitely not. It’s just going to be a case of “Start at the beginning, then carry on till I get to the end, then stop.” No technique to speak of, just the application of common sense (he said hopefully).

                                    Won’t be starting that for a few days, but. Because there’s quite a lot of hull that I won’t be able to reach after planking it, I’m going to paint everything (except where the glue’s going, hopefully) with a very thin epoxy intended for soaking into wood. This will leave part of the inner surface of the planking uncoated, but I’m thinking that I’ll probably drill a small hole in the deck above each unreachable compartment, pour in some of this very thin epoxy and give it all a hearty shake, then pour out the excess. That’s the best I’ve been able to come up with so far. Sounds great in theory…

                                    Yes, I expect to be using P38, Bondo, whatever I’ve got to try to achieve that elusive silk purse result.

                                    Are you about to start planking something?

                                    John

                                    #124650
                                    Johannes Jones
                                    Participant
                                      @johannesjones12331

                                      In post 124645, paragraph 3, line 3, the sentence should have read, “in the lower left illustration of Fig. 6, it’s equally clearly not there.”

                                      Apologies for any confusion caused by this omission.

                                      John

                                      #124651
                                      gecon
                                      Participant
                                        @gecon

                                        John, water resistant glue? How does that aid removing planks?  If you meant water soluable, I don’t recommend that on a wooden hull -nor anywhere else on a boat.

                                        The sheet leads look good. An advantage of a planked hull…full access to the innards for routing sheets and guide tubes before planking.:-)  I made a semi-scale interior on mine. It was not easy to hide the R/C gear behind all the bunks and lockers. An excersise i ‘self-hurting’ at times.

                                        Indeed, a lot of careful scrutiny of the drawings is required in these Billing kits. I think their idea is that the drawings free Billings from writing instructions in a dozen or so languages. I wrote down a lot of instructions for myself while trying to decifer the drawings!

                                        You are probably NOT supposed to notice the bottom of the cockpit (or steering well) in drawing nr5!  The cockpit part numbers in the next drawing are probably supposed to indicate when to construct/install the well 🙂

                                        I would be surprised if the strip pt 99 does not bend suitably around th top of the hull. I expect you have seen also that pt 98 (3 strips supplied) is wider than pt.99 so this will cover the join between the two uppermost planks pt.99. This detail is already moulded into the ABS hull on my ‘538’ kit.

                                        You seem to have good control of the sitation so I won’t disturb your own build thoughts/plans any further.

                                        I’m not online so much these days, but I’ll look in at least once a week to see your progress photos. Have fun.

                                        Regards, George

                                        #124653
                                        Johannes Jones
                                        Participant
                                          @johannesjones12331

                                          Yo.

                                          Water resistant glue lies midway between water soluble and waterproof. I build all my boats with this type (when I’m not using CA or epoxy). As the name implies, it’ll resist water to some extent, but if it’s kept wet for any length of time, the glue will dissolve, or at least soften enough so the plank (or whatever) can be eased off. I must confess that I haven’t had to do this in earnest yet (tbh, I did try it once, but the ply [a part from a SLec kit] delaminated faster than the glue softened), but I do know that the glue I use (Titebond II Premium Wood glue Water-resistant) will eventually dissolve in water. You (the builder) make it waterproof with paint or varnish or whatever. That’s my understanding anyway, and I haven’t as yet experienced anything that might make me change my mind.

                                          This is, of course, only my opinion. I’ll probably be deluged with posts telling me just what an idiot I am. Hey-ho, something to look forward to, I suppose.

                                          Feel free to disturb my thoughts/plans any time you like, I’m not slaving away over a hot Paul Archer all the time. I spend quite a lot of time waiting for paint/varnish/glue to dry, or maybe thinking about the best way to tackle a problem or combing the internet for the same reason. I enjoy the chat. Although, please don’t do what a chap from a different forum did which was, having got my email address,  to send me over 50 emails over a 5 day period. I got very little done that week, but, on the plus side, I now more about him than I do about myself.

                                          Cheers,

                                          John

                                          #124654
                                          Johannes Jones
                                          Participant
                                            @johannesjones12331

                                            George, meant to ask, have you got any photos of your Paul Archer’s interior? I’d be very interested to see them if you have.

                                            John

                                            #124678
                                            gecon
                                            Participant
                                              @gecon

                                              John……who is Paul Archer? And I certainly have not taken photos of his interior.🤣 Sorry, couldn’t resist that. ….


                                              There are many detailed build photos on my build log of the 528 Colin Archer. You should find the log easily in the forum. I have written a post there recently.

                                              George

                                              #124684
                                              Richard Simpson
                                              Participant
                                                @richardsimpson88330

                                                John, Just follow this link:


                                                Colin Archer Build Thread.

                                                #124686
                                                Johannes Jones
                                                Participant
                                                  @johannesjones12331

                                                  Hi George. Richard pointed me towards your photos. I’m extremely impressed; you’ve done a fantastic job. I especially like the little stove.

                                                  John

                                                Viewing 23 posts - 1 through 23 (of 23 total)
                                                • Please log in to reply to this topic. Registering is free and easy using the links on the menu at the top of this page.

                                                Code of conduct | Forum Help/FAQs

                                                Advert

                                                Latest Replies

                                                Home Forums Building Kits Topics

                                                Viewing 25 topics - 1 through 25 (of 25 total)
                                                Viewing 25 topics - 1 through 25 (of 25 total)

                                                View full reply list.

                                                Advert

                                                Newsletter Sign-up