Sir Lancelot

Advert

Sir Lancelot

Home Forums Building Kits Sir Lancelot

  • This topic is empty.
Viewing 25 posts - 126 through 150 (of 167 total)
  • Author
    Posts
  • #30428
    Wallace Manning
    Participant
      @wallacemanning93491

      Hi Paul just a quickie to ask just putting the finishing bits on and the anchor did you drill a hole for the anchor or cut the shank down and just glue the anchor to the hull.I dont want to drill a hole if I can get away with it as I dont want any water getting into the hull,look forward to your reply of how to fix many thanks. wallace

      Advert
      #30445
      Paul Godfrey
      Participant
        @paulgodfrey14946
        Hi Wallace,
         
        When planning the build early on, I gave some thought to the anchor as, like you, wanted to avoid simply cutting a hole which could lead to water ingress.
         
        My solution was to cut a hole in the anchor recess, but to then insert a length of square-section plastic tube (of suitable size so that the anchor shank was a snug fit) into this hole, flush with the outside of the hull.
        That way, I could paint the hull and anchor separately, then tilt the hull over to drip in some epoxy, and push the anchor in.
         
        However – I fitted this tube before the foredeck, which allowed me to re-inforce the join inside the boat with P38 filler. This produced not only a completely watertight fit, but gave more strength to the anchor tube / hull join.
         
        I appreciate you will not be able to do this on your S.L. having fitted the foredeck, but it may give you some ideas!!
         
        Best wishes,
        Paul
         
         
        #30551
        Paul Godfrey
        Participant
          @paulgodfrey14946
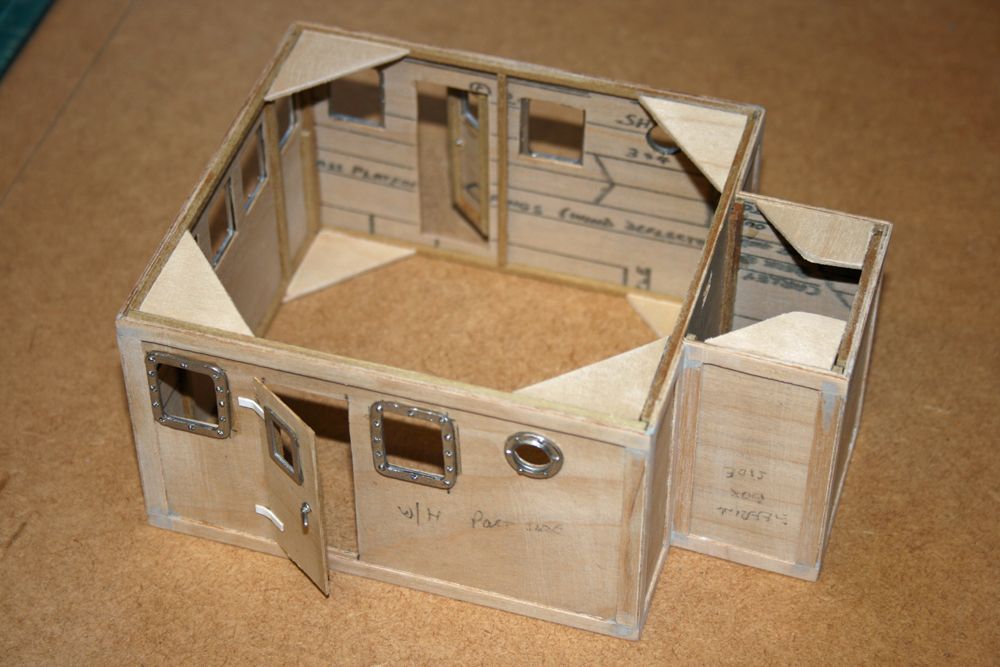
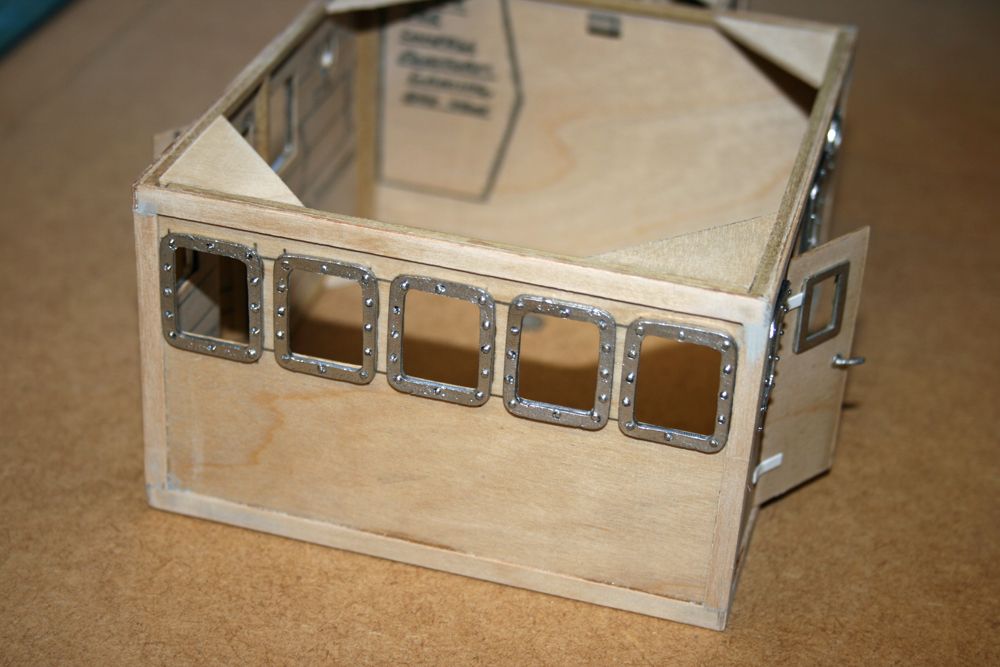
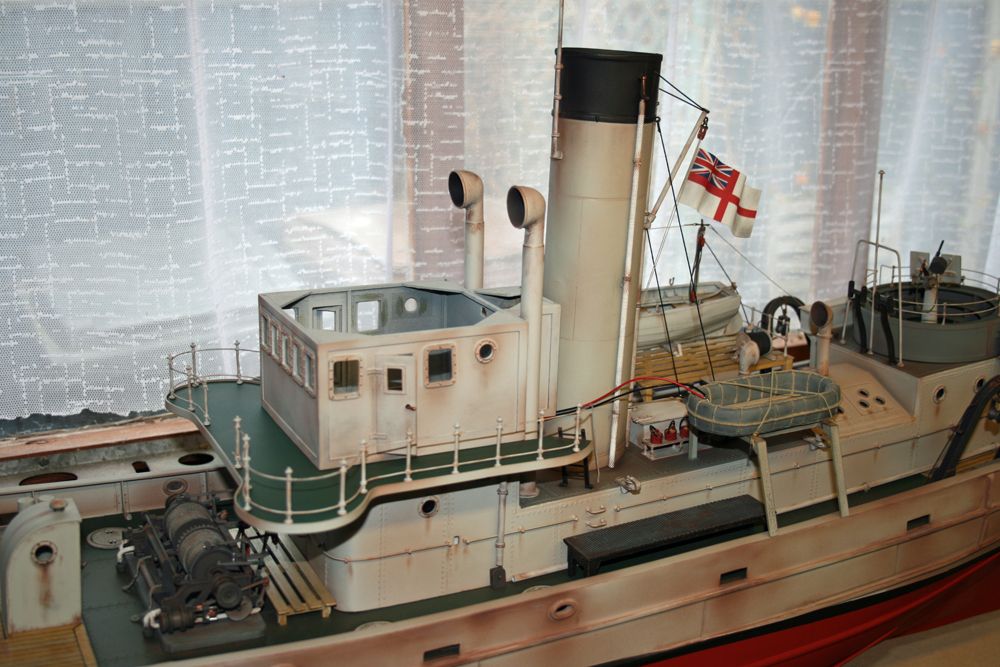
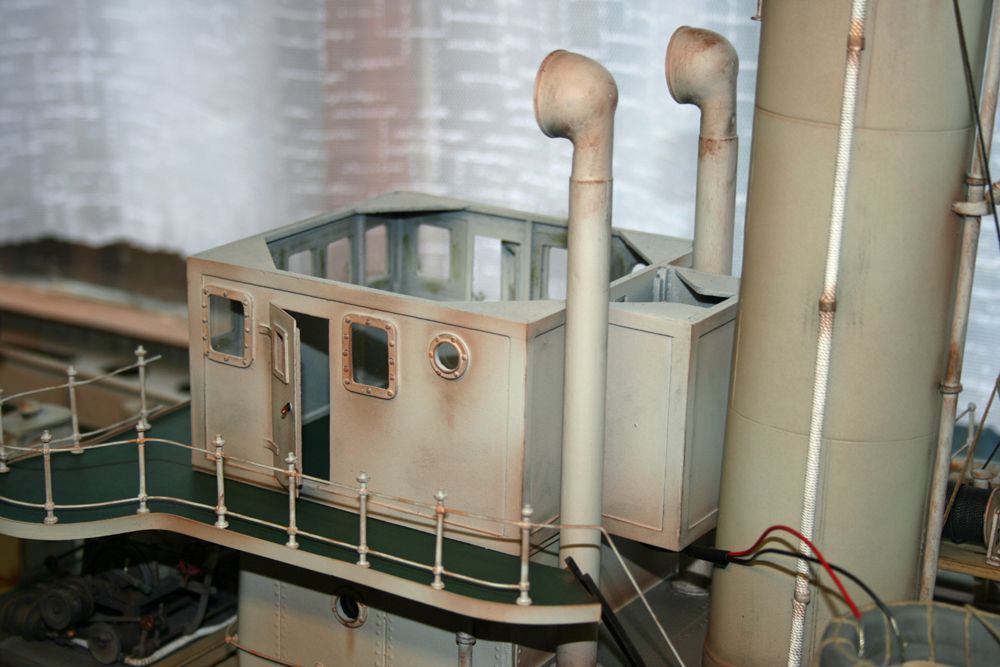
          The wheelhouse structure (minus interior details & roof) has now been built. The walls were cut out from printed ply sheet, and glued together to form the basic shape (the ‘extension’ at the rear housed the steam engine for steering the ship). Finishing pieces were then fitted to all external edges, and internal strengthening strips & gussetts were also added.
           
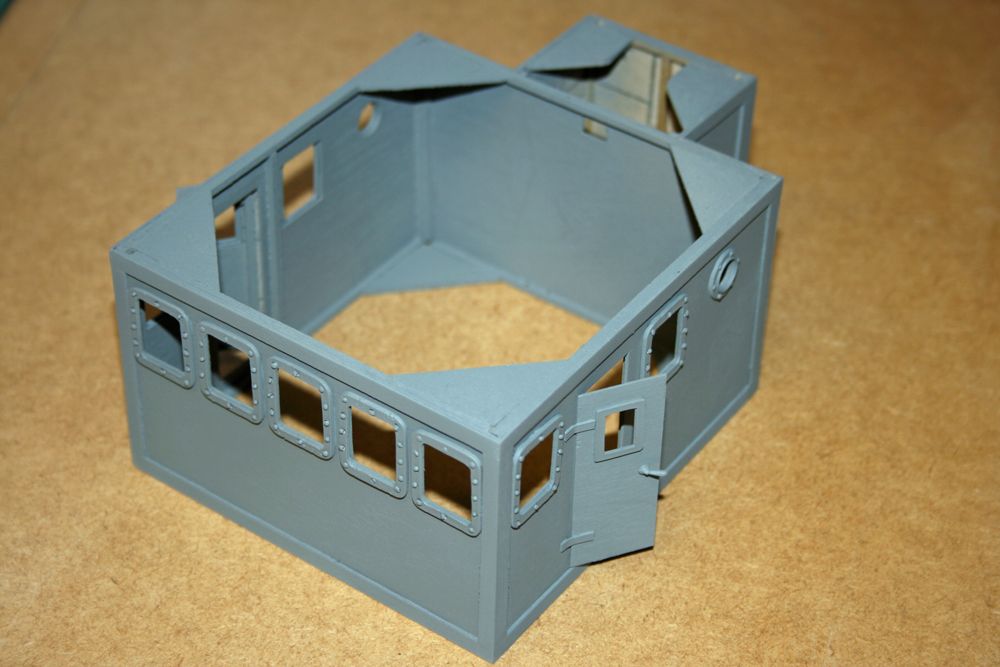
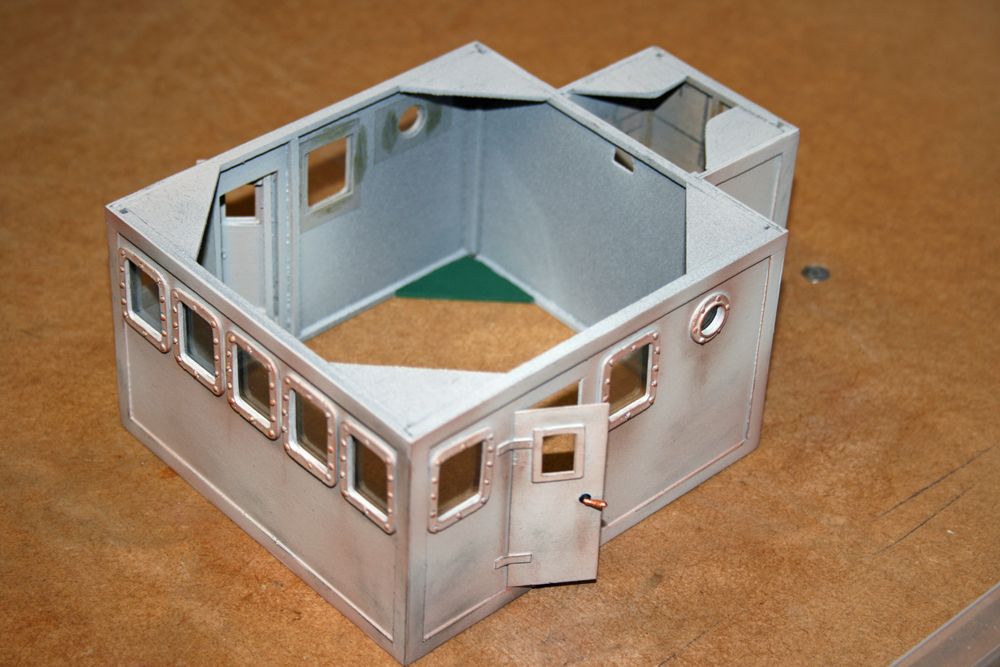
          Next, the white metal window frames were glued in place, along with the doors, and the whole assembly sprayed with grey primer. Two top coats of grey were then applied, followed by the usual weathering. Lastly, glazing strips were cut and fitted inside the wheelhouse.
           
          The following photos show the build:
           

          You will see in the above photos that there is a small rectangular hole cut in the rear wall of the wheelhouse. This hole will allow the wires seen in earlier photos (which sprout up from the lower superstructure, justin front of the funnel) to pass up into the ‘extension’ and enter through into the wheelhouse for the interior lighting and the navigation lights (additional wires will lead up to the searchlight).
           
          Next post covering the handrails for the wheelhouse deck following shortly.
           
          Paul.
          #30552
          Paul Godfrey
          Participant
            @paulgodfrey14946
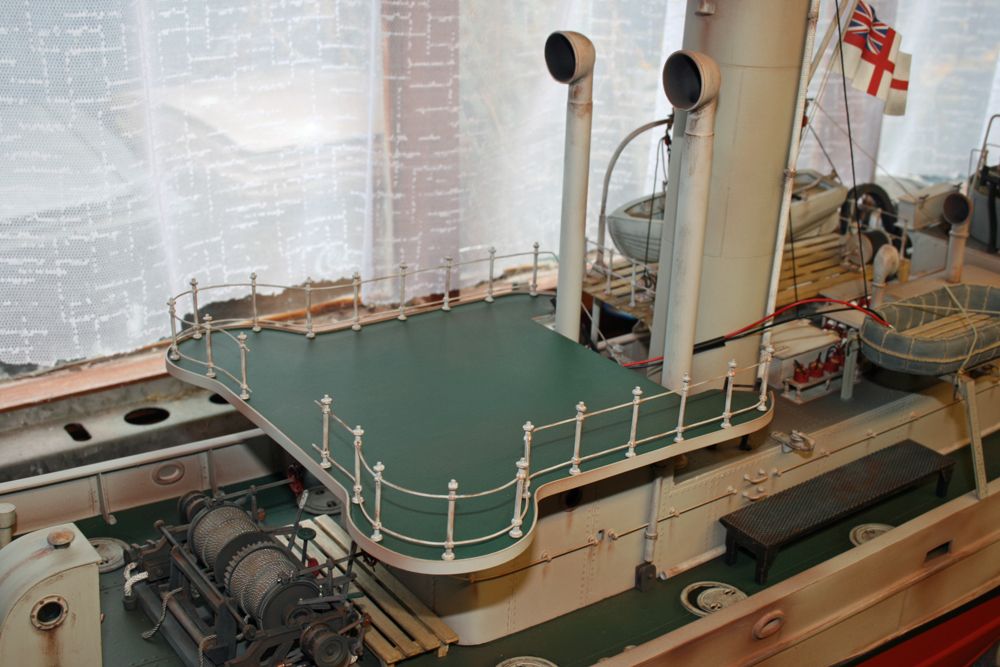
            So, to the wheelhouse deck handrails.
             
            The stanchions for these differ to previous ones seen, as the holes for the wires are just below the top and just above the bottom of the stanchion. Also, they have a ‘spike’ on top onto which the white metal capping pieces fit.
             
            The first task was to lay the four white metal capping pieces onto the deck, up against the vertical strip which fits around the deck perimeter. The holes in the capping pieces, into which the tops of the stanchions will eventually fit, can then be used as a guide to drill into the deck, ensuring that the stanchions when fitted will be correctly spaced, and parallel to each other (as each hole was drilled, I put a small length of wire through it to prevent the capping piece from moving).
             
            Next, the brass wire lengths (once again, purchased seperately as the wire within the kit was too thin & easily damaged) were bent to shape – each railing on each side was made from two lengths, the curved front section and the straighter rear section, top and bottom, making four lengths each side, eight in total. The stanchions were slipped over the wires, and superglued into the holes a few at a time, using the white metal capping pieces temporarily dry-fitted to ensure correct alignment.
             
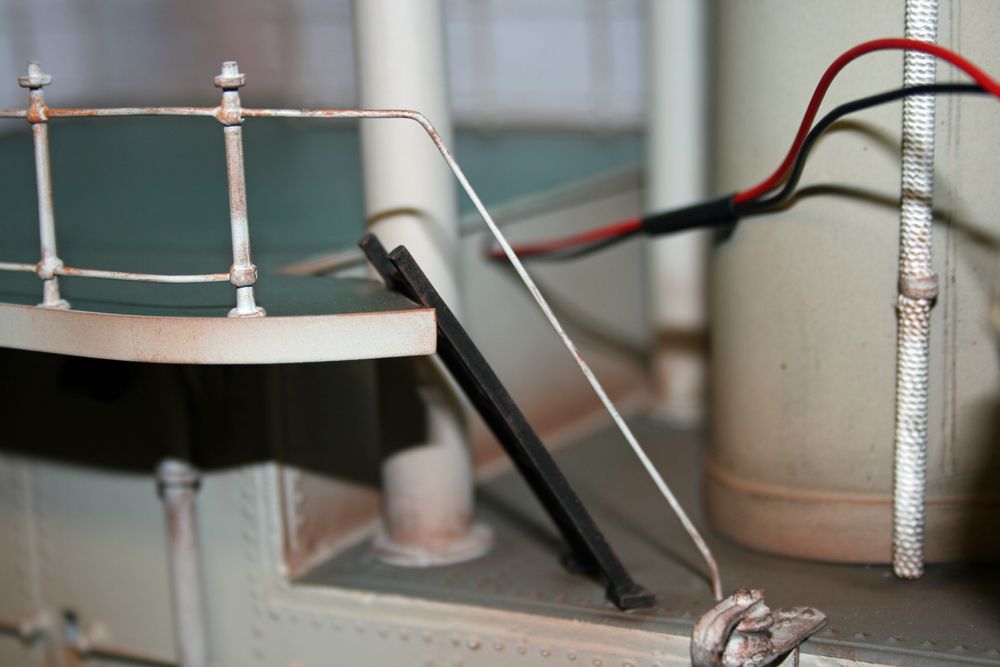
            The following photos show the railings in place, painted and weathered:
             

            The above photo of the stair handrail also shows the aforementioned wiring that will pass up into the rear ‘extension’ and through the hole into the wheelhouse for the interior lighting and navigation lights.
             
            Finally for now, some pics of the wheelhouse placed in position (but not yet glued):
             

            Next will be the fitting of the material strip that runs around the wheelhouse deck railings, between the upper and lower rails. Although some Solartex (a heat-shrink plastic film which is attached using a modellers iron) is included, I will use something more realistic, and will probably tether (by stitching) this to the railings as per other various ships I’ve seen photos of. There will also be the internal wheelhouse detail to fit, before moving on to the roof (compass platform deck) and lighting which will be attached to the underside of the roof.
             
            Paul.

            #30557
            Wallace Manning
            Participant
              @wallacemanning93491
              Paul you will soon be catching me up looking good as always. wallace
              #30565
              Paul Godfrey
              Participant
                @paulgodfrey14946
                Thanks Wallace,
                 
                Yes, not long to go now. I’m going on holiday at the end of June, and all being well will be moving house in July, so I’ve set myself the target of completing S.L. before the holiday (think that may be somewhat optimistic!!).
                 
                Regards,
                Paul.
                 
                #30610
                Robin Lee
                Participant
                  @robinlee31938
                  Looks a really enjoyable model to build Paul. Will look really good on the lake. Have you a set of crew figures lined up?
                  Robin
                  #30621
                  Paul Godfrey
                  Participant
                    @paulgodfrey14946
                    Hi Robin,
                     
                    Yes, its a very enjoyable build, and I would recommend it to anyone who’s willing to make a few mods here and there – guess this probably applies to many kits.
                     
                    The kit does come with five crew, but they are white metal items, and apart from the weight disadvantage, are a little bit on the rough side. I had previously bought a couple of figures from a range called ‘Wee Friends’ which are made from resin, and are very crisp and well detailled. The figures they have which are suitable for a british Second World War naval vessel amount to four or five, and I will probable buy two of each. They do cost, however, around £9 each, so a bit of an outlay, but very much worth it – you need a good crew!!
                     
                    Regards,
                    Paul.
                    #30834
                    Paul Godfrey
                    Participant
                      @paulgodfrey14946
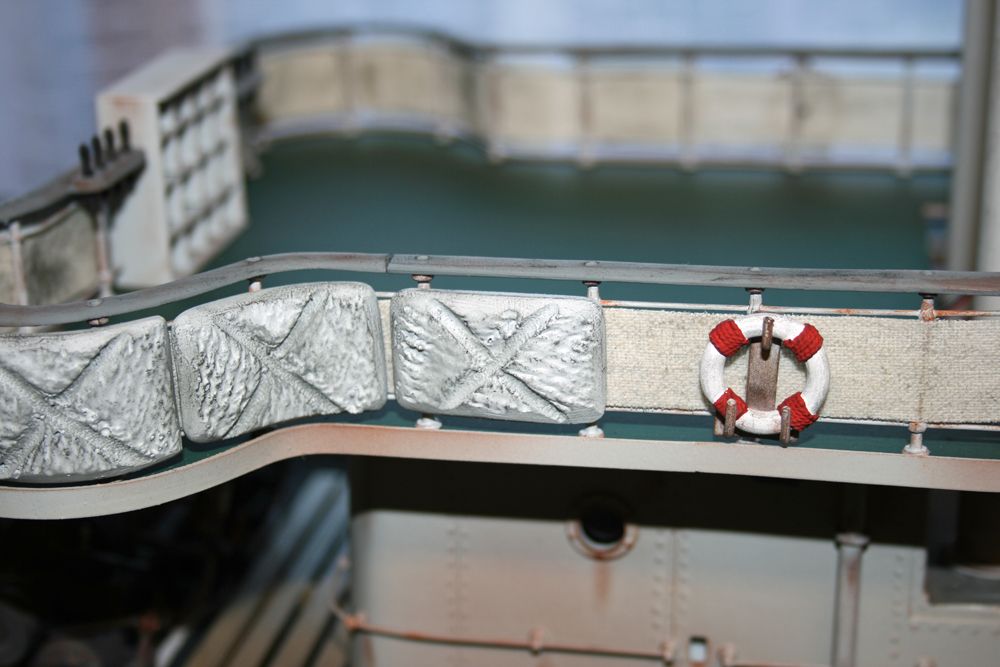
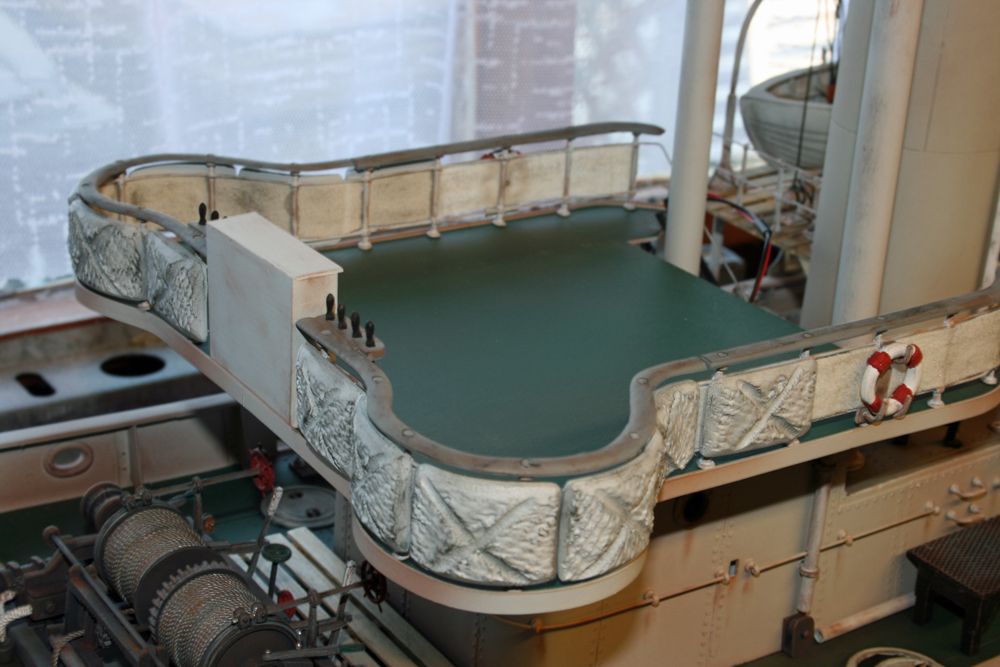
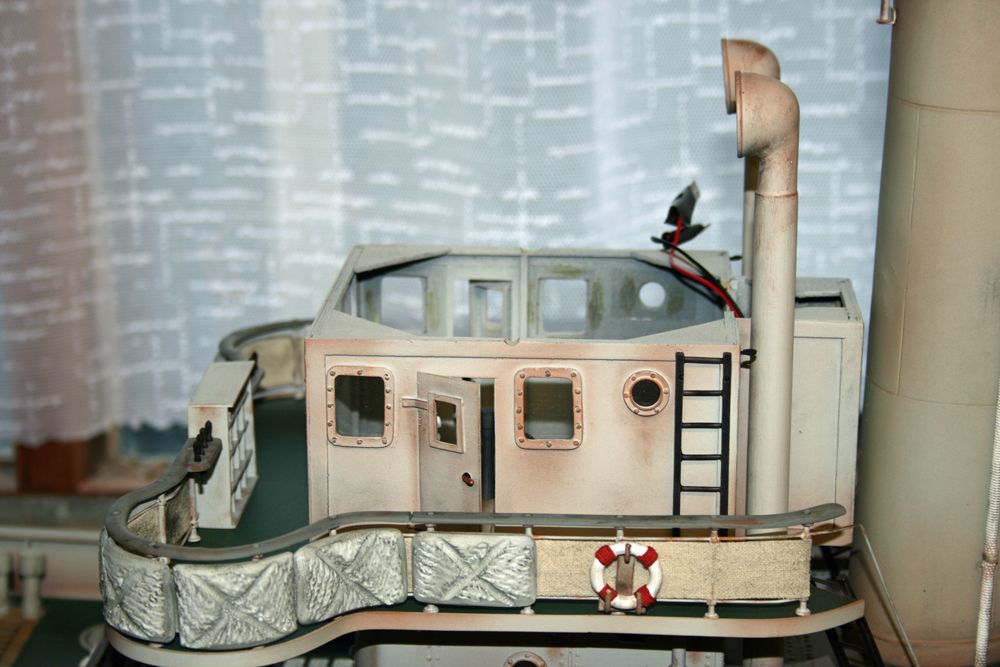
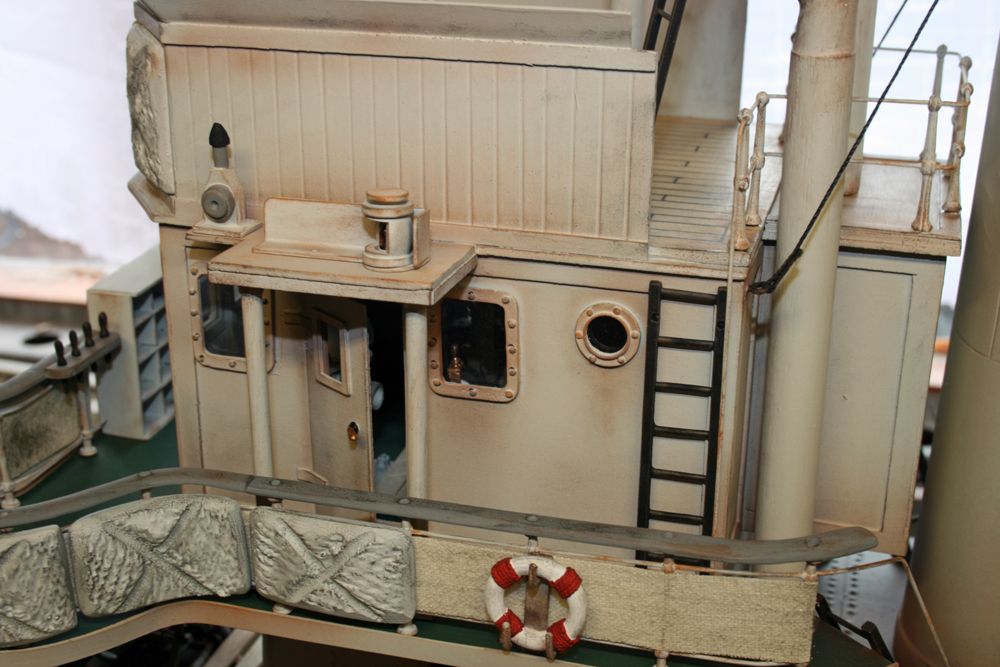
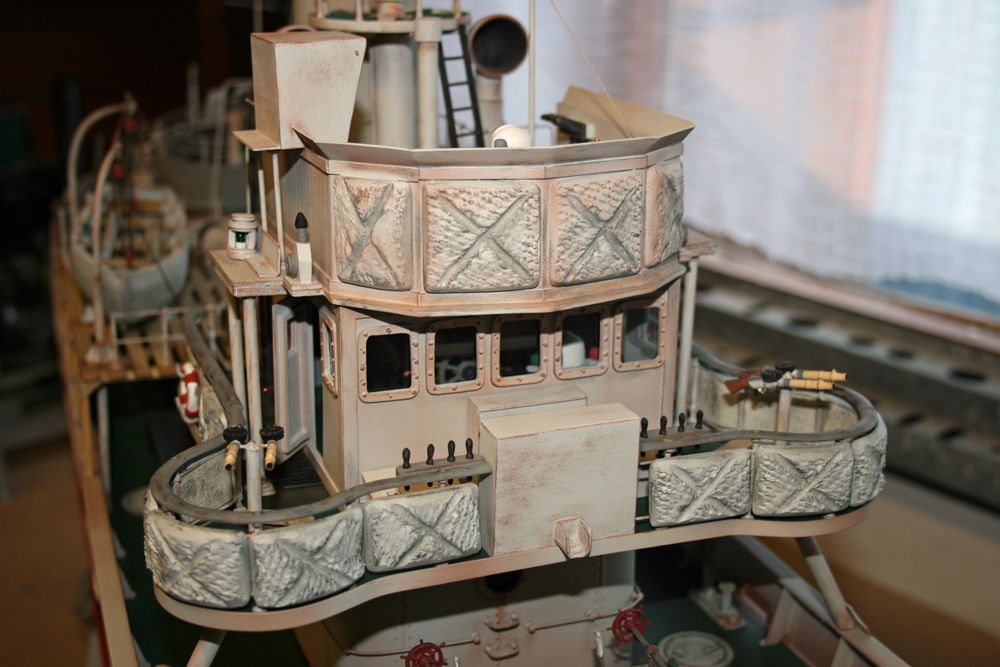
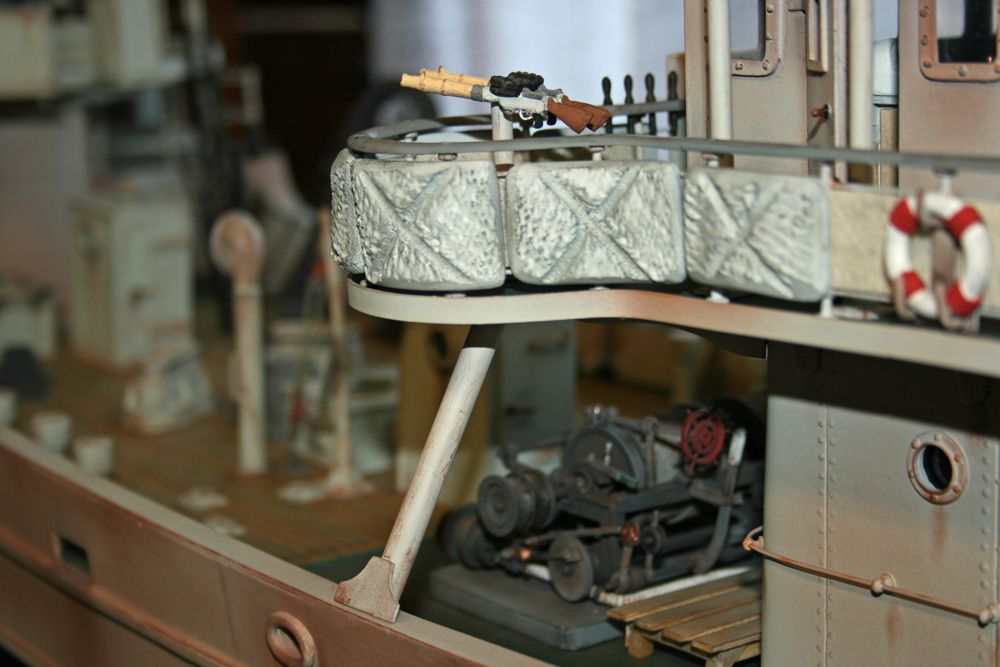
                      The wheelhouse deck railings are now complete. The white metal cappings have been added, along with the material between the upper and lower rails, the splinter mats, and the lifebelts:


                      The material used was actually from an old pair of beige linen trousers my wife was about to dispose of !! I first cut out a large piece of material, and hung this up from one end. It was then sprayed with matt varnish, thinned 50/50 with enamel thinners. After drying overnight, strips of the appropriate width could be easily cut with a sharp knife and steel ruler – the varnish will prevent the edges from fraying, and also gives the material added stiffness making it easier to work with.
                       
                      In the end, I decided not to sew the material strip to the railings (the majority of it is covered by the splinter mats anyway), and instead simply glued it to the stanchions with thick superglue.
                       
                      The splinter mats were a bundle of fun – not only did they need trimming to size, but most needed bending to some degree as well. These items are made from resin, and cutting a little off of the tops and bottoms with a fine saw is easy – the edges then just need sanding to the same profile as the sides. What required a little more thought was how to bend them to shape. The first attempt with a blow torch sort of worked, but the mat eventually cracked when bent too far. Next was to boil some water in a saucepan, and imerse the mats in it. The idea was to firstly try 1 minute, check the mat, and if still too hard, try another minute. As it turned out, 1 minute was perfect. The mats were removed and placed into a tea-towel, and could very easily be bent into the required curvature. After a minute or so, they had sufficiently cooled to retain their shape. (I also had to do this for a previously bent and painted mat which required re-bending – the paint (Humbrol enamel over Halfords grey primer) was completely unaffected).
                       
                      Once the material and mats were weathered, it was then just a case of attaching the lifebelts – one each side.
                       
                      The next photo shows the wheelhouse glued to the deck:
                       
                      As you can see, the ladders to the compass deck have been attached, and the wires from the lower superstructure, which will link up to the wheelhouse lights, navigation lights, and the searchlight, can be seen sprouting up at the rear. The flag locker is in position, but not yet glued – this was built so that the ends of the railings would finish in the correct position.
                       
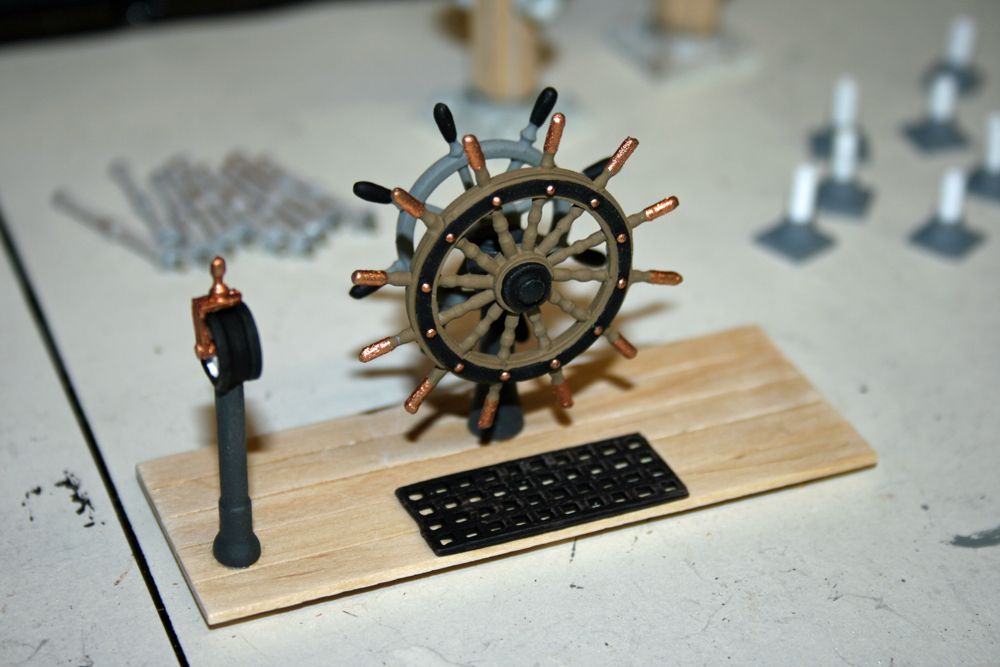
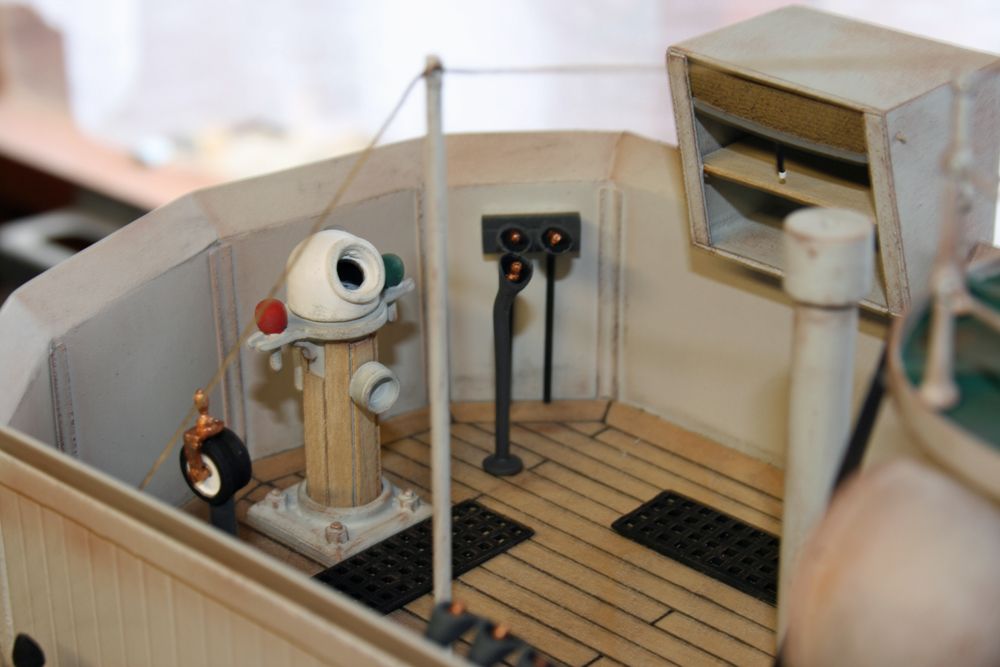
                      The ships wheels have been painted, and mounted to a decked section (made from coffee shops stirrers !). There were two wheels, the larger wooden wheel was for manual operation of the rudder, and the smaller steel one was used in conjunction with the steering steam engine housed in the rear extention to the wheelhouse.
                       
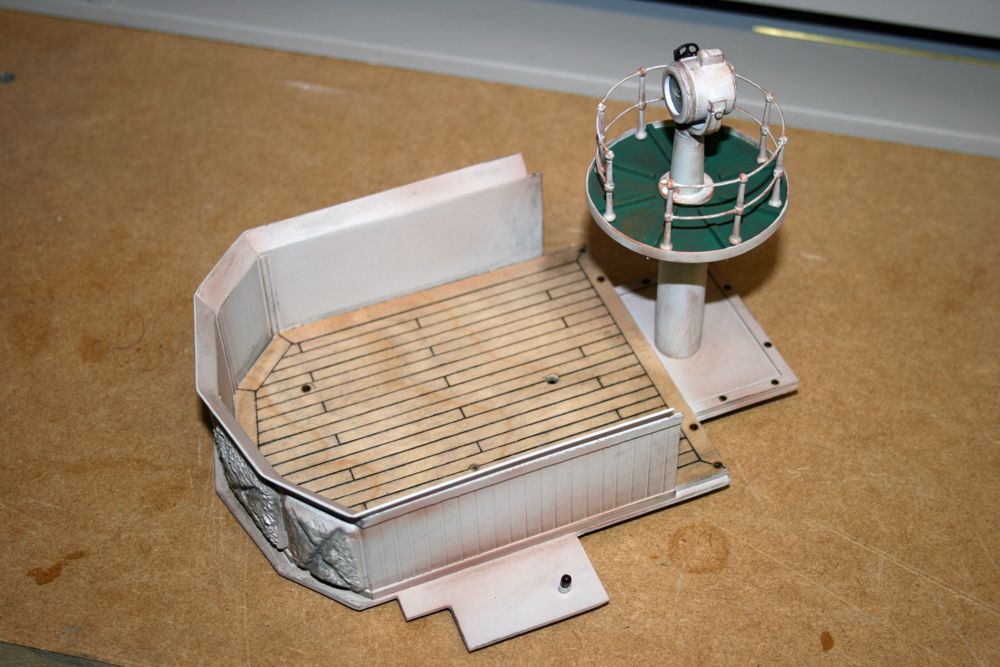
                      The final photo for this posting shows the basic compass deck construction, to which the searchlight has been fitted. The supplied piece of plywood for the deck had the outline, including the navigation light extentions, hand-drawn on it, but not very accurately. I re-drew it to the dimensions from the plan, and all was then well !!
                       

                      The wiring for the searchlight runs down the mounting column, and joins underneath with the wheelhouse lights and navigation light wiring. There are connectors which will fit into the wires coming up through the rear of the wheelhouse. You can just make out the port navigation light at the bottom of the photo, over which the housing will eventually fit. Holes have been drilled ready for the various fittings, and the holes at the rear, just below the searchlight, are for the stanchions in this area.
                       
                      Thats it for now – next will be fitting the compass deck to the wheelhouse, adding the fittings, and then the guns which are mounted in the wheelhouse deck curved extentions each side at the front.
                       
                      Paul.
                      #30837
                      Ole Vauger
                      Participant
                        @olevauger

                        Hi Paul.
                        It has been a great pleasure to follow the project. Too bad that it is almost finished. For us, of course, who find it interesting. At the same time I’m looking forward to seeing it finished.
                        Ole

                        #30838
                        Paul Godfrey
                        Participant
                          @paulgodfrey14946
                          Hi Ole,
                           
                          Glad that you have found the build enjoyable and interesting.
                           
                          I will have mixed feelings when it’s finished – I’m looking forward to sailing Sir Lancelot at my club’s lake, and also to start my next project, but I will certainly miss the enjoyment and challenges this build has brought me!
                           
                          Best wishes,
                          Paul.
                          #30855
                          Robin Lee
                          Participant
                            @robinlee31938
                            Hi Paul,
                            Almost there – looks a really enjoyable model to build. Thanks for the info on bending resin components, that may come in useful.
                            Regards
                            Robin
                            #30856
                            Ole Vauger
                            Participant
                              @olevauger

                              Hi Paul.
                              Do understand that you can not wait to get her on the water.
                              It will get attention at the club I’m sure.
                              And it pleases me to read that you have thoughts about a new project.
                              Maybe we are lucky and get to see progress on that too.
                              Best wishes Ole

                              #30857
                              Paul Godfrey
                              Participant
                                @paulgodfrey14946
                                Hi Robin & Ole,
                                 
                                Yes, not too much left to do, comparitively speaking!!
                                 
                                The compass deck is now fitted, and I’m currently adding detail to it – the next posting will be in a week or so’s time. All lighting and associated wiring has now been completed.
                                 
                                Things left to do include the mast, ratlines and other rigging, guns on the wheelhouse deck, supports beneath this deck to the bulwark cappings, and support rods to the four gallows. I also have some extra detail, such as crates, drums, ropes etc to add, and of course, the crew as mentioned in a recent posting.
                                 
                                Ole – My next project is somewhat different – a 1/12th scale Severn Class lifeboat by Speedline Models. Even though there is a superb (and very long!) review of this kit by Terry Small on this website, I will be posting a build log of this boat as well. It will be much more detailed than my Sir Lancelot log, with many more photos and descriptions, and unlike seasoned builder Terry’s review, it will be from a relative newcomers perspective.
                                 
                                S.L. to finish first though, then moving house and the associated decorating etc to deal with before starting the next project !!!
                                 
                                Regards,
                                Paul.
                                #30874
                                Ole Vauger
                                Participant
                                  @olevauger
                                  Hi Paul
                                  Still some details, I understand.
                                  Looking forward to the Severn class construction.
                                  Considered Tamar class produced by the model Slipway but I have to buy directly from England. I think.
                                  The price here in Norway is 737 pounds.
                                  Best wishes
                                  Ole
                                  #30962
                                  Paul Godfrey
                                  Participant
                                    @paulgodfrey14946
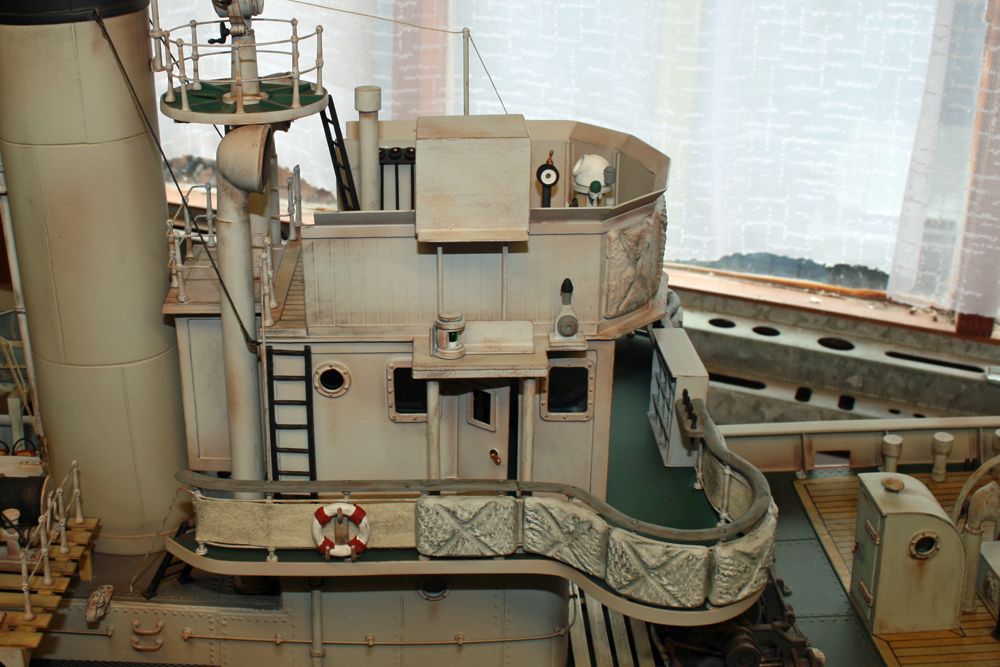
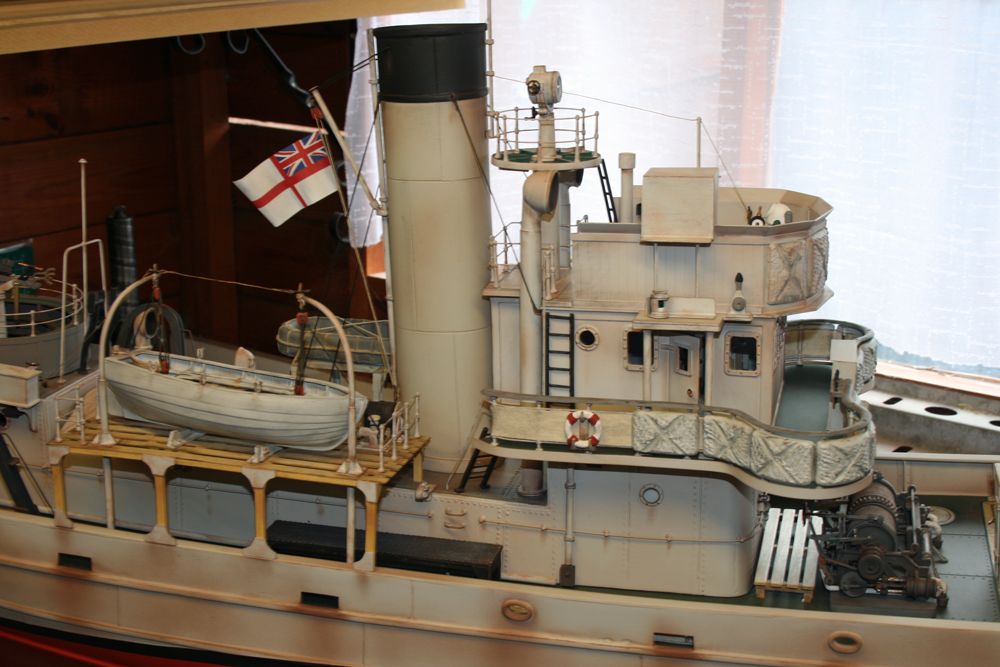
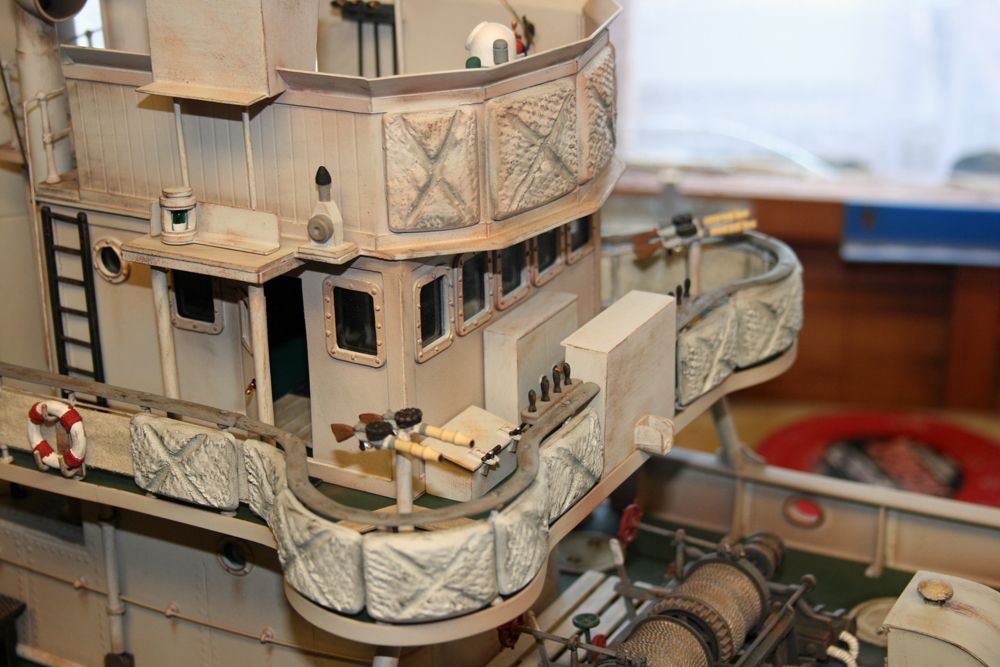
                                    The compass deck has now been fitted, and associated detailing has been added. The first two photos show the starboard side:
                                     
                                     
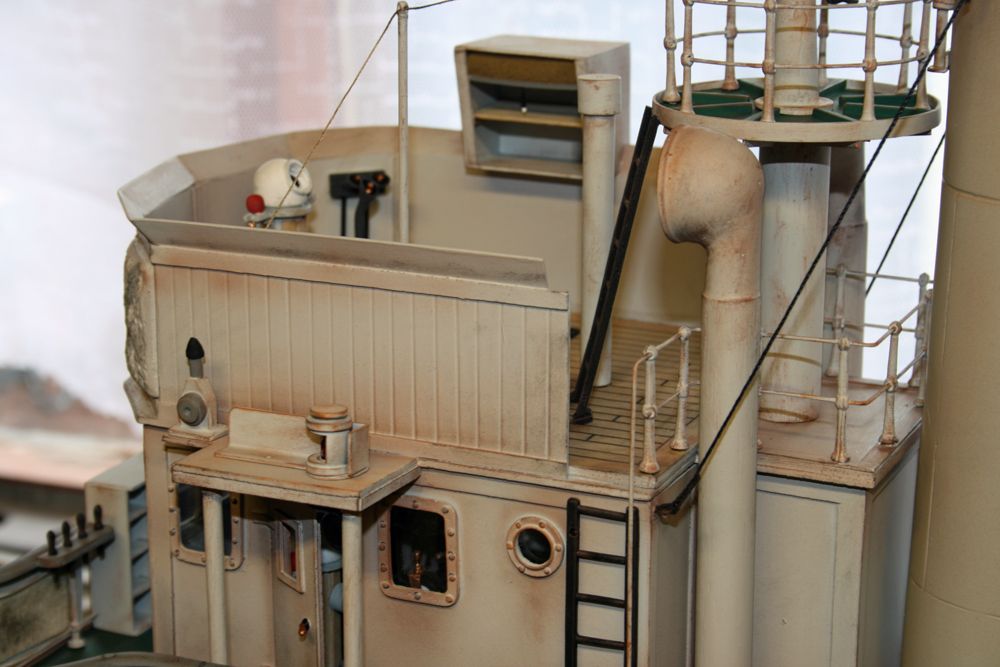
                                    And the next two show the port side detail:
                                     
                                     
                                    In the above photos, you can see the stanchions and railings at the rear of the compass deck, passing between the funnel and searchlight mount. The kit plans & accompanying photographs show the railings on each side ending at the funnel (ie they are not linked together by a section of railings going across the boat), but I yet again decided to practise modellers licence, and have a continuous railing as shown, which I prefer.
                                     
                                    The next pic shows the compass binnacle, telegraph, locker (for charts, I think), and other deck items. The locker has a rolled-up & painted piece of fabric for the shutter (held in place with a length of wire passing through it and the locker sides), a strip of painted thin plasticard for the edging, and a small piece of thin wire painted black for the handle cord.
                                     

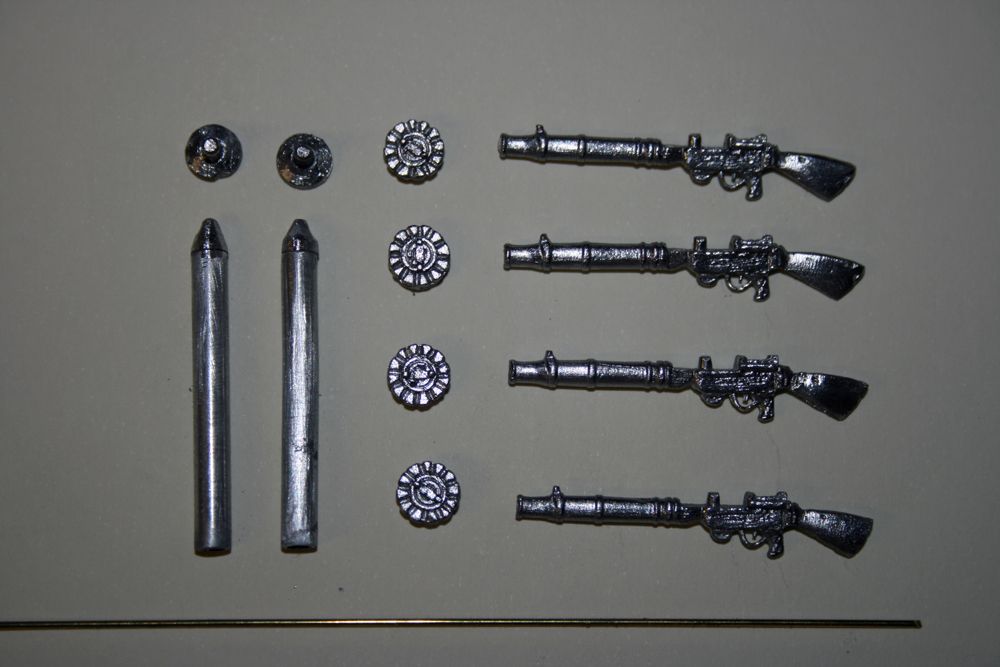
                                    The last photo in this posting is of the components for the Lewis guns which are mounted at the front of the wheelhouse deck, two each side. If you look at the two aluminium tubes, you will see a ‘cone’ like white metal fitting attached to the top of each one. Originally, these components were the gun mounts, and consisted of a ‘ring’ on each side of the cone joined by a very thin rod. The idea was that the bottom of each ring should be cut, and the ring opened out so that the barrel of the gun could be fitted inside, then the ring closed up again. These items were incredibly fragile and very easily bent & twisted, and I could envisage the guns snapping off. So, I will drill a small hole through the cones, and pass a thin wire through & into the gun on each side – much more secure.
                                     

                                    Thats it for now. I will finish off the guns and their wooden seats, and build the three lockers which fit on the deck in front of the wheelhouse.
                                    Paul.
                                     
                                    #31018
                                    Paul Godfrey
                                    Participant
                                      @paulgodfrey14946
                                      The wheelhouse deck has now been completed, by the addition of a central locker and two outer ammunition lockers in front of the wheelhouse, and the four Lewis Guns with raised wooden decking:
                                       

                                      The above photo and the next one show the supports for the wheelhouse deck extensions, where the Lewis Guns are mounted. Of course, they can’t be attached top and bottom, as this would prevent the superstructure from being removed!! I had always assumed that the supports should be attached underneath the wheelhouse deck, so that they would come away when lifting off the wheelhouse, like the boat deck & Carly float mounting platform. But off course, the boat deck & float mount penetrate into the superstructure, and these have to come away with the superstructure, but the wheelhouse deck mounts don’t. So, I decided to fix them to the bulwark cappings, with a short length of 1.5mm brass rod fitted into the dowelling & passing through the bulwark capping for added strength. I chose to do it this way as it’s easier to get a perfect fit against the capping, and no so important if there’s a slight gap under the wheelhouse deck.
                                       

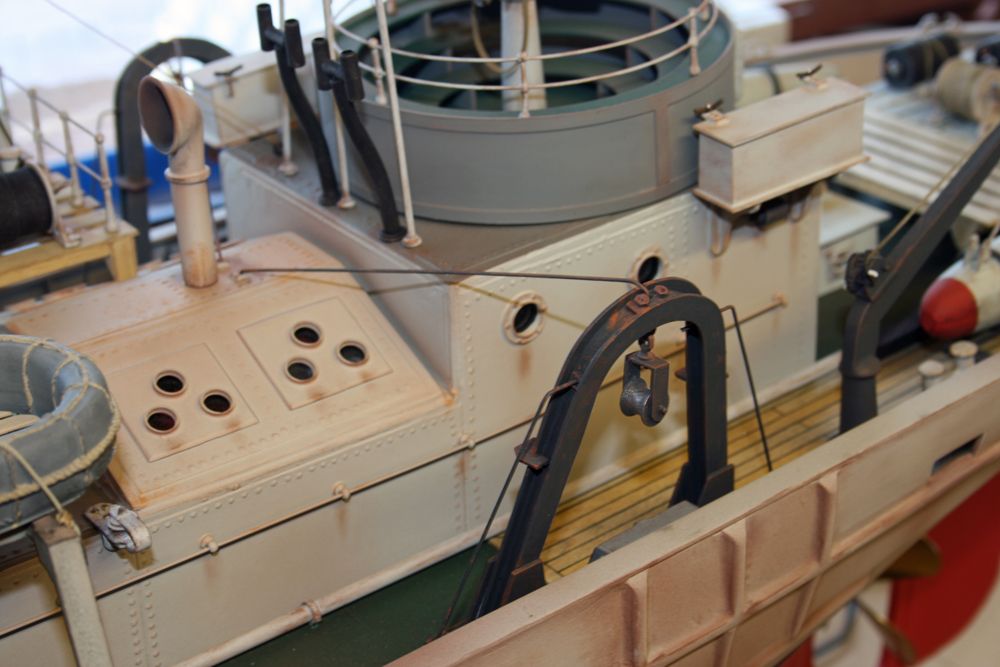
                                      I have also made up the rear gallows supports:
                                       

                                      Again, these can’t be permanently attached at both ends, but rather than attach them to the superstructure so that they lift off with it (the method recommended in the instructions), I decided to make them fully removable. This avoids any possibility of damage when removing/refitting the superstructure. I have made them using steel wire rod rather than brass for added strength, and this means that they do actually give support to the somewhat-vulnerable-to-damage gallows.
                                       
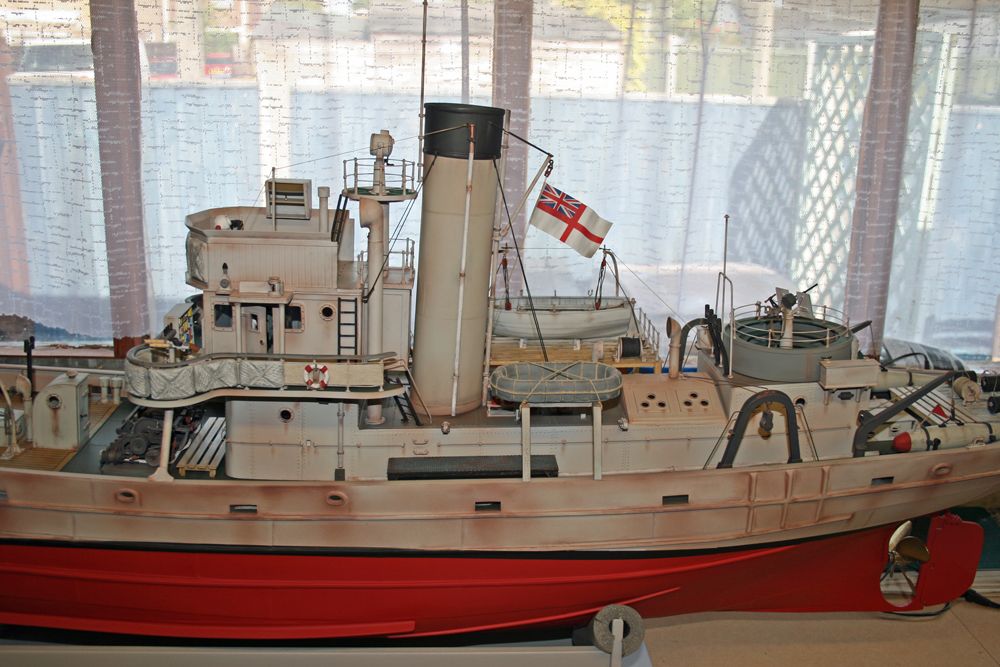
                                      The final two photos are of the completed superstructure (minus final rigging), and the boat to date:
                                       

                                      Next will be the mast & rigging.
                                      Paul.
                                      #31023
                                      Wallace Manning
                                      Participant
                                        @wallacemanning93491
                                        Hi Paul well done its looking so good almost at the end credit to you ,I have only a few bits to add and when the lake is clean etc I will be down for its first sail.
                                        wallace
                                        #31036
                                        Paul Godfrey
                                        Participant
                                          @paulgodfrey14946
                                          Hi Wallace,
                                           
                                          Thanks as always for your kind comments.
                                           
                                          I’m catching you up, but doubt if my S.L. will see the club’s lake until much later in the year, due to forthcoming house move.
                                           
                                          Regards,
                                          Paul.
                                          #31180
                                          Paul Godfrey
                                          Participant
                                            @paulgodfrey14946
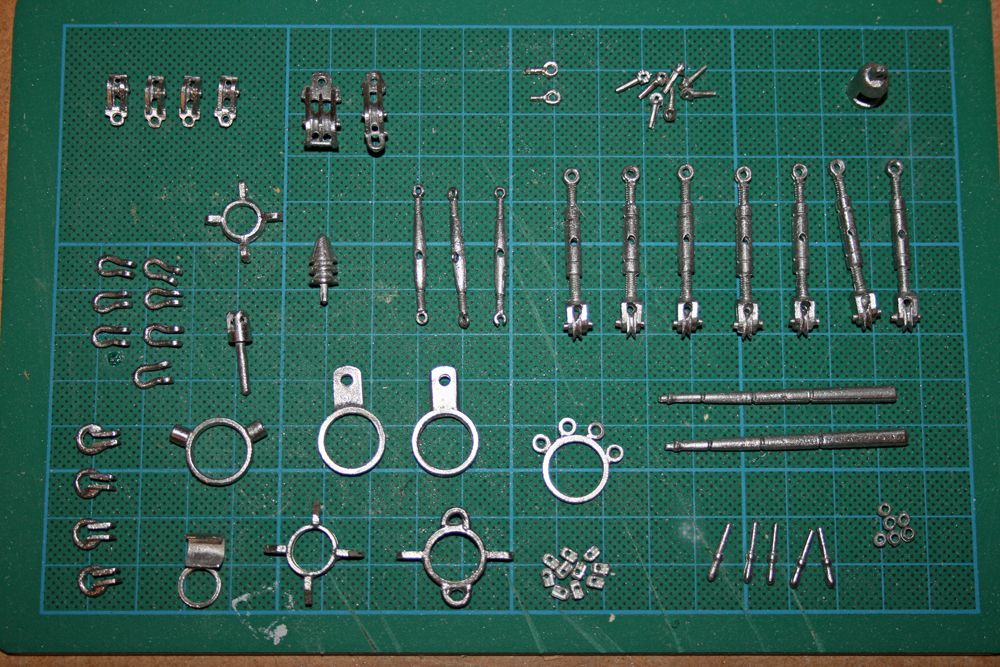
                                            The mast has now been built, and fixed in position. The first photo is of the white metal components for the mast and rigging:
                                             

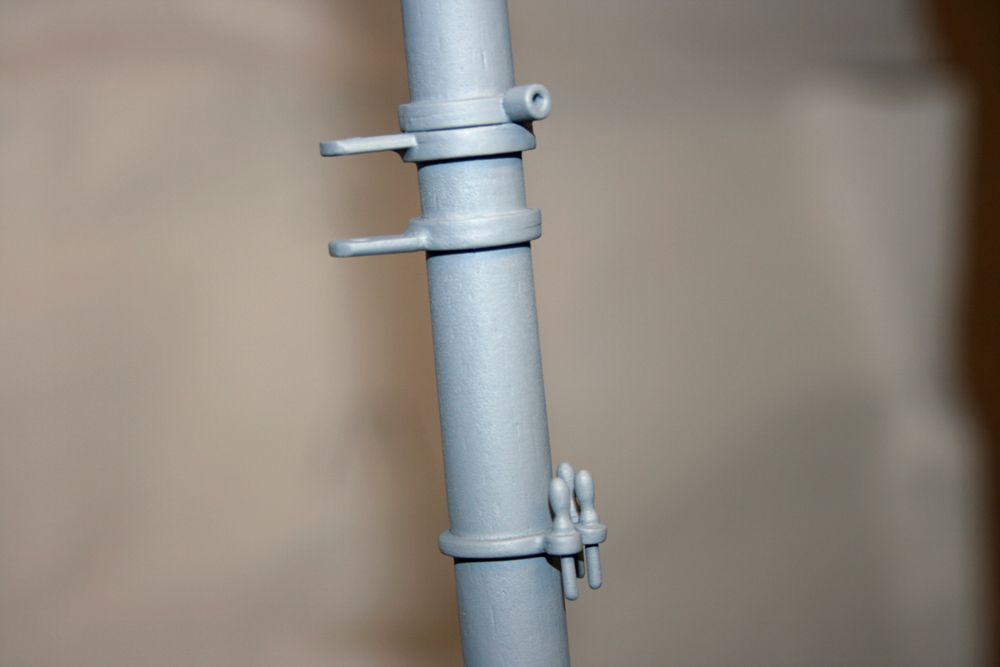
                                            The next is a lower section of the mast, in primer. The forward gallow support rods fit into the upper component.
                                             
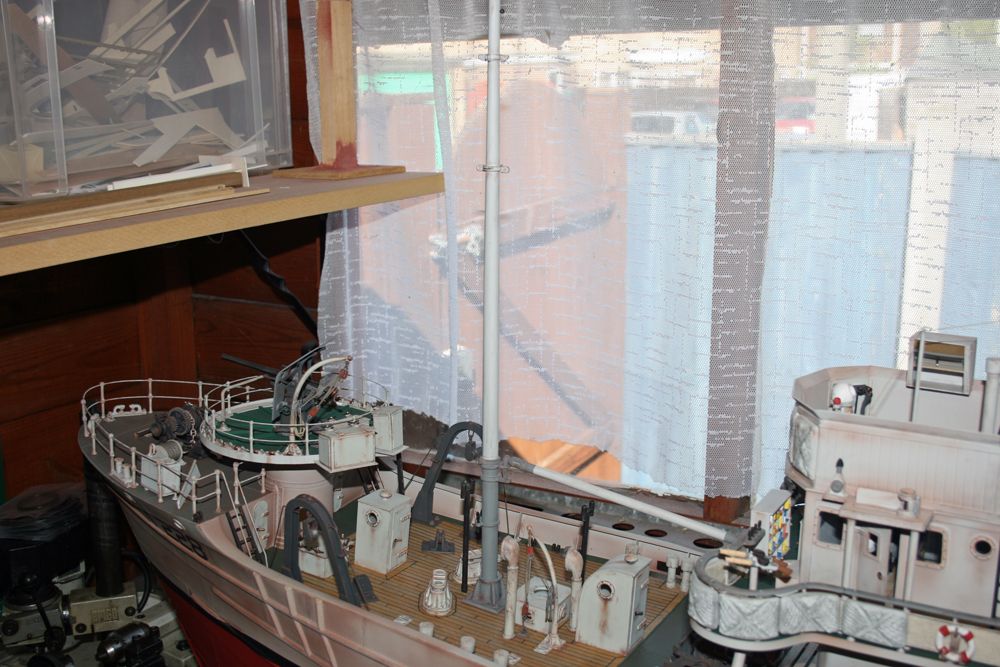
                                            The mast and derrick are shown in the next pic, followed by a closer shot of the derrick and associated fittings. The mast is made from a length of dowelling, and has to be tapered, which I decided to do by simply sandpapering by hand (I have seen an article with the dowelling inserted into a drill, but didn’t fancy trying that to be honest!).


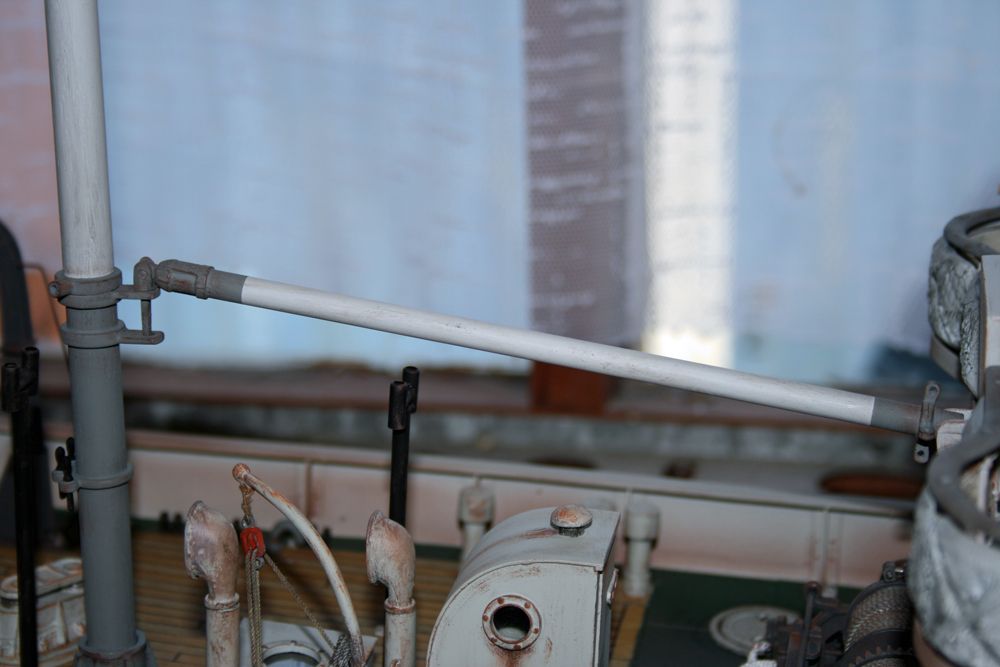
                                            The rear end of the derrick rests in a ‘U’ shaped bracket which is attached to the front of the flag locker, and the front end of the derrick is pivoted, allowing it to be raised & lowered (which is also neccessary when removing the superstructure). There will be ‘ropes’, blocks and chain attached between the gooseneck at the end of the derrick and another gooseneck half way up the mast. The ratlines, other rigging, and the gallows support rods will finish the boat, apart from some final detailing, and of course the crew.
                                            Lastly for now is a photo of the boat to date:
                                             

                                            Paul.

                                            #31182
                                            Wallace Manning
                                            Participant
                                              @wallacemanning93491
                                              Looking great Paul not long now
                                              wallace
                                              #31207
                                              Robin Lee
                                              Participant
                                                @robinlee31938
                                                Very impressive Paul – hope to see it down at the lake soon.
                                                Robin
                                                #31237
                                                Paul Godfrey
                                                Participant
                                                  @paulgodfrey14946
                                                  Thanks Wallace & Robin for the kind comments as usual.
                                                   
                                                  Sorry for the long delay in responding, I’ve only just got back from Morocco (landed at Gatwick about 5 hours ago in fact !!).
                                                   
                                                  Regards, Paul.
                                                  #31542
                                                  Paul Godfrey
                                                  Participant
                                                    @paulgodfrey14946
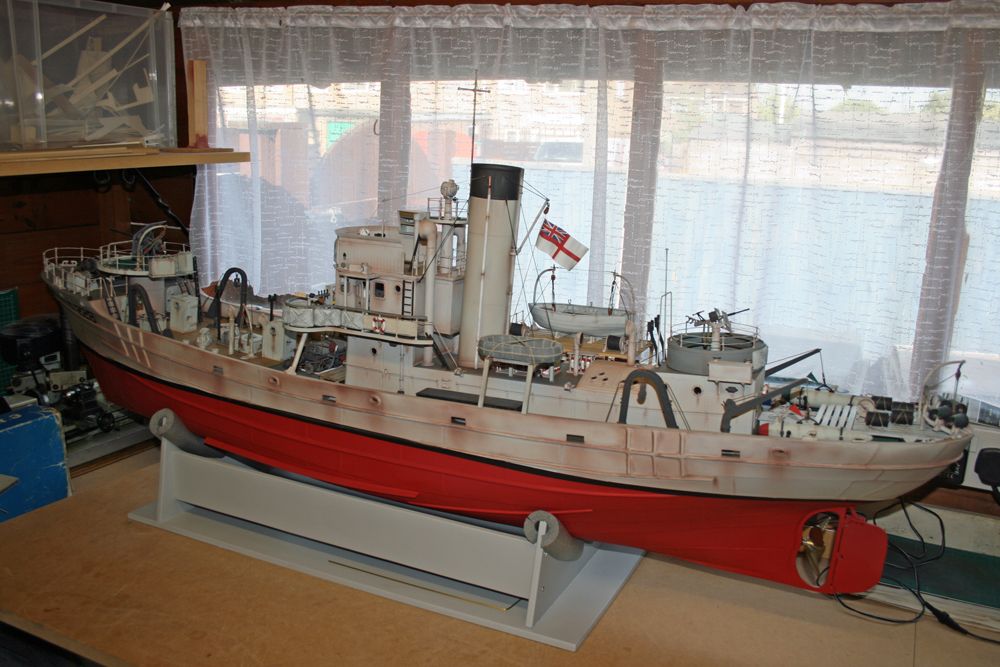
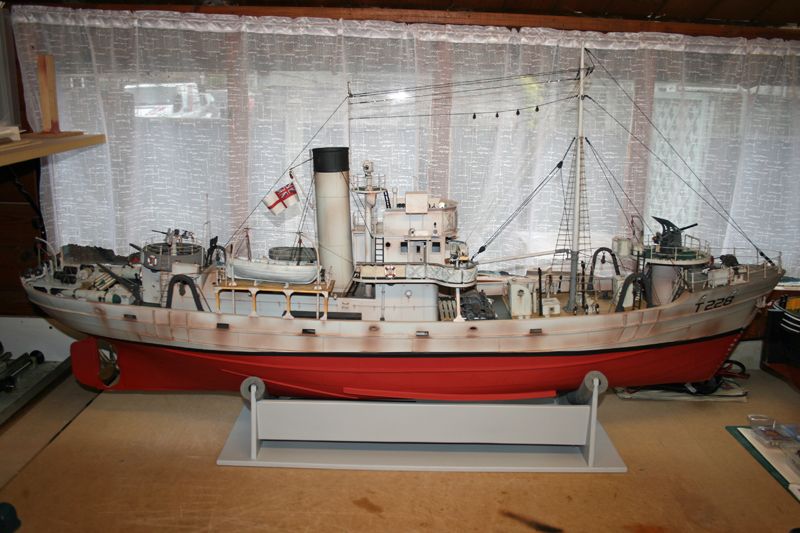
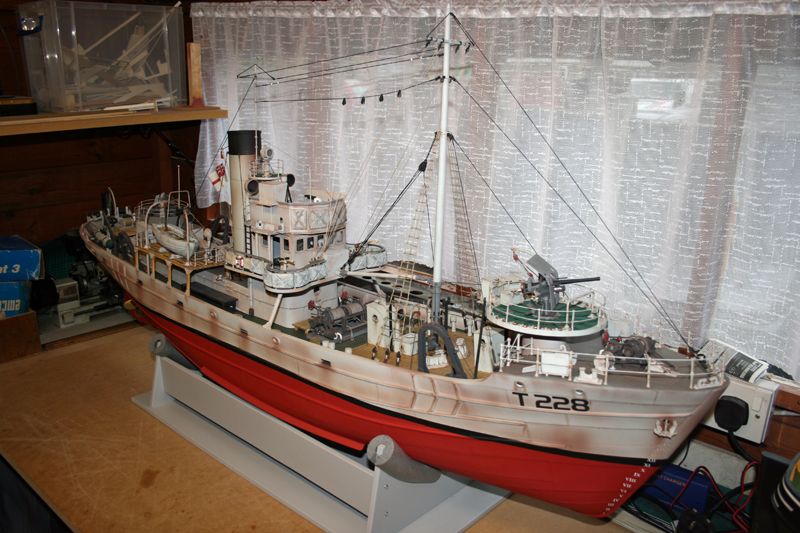
                                                    Apart from the crew (and some ballasting that will no doubt be needed), Sir Lancelot is finally finished.
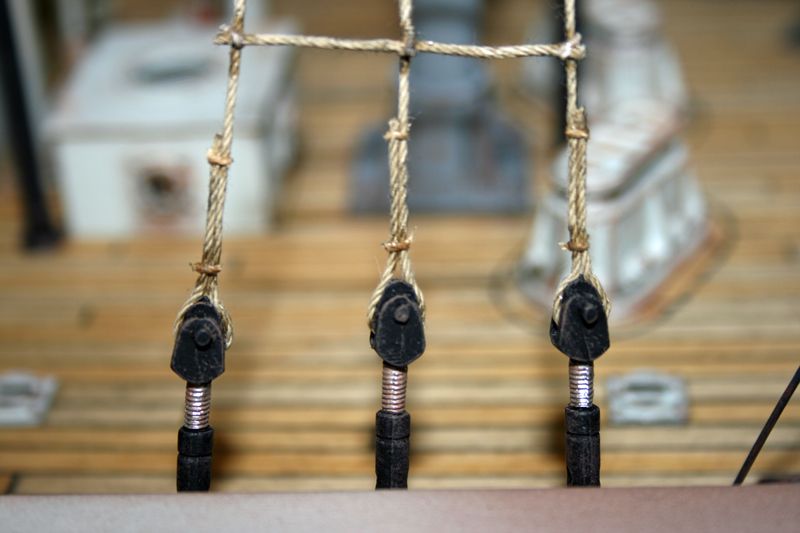
                                                    The rigging has taken much longer than anticipated, mainly down to the ratlines which were very fiddly indeed. The first photo shows the lower section of one of the ratlines:
                                                     

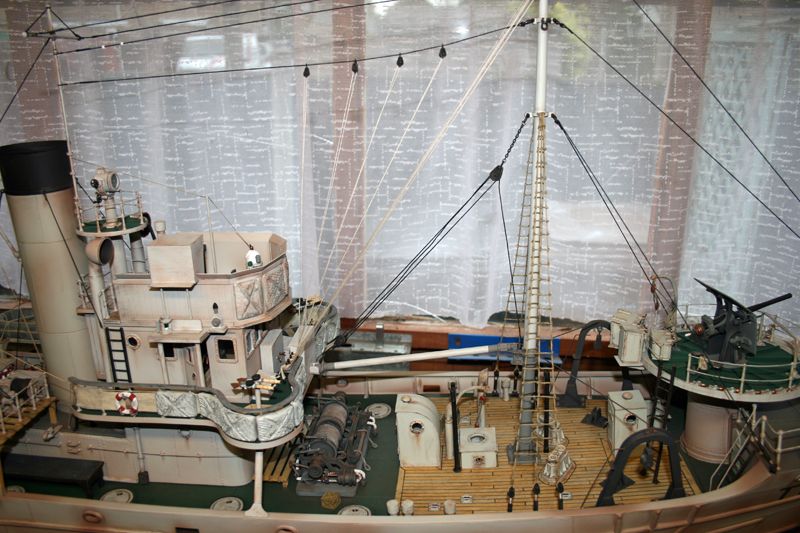
                                                    The method of construction was to first fit the three vertical lengths of thicker thread from the deck, as shown above, to the mast. Next, lengths of the same thread were attached horizontally using thick superglue initially to hold in position. The spacing between these horizontal pieces was kept uniform by using a strip of plasticard cut to the correct width. This was placed above the previously attached length of thread, allowing the next one to be positioned accurately. There are 23 horizontal lengths attached to each ratline, and where they attach to a vertical thread, a thinner piece of similarly coloured thread was knotted around the join. A tiny amount of superglue was added to each knot, and when fully dry, the excess thread was cut off using a sharpe blade. So, 138 knots were required here alone (along with tweezers and a very steady hand!). The next photo shows the ratlines and other rigging:
                                                     
                                                     
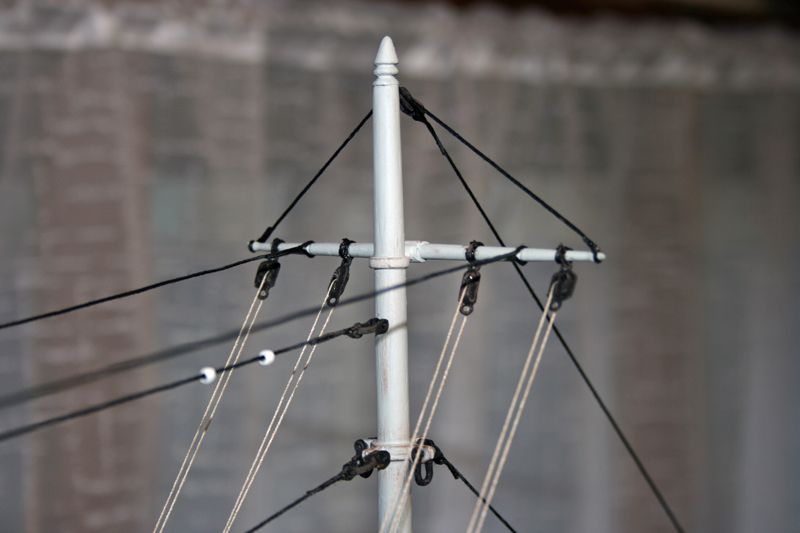
                                                    And the next one shows the top section of the mast:
                                                     

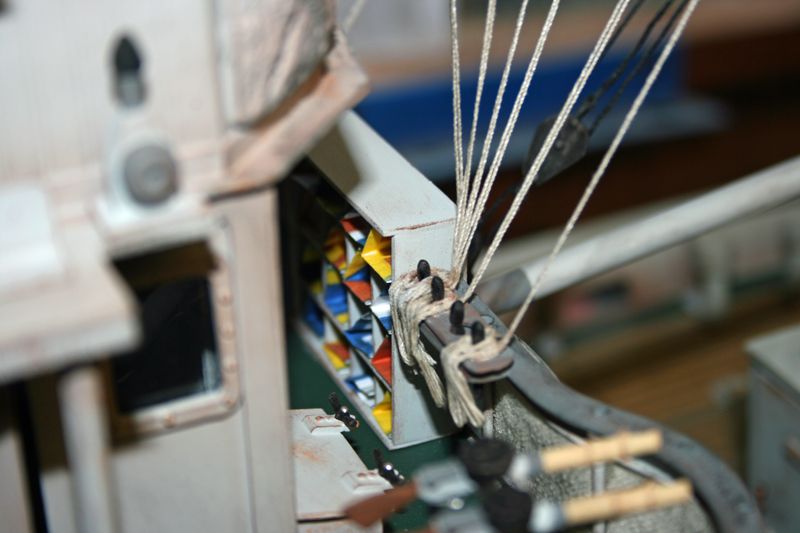
                                                    You can see in the above photo the four pairs of beige ‘ropes’ which attach at their lower ends to the belaying pins at the front of the wheelhouse deck. Also attached to these belaying pins are four other pairs of ropes which can be seen in the previous photo to the one above. Once again, the issue here is that they need to be detachable at one end or the other, when lifting off the superstructure. It would have been easier to have them detachable from the mast, but my concern here was that they would be left dangling from the superstructure, and could easily become caught on something. But, to have eight pairs of ropes detachable from the belaying pins was going to need some thought. My solution was to cut a small thin strip of plasticard, with four holes drilled into it, so that it could be slipped over the tops of the belaying pins and rest on the pin rack beneath. The ropes could then be glued to it, as shown in the following photo:
                                                     

                                                    The various threads were attached whilst the plasticard strips (already painted to match the rack & handrail capping beneath) were in position. Once the glue had dried, the excess thread was cut off, and some previously made-up coils of thread were attached around (but not to) the belaying pins to produce the above effect. So, to detach the ‘ropes’, the plasticard strip on each side is simply lifted off, leaving behind just the pins.
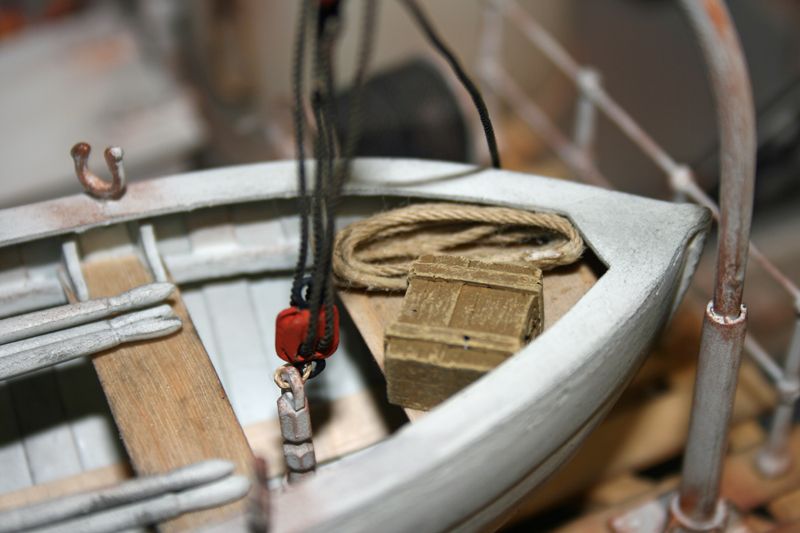
                                                    I’ve also added various coils of rope around the boat, and several ‘wooden’ crates, for extra detailling. An example is shown below:
                                                     
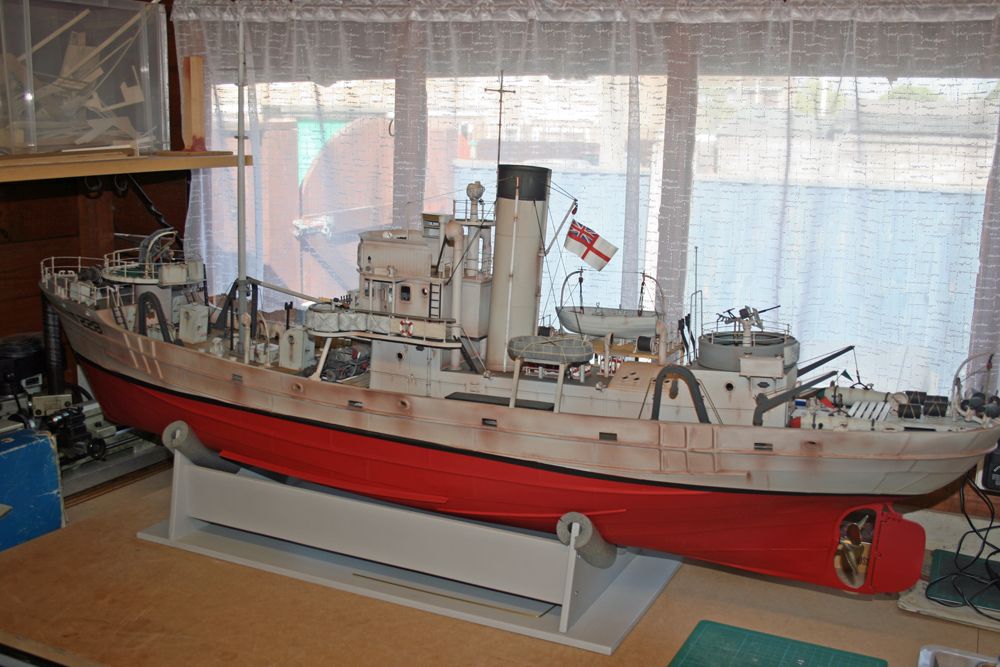
                                                    And finally for now, a couple of pics of the completed boat:


                                                    The boat is now at my mum’s for the time being, as all being well I’ll be moving house in the next few weeks or so. I may have some time to start on the crew, but what with the usual decorating etc, it’s unlikely to be ready for its first sailing until much later this year. Further photos of crew etc will follow when time permits!!
                                                    Paul.

                                                    #31543
                                                    Wallace Manning
                                                    Participant
                                                      @wallacemanning93491
                                                      Well done paul it looks fab what a great build you done you must be so please with it just like myself with my build I have only to put the flags on the two floats and get it into the water thats when the lake is done.I have started my new build its online under warships again called RESOLVE.
                                                      wallace
                                                    Viewing 25 posts - 126 through 150 (of 167 total)
                                                    • Please log in to reply to this topic. Registering is free and easy using the links on the menu at the top of this page.

                                                    Code of conduct | Forum Help/FAQs

                                                    Advert

                                                    Latest Replies

                                                    Home Forums Building Kits Topics

                                                    Viewing 25 topics - 1 through 25 (of 25 total)
                                                    Viewing 25 topics - 1 through 25 (of 25 total)

                                                    View full reply list.

                                                    Advert

                                                    Newsletter Sign-up