1:24 RRS Discovery

Advert

1:24 RRS Discovery

Home Forums Beginners 1:24 RRS Discovery

  • This topic is empty.
Viewing 11 posts - 1 through 11 (of 11 total)
  • Author
    Posts
  • #2964
    Norman Sutherland
    Participant
      @normansutherland83134

      Hull leaks and stability issues in a 35 year old wooden model…

      Advert
      #92217
      Norman Sutherland
      Participant
        @normansutherland83134

        Hi everyone. I’m returning to model boats after a break of quite a few years!

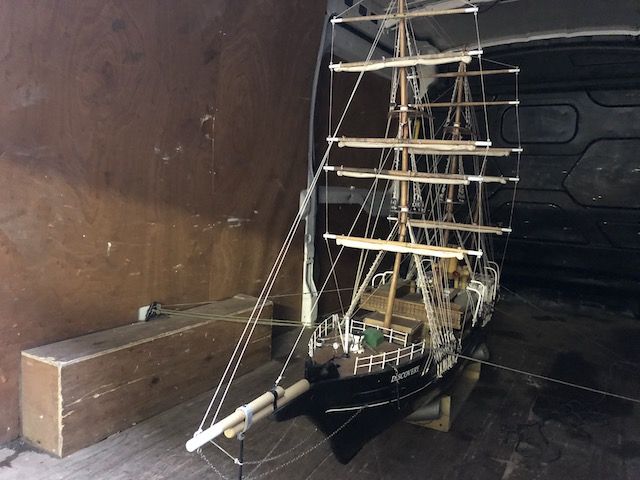
        Must confess I never did that much with boats (just a couple) but did lots of RC planes, helicopters and garden trains. My interest was re-kindled through the acquisition of a built model I purchased a few months ago. This is a scratch built 7 and 1/2 foot model of the RRS Discovery built by a member of Dundee model boat club over 30 years ago.

        discovery transit.jpg

        early pic.jpg

        I always knew the model would be top heavy and was worried about the state of the hull, not least what had caused it to stop being sailed in the first place! (It's been a static model in a local building firm for many years) 

        A couple of days ago we got it back in the water to do some ballasting tests and my worst fears were realised. 1) It will need an awful lot of ballast and maybe even a false keel and 2) … and more concerningly…it leaks like a sieve.

        Edited By Norman Sutherland on 08/11/2020 22:07:00

        Edited By Norman Sutherland on 08/11/2020 22:08:16

        #92218
        Norman Sutherland
        Participant
          @normansutherland83134

          I shouldn’t have been surprised given how long the boat has been out of the water but I desperately want this vessel to sail again – ideally in the infinity pool beside the V&A Dundee which is also right next to the full size RRS Discovery! infinity pool and rrs discovery.jpg

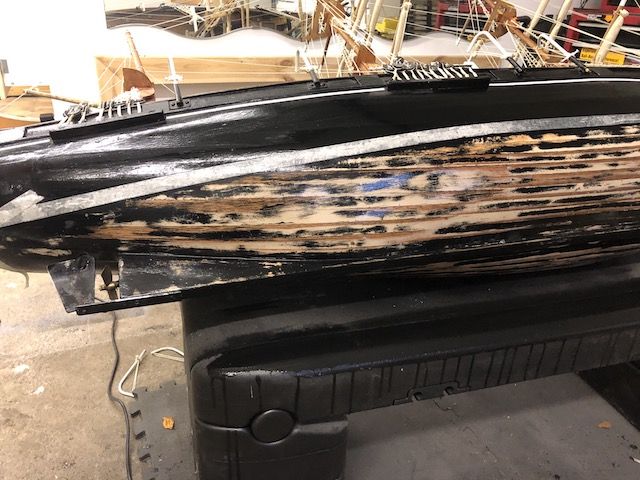
          So far I have flooded the hull with varnish and done as much as I can to fill any gaps from the inside but the inside is already skinned with glasscloth – which is obviously rendering much of the varnish pointless – and I am now convinced I’m also going to have to do something to the exterior of the hull aswell. I have therefore sanded the old paint off from below the waterline so I can re-paint in just anti-foul red without having to try and match the old hull paint but need advice on how best to seal it?

          discovery hull 1.jpg

          #92219
          Norman Sutherland
          Participant
            @normansutherland83134

            I have checked other threads and know that similar questions have been asked before but my situation here is quite unique given the age of the hull, inner fibreglas covering and desire to keep my restoration sympathetic to the finish realised by the original builder.

            My options seem to be:

            1. Seal the exterior wood with varnish and paint?
            2. Seal the exterior wood with sanding sealer and paint?
            3. Seal the exterior wood with epoxy resin and paint?

            In terms of the stability, whilst I could make/fit a false keel, this would stop me from sailing by the V&A as the pool is a very shallow draft. Do I have any options apart from getting as much weight as I can as low as possible?

            Any advice would be gratefully received in order to help me get this lovely old model seaworthy again and sailing beside its full-size counterpart!

            discovery bridge.jpg

            Many thanks. N

            #92223
            ashley needham
            Participant
              @ashleyneedham69188

              Norman. Probably the best and easiest way to seal the hull is to use fine glass cloth and EzeKote acrylic resin.

              Z-poxy resin or an epoxy resin could also be used but Ezekote is water washable odourless and dries qickly.

              As for floating, was the model very tendr originally? You may have no choice but to fit a keel, using perhaps a few captive studs underneath. Plain steel sheet drilled to accept suitably drilled shee lead might be a starting point enabliig experiments to find the best combination of minimum weight/depth etc???

              Ashley

              #92226
              Malcolm Frary
              Participant
                @malcolmfrary95515

                Ashley has already given the correct answer to the waterproofing problem. Just simple resin or varnish won't work because the hull structure will "work" and re-open the holes. The cloth prevents this.

                Back in the day it probably used SLA as a battery. While SLA is great as ballast, it has the drawback that such batteries put the center of gravity where they want it, not where you want it. Usually too high, often at the wrong point along the hull.

                You get the same voltage capacity for much less weight, and in a more managable shape, using NiMh. The weight saving can be made up by fitting lead as low as possible inside, and/or as an extrenal strip along the keel.

                I expect that it is not intended to operate under sail?

                #92227
                Dave Cooper 6
                Participant
                  @davecooper6

                  Hi Norman

                  When trying to trace leaks, I have in the past used the old trick of a drop of washing-up liquid placed, selectively, and one at a time inside the hull. Then a little warm water and, perhaps, gentle heat from a hair dryer along the outside of the test area. Watch for soap bubbles inside…

                  I think in your case, I would start with the prop' shaft and rudder areas first, then move onto the hull planking. This is if you want to preserve the structure "as is". Failing this, then re-glassing looks like the best bet as the experts have already suggested.

                  Good luck,

                  Dave C

                  #92231
                  ashley needham
                  Participant
                    @ashleyneedham69188

                    As it used to go on the water, it may well Be as Malcolm suggests and the weight of the original battery was missing from your trial.

                    A lead strip underneath, along the centreline can work well…several strips glued together, and can be very unobtrusive. You will have to waterproof the hull and re-visit the water armed with some sheet lead.

                    Ashley

                    #92232
                    Norman Sutherland
                    Participant
                      @normansutherland83134

                      Thanks to all who have responded. Much appreciated! So:

                      1) I will have to use cloth as well as resin on the hull exterior! I was hoping I could avoid this but probably always know it made sense. In terms of products/suppliers, what/who would people recommend? I have already ordered fibreglass resin and hardener from here but this may not be suitable? Also, what kind of cloth would you use? Sounds like Ezekote is the answer to the first question Ashley?

                      2) On the stability issue, I intend to use a lead acid battery but can get this right down into the bottom of the boat where I also have a fair bit of space for lead. I'm sure I will have more success now that I have flattened some old lead pipes as my original test was done using them in their "unflattened state" which obviously raised the C of G substantially! It sounds like a bit of trial and error after that to get the best results.

                      When it comes to securing the lead, I had thought of positioning the strips where they are required and then flooding the bottom of the boat with resin to hold these in place/further seal the keel area while leaving a suitable shaped space for the battery. Is there any reason not to do this – other than the weight it will add to the hull on a permanent basis – or is there a better way to secure the lead in place?

                      Again, sorry for all these simple questions but all assistance is very much appreciated.

                      …and Malcolm, you are correct, although fitted with sails I suspect it was always a model just for steaming! Frankly, I think you'd need to have a very large, very deep false keel if you wanted to show even the slightest bit of sail.

                      #92235
                      ashley needham
                      Participant
                        @ashleyneedham69188

                        i USED 100 gsm….grams/sq/metre woven glass cloth for my Valiant battleship, and this should do for yours. It is very fine, and two layers will be very thin and not need vast amounts of wet`n`dry work. The finer the better I reckon for remedial work such as yours.

                        I have used `easy composites` for my stuff but a quick search shows there`s loads out there. I also used epoxy resin as this does not smell and dries `dry`, and not tacky like polyester can.

                        I sort of dislike gluing ballast in place, preferring to hold it in situ with ribs or whatever, as once set in place you are stuffed if anything goes wrong. However, a long ongoing project has seen lead shot mixed with resin and spread about, giving the lowest possible c of g. Reminder….the heavier it is (if you have fixed ballast) the more difficult it is to launch and transport (bad backs and all that).

                        Ashley

                        #92236
                        Colin Bishop
                        Moderator
                          @colinbishop34627

                          Eze Kote is nicer and easier to use than epoxy resin and as you are intending to waterproof the hull rather than add strength to it then it should be entirely adequate. You need more coats than with epoxy but they dry quickly and a little goes a long way. A wipe over with a damp cloth gets rid of any runs on the surface.

                          Also Eze Kote sands very easily to give a good finish. It's quite a versatile material and I have been using it to bond printed planking on paper to the deck of my current liner model. It soaks through the paper and is effectively transparent so you can even use it an adhesive varnish if you want.

                          Colin

                        Viewing 11 posts - 1 through 11 (of 11 total)
                        • Please log in to reply to this topic. Registering is free and easy using the links on the menu at the top of this page.

                        Code of conduct | Forum Help/FAQs

                        Advert

                        Latest Replies

                        Home Forums Beginners Topics

                        Viewing 25 topics - 1 through 25 (of 25 total)
                        Viewing 25 topics - 1 through 25 (of 25 total)

                        View full reply list.

                        Advert

                        Newsletter Sign-up