Getting the keel and frames right

Advert

Getting the keel and frames right

Home Forums Beginners Getting the keel and frames right

  • This topic is empty.
Viewing 12 posts - 1 through 12 (of 12 total)
  • Author
    Posts
  • #43048
    Brian Muir
    Participant
      @brianmuir84327

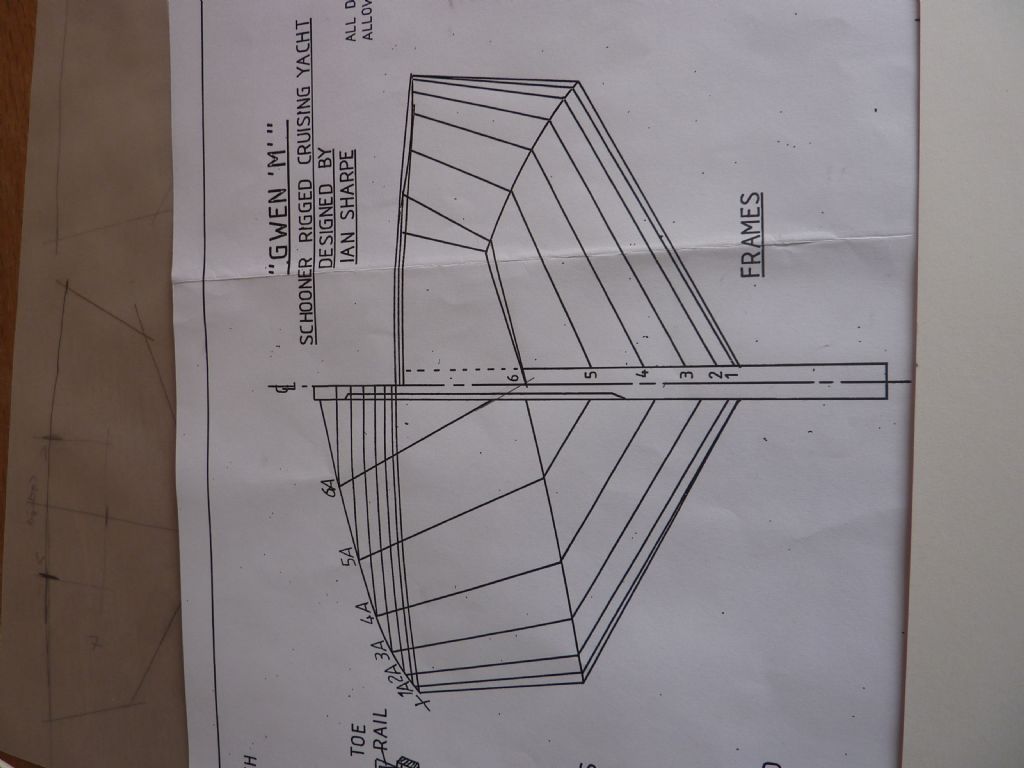
      I decided to build a "rough" prototype of the Gwen M to see what problems might arise (I don't have any instructions to go with the plans). I quickly discovered that rough work is not an option…. anyone got tips on holding the keel horizontal and ensuring the frames are at right angles. I have a bench vice and have seen pictures of jigs for this sort of thing.

      Advert
      #2296
      Brian Muir
      Participant
        @brianmuir84327

        First timer cutting wooded sections

        #43049
        Bob Abell 2
        Participant
          @bobabell2

          Hello Brian

          This maybe just what you are looking for?………

          **LINK**

          Bob

          #43051
          Gareth Jones
          Participant
            @garethjones79649

            Hi Brian,

            Here's another link to a thread on this forum which might help. I hope you found the motor information useful.

            **LINK**

            Gareth

            #43066
            Brian Muir
            Participant
              @brianmuir84327

              Thanks for that, looks useful. I obviously need to be much more careful about the setup.

              Cheers Gareth, the motor info was very useful, did reply via email?

              #43069
              Gareth Jones
              Participant
                @garethjones79649

                Hi Brian,

                Thanks for the email in response to the motor info, I meant to reply at the time but went away on holiday just after receiving it and forgot.

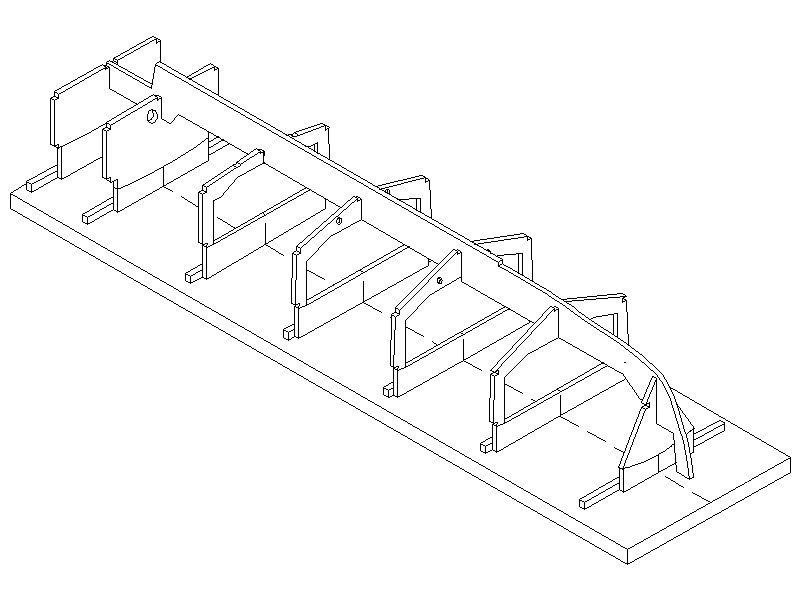
                The normal method of keeping the frames vertical and the keel horizontal is to extend the frames vertically, effectively above the deck level. This extension on each frame is long enough to keep the keel horizontal, or at whatever angle is defined on the drawings. It also provides the means of attaching the frame to the baseboard. I use some pieces of timber, approximately 20 mm square which are screwed down to the base board as dictated by the frame spacing and the frames are screwed to them. That way the frame can be fixed vertically and square across the hull. On completion of the hull the surplus part of the frame is cut off. You can see the whole sequence in my Shemarah thread.

                Gareth

                #43543
                Brian Muir
                Participant
                  @brianmuir84327

                  Hi Gareth, looking at the Shemarah, are all of the frames extended? You say the surplus is later cut off, but if they attached to the keel isn't it difficult to cut them accurately?

                  Also how do you get them all lined up, do you mark the waterline level on the vertical centre line of each frame? Some frames will have the deck section removed to give access to the battery / servo space, so the waterline marker would be lost too?

                  Cheers, B

                  #43544
                  Brian Muir
                  Participant
                    @brianmuir84327

                    This pic shows the difference in the size (depth of the frames I will have to deal with

                    Bp1020110.jpg

                    #43546
                    Kimosubby Shipyards
                    Participant
                      @kimosubbyshipyards

                      Hello Brian,

                      There are two obvious ways to set up the frames for a build, either upright or up side down. Which ever way chosen, they must be arranged about a chosen datum – that is a reference that will be common to ALL frames of the build. I usually find that the waterline is a good choice to make, as all frames will either have this line through them, or can be related to it by a measured distance on your plan.

                      For yachts build up side down! This allows the keel to be above the work, and enables access to almost all the hull for planking/sheeting etc.

                      When Gareth says extend the frames, he means that you allow for an extension of material (ply?) on each frame at the deck line such that this can be screwd to a cross beam. This beam is screwed to a building board which is level and flat. The cross beam length is longer than the boat is wide so that the screws can be withdrawn once the frames are covered! The length of the extension to the frame is such that when all the frames are mounted the waterline (marked on each frame) is parallel to the building board and all the waterline marks are in a straight line to each other.

                      When viewed from either end along the length, the frames if set up correctly should replicate the plan view you started with on paper, if not, move the offending frame till it's in the right place.

                      On your indicated plan of the frames above, draw a line perpendicular to the keel centre line about 2 inches above the deck. As you take off each frame, include this excess as it is the extension discussed above. We would normally either phtocopy the plan enough times to give a separate sheet for each frame, or better still, scan to a computer and use the crop/cut/flip capabilities therein to create a full frame for each frame required and then print out ensuring they are to the correct scale. NOTE you must allow for the plank thickness on each frame that is subtract the thickness as it is usual for the plans to show the final outside dimensions. [The builder can use whatever thickness material desired.]

                      With this yacht hull, it is possible to build the hull over the frames without incorporating any of the rames into the hull. When the hull is covered it can be lifted off and then cross beams inserted to hold the shape. I've made several IOM hulls this way using 0.8mm ply and 2mm joining batterns along the chine edges. They are still going strong, as Gareth saw last weekend! The deck, once fitted gives good strength the the final build, fitted after any other internal bits have been added.

                      Kim.

                      #43550
                      Gareth Jones
                      Participant
                        @garethjones79649

                        Hi Brian,

                        I think Kim has explained the process pretty well, I will just clarify what I did on Shemarah.

                        I extended all the frames above the deck level to a line parallel to the waterline. Effectively the waterline was the primary datum and the hull was built with the waterline horizontal on the building board.

                        There is quite a lot of sheer on Shemarah, i.e. the deck is higher at the back and front than in the middle. Also the front of the deck is higher than the back, relative to the waterline. The first frame at the front was extended upwards by about 50 mm above the deck. All the other frames had to be extended by a greater amount than this. I just drew a horizontal line on the plan view which showed the side elevation of the hull lines. I then transferred that same line on to the plan view that shows the hull cross section, i.e. the frames, and then cut each one out accordingly.

                        Where I required access to the inside of the hull on the completed model, the centre section of the frame was cut away so many of the frames ended up as 'U' shaped piece of plywood. Each frame was fixed to the building board using approx 20 mm square timber. As Kim says, don't forget to make these long enough to extend outside the hull. Once the hull has been planked you need to be able to remove the screws holding these cross pieces to the building board.

                        It is not too difficult to cut off the surplus part of the frame afterwards. I made up deck beams to attach to most of the frames. The top edge of each beam was shaped to the camber of the deck, i.e. the middle section is higher than the outer edges. These were glued to each frame and then the surplus piece of frame cut off with a razor saw or Bosch multi tool. The frames were then sanded to the final shape, flush with the deck beams.

                        Getting all the frames exactly in line is not easy and before you start fixing the skin and deck you may need to shuffle them a bit on the bulding board or put in a bit of packing.

                        I hope that clarifies the process, but if you have any more questions feel free to ask. I can confirm Kim's yachts are very soundly constructed and quite fast. He even had the nerve to beat my wife in most of the races we had in Ramsey last Sunday and he was sailing a 1 metre yacht while my wife was sailing a Marblehead.

                        Gareth

                        #43553
                        Brian Muir
                        Participant
                          @brianmuir84327

                          Excellent explanation, thanks chaps!

                          #43556
                          Paul T
                          Participant
                            @pault84577

                            Brian

                            This is an example of frames being assembled on a building board

                            ellie frame.jpg

                            You can see the blocks of timber that are used to fix the frames to the building board, you might also just make out the cutting lines where the extension pieces are separated from the frames after assembly.

                            Hope this helps

                            Paul

                          Viewing 12 posts - 1 through 12 (of 12 total)
                          • Please log in to reply to this topic. Registering is free and easy using the links on the menu at the top of this page.

                          Code of conduct | Forum Help/FAQs

                          Advert

                          Latest Replies

                          Home Forums Beginners Topics

                          Viewing 25 topics - 1 through 25 (of 25 total)
                          Viewing 25 topics - 1 through 25 (of 25 total)

                          View full reply list.

                          Advert

                          Newsletter Sign-up