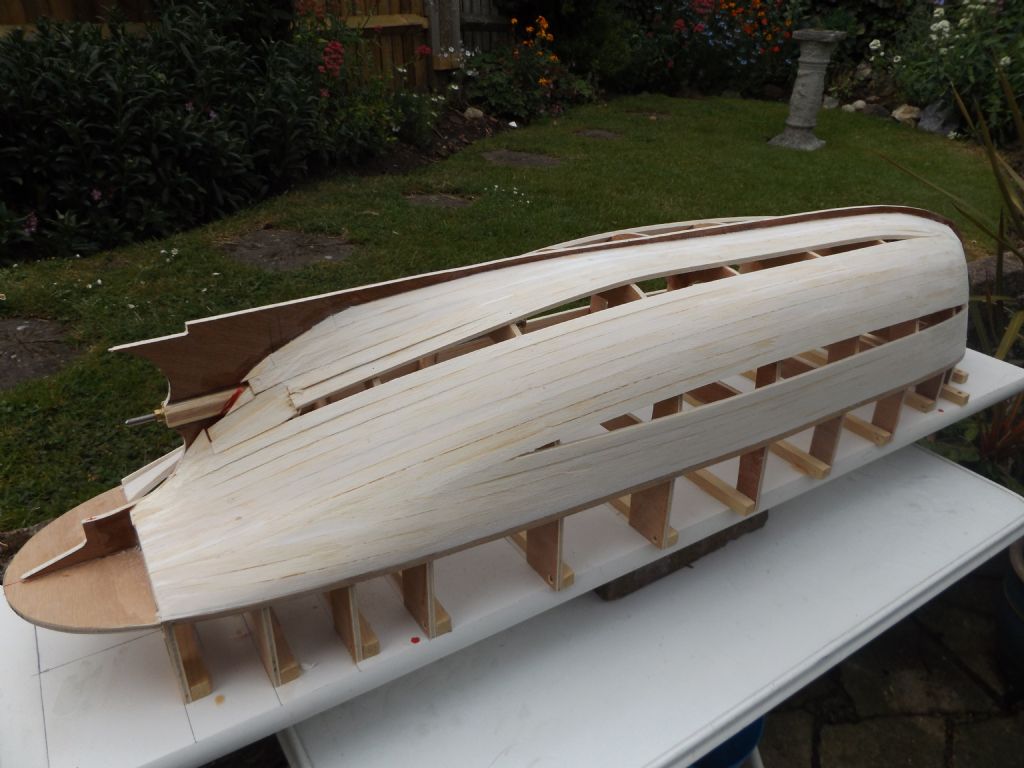
Planking – not even

Advert

Planking – not even

Home Forums Static modelling Planking – not even

  • This topic is empty.
Viewing 18 posts - 1 through 18 (of 18 total)
  • Author
    Posts
  • #5812
    John Arnold 3
    Participant
      @johnarnold3
      Advert
      #70379
      John Arnold 3
      Participant
        @johnarnold3

        I am constructing my first ever timber boat (Bluenose) and I am currently well into planking which I find not quite as difficult as I first thought HOWEVER as I have now got to the part where the planks are fitted to tight curves in the frames I am finding the the planks are not very 'even' on the surface. What I mean by that is that some planks appear (and feel) to be 'higher' than the adjacent one (the surface is not very even). This could be due to the curve of the frames near the front and rear of the boat which result in the plank not fitting flush with the edge of the frame resulting in the the plank not touching the frame across the width of each plank (hard to explain hope you understand).

        Also due to the tight curves of some frames the edges of adjacent planks do do fit flush together leaving a very small gap between adjacent planks on the outside even though they are actually touching on the inside of the hull. I have tried to reduce this as much as possible be sanding the planks along the edge at a slight angle (instead of being a right angle to the face). Once again I hope I make myself understood.

        I know that once the planking is finished I then have to 'fill' any gaps and sand the hull to an even smooth finish BUT am I being too particular? Do I have the correct technique? Do I assume correctly that the planking is to get the contour of the hull correct and filling and sanding is the final 'touch.

        The kit is from Billings and both the user manual and a video put out by Billings doesn't explain things very well (not for a beginner anyway) and seems to assume that the reader/viewer knows a lot already.

        Lastly will timber filler sold for use in homes (eg on architraves, timber furniture etc) be suitable for a my boat hull?

        Thanks

        #70380
        Banjoman
        Participant
          @banjoman

          Hello John,

          Without having seen your build, I am inclined to suspect that you have made the common beginner's error of trying to force-bend the planks into compound curves, something that essentially cannot be done, and which typically results in one edge of those planks sitting higher than the rest.

          Another potential source of unevenness might also be in the chamfering of the bulkhead edges to give a smooth line for the planks to rest on.

          Alas!, although I have never tried myself to follow a Billings build instruction, they do not have the greatest of reputations, and I am not surprised if you find them difficult to follow.

          There are a number of articles available on the Model Ship World forum that, taken together, describe quite well the relevant techniques of spiling planks (i.e. cutting them to the correct shape for them to lay smooth with a straight edge for the next plank to lay up to), and also the use of stealers and drop strakes: **LINK**. It is in my view very much worth the effort to read them all, and they should hopefully help you understand better how to go about the planking.

          And yes: you are perfectly right to assume that the planking alone should in principle produce the correct hull shape, and that sanding and filling should be for touching up and sorting minor issues. That said, if the hull is going to be painted, you have a larger margin of errors, and can rely a bit more on the filler.

          Standard timber fillers will work perfectly fine, at least if, as I assume, you are building a static model. If you intend to put her into the water, you might be better of with e.g. Isopon P38 car body filler or something similar, but for a static model, standard indoors wood filler will do you nicely. As always, if you are not familiar with a product, do a test piece first, to learn how it behaves when put on and when sanded before applying it to your model.

          Good luck and enjoy your build!

          Mattias

          #70382
          John Arnold 3
          Participant
            @johnarnold3

            Hello Mattias

            Thanks for your reply and information.

            In answer to some of your questions

            It IS a static model

            Yes the hull will be PAINTED

            Yes I did bevel the edges of the frames (by sanding/filing) to fit the shape of the hull so that the planks would be in contact with the whole edge of each frame instead of possibly touching only a small part of each frame.

            Not sure what you mean by (trying to bend planks) into a compound curve. I have included two images from the building instruction booklet which came with the model. The curves in the frames I referred to are mainly near the rear/stern of the boat hull in particular frame numbers 1, 2 and 3 – note the tight (outside) curve.

            Note this model has two separate halves to the hull which are joined/glued together after all planking is done – it is a model for beginner/intermediate builder.

            I have tapered each plank (by sanding along one edge) before fixing so the ends are much narrower than the middle as they need to 'fill' a much smaller distance on the hull at the front and back than in the middle. Maybe this is completely necessary as the hull will be painted but the instructions suggest to do this. Note this is the instruction in the book for planking –

            Planking

            Sand the planking strips to taper fore and aft. Hold strips in place with pins and glue with white cement

            No real instruction on what to do.

            I am also sanding one edge at a slight angle to allow for the fact that each plank will be at a slightly different angle (on the face) than the adjacent one to the edges better contact the adjacent one. This still results in a slightly raised edge where each adjacent planks touch.

            I haven't got to the stage where stealers may be required.

            I guess as the hull will be painted then filling and sanding will fix all this (high spots in the planking. Correct?

            I can understand that when building a hull for a old style sailing ship which has a timber look hull it is very important getting the planking done as neatly as possible.

            bluenose planking 2.jpg

            bluenose planking 1.jpg

            #70383
            Colin Bishop
            Moderator
              @colinbishop34627

              I agree with what Mattias says. When planking you do need to 'respect' the way the plank wishes to lay, even if this means there are gaps which need to be filled with 'stealers' or thin triangular short planks.

              As a filler I would recommend Ronseal High Performance Wood Filler:

              **LINK**

              As well as being outdoor quality it is also easy sand so that, unlike some other fillers it won't be harder than the surrounding wood which can result in ridges being formed as the filler stands proud of the surface.

              Hope all goes well!

              Colin

              #70384
              Dave Milbourn
              Participant
                @davemilbourn48782

                John

                One of the causes of adjacent planks appearing to be at different levels is the width of the planks. Narrower material will follow the curve of each frame more closely. Another cause is a slight variation in the thickness of the material. If you buy pre-cut strips this is almost unavoidable, so I've always cut my own strips from sheet – it's also cheaper that way. Of course if you have a kit you're stuck with what you get unless, as with my Dumas Lord Nelson Victory tug, it's so unspeakably horrible that you have to replace it all!

                One tip I can pass on is to use thick superglue to attach each plank to the frames – sometimes referred to as a "liquid pin" – with a bead of PVA or aliphatic glue along the edges. My own current preferences are Slo-Zap cyano and Deluxe Materials' Speedbond resin glue. Like Mattias I have always used P38 as a filler for sailing models.

                To make sure you don't sand too much off the planks, draw pencil lines across them at about 2cm intervals and then sand until these lines just disappear. Works for me.

                Dave M

                #70385
                Ray Wood 3
                Participant
                  @raywood3

                  Hi John

                  I remember building a billings fishing boat many years ago and the planks supplied were only 1/16" thick and brittle mahogany type timber which wasn't very forgiving. I would also consider stopping the planks on the bulkhead before the stem and the stern and fill with soft block, as tapering the planks and trying to fix to the stem can be quite a task. I have a series of pictures in my Ray's Boats album showing the planking of a tug I'm building, albeit I'm using 3/16" balsa which gives you more meat for the final sanding, which will be filled and glass clothed as she is going to be a working model Hope this helps Good Luck.

                  Regards Rayhh cul june16 008.jpg

                  #70386
                  Banjoman
                  Participant
                    @banjoman

                    John,

                    By "bending planks into compund curves" I meant to try and edge-set them, i.e. not only bending them over the frames, but also across their own width; see p. 3 of this primer on planking by David Antscherl for a more detailed explanation of the matter, and on how to deal with it by spiling off the planks: **LINK**.

                    Mattias

                    #70389
                    John Arnold 3
                    Participant
                      @johnarnold3

                      Thanks everyone.

                      As I live in Australia most if not all the brands of filler and glue you mention are not available here.

                      I use a PVA (white) adhesive.

                      The planks in the kit are all pre-cut out of a timber they call PINE. It's certainly not balsa and I have no reason to doubt that it is pine. They are precut to a size 1mm thick and 3mm wide.

                      I have NO trouble bending them over the frames – I have seen some video clips of other boats which require so much bending that they suggest using a bending (crimping) tool on the planks, or wetting ot steaming them and then pre bending them around a shape to get them preformed for the bends. I do NOT have to do that (refer to the image from the manual further back.

                      I now get the idea that it isn't particularly necessary to get the surface of the hull (after planking) totally smooth and that filling and sanding should allow the surface to be completely smooth prior to painting.

                      I guess that is what I was originally asking originally so THANKS everyone.

                      It is my first boat kit (used to build flying model aircraft a long long time ago) and at my age not as good eyesight as in my earlier year it probably will be my last.

                      I have always wanted a static model sailing ship/boat and could only ever find very ordinary boats for sale and so decided to have a go at building one. I searched Ebay and other places for a suitable boat kit and found the BLUENOSE II which I admired for its lovely lines (it is a schooner for those who don't know) and I liked to look of it more than the 'square rigger' sailing ships I originally wanted – thank goodness I decided not to get one now that I know what is involved with planking those shaped hulls with 'compound' curves.

                      #70390
                      John Arnold 3
                      Participant
                        @johnarnold3

                        Thanks Matthias

                        I understand what you mean by bending the planks across their own width but I think that would be difficult with planks only 3mm wide. I would probably have to use two very thin pins at each frame/bulkhead which might cause them to split or maybe use very very strong rubber bands around the hull. Maybe not worth the extra effort so long as I can get filler and sanding to smooth the surface.

                        By the way instead of using pins as the instruction book shows I have been using small foldback paper clips/bulldog clips/ paper file clips or whatever they are called where you live. Makes it faster. I also use rubber bands in places where the clips are not effective.

                        I think now that if I had the opportunity in getting a kit with a preformed hull I may have gone that way. I have seen a few around although usually they are smaller models and not as much superstructure and mast/sail details. Remember I purchased this kit as I have given up buying a pre-made model – don't get me wrong so far I am enjoying what I have done but that might change when I get to the rigging. I think I hear some groans coming alreadysmiley especially from those who have built lots of boats and get a real buzz out of doing so (I know of a chap who builds models to sell (he only charges for the cost of the materials used).

                        Maybe once it is finished I might change my mind and try another kit.

                        #70393
                        Banjoman
                        Participant
                          @banjoman

                          You're welcome John!

                          I'm very sorry if I was not very clear in previous postings, but what I meant was the exact inverse, i.e. that one should never try to bend a plank across it's own width! Apart from the risk of the plank splitting, this is very likely to lead to one edge being forced up from the frames, and, if tensions are severe enough, might even twist the hull out of true.

                          What I was trying to point in the direction of was and is the technique called spiling off which involves cutting tailor-made planks that, flat on the table, are curved, but when put in their assigned places on the frames lay themselves neatly in place with no edge-setting or similar forcing involved. This cannot be done, though, with pre-cut planks only 3 mm wide, like those you have, as the material must be wide enough for the curved shape. Again, see p. 3 in David Antscherl's primer linked to above for a better explanation complete with photos.

                          All this said, I am sure that if you carry on planking like you've started, do that as well as you can, and then care with filling and sanding, you should get a perfectly fine hull!

                          Mattias

                          #70395
                          John Arnold 3
                          Participant
                            @johnarnold3

                            Thanks Mattias.

                            Getting 'back' to fillers I am wondering if the multipurpose fillers which either come as a powder and mixed with water or come in a premixed tub would be ok to fill any gaps uneveness in the planked hull. There is one here in Australia which is advertised as suitable for repairing cracks, dents and holes and gaps inside and outside the house in plasterboard, masonry, TIMBER, brick and stone and is easily sandable as well as being low shrinkage.

                            It contains mainly calcium carbonate. Also remember I will be painting the finished hull so timber colour match is not important but the calcium carbonate bothers me.

                            I am just thinking that a lot of timber putties (for filling holes etc) dry fairly hard and maybe harder than pine which would then be difficult to sand evenly.

                            #70396
                            Banjoman
                            Participant
                              @banjoman

                              No worries, John

                              As for fillers, it is very difficult to give specific advice right across the globe, as it is so hard to know how brands and spcific products within brands translate (or don't). To make it even worse in my case, I live in Belgium, not the UK, where the range of stuff generally available is similar but not identical.

                              Personally, on static models (or in places on r/c hulls whre it hasn't mattered) I've tended to use mainly standard Polyfilla Superfine filler (**LINK** — sorry 'bout it being in Flemish, but it's either that or French), which is a standard type of easy-to-use and probably not overly strong general filler paste, but what the corresponding product (if any) would be in the Australian market, I've no idea. I note that there's Polyfilla in Australia too, but seemingly the brand there is in the hands of a different group to the Akzo Nobel one that owns the brand here.

                              There are other Australians on this forum, so hopefully they might be able to give you more locally relevant advice.

                              Otherwise, I would suggest that you get the smallest container possible of a locally available wood or general filler that, from the manufacturer's description, seems might fit your purposes, and then make yourself a small test piece by glueing some plank cut-offs to a small piece of backing material, taking care to leave a bit of space inbetween them, add filler, allow to set, sand and paint (it's when paint is added that any unevenness becomes really visible). If you like the results, fine; if not, either try again but change any steps in the process you were not happy with, or repeat with another product.

                              Good luck and good filler hunting

                              Mattias

                              Edited By Banjoman on 22/03/2017 11:52:56

                              #70398
                              Dave Milbourn
                              Participant
                                @davemilbourn48782

                                I use "Fine Surface Polyfilla" as a grain-filler. It will also fill small gaps in between planks. The technical term for such stuff is a 'vinyl-based spackle' and you can buy it in a tub and sometimes in a squeezy plastic tube. I'm sure you'll be able to find a similar product in Australia. Here's the UK website **LINK**

                                Dave M

                                #70403
                                John Arnold 3
                                Participant
                                  @johnarnold3

                                  Thanks Mattias and Dave

                                  Yes we have Polyfilla here too and I note on the link in Dave's replay that it will fill gaps up to 2 mm which is heaps ok.

                                  I was just a little concerned that those types of products may not work well on a wooden models.

                                  I think too that if I use a spatula/ putty knife to apply the filler it will only fill the low points and any gaps making sanding fairly easy even if I have to apply a second coat to get it as perfect as I can.

                                  Forget any worries about Flemish. If you really want to use French as I have a very very limited knowledge of French but my wide used to teach it to 13-18 year old students.cheeky

                                  Thanks again

                                  I am learning lots

                                  Regards

                                  John

                                  #70404
                                  Banjoman
                                  Participant
                                    @banjoman

                                    Again, John, no worries

                                    I'm sure there are products out there that are more and other that are less suitable to model work, for example because of their ease or difficulty of application, of sanding, of fineness of surface, of resistance to cracks or (if your model is to be sailed) the elements and so on and so forth, but really: if you can use something on a full scale job, you can use it on a model!

                                    Also, there are no laws against a pick-and-mix approach, except those of chemistry. That is to say: when you add layers of surface treatment products (fillers, sanding sealers, paints, varnishes, etc.), unless these are all from the same brand and series of products (and thus may be taken on faith to be compatible), it is in my opinion always a wise thing to do a test piece first! If two products react adversly with each other, it is so much better to have this happen on a discardable test piece than on a model on which you may already have spent tens or even hundreds of hours!

                                    Test pieces are also great for familiarising oneself with the behaviour of a product or method of application that one hasn't tried before. See e.g. p. 19 (**LINK**) of my Moonbeam thread for some examples of such testing; also, this short thread on spray filler covers asking for advice, finding out about, testing and correcting the use of a previously unknown product (**LINK**), which I then went to further test for compatibility with my paints, cf. **LINK**.

                                    Oh, and if you'd rather have a go at the info sheet in French, here goes: **LINK**

                                    Mattias

                                    #70406
                                    John Arnold 3
                                    Participant
                                      @johnarnold3

                                      Once again thanks Mattias

                                      Very interesting links.

                                      I remembered a while ago that when I used to making flying model aircraft I think I sometimes used timber dust (from sanding) mixed with something maybe DOPE (or maybe glue) and used that for a filler as it sanded well. There wasn't a lot available back in the 1970's.

                                      My planking isn't real good particularly near the stern but I figure that filling and sanding will sort out most imperfections and if not those who will view my model when finished will not notice as they will not know what the hull is supposed to look like anyway (contour and lines). I'm making it for me not to exhibit.

                                      I'll get there.

                                      John

                                      #70407
                                      Banjoman
                                      Participant
                                        @banjoman

                                        You're very welcome, John

                                        Mixing wood dust with glue or dope is a classic trick, that I still use from time to other, particularly when a colour match is essential. In the end, what counts is that it works, not that it is done according to some procedure or other.

                                        Likewise, I entirely agree with what you say about not building to exhibit! I do not mean to cast any aspersions on those who build for that purpose, or even to compete — that is perfectly fine and legitimate and all — but personally, the only person I aim to please is myself. Firstly by having fun during the build and secondly by trying to achieve a result that I am pleased with. Of curse it also pleases me if other people like what I've done, but if they don't, that's fine too, as long as I'm happy with it myself.

                                        Mattias

                                      Viewing 18 posts - 1 through 18 (of 18 total)
                                      • Please log in to reply to this topic. Registering is free and easy using the links on the menu at the top of this page.

                                      Code of conduct | Forum Help/FAQs

                                      Advert

                                      Latest Replies

                                      Home Forums Static modelling Topics

                                      Viewing 25 topics - 1 through 25 (of 25 total)
                                      Viewing 25 topics - 1 through 25 (of 25 total)

                                      View full reply list.

                                      Advert