Birthday boat

Advert

Birthday boat

Home Forums Scratch build Birthday boat

  • This topic is empty.
Viewing 25 posts - 76 through 100 (of 288 total)
  • Author
    Posts
  • #46746
    ashley needham
    Participant
      @ashleyneedham69188

      Hmm. Especially if constructed from native wood!! lets face it, the centrifugal is the way to go

      How about having a simple on/off clutch operated via an electromangentic unit, current to which could be simply switched by a puny servo and microswitch? this would provifr the clutch power that the puny servo is sorely lacking.

      I thought the worm-drive idea for clutch operation was good.. loads of progressive power…was that yours Bob?

      Ashley

      Advert
      #46758
      Amy jane September
      Participant
        @amyjaneseptember49770

        Thank you for that.

        We shall try the dog clutch, nothing ventured, nothing gained and all that.

        The reason for avoiding the centrifugal clutch is the notion that the boat should sit nicely on the plane at fairly low engine revs, hence the need for a non slipping clutch at low speeds.( The cone clutch was ok at full throttle, but slipped at lower speeds.) If the dog clutch is not satisfactory, then it will be a permanent, flexible, connection to the prop shaft, and just switch off the ignition from idle.

        The electric clutch would do want I want well, but perhaps getting a little too involved? Shall look into it though.

        The rest of the build is on hold, until I can organise myself a work shop, this is not a kitchen table project! I have allowed plenty of time to build this, so no panic yet.

        Thanks again

        Aj

        #46759
        Keith Long
        Participant
          @keithlong89920

          Amy

          I don't know whether this suggestion will help or not, but Peugeot 504s had a 12 volt electric clutch built into the cooling fan hub to transmit the drive from the water pump. The clutch could transmit about 5hp without any slippage and was either "in" or "out", no half measures. From memory the central shaft size was about 12mm. If Pug 504s (or 505/604 possibly) are thin on the ground there might well be something else in the automobile line that would suit. Could be worth having a word with the local car breakers or garages to see if they know of anything.

          Keith

          #46762
          ashley needham
          Participant
            @ashleyneedham69188

            Keith, I like your style. A veritable nugget of arcane knowledge! may be on to something there.

            Loads of cars, before the advent of electric fans had a fluid clutch in the cooling fan hub…wonder how much power they are capable of transmitting?

            Ashley

            #46767
            Amy jane September
            Participant
              @amyjaneseptember49770

              Thanks for that, Keith. Good idea, though I think a Peugeot would be hard to get, but don't the air con compressors on most cars have electric clutches? May be worth a thought.

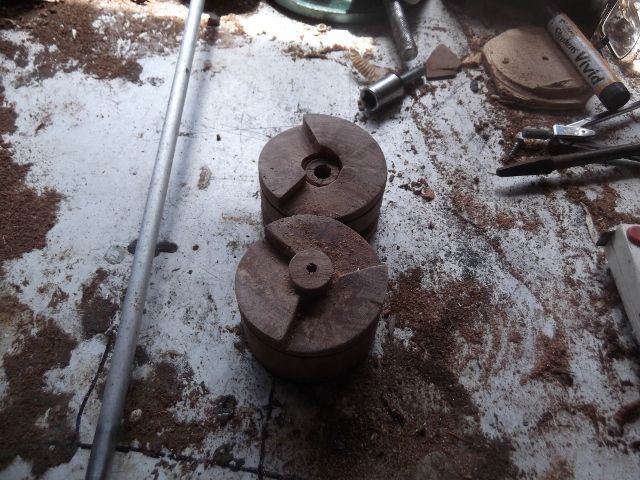
              Lynn has been busy today and the dog clutch is done.

              dscf5561 (640x480).jpg

              dscf5557 (640x480).jpg

              She says it was fun to make, although it's not perfect, but will hopefully be ok. (If not, we will have a couple of interesting candle holders!) She hopes to give it a test run tomorrow.

              #46768
              Bob Abell 2
              Participant
                @bobabell2

                That looks the bizz!

                What size is it, please?

                If you run aground and the prop snags…..Have you thought about a slipping device?

                Bob

                #46771
                Amy jane September
                Participant
                  @amyjaneseptember49770

                  Thanks Bob. Diameter is 2 2/4". I hadn't considered what would happen on a grounding, but given the clutch leaver set up, would probably just pull the clutch disengaged.

                  #46778
                  ashley needham
                  Participant
                    @ashleyneedham69188

                    Amy. Well impressed with that. Not an easy thing to make..just one, let alone getting them to match up.

                    How about facing the mating surfaces with rubber (inner tube rubber for instance) to give a measure of shock absorbsion. Grease `em up and they will disengage easier like. Or will the tight tolerances not allow this mod? perhaps thinner cycle inner tube rubber on just one face.

                    Ashley. (showing great restraint on the joke front)

                    #46793
                    Amy jane September
                    Participant
                      @amyjaneseptember49770

                      Ashley. We like that that idea, it would also help compensate for the slight imperfections.

                      Given that the prop will be fairly small in diameter, the 'snatch' hopefully shouldn't be too great, (we did consider using five teeth, for this reason, but decided not to make things too difficult!)

                      #46796
                      Amy jane September
                      Participant
                        @amyjaneseptember49770

                        Hello

                        The clutch has been run, and Lynn is quite happy with it. She tried Ashley's rubber strip suggestion, but they just peeled off when the clutch was engaging, still it was worth a try! She gave everything a good smear of tallow and the clutch engaged and dis engaged easily. Just the slightest bit of pressure on the end of the prop shaft kept the clutch closed, and it still opened with out problem. She said it was amuseing to notice that there was enough air pressure to still revolve the shaft with the clutch full opened!

                        Photos shortly.

                        Aj

                        #46797
                        Bob Abell 2
                        Participant
                          @bobabell2

                          Hello Amy

                          You are making good progress, which is nice, and I'm impressed with your engineering skills!

                          No doubt, it will be revealed in due course, that you two young ladies are more than meets the eye?

                          Would it not be a good idea to contain the two coupling halves within an outer sleeve?

                          This would prevent any tendency to separate sideways, during running?

                          You could use an old Baked Beans tin in your case

                          Bob

                          #46801
                          ashley needham
                          Participant
                            @ashleyneedham69188

                            Amy. Chipping the ends of the clutch teeth was what was worrying me, shame the rubber didn`t work. What glue did you use? I am sure that Evo-stick would have kept it attached, however..it is not going to be used much really is it?? Just on the odd occaision

                            I was going to suggest a sort of fluid flywheel, which would effectively disengage the drive at low revs but lock up at speed but I realised this might be a bit tricky to engineer in the garage!

                            Ashley

                            #46802
                            Amy jane September
                            Participant
                              @amyjaneseptember49770

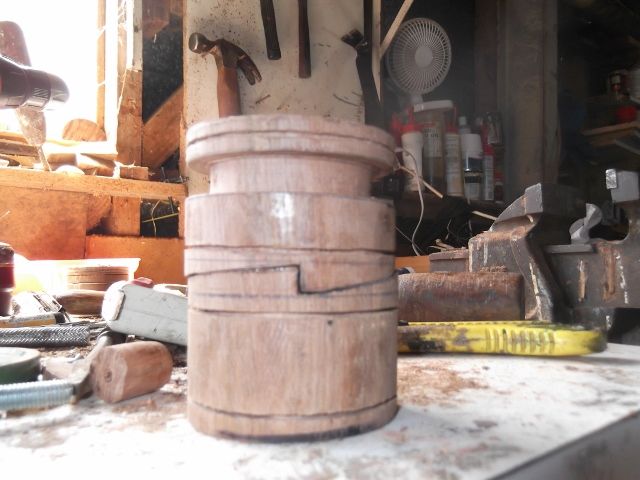
                              Here are some photos, sorry about the delay

                              dscf5562 (640x480).jpg

                              Clutch open

                              dscf5563 (640x480).jpg

                              closed.

                              Bob, Nothing special about us, I'm afraid.

                              There is a central spigot, that engages in a hole in the other half, to keep every thing aligned.

                              Ashley, the rubber was glued with contact cement, although I don't know what brand.

                              You are right though, the actual number of times the clutch is used wont be great. A fluid clutch would be probably expecting a bit much, given the rather rudimentry nature of our equipment! (hmm ….2 baked bean cans and a stick blender…..)

                              Thanks for the suggestion of a dog clutch, Bob, an improvement over the cone, and worth the effort of re doing.

                              Next step is for me to arrange a workshop, and get out the jigsaw and plywood. 'twill be fun.laugh

                              Edited By Amy jane September on 02/02/2014 09:26:38

                              #46804
                              Bob Abell 2
                              Participant
                                @bobabell2

                                OK Amy

                                A bean can over the dog teeth would contain any flying bits of wood?

                                And the clutch teeth need not be exposed

                                Safety First

                                Bob

                                #46823
                                Amy jane September
                                Participant
                                  @amyjaneseptember49770

                                  Hello Bob.

                                  Your bean can makes a lot of sense, as the clutch parts are wire bound, to prevent the timber splitting. We would have turned the parts to fit in a can, if we had thought of it! crying We shall file that away in the 'good idea box' for future use.

                                  I don't feel safety is an issue, as the clutch is well buried, and you would have to try very hard to put your finger in it!

                                  #47134
                                  Amy jane September
                                  Participant
                                    @amyjaneseptember49770

                                    Hello again,

                                    Great news. I now have a workshop! Yippeeeeee…..

                                    (Nothing to Bobs standard, but a work shop all the same!)

                                    The corner of a disused store room at work. It has a decent bench, and I can leave everything set up. So I'll install myself over the next week, and then it'll be full steam ahead!laugh

                                    Aj

                                    #47139
                                    ashley needham
                                    Participant
                                      @ashleyneedham69188

                                      Amy, Good news about the workshop. At some stage of course you would need this; A lot of things can be done piecemeal but at the last knockings the entire vessel would need to be out on a bench.

                                      Remind me what size ply you are using to skin this with plse? or is that to be decided. I take it you will be finishing the completed vessel with normal household undercoat and topcoat?

                                      Ashley

                                      #47148
                                      Amy jane September
                                      Participant
                                        @amyjaneseptember49770

                                        Hello

                                        yes, good news indeed, I think there would be a family mutiny if I built this on the kitchen table!

                                        The hull will be 1/8" ply, a little heavier than needed, but I have half a sheet left over from building my canoe, so that's what it shall be! I am developing my own range of paints, clear coats and glue, that so far seem to look promising, and I can make at home for only a few dollars a litre. (Early days yet)

                                        Aj

                                        #47149
                                        ashley needham
                                        Participant
                                          @ashleyneedham69188

                                          Will we be seeing little tinlets of "AJ" paint then at our modelshops, rather than Humbrol??? Ashley

                                          #47153
                                          Amy jane September
                                          Participant
                                            @amyjaneseptember49770

                                            Hmmm….. 33 30ml cans per litre, $5 per can, $165 . Cost of $3.50 per litre to manufacture ….Hmmm…… any profit in that?

                                            #47329
                                            Amy jane September
                                            Participant
                                              @amyjaneseptember49770

                                              dscf5603 (640x480).jpgHello all.

                                              Well, I'm settled into my new work shop, and construction is well under way. Having the work shop at work means that I only get to build during my lunch breaks and after work, (I was beavering away after work the other day,and lost track of time. The blighters all went home and locked me in! No one thought to question why my car was still out side!)

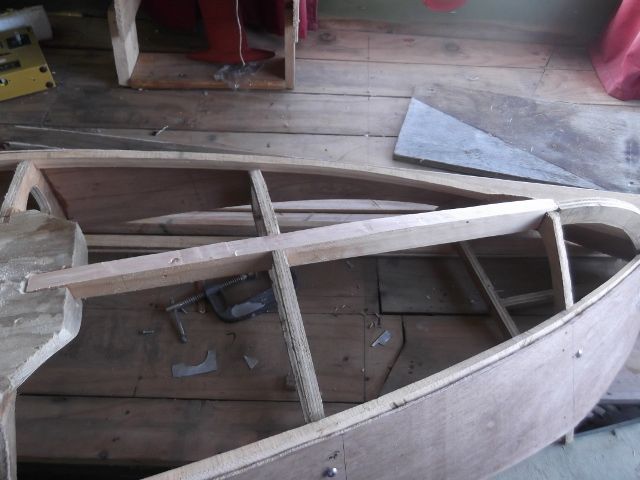
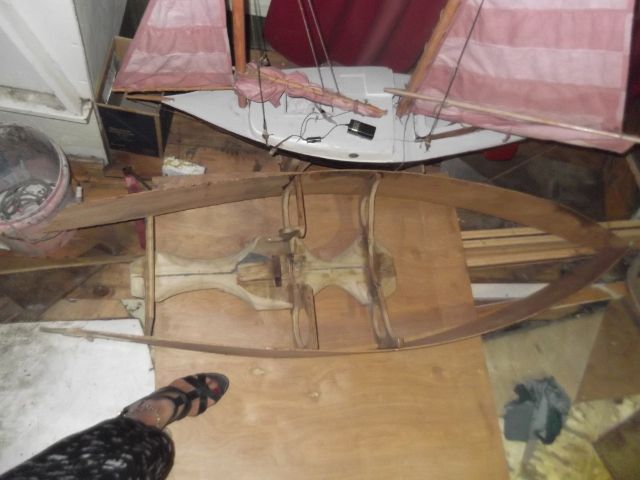
                                              Cardboard patterns of the sides were made from the half model, and scaled up onto the 1/8 ply. The "yule log" was tidied up and the sides wrapped around.

                                              dscf5593 (640x480).jpg

                                              more frames cut and installed, stem and stern block installed, and the keelson put in

                                              dscf5603 (640x480).jpg

                                              How did that photo end up twice, oh well.

                                              Everything is just dry fitted at the moment, will be all diassembled and glued and nailed when sorted. (I like to get all the bevels planed on before gluing, so I don't put to many nails in silly places, like where I need to plane!)

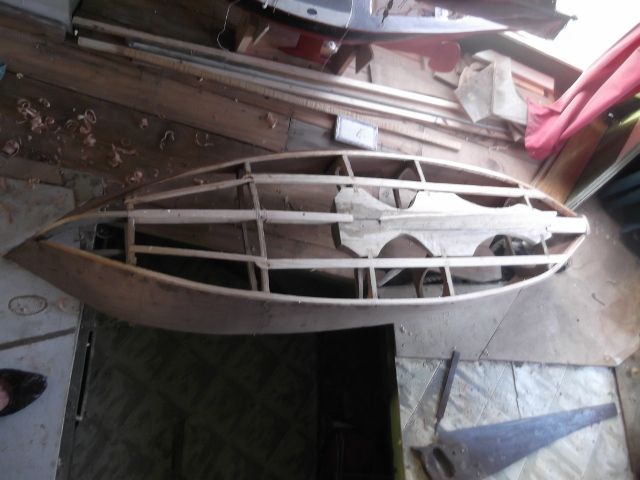
                                              dscf5606 (640x480).jpg

                                              all glued up and stringers in. If this was a displacement hull, I wouldn't hesitate to use my home made glue, (I used it through out on the tancook whaler) but as this boat will take a bit of a beating, it's epoxy through out at this stage. The ply is some sort of tropical hardwood, though quite light. The stringers are radiata pine, from a demolished building.

                                              Amy jane

                                              #47332
                                              Bob Abell 2
                                              Participant
                                                @bobabell2

                                                That's very nice, Amy…Interesting unusual construction

                                                It reminds me of Charles Darwin's theory of evolution! Where you have built a boat, the NZ way without any guidance from the outside world…..We must congratulate Amy and Lynn for sticking at it!

                                                Is that the motor, I can see at the back end?…..It looks very small or your boat looks enormous!

                                                Keep up the good work, ladies, you're "Doing a good job!"

                                                bob

                                                ps….Can't imagine what you'll build next!

                                                #47343
                                                Amy jane September
                                                Participant
                                                  @amyjaneseptember49770

                                                  Thanks for the praise, Bob. (never say no to that!)

                                                  The engine is tucked away under Lynn's work bench, so no, that's not what you see.

                                                  The hull is 63"x 14" so not small, but will shrink once in the water!

                                                  The next boat will be a small (30&quot motor bootlegger, But I'll get this one finished first!

                                                  Aj

                                                  #47441
                                                  Amy jane September
                                                  Participant
                                                    @amyjaneseptember49770

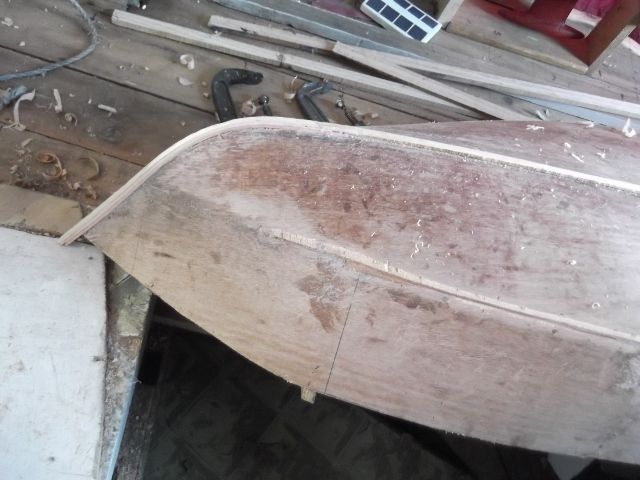
                                                    Ladies and gentlemen, you may inspect my bottom! (not too close mind, it's not perfect)
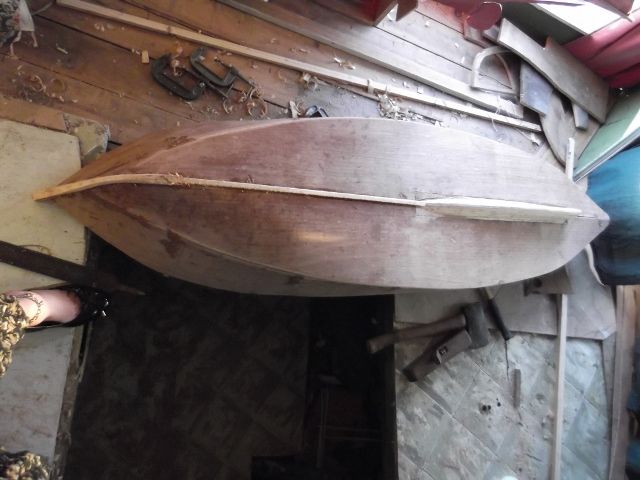
                                                    dscf5630 (640x480).jpg

                                                    Had a bit off fun getting the ply down at the bow, I didn't want to boil it, couldn't be bothered waiting for it to dry before glueing. I pulled it down with long screws, over a period of a couple of hours. ( I would trot down to my work shop every half hour, between morning tea and lunch, and tighten in a few more turns. Now every one in the office thinks I have a weak bladder!) The bottom was taken off and glued and nailed down after work, ready for the next day. By dry fitting, and useing half a dozen screws as locators, I could fair the bottom down to within a 1/32" and know it would still fit once the glue was on!
                                                    dscf5636 (640x480).jpg

                                                    Cut water on, all faired up and ready for filling, sanding and sheathing.
                                                    dscf5634 (640x480).jpg

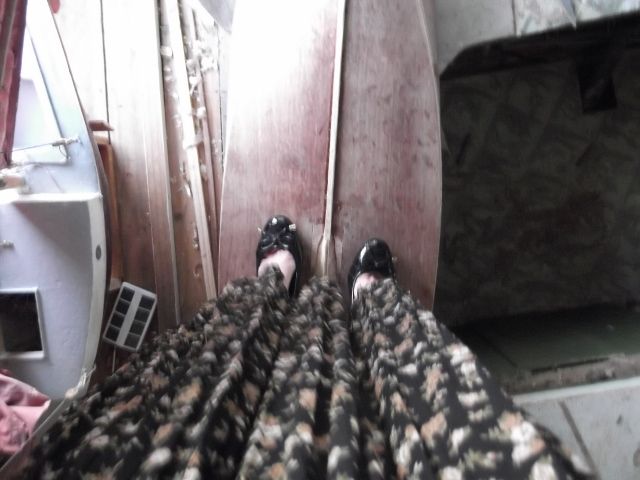
                                                    The Amy jane test for structual integrity! ( the bottom withstands 47 pounds per foot!)
                                                    dscf5633 (640x480).jpg

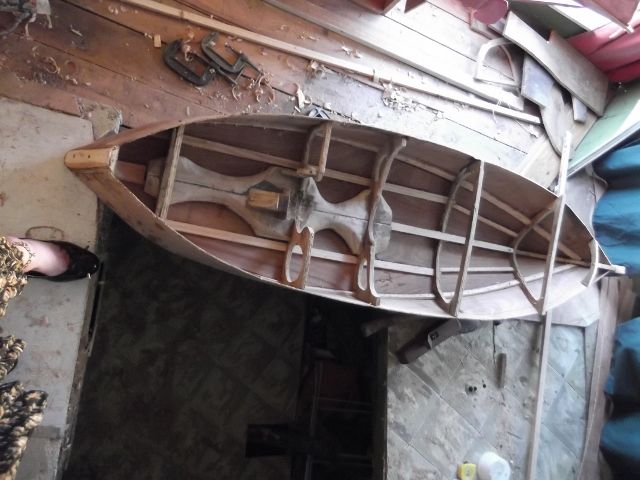
                                                    Final shaping yet to be done on stern block and skeg.

                                                    I decided to trial the radio I bought for it in the Tancook Whaler first, glad I did! Not so good. (Well it is 40 years old!) The servos were very feeble, and were reluctant to centre properly. I'll leave it in the Tancook, and I have bought a brand new 4 channel for this boat. ( cost less than $20, (10 quid). Lynn has been testing it in one of her aeroplanes, and tells me it works perfectly)

                                                    A question-

                                                    As I have not built a planing model before, I'm basing my calculations on a what I would do for a very small full sized boat. I would appreciate a second opinion on my ball park figures.

                                                    Displacement, 1/2 cubic foot, say 32lbs

                                                    bottom area 4.3 square feet

                                                    bottom load 7.4 lb per square foot

                                                    some where near right? miles off? (7 lbs would be a fairly light loading on a even a small fullsized boat)

                                                    Weights at the moment are,

                                                    hull 13 lbs

                                                    engine 10 lbs, so still a bit to play with

                                                    Thanks

                                                    Amy jane

                                                    #47448
                                                    ashley needham
                                                    Participant
                                                      @ashleyneedham69188

                                                      Amy. A whopper still. Not a fair test of hull strength given your petite and slender build..

                                                      Not sure about the question? is this for interest only, . For a planing design no extra ballast will be added…?

                                                      The motor mount tree looks very..organic in the bottom and interesting. I dig interesting.

                                                      Still not sure it will plane properly with the tapered stern, fast perhaps, but. Peter on our pond built something very similar, if a bit smaller and the stern digs in..although he does have significant cut-up at the rear, and the bow lifts in spectacular fashion (interesting).

                                                      Ashley

                                                    Viewing 25 posts - 76 through 100 (of 288 total)
                                                    • Please log in to reply to this topic. Registering is free and easy using the links on the menu at the top of this page.

                                                    Code of conduct | Forum Help/FAQs

                                                    Advert

                                                    Latest Replies

                                                    Home Forums Scratch build Topics

                                                    Viewing 25 topics - 1 through 25 (of 25 total)
                                                    Viewing 25 topics - 1 through 25 (of 25 total)

                                                    View full reply list.

                                                    Advert

                                                    Newsletter Sign-up