Shemarah II

Advert

Shemarah II

Home Forums Scratch build Shemarah II

  • This topic is empty.
Viewing 25 posts - 276 through 300 (of 371 total)
  • Author
    Posts
  • #40937
    Gareth Jones
    Participant
      @garethjones79649

      Hi Bob,

      Its a good attempt and a very ingenious way to make the lead screw. However I think the pitch of the thread does need to be around 4 mm or by the time the second, opposite hand thread groove has been cut, the lands between the grooves will be too small. I think the Trimline method looks crisper and neater, even though it does not actually have a groove in the shaft.

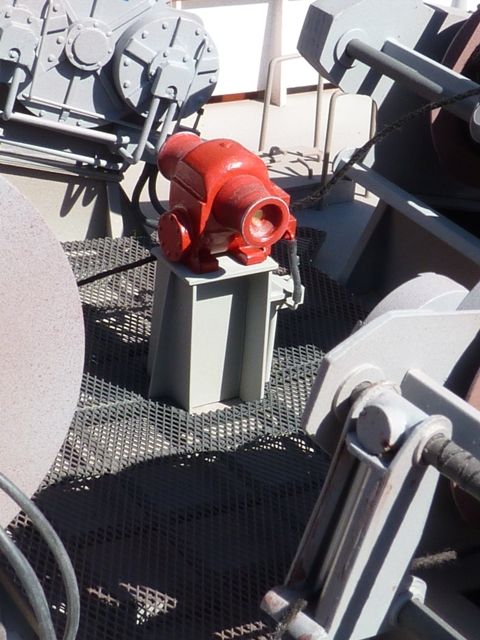
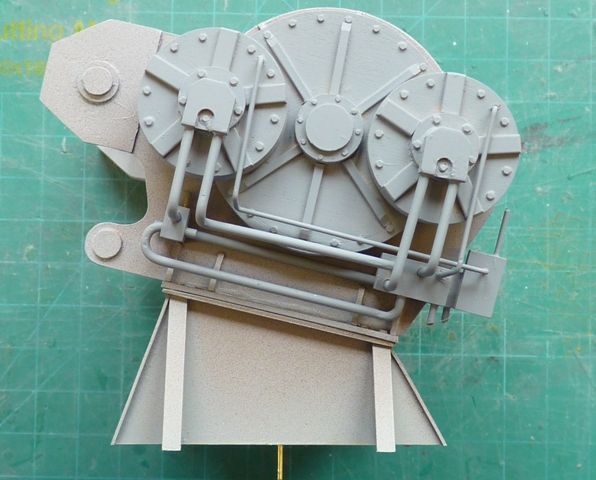
      I am going to start making the first 'production' winch tomorrow. There are a number of changes to make from the prototype including a bigger diameter for the area where the wire is wrapped around the drum and a more 'sculpted' look for the hydraulic motors and gearbox. The existing simple sharp edged discs used for the motors and gearbox look a little oversimplified.

      I will make up a new leadscrew and paint it before wrapping the Trimline on and then varnishing it tomorrow. Watch this space over the next couple of days.

      Gareth

      Edited By Gareth Jones on 11/05/2013 17:40:26

      Edited By Gareth Jones on 11/05/2013 17:41:05

      Advert
      #40934
      Gareth Jones
      Participant
        @garethjones79649

        Hi Bob,

        Ourlast posts just crossed in the wires somewhere, I had not seen your second attempt. It looks much neater and would have been just the job if your lathe could have done a left hand thread.

        Gareth

        #40939
        Gareth Jones
        Participant
          @garethjones79649

          Hi Bob,

          Ourlast posts just crossed in the wires somewhere, I had not seen your second attempt. It looks much neater and would have been just the job if your lathe could have done a left hand thread.

          Gareth

          #40962
          Bob Abell 2
          Participant
            @bobabell2

            Hi Gareth

            I worked on one of these devices way back in the 60`s!

            It was on a SS sheet polishing machine for Sam Fox in Sheffield……….Sigh!…..The things that stick in one`s mind?

            The threads were the easy stuff, but at each end, the drive dog had to "go about turn" and come back on itself through 180 degrees!….Food for thought?

            Bob

            #40986
            Gareth Jones
            Participant
              @garethjones79649

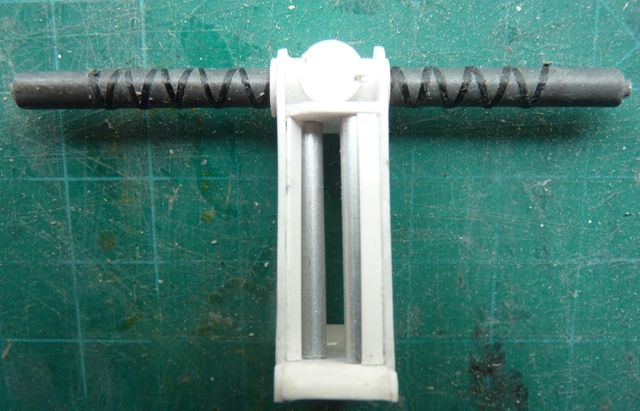
              Well I won't keep you in suspenders for any longer, I have decided to go down the Trimline route for the winch leadscrew. Heres a picture of the prototype. I will need three altogether so I will make a couple more and if my quality improves I will make another to replace this.

              shemarah 319.jpg

              If I do eventually find a better solution, or Bob buys a better lathe I might replace it a some point in the future but for now its fine.

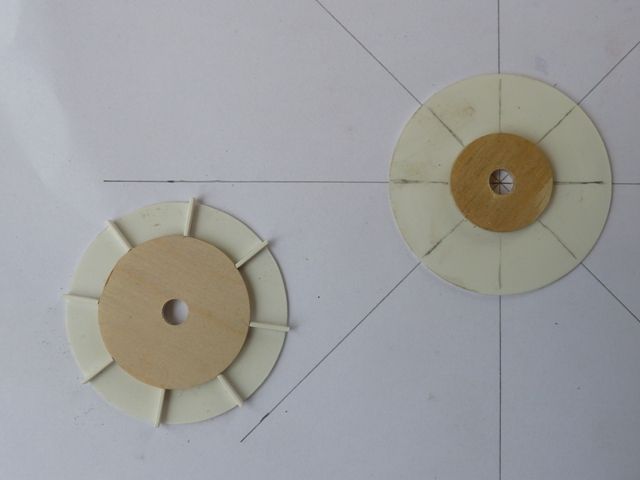
              The winch production line has been rolling this afternoon making the three drums required. I have found the easiest way to mark the sides to fit the stiffening ribs is to lay the side discs on a piece of paper on which 8 segments of a circle have been marked out.

              shemarah 321.jpg

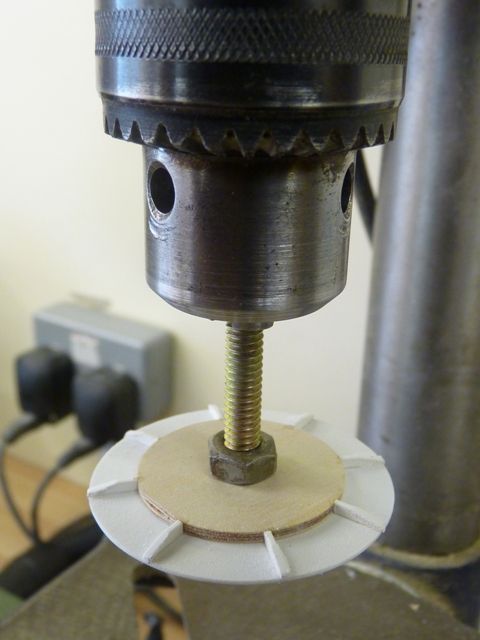
              The edges are trimmed and chamfered using a 6 mm bolt as a mandrel to hold the discs in my pillar drill while I hold a piece of abrasive paper fixed to a wooden block against the edge and side of the disc. Provided the stiffners are properly stuck on and you don't press too hard it works quite well.

              shemarah 322.jpg

              shemarah 320.jpg

              Here's the work in progress on the rest of the drums. I have increased the diameter of the plastic waste pipe that forms the inner cylinder as the original, although probably close to the right scale size, would have needed several hundred feet of cord wound on to represent a full drum of steel wire rope.

              Gareth

              #41026
              Gareth Jones
              Participant
                @garethjones79649

                Yesterday was winch drums, today its been the remaining sideplates and cross pieces to make up the other two frames. The two outer winches are handed and the centre one has the paying on gear mounted higher up so that the trawl warp can pass over the net drums which are between the winch and the pulley block which hangs from the centre of the rear gantry.

                shemarah 323.jpg

                If I have to make lots of parts the same size, I find its best to make them all and then lay them out together for comparison. There were about a dozen cross pieces to make, all 64 mm long and although I try and measure every one carefully its only when I lay them all side by side I find the odd one or two that are significantly different, usually too long. However a quick trim on the disc sander is an easy way to get them all the same length and the ends square. All the cross pieces locate with cocktail sticks fitting into 2 mm holes in the sideplates.

                Edited By Gareth Jones on 13/05/2013 18:07:37

                #41036
                LARRY WHETTON
                Participant
                  @larrywhetton68737

                  Hello Garath ,

                  Very nice disc cutting , what do you use ..?… ..Larry…

                  #41038
                  Gareth Jones
                  Participant
                    @garethjones79649

                    Hi Larry,

                    To make the discs :-

                    Draw the required size on a piece of ply using a compass and then roughly cut it out using a scroll saw.

                    Trim the edges close to the line using a disc sander which gives a nice square edge.

                    Drill a hole through the middle of the disc, preferably the final size required. You can use the impression made by the point of the compass to find the centre

                    Fit a suitably sized bolt through the hole with a nut and washer to clamp the disc up on the bolt

                    Fix the bolt in the chuck of a pillar drill and then sand the edge until its smooth, circular and the right diameter.

                    Depending on how many discs I need, I usually sand them all together in the pillar drill as its quicker and easier to keep the edge square and all the discs the same size. I have a range of blocks of wood with different grades of abrasive paper stapled to them so the paper is held flat against the edge of the disc. That way you can either get a nice sharp square corner or round it off if thats what you need.

                    You could use the same method with a hand drill if you have some way of holding it while sanding the discs.

                    Simples

                    Gareth

                    #41098
                    Gareth Jones
                    Participant
                      @garethjones79649

                      The las couple of days have been spend adding more bits on the winches. The bases have been painted in their top coat of Humbrol, Grey 64. The main frames are now complete with all the simulated bolt heads and filler plugs and have been given a coat of primer. The drums have also been primed.

                      shemarah 324.jpg

                      shemarah 325.jpg

                      All three brake drums have been made and primed although I have a couple of actuators to make yet. I dont have any photos showing this area clearly so I have had to improvise here.

                      shemarah 326.jpg

                      Still have to make another two sets of paying on gear and the final version of the gearboxes, hydraulic motors, pipes and control valves. Then on to painting and weathering of the whole assembly before I finally add the winch cables. I must remember to count up how many individual parts have gone into each winch – its a lot.

                      Gareth

                      #41241
                      Bob Abell 2
                      Participant
                        @bobabell2

                        Hi Gareth

                        Looking at your simulated crossed spiral thread………………Not really worthy of your normal build quality? I would suggest that three lengths of M4 screwed rod would look more realistic and businesslike for your splendid model

                        The preferred modern method of controlling the screwed shaft would be by a reversing motor and switches?

                        Just a suggestion

                        Bob

                        #41258
                        Gareth Jones
                        Participant
                          @garethjones79649

                          Hi Bob,

                          I agree the lead screw is not yet a very good representation of the real thing. However it is relatively easy to remove and fit a replacement by springing the sides of the winch apart. I am going to wait until the winches are complete and painted and see what the whole thing looks like at that stage. I have tried fitting a long 4 mm screw through one side of the winch (just to see the effect) and I think that looks worse. One of the features of the Trimline approach is that the grooves represented are actually proud of the shaft. A printed version on a flat sheet of paper might look better.

                          Making the winch fully operating would be a real engineering challenge, not beyond the ability of some of the modelling engineers who build fantastic replicas of real internal combustion engines and the like, but way beyond my ability. Perhaps when Shemarah is nominally finished I will look at improving some individual features. I have built in provision for a working anchor so that might be the first step. The winches are easily removable as the bases on which they will be fixed are just secured to the deck using brass pins. I think a small motor could be fitted inside the winch drum but getting a working paying on mechanism as well would be a real challenge.

                          At the moment I am mass producing the three sets of hydraulic motors, gearboxes and hydraulics. I have been trying various means of dying some cord to represent the wire rope on the winch and at the moment 1.5 mm cotton cord dyed using Colron wood dye looks the best, but slightly on the big side and 1 mm cord looked too small. I would normally have sent off to Keith Jewell at Modelling Timbers for a supply of an intermediate diameter cord but unfortunately he has been seriously ill, just at the point of a planned house move (to the Isle of Man I think). I hope that he makes a full recovery as I have found him to be very helpful in the past and he could supply all sorts of bits and pieces that are very difficult to get anywhere else.

                          I will have some more progress to report on Shemarah next week but this weekend I will be busy with a VMYG meeting and open day in Grimsby and our daughters birthday.

                          By the way Kim, I don't claim to be a Yottie, I am just the technical assistant on radios and sail winches to my wife who is a vintage Yottie. My reputation within Goole MBC could end up in tatters casting aspersions about my modelling inclinations, we have had major club civil war over smaller issues.

                          Gareth


                          Edited By Gareth Jones on 24/05/2013 09:13:41

                          #41321
                          Gareth Jones
                          Participant
                            @garethjones79649

                            All three winch gearboxes are now complete and primed so the only parts I have left to finish on them are two further sets of paying on gear and the final version of the lead screws, whatever form that might eventually take.

                            shemarah 327.jpg

                            I always have a forlorn hope that when I prime an assembled component the paint will fill all the joints between the details parts but of course the opposite is true, it just shows up all the gaps. You can see one of the two brass locating pins on the bottom of the winch base. At the moment thats all that holds them on the deck and the winch is just tacked on to the base with 4 spots of superglue. This will allow me to remove all the major bits from the deck when I am ready to give it a final coat of paint and weather it.

                            shemarah 328.jpg

                            Hopefully the winches will be complete in time for the Goole MBC open day this coming Sunday and the CADMA show the following weekend.

                            Gareth

                            #41323
                            LARRY WHETTON
                            Participant
                              @larrywhetton68737

                              Gareth,

                              Another fine scratch build . better than so called resin castings sold at silly prices ,

                              and to say i built that , is icing on the cake cheers Larrry..

                              #41366
                              Gareth Jones
                              Participant
                                @garethjones79649

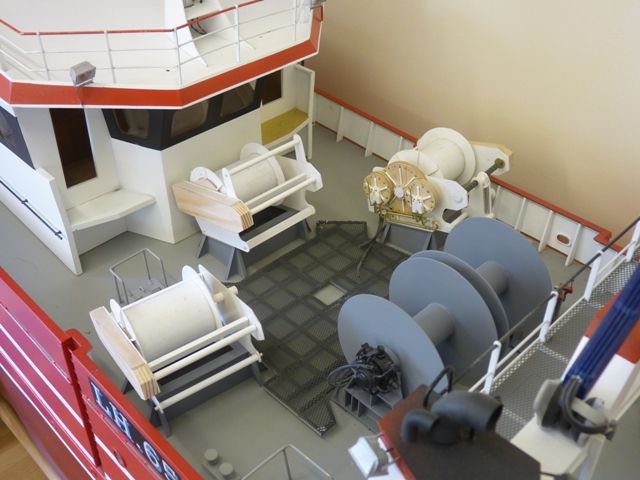
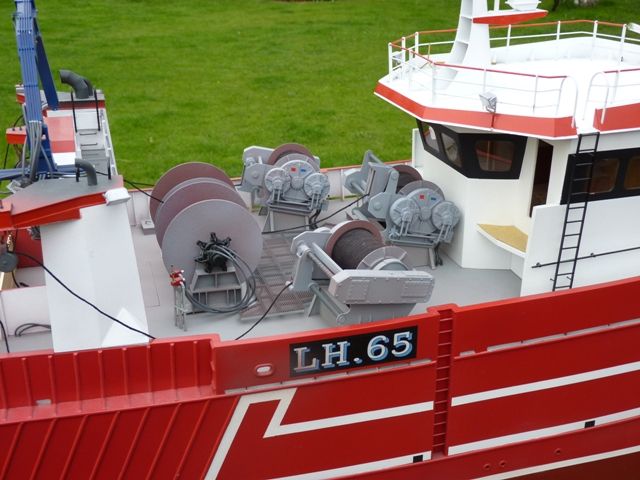
                                The main winches are finally just about finished, apart from the dreaded leadscrews. I have fitted one winch with the 'Trimline' version, the other two are just plain painted rods for now.

                                shemarah 329.jpg

                                shemarah 330.jpg

                                shemarah 331.jpg

                                The weathering/rust on the drums is not quite the right colour, its a bit too red at the moment but until I can find a suitable more orangey colour it will have to do. I have not really done anything but the winches on Shemarah over the last 6 months so it will be nice to move onto something different as the next job. I did very little while I was back at work so I guess I could have built the winches in about 6 weeks of 'normal' working.

                                My plan is to try and make the warp head winch and its platform and controls next and then move on to the front of Shemarah for a change and build the winch and the associated pulleys and ropes which control the position of the derrick used to offload the catch from the hatch forward of the wheel house.

                                This Sunday is the first Goole MBC open day so I hope to take some sailing photos as the weather forecast is quite good at the moment, unlike last years equivalent event which was washed out by torrential rain on the same day as the Jubillee Pageant on the Thames.

                                Gareth

                                #41367
                                Bob Abell 2
                                Participant
                                  @bobabell2

                                  Hi Gareth

                                  Your model is simply beautiful and splendid, the attention to detail is really awesome!

                                  It must be most off putting when you get a apathetic response from the members!

                                  Keep up the good work

                                  Hope to see you and a few others at Llandudno shortly

                                  Bob

                                  #41368
                                  Kimosubby Shipyards
                                  Participant
                                    @kimosubbyshipyards

                                    Hello Gareth,

                                    only just spotted your comment on the 24th May about only being a consultant etc. We can always think of you in the closet?

                                    I'll bring some 47 strand small diameter wire with me to Llandudno, it might do the winch wire. And yes, you are correct, Master keith Jewell has returned to us here on the Island, (not home as that's Peru and another story), and he's making good progress. I'm told once he's fully A1 he'll be back up and running the website, I'll keep you up to speed.

                                    And lastly I can but admire your work on this project, absolutely wonderful and I hoipe to see it one day in the flesh and on the water! You're not rumoured to be bringing it to N Wales are you?? [Thought I'd start that one for everyone.]

                                    See one and all at Llandudno, now to post some last pictures of that darn 36R!

                                    Happy sailing, Kim

                                    #41369
                                    LARRY WHETTON
                                    Participant
                                      @larrywhetton68737

                                      Gareth,

                                      as Bob as put in nut shell , building at its best,

                                      i have been mucking abouit with true rust, made with old brillo pads wich break down . into a fine rust powder , lighly aplide with brush and lite aplide thined down pva ,

                                      to effect spray with lite coat of clear spray to fix, try it on a bit of detail first , off model ,

                                      also ladies powder eye make up have good range of colors cablingcrabing line……

                                      Heres one i did earler…………………….looking forward to pool pictures………..Larry..

                                      dscf2098.jpg

                                      #41461
                                      Gareth Jones
                                      Participant
                                        @garethjones79649

                                        Hi Shemarah fans one and all, sorry to disappoint you but I did not take any photos of her in action last weekend at Goole. Quite a lot of time was taken up supervising our Springer have a go boats which were particularly popular in the good weather. However I did get one photo of Shemarah tied up in harbour. Since its so heavy it was easier to leave it on the pond all day rather than move it backwards and forwards from the table in the GMBC gazebo.
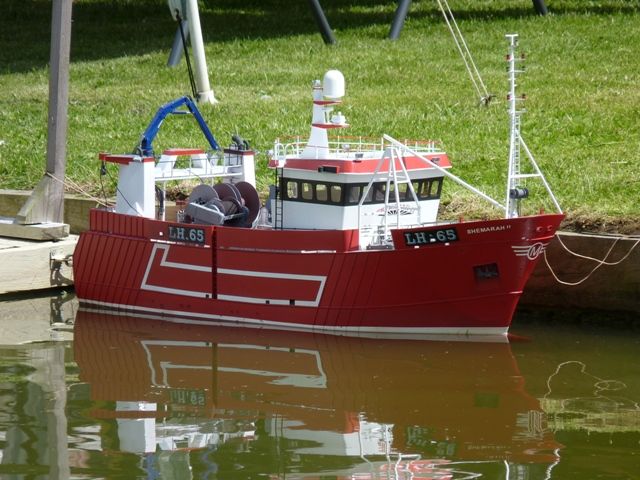
                                        shemarah 332.jpg

                                        I like the look of your rust Larry, very impressive. I see that it is now possible to buy some weathering powders for applying to models so I am going to try and get hold of some at the CADMA show this weekend. I dont think I will be making Shemarah look too old and uncared for, just nicely weathered.

                                        I dont think Shemarah will be making the trip to Llandudno. Since its primarily a Vintage Model Yacht Group event I think we will have a car full of them. At the moment Elizabeth is planning to bring her two vintage Marbleheads (one for vane sailing) and her newly completed 36R Razorbill. We will probably bring a Springer rescue boat which might just leave room for our narrow boat. We have recently been looking at vehicles to replace our Honda CRV and model boat transportation is a key performance factor. The most critical requirements are having a flat floor with the rear seats folded down and space to fit a 78 inch long sailbox, which goes up in the roof in the CRV, suspended from bungees across the grap handles. The best option so far seems to be a Toyota Verso.

                                        This week I have been making the warp head winch for Shemarah. The warping drums were made from two styrene discs mounted on a short length of 4 mm styrene tube. The discs are cut from 1 mm sheet using a suitably sized length of brass tube with a chamfer filed on one end to make a cutting edge. I have tried stamping them out using these tubes but I find its better to cut them by mounting the tube in the pillar drill and cutting down through the styrene on to a wooden block. The discs were then glued to the tube and the space between filled with P38. When this had set, a short length of brass rod was pushed into the tube, making a reasonably tight fit, so that the drum could then be sanded to the right shape in the pillar drill. Heres the finished example with both warping drums back to back on the brass rod which locates them in the winch.
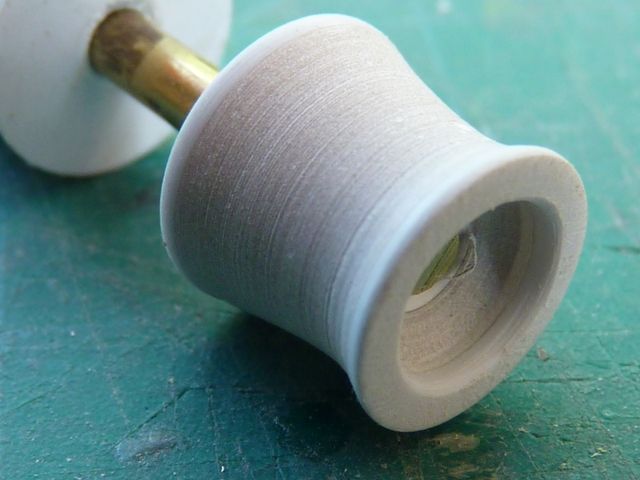
                                        shemarah 333.jpg

                                        The winch platform was built up from styrene sheet and locates in the deck using my traditional brass pins. The body of the winch was built up from a short pieces of wooden dowel, a short length of aluminium tube and assorted styrene bits and filler. A few photo etched brass nuts add to the effect.
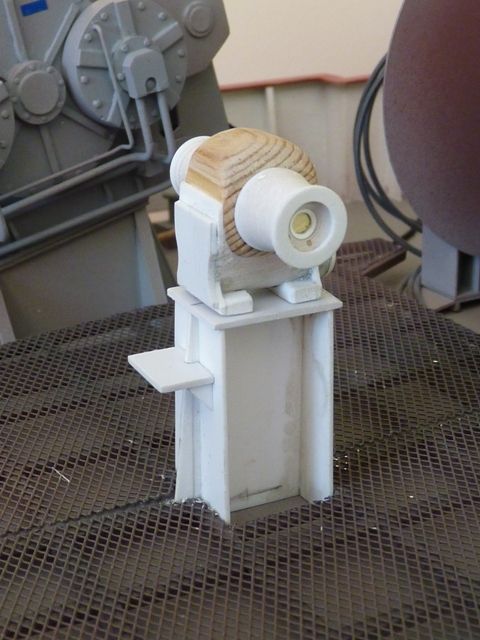
                                        shemarah 334.jpg

                                        The hydraulic control valves were added before painting. I do not have a good photo of the front face of the full sized assembly but the final version is quite realistic, if not completely representative.
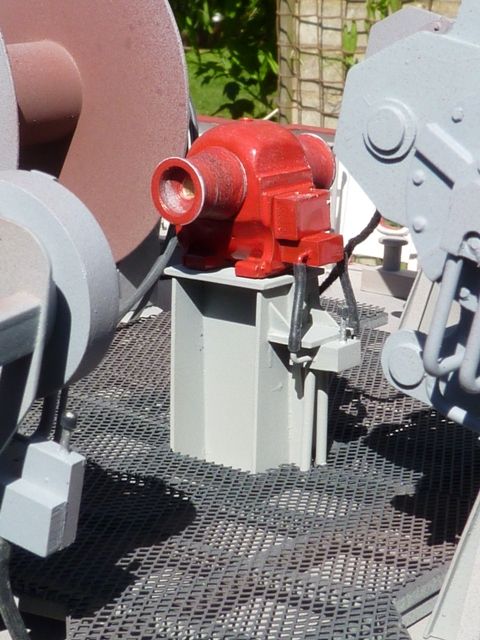
                                        shemarah 335.jpg.


                                        shemarah 336.jpg

                                        The next step is to move back to the front, so to speak, and I plan to make the deck pulleys for the A frame hoist, followed by the winch and rigging blocks for the derrick. This weekend we will be at the CADMA show in Doncaster so if you want a closer look, come and see Shemarah on the Goole MBC stand.

                                        Gareth

                                        Edited By Gareth Jones on 08/06/2013 07:50:44

                                        Edited By Gareth Jones on 08/06/2013 07:52:27

                                        #41791
                                        Gareth Jones
                                        Participant
                                          @garethjones79649

                                          The last week has been spent working on the front of Shemarah for a change. I have made the pulleys and sheaves for the A frame crane used to offload the catch. They are constructed from small pieces of styrene sheet with the pulleys being made the same way as the warping drums for the warp head winch. The wire rope is 1.0 mm cord dyed using Colron wood dye. I have found from past experience that you have to make sure this is really dry before you put it anywhere near a painted part or the solvent just eats into the paint.

                                          shemarah 337.jpg


                                          shemarah 338.jpg

                                          I have also been experimenting with Humbrol weathring powder and it looks to be quite effective at simulating rust, particularly on matt painted parts.

                                          shemarah 339.jpg

                                          I have begun to construct the pulley blocks for the derrick but this time I am cheating and using RB Models kits, although I have had to adapt some of them to make up double pulley blocks. One thing I have found difficult to come by are small shackles. The smallest I have found are about 7 mm long which would be a huge 7 inches at the scale of Shemarah. I really need something about half that size or less so I have been experimenting with making my own using 1/64 diameter brass wire.

                                          The wire is wrapped around a small brass pin which is inserted in a piece of sheet brass with a suitably sized, snug fitting hole drilled about 2.5 mm from the edge of the sheet. The edge of the brass sheet was rounded off to give the shape of the shackle and the sheet clamped in a vice to give a secure grip with both hands free. I have a pair of Xuron pliers with one flat blade tip and one round tip which are really effective for bending wire. I keep intending to buy a similar pair of cutters which allow you to snip off wires in really confined spaces.

                                          shemarah 340.jpg


                                          The ends of the wires are snipped off and then formed into the correct eye shape which is a bit fiddly but not too difficult, The brass pin is then snipped off at a suitable length and soldered into the shackle. Heres one on a millimeter scale rule.

                                          shemarah 341.jpg

                                          With a bit of practice I should be able to make up suitable shackles, even slightly smaller if necessary. It is not too difficult to solder in the pin in situ when using the shackle to join two pulley blocks or similar components, as there will no doubt be on the fishing gear. I dont plan on threading the pins though.

                                          Gareth

                                          #41792
                                          ARTHUR COLLETT
                                          Participant
                                            @arthurcollett48040

                                            Hi Gareth

                                            Nice little shackle. hopefully not dropping it down that black hole on the floor as one of the forum contributors (cannot remember who) previously posted about. I made a 1;50th scale outboard prop for a rubber duck. Was so proud of the achievement and while admiring it to drop it down that black hole never to be found. Needles to say. I had to redo it.

                                            Always a pleasure to view your new postings and ideas.

                                            Regards

                                            Arthur

                                            #41794
                                            Gareth Jones
                                            Participant
                                              @garethjones79649

                                              Funny you should say that Arthur, I had to sweep the floor to find it just before I took the photo. I have just had a tidy up and found a pulley block I had lost. I think the spiders go round at night collecting interesting looking bits which are never to be seen again.

                                              Gareth

                                              #41849
                                              Gareth Jones
                                              Participant
                                                @garethjones79649

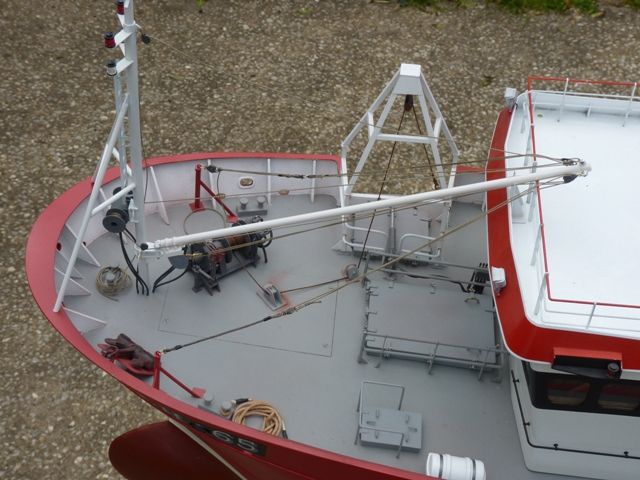
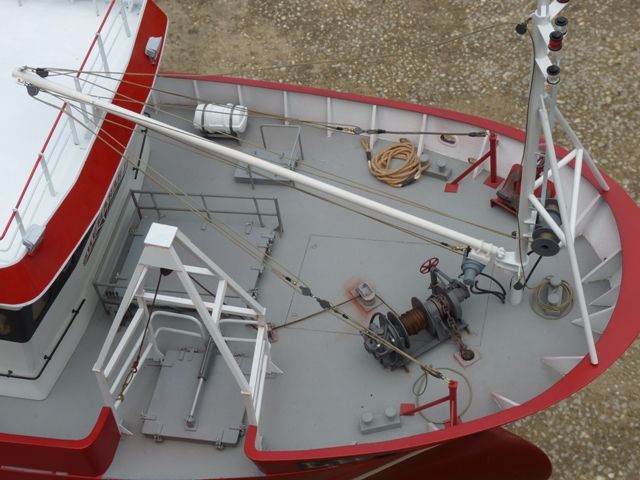
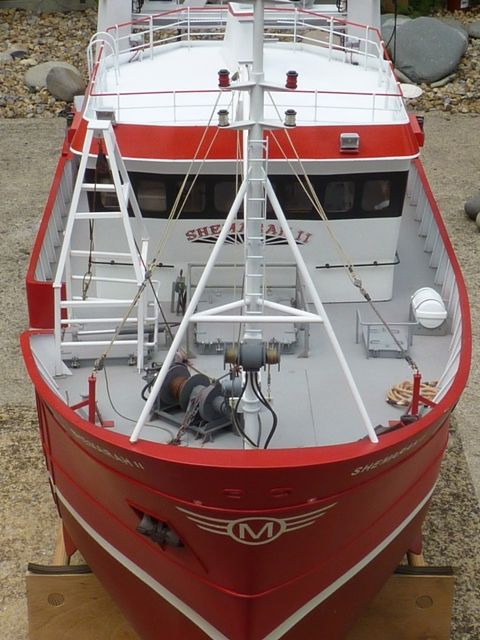
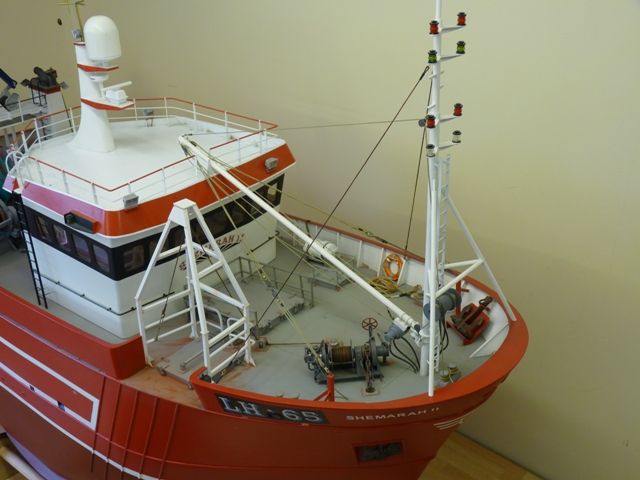
                                                The shackles are all made now, although I have only fixed the pins in with a drop of superglue rather than solder. The derrick rigging is complete thanks to Kim Holland who provided me with some green Durox wax thread which is just the right appearance to simulate the ropes. I need to do a bit of touching up on the brass bits here and there but overall it looks pretty good.

                                                shemarah 342.jpg

                                                shemarah 343.jpg

                                                shemarah 344.jpg

                                                The next step is to fix the lifebelt to the port side, just behind the spare anchor, add the wire stays for the mast, install several ventilators along the port side and an additional hydraulic control panel on the stbd side and the area forward of the wheel house will be complete. (unless I think of anything else I have missed off)

                                                #41916
                                                Gareth Jones
                                                Participant
                                                  @garethjones79649

                                                  I have now added the lifebelt on the port side. Quite a quick job as I made all 4 lifebelts some time ago so I just had two little metal hooks to make from thin brass strip, paint them white and stick them on.

                                                  shemarah 345.jpg

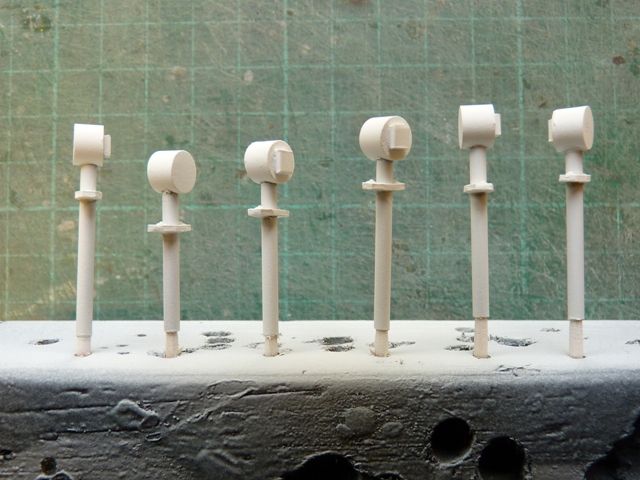
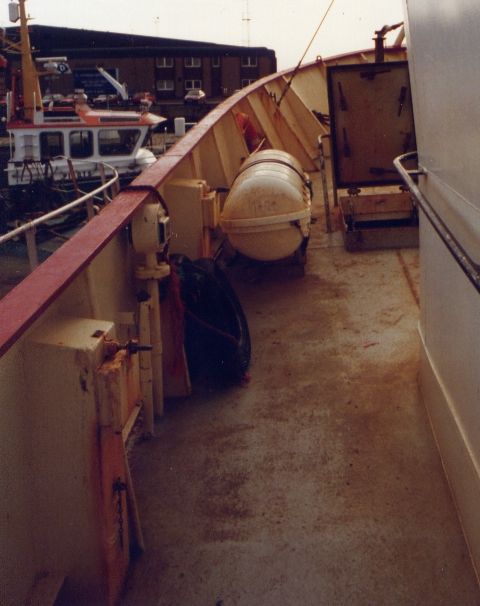
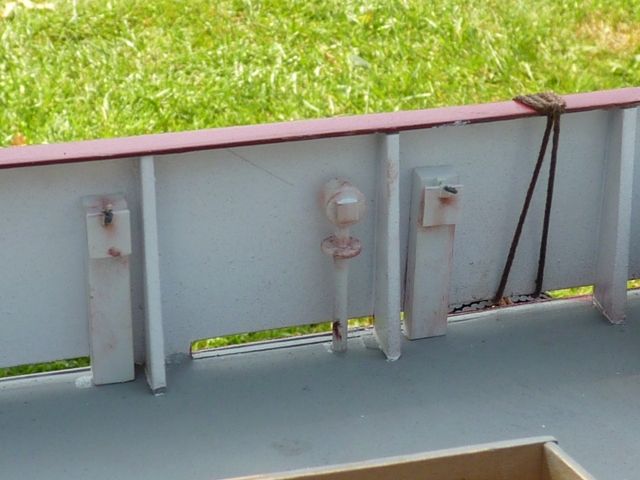
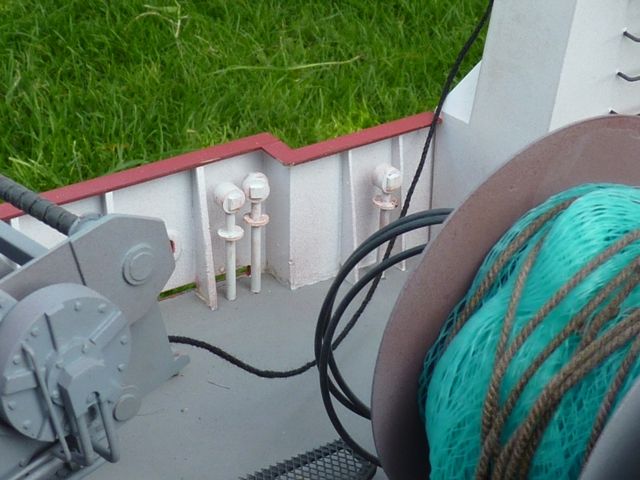
                                                  I next made two prototype ventilators. Most of the vents fitted to Shemarah fall into two distinct types, rectangular ones which I think are compartment vents and circular ones which I think are tank vents.

                                                  shemarah 346.jpg


                                                  All the tank vents have a flange in the pipe, a few inches below the outlet. I dont know what this is, perhaps it houses a screen to prevent debris falling down the vent into the tank or it could be a flame arrester to prevent any flammable gases flashing back to the tank if they get ignited. Maybe some marine engineering expert could enlighten us.

                                                  The production line for the tank vents has been in full swing and I have made all 6 required. Tomorrow it will probably be the remaining rectangular ones and one or two others which are slightly different design.

                                                  shemarah 347.jpg

                                                  All the circular vents will be attached using cocktail sticks into a 2 mm hole in the deck. The rectanguar ones all fit flush with the side of the bulwarks and can just be glued on in the appropriate position.

                                                  Gareth

                                                  #41953
                                                  Kimosubby Shipyards
                                                  Participant
                                                    @kimosubbyshipyards

                                                    Hi Gareth,

                                                    that Durox thread looks the business and seems to lay down nicely too. Glad I could help.

                                                    Flash back arresters usually have a small toggle arm so they can be reset if tripped (and safe). Is the flange not just the join so that the ends can be replaced? The only vents I'm familiar with all had a 180' bend in the top end, and where needed, a small ball in a cage to bung the hole if swamped.

                                                    PM in the stack for you too.

                                                    Kim.

                                                    #42345
                                                    Gareth Jones
                                                    Participant
                                                      @garethjones79649

                                                      Hi Kim and others,

                                                      While on the topic of vents, attached is a picture of one of the circular vents on the real Shemarah. It was one of the photos taken by Jim Pottinger for the original article in Model Boats magazine which inspired me to build the model. You can see the connecting flange a few inches below the top of the vent but what its for is a bit of a mystery.

                                                      shemarah 348.jpg

                                                      The front of Shemarah is now complete apart from a bit of weathering and painting to do. All the bits have now been fitted including the additional hydraulic panel which I guess operates the hoist on the A frame.


                                                      shemarah 349.jpg

                                                      The ventilators on the port side

                                                      shemarah 350.jpg

                                                      …. the shrouds that brace the mast.

                                                      shemarah 351.jpg

                                                      and I have added the group of three ventilators on the starboard side rear and two on the port side rear. The net drums have also aquired the first attempt at some trawl netting and associated ropes.

                                                      shemarah 352.jpg

                                                      Its now the height of the model boat club regatta season and I have been taking Shemarah around on a few trips. I had always planned to make a trolley to transport it from the car to the waterside and have been contemplating various options including converted prams, wheelchairs, garden trollies and fishing trollies. Whatever solution I adopted had to collapse down to as small a space as possible as our car gets packed with boats once you get Shemarah and few of my wife's yachts inside. In the end I decided to make a purpose designed 2 wheel trolley. I have included some additional pictures on a separate thread but here is Shemarah trying it out.

                                                      shemarah 353.jpg


                                                      The next tasks are the fishing gear including the trawl doors, clump and bridles which will pretty well complete the back end of the model, leaving only the wheel house to finish. However there is probably enough to do on that to keep me busy till the end of the year.

                                                      The last week has been spent on a top secret family project which will be going for pond trials on Friday and will be revealed in due course (Paul Freshney permitting of course)

                                                      Gareth

                                                    Viewing 25 posts - 276 through 300 (of 371 total)
                                                    • Please log in to reply to this topic. Registering is free and easy using the links on the menu at the top of this page.

                                                    Code of conduct | Forum Help/FAQs

                                                    Advert

                                                    Latest Replies

                                                    Home Forums Scratch build Topics

                                                    Viewing 25 topics - 1 through 25 (of 25 total)
                                                    Viewing 25 topics - 1 through 25 (of 25 total)

                                                    View full reply list.

                                                    Advert

                                                    Newsletter Sign-up