My Goblin

Advert

My Goblin

Home Forums Beginners My Goblin

  • This topic is empty.
Viewing 14 posts - 26 through 39 (of 39 total)
  • Author
    Posts
  • #42632
    Andy C
    Participant
      @andyc56856

      Long over due, but the Goblin had it's first outing on proper water today. We were spending the morning climbing and zip lining in Tilgate park down in Crawley. Tigate park also has a very large lake that is used by an adventure company for all sorts of boating, so I thought it would be a great place for first sea trials. Well, what can I say. The wind was up, so I thought it should sail nicely. She did!!!

      I was amazed. There were some dead spots by the shore, under some trees where she became a bit stuck. No problem, crank up the motor and she was back in the wind. Battery was good, using a lipo at 7.2 v, so had a good sail about.

      Second time out I decided to yighten the sails a bit and see if she would speed up. Really bad idea, she sailed out to the middle of the lake, and would not respond very well to the tiller. I really struggled to get her back, even using the motor, but she returned eventually. When lifted from the water i noticed why she struggled under electric power, the prop had fallen off. I had thought I had screwed it on tight enough, but obviously not.

      Can anyone suggest a way of giving more rudder movement, maybe longer servo arms or something?

      Also, what did I do wrong with the prop? It is is a M4 screw threaded item.

      Any ideas appreciated.

      regards Andy

      Advert
      #42633
      Malcolm Frary
      Participant
        @malcolmfrary95515

        Prop – use a locknut, tighten the locknut against the prop so that they are at the same time pushing against each other and the shaft thread. A dab of thread sealant helps as well. Make sure that there is a washer or two between the locknut and the face of the propshaft. Going forward, usually the prop tries to tighten itself. In reverse, Newtons observation about equal and opposite forces applies. The prop tries to wind itself off.

        Steering – If the tiller arm and the servo arm are the same length, you have the ideal rudder throw. If the servo arm is shorter that the tiller arm, go for matching holes. If longer, you have a good chance of toggling over and latching. Amusing or embarrasing, depending on whose boat it is. Under sail conditions, it does need more rudder area than a power boat at low speed, but with stronger wind the balance between fore and main sails becomes the critical factor. It can easily overcome any rudder, with whatever travel is available. To this end, keeping the sails their intended shape is vital.

        Basic sail tuning is to ensure that the sail leading edges are straight, that there is a slight curve to the leech and foot to allow an aerofoil shape, and that the outer end of the booms cannot lift when the wind blows. And everything needs to pivot freely.

        #42638
        ashley needham
        Participant
          @ashleyneedham69188

          Andy. Looking good! Excellent effort. As Malcolm says, sailing boats usually need more rudder area. If you were, by the looks of it, using a fairly common commercial rudder, you could easily just go up a size assuming you are not on the largest already!

          Missed your earlier post regarding soldering capacitors to motor casings.. I normally just put one across the two terminals. If you are really struggling with interference (not in your case) then there is the option of adding case/terminal capacitors.

          Painting, and everyone has their preference, I would not bother with special marine paints. A few coats of EzE-Cote to seal the hull and ordinary undercoat and a splash of Humbrol on top does it for me, considering how much time these things actually spend in the water.

          As you have discovered, Epoxy is very hard when it comes to sanding. My usual method for proshafts is to hold in the desired place, fix with a few spots of superglue, and when held firm, run epoxy around the shaft. Leave the epoxy LOW on the outside so you can use filler (P38 sands so much easier) or alternatively just use P38 to fix.

          There is a special light filler for balsa that is very handy. It dries quickly and is very soft, ideal for grain filling and all those small jobs. I bought some to use on the styrofoam things I have been making, but it does a good job elsewhere, if sealed to harden it up after.

          Whats next, eh??

          Ashley

          #42642
          Malcolm Frary
          Participant
            @malcolmfrary95515

            Enlarging the rudder can be as simple as laminating a sheet of wood each side to the desired size and sanding to a nice shape before painting. Longer can be helpful – when a yacht gets a good lean on, still having some rudder in the water helps a lot, even if it is only acting as an elevator.

            #42645
            LARRY WHETTON
            Participant
              @larrywhetton68737

              Hello Andy,

              Nice to see now on the water, sounds like a eventfull first sail was bit puzzled about motor and sail mix so i pulled my copy of drawing of Goblin , shows no sail control ,

              so you are fighting the elements, with now sail control , and as for prop loss a lock nut and a bit of lock tight will cure that , rudder is to small , so laminate ply on ether side increase at least twice side , and sail on calm conditiones,

              and i would try and sail control you are carrying a lot sail for motor sailer,

              try and post a picure next time you sail, it will help but dont be downhearted it a good start ,

              i am sure there will a lot help here , if you require with sail control there is a load of info on the web and you have a lot room in hull to install it, hope this helps cheers Larry…..

              #42666
              Andy C
              Participant
                @andyc56856

                Hi All

                Thanks for the great advise. I will certainly add a lock nut to the new prop and some lock tight too. As for the rudder, I will have a go at making it bigger and I think longer as well.

                There is no sail control as this is supposed to be an easy build model for 2 channel control. I think my problem was the sail lines were too short for the stronger wind conditions. i will have another go and add some photos too.

                It might be ahile though as I don't get much lake time. Wewere in Crawley for Go-Ape so seemed like the ideal opportunity to give her a go. I will keep you informed as to my progress.

                My next model will be the Solent Hovercraft again. I dismantled the first one and I am rebuilding it from scratch. this time it will be powered by brushliess jobby and a better prop. I will up date my hovercraft thread with updates,

                Cheers Andy

                #42752
                Andy C
                Participant
                  @andyc56856

                  Hi All

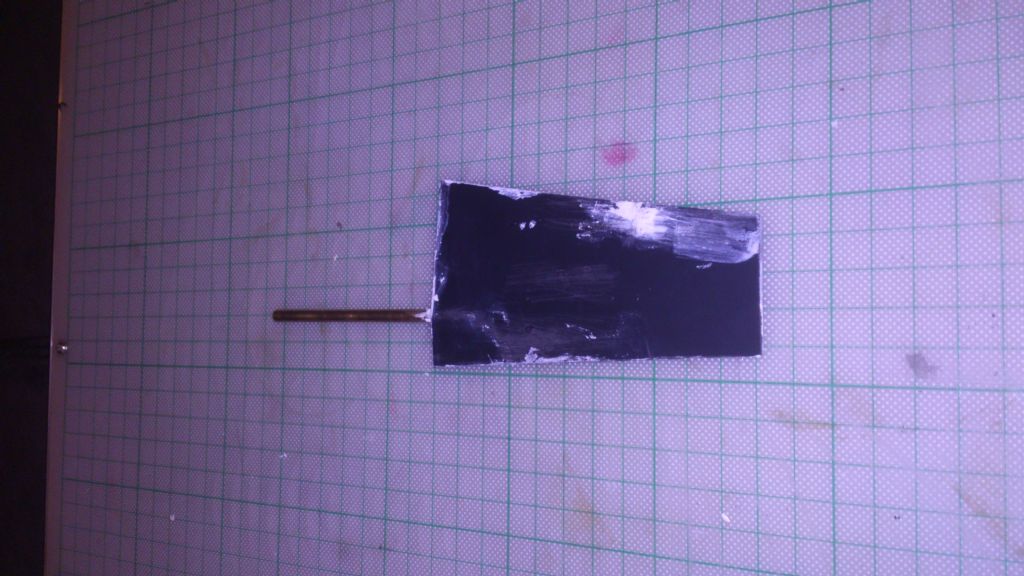
                  I had a go at enlarging the rudder for the Goblin.

                  Enlarged Rudder

                  For this I actually used some plastic card that I am using to rebuild the Hovercraft. I used the outline of the original rudder and enlarged by 1cm each side a about 5-6cm longer. Unfortunately the glue had dried and I was cleaning up the edges the knife slipped and now I have had to fill the small cut out. I have also used milliput (for the first time) to fill the top edge around the shaft.

                  I need to finish cleaning it up and then seal and paint. Will post the final outcome later.

                  Regards

                  Andy

                  #58819
                  Andy C
                  Participant
                    @andyc56856

                    Well, I can't believe it has been quite so long since I last posted an update on the Goblin.

                    After her outing to the pond the other week, it was clearly time for an upgrade. The sails were woefully inadequate and the wrong shape. Can't blame them really, they were made from a five year old slightly mouldy looking umbrella. First stop the umbrella shop, otherwise known as poundland. Would you believe it, none in stock. Just cause it is the middle of June, you would think they would have a few. So off to the next best place, Sports Direct. Luck would have it a nice bright white one from Dunlop. Five quid, blimey that's steep, but bought it anyway.

                    Back home, check the plans, made some calculations, drew a template on paper. Added a bit extra on a couple of sides, to allow for rolling the mast in and Bob's yer uncle a new mast & sail complete with Dunlop emblem. Pic to follow. Now for the smaller front sail, gib??! Strung up, looking good.

                    On to the paint job. Isobel and I had made a visit to the rattle can outlet, bought some grey primer and a lovely shade of

                    Turquoise.

                    I know, sounds odd, but that was what she wanted and who am I to argue with a ten year old.

                    So fast forward a few days and the primer is on. Now here is where I come unstuck.

                    How to prepare for the top coat. How much rubbing down,smoothing etc. does she now need. I have a variety of wet n dry, but how high do you go? 1500, 2000?

                    Any advice greatly received for the next round of renovation.

                    Cheers

                    Andy


                    Edited By Andy C on 28/06/2015 23:30:01

                    #58822
                    Dave Milbourn
                    Participant
                      @davemilbourn48782

                      Just an addendum to this thread:-

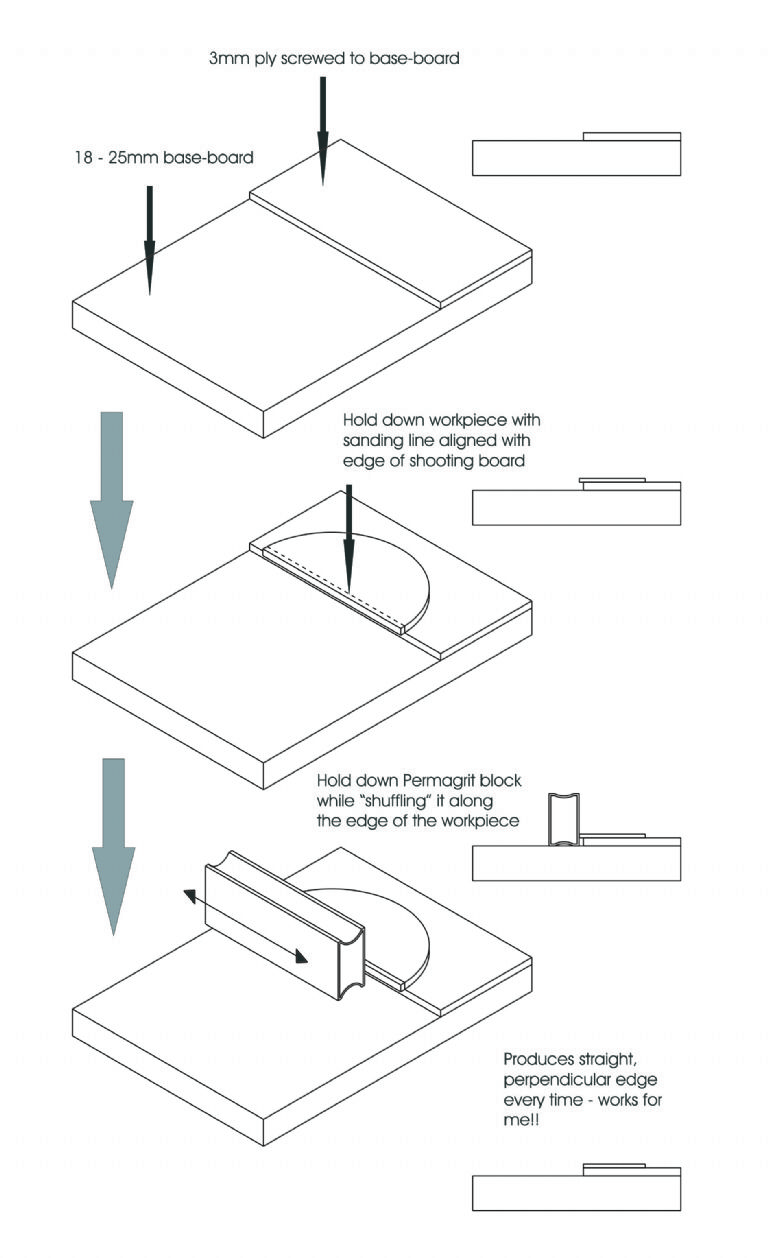
                      For squaring edges I've used this method for a long time now:

                      shooting board.jpg

                      Dave M


                      Edited By Dave Milbourn on 29/06/2015 08:28:08

                      #58827
                      Andy C
                      Participant
                        @andyc56856

                        Hi Dave

                        thank you for sharing, this will come in really handy. Easy to make too.

                        Andy

                        #58981
                        Andy C
                        Participant
                          @andyc56856

                          Well, after searching here at MB headquarters and a couple of back issues, I decided to use 600 grit wet n dry. Bad idea, too coarse. In some places it rubbed through to the white coat underneath. Not everywhere, so assume it must have been some high spots. Tried 800 grit W n D on the canin with a bit more success. Ran out of the primer, they don't seem to last long, unless I was a bit heavy handed with the couple of coats I put on. Off to Halfords to buy another one. Bought a bigger can this time, lighter coats and covered nicely. Now will rub down with 1200 grit W n D and hope it does not go through the layer again.

                          Andy.

                          #58984
                          ashley needham
                          Participant
                            @ashleyneedham69188

                            Andy. The whole point of the first coats of undercoat/primer is that you DO rub most of it off. Its purpose in life is as a filler to fill the grain and show you where there are issues.

                            On a toddy balsa craft and with thin spray primer I think probably 1200 is the roughest to use.

                            If you are sanding evenly and there are high spots that go through, well, there are obviously areas that need re-doing.

                            Doing this veneering/varnishing lark lately, the first three coats of varnish were almost sanded completely away. I ended up with bare veneer after three coats. It was only after this that the coats built up. Same with paint, certainly the first two coats of primer can be sanded away almost completely, before going on to the top coat. If using rattle cans, the first topcoat should really cover with a good finish, and this shows that the prep has been good. Topcoats should not need any attention if spraying (barring the odd run….curses!!!)

                            Ashley

                            Ashley

                            #58987
                            Andy C
                            Participant
                              @andyc56856

                              Thanks Ashley. I am on the right track then. Need to finish this one off so can concentrate on the little Triton. Another new technique for me there too. Using tissue and dope. Ah well, leaning is good.

                              Andy

                              #59021
                              ashley needham
                              Participant
                                @ashleyneedham69188

                                Not a fan of tissue and dope, as although this gives some protection, it is not hard by any means.

                                To be honest, even glass tissue and Eze-Cote is not HARD. BUT glass and resin may be overboard for a small EZE type craft.

                                In the spirit of thgings (and I am sure Dodgy would approve) simply paint will do…household undercoat and a splash of Humbrol enamel.

                                Ashley

                              Viewing 14 posts - 26 through 39 (of 39 total)
                              • Please log in to reply to this topic. Registering is free and easy using the links on the menu at the top of this page.

                              Code of conduct | Forum Help/FAQs

                              Advert

                              Latest Replies

                              Home Forums Beginners Topics

                              Viewing 25 topics - 1 through 25 (of 25 total)
                              Viewing 25 topics - 1 through 25 (of 25 total)

                              View full reply list.

                              Advert

                              Newsletter Sign-up