Help required for building Billings Bluenose II “600”

Advert

Help required for building Billings Bluenose II “600”

Home Forums Beginners Help required for building Billings Bluenose II “600”

  • This topic is empty.
Viewing 25 posts - 76 through 100 (of 135 total)
  • Author
    Posts
  • #75814
    John Arnold 3
    Participant
      @johnarnold3

      Well that wasn't very fruitful.

      I searched through all the other instruction manuals for placement of the 41 eye bolts. In the instruction manual I can find 16 in the 'cabin' roof (to create a 'grab rail&#39, 8 on the bowsprit (although only 4 seem to be used – the ones on the sides which should have a line to each side of the hull aren'r shown to be rigged), 5 on the foremast (although there are 4 others drawn in the diagram but not labeled). That makes 29. There appears to be another 5 on the main mast but not labeled even though there is rigging on them and 1 labeled at the end of the foresail boom so that totals 35 labeled and another 5 on the main mast not labeled.

      Now some of the rigging goes to the deck and would need to be secured by something so I assume eyebolts go there so maybe another 3.

      The rigging also goes to the booms and gaffs but if I count them in as requiring an eyebolt there would not be enough so I am assuming that the rigging is simply 'tied' to them without using an eyebolt?

      Also I can only assume that on this model there is not provision for rigging the bowsprit to either side of the hull near the rails even though it appears eyebolts are in the bowsprit.

      John

      Advert
      #75815
      Banjoman
      Participant
        @banjoman

        John,

        Right now just a comment on how to mark the waterline: in my example, too, one would use a pencil on a block to get a pencil line all around; otherwise, it becomes way too tricky.

        The way I do it is as follows:

        1. I paint a band around the general mid-hull area (where the waterline will be) white.
        2. Once the white paint is dry, I put on the pencil line using a pencil on a block. However, I set the block-and-pencil up so that the line sits maybe half a millimeter or so higher than the actual desired top edge of the finished waterline boot topping.
        3. I then add the masking tape just below the pencil line. That way, there are no pencil traces in the white paint that will show, and the pencil marks will disappear neatly under the black top coat above the waterline.

        The Trimline to which I linked is a form of pin stripe tape, so if you have access to some other brand, that is most certainly an option!

        Mattias

        #75817
        John Arnold 3
        Participant
          @johnarnold3

          Aha! Yes a pencil line above. It does though concern me that I could get 'bleeding' under the masking tape and I would need to mask twice, once for the top (black) and once for the bottom (hull red).

          I might though order some trimline from Cornwall Model Boats as I can't source any here in Australia and the smallest pinstripe for motor vehicles I can find is 3mm wide and it could be thicker than the ones for model boats.

          Getting back to the coverage of model acrylic paint. I remember your experiments for me (thanks again) but I was thinking that model acrylic paint would cover similar to house paint so based my measurements on 16 square metres per litre of paint. Model acrylic appears to cover much more.

          John

          #75818
          Colin Bishop
          Moderator
            @colinbishop34627

            I have used Trimline on several models successfully, it does make things easier around the waterline. It will accommodate curves very well but don't try to stretch it too much.

            Colin

            #75819
            Tim Cooper
            Participant
              @timcooper90034

              John

              Like Colin I have used Trimline on most of my models, I find that it' s very easy to use and there are 9 or 10 different widths on each roll. The ones not used on the waterline have been used for different things window frames, step edges on a lifeboat etc. Just used some white, Orange and yellow to decorate a Lego mini figure stand for a grandsons birthday.

              On the Vallejo paint I have just had some bottles delivered to paint a Schnellboot crew, my normal paint for crew would be Games Workshop acrylics. Interesting to see if I find a difference between the two paints.

              Tim

              #75828
              John Arnold 3
              Participant
                @johnarnold3

                Thanks Colin and Tim,

                Just how far will Trimline stretch around bends. For example were you able to apply it in a single piece or did you cut and join it at the bow and also around the transom?

                I am very happy with the Vallejo Primer I used. I applied it using a number 10 flat brush on the hull and it flowed off the brush very easily.

                John

                #75829
                Tim Cooper
                Participant
                  @timcooper90034

                  John

                  I have applied the Trimline to the sides first cutting at the bow and stern, then a piece across the stern. Trying not to stretch it as it seems to relax after a few days and you can get a small gap.

                  Tim

                  #75837
                  John Arnold 3
                  Participant
                    @johnarnold3

                    Thanks Tim for the warning on the trimline sometimes relaxing/contracting.

                    John

                    #75838
                    Ray Wood 3
                    Participant
                      @raywood3

                      Hi John

                      Tamiya 3mm is good stuff, I've used it to create the waterline on Wild Duck, in this case the topsides white and antifouling red painted the tape removed pulling it back on it's self, and the line hand painted blue with a long haired brush, I guess at your scale 3mm is far to wide ?

                      Regards Raywd31.jpg

                      #75848
                      John Arnold 3
                      Participant
                        @johnarnold3

                        Thanks Ray,

                        Not sure if 3mm is too wide. That would equate to 300 (1 foot) wide on a real boat (1:100 scale). I will have to watch the videos of the real boat to try and ascertain how wide it is there. Maybe 2mm might be preferable but 3mm also may not out of place.

                        John

                        #75851
                        John Arnold 3
                        Participant
                          @johnarnold3

                          Later

                          After viewing videos of the real boat again especially one of it in dry dock I am convinced the 'water mark' is maybe 600mm wide at most and as such I will be happier to use 2mm trimline. These small scale boats are difficult in many ways.

                          John

                          #75885
                          John Arnold 3
                          Participant
                            @johnarnold3

                            Firstly just letting you know that I am now in the middle of painting the hull and deck fittings and structures.

                            I am look ahead at the rigging and trying to work out an easy way of 'splicing' the rigging lines. Maybe not the correct terminology but after the rigging line goes through an eye bolt and then back onto itself. Mattias covered this in his posts about building his MOONBEAM. I note that he used "0.10mm cotton thread" wrapped around the 'rope' and 'watered-down aliphatic resin' – firstly can I assume this is the same as the white woodworking glue? Now that looks to be a lot of very fine (and eye straining) work. Is there a way of not wrapping with the 0.1mm thread? MY model is scale 1:100 and I'm not that interested in authenticity of the 'joint' especially at scale 1:100.

                            Is it possible to just glue the 'joint' together? I am trying to visualise holding the two 'ropes' together as the glue dries.

                            Thanks

                            John

                            #75886
                            Colin Bishop
                            Moderator
                              @colinbishop34627

                              Just for the record, Aliphatic Resin Glue is not the same as white wood glue which is PVA and generally thicker. Aliphatic has a yellowish colour and is thinner.

                              If you can get the Aliphatic then you can glue the two lines together but you will also glue your fingers to them! If you can use superglue then that would be a better option as it will dry almost instantly. It will also help if you use a 'tail' which extends above the glued joint that you can snip off after it has dried.

                              Best to practice off the model first I think!

                              Colin

                              #75896
                              John Arnold 3
                              Participant
                                @johnarnold3

                                Thanks Colin for clearing that up (aliphatic resin glue). When Mattias (in his posts) mentioned "watered down aliphatic resin glue" all I could think of was pva glue which I know can be watered down.

                                The main problem I see is holding the lines together while the glue dries. Maybe using an extra thin thread (0.1mm) simply tied around the two lines with a single knot might work. Yes it mucks up the look but it may not be noticed adjacent to an eye bolt.

                                Edited By John Arnold 3 on 18/02/2018 20:41:33

                                #75902
                                John Arnold 3
                                Participant
                                  @johnarnold3

                                  Moving on.

                                  If I attempt to 'wrap' the 'jointed' rigging and use 0.1mm thread as Banjoman does on his Moonbeam model I note that Cornwall Model Boats sell this size in either "Rigging Thread 0.10mm Natural" or "Rigging Cord Natural Hemp 0.10mm". I am thinking the first one (thread) would be more suitable than the second (cord) even though the same diameter but seek the experts advice before I place an order.

                                  Thanks

                                  #75903
                                  Banjoman
                                  Participant
                                    @banjoman

                                    John,

                                    Sorry for not having reacted before, but once more I've been far away from my computer over the weekend, which was in the main nice and sunny here in Belgium, and thus perfect for pre-spring work  in the garden …

                                    Anyway, and first of all: at scale 1:100, I think it would actually look perfectly fine to just tie the rigging thread to the eyebolts with a simple knot …

                                    That said, if you want to try your hand at seizing/serving the standing ends with 0.1 mm thread, I'd say the most important aspect is to make sure that the rigging thread you are working on is set up reasonably taut. Not guitar string taut or anything like that, but sufficiently fixed that it doesn't twist as you wrap the serving around it. This sometimes calls for a bit of creativity, but can usually be achieved by letting the free end pass over something, say the crosstrees, or another spar, or part of the gunwhale, or a block of wood laid across the hull, or whatever works for the position in question (this is where the creativity comes in!) and then weighting down the free end with something not terribly heavy, say a small clamp or two. This will usually be enough to keep the line taut enough. Or the free end can be tied off on anything that comes to hand.

                                    You will of course also need to secure the loop taken through the eyebolt. If the strain is not to high, it might be sufficient to temporarily tape the short end to the long one a bit above where the short end will later be cut off; if, however, you find that the thread slips too much, start by tying off the 0.1 mm serving thread around both ends of the rigging thread with a clove hitch just above the deadeye. If you want to make double sure, use a sewing needle to first take it through both ends of the rigging thread before tying the double hitch.

                                    Once the loop has been secured and the free end set up reasonably taut as described, serve the joint by going around it with the 0.1 mm thread maybe ten times or so, and tie off with two simple hitches, and secure the whole thing with watered-down PVA glue.

                                    There's no particular need to use aliphatic resin (AR) if you already have PVA to hand. The reason I used the former was that it tends to be my go-to wood glue for model building, as it tends to sand better than PVA, and, importantly for r/c models, is more water resistant than PVA. Water resistance, however, is not of great importance on a static model …

                                    However, I do find it very useful to secure permanent knots of any kind with glue, either AR/PVA or (in some cases) thin CA,m as it stops them from working open and thus allows me to cut off any excess very close to the actual knot.

                                    Speaking of cutting off, after putting glue on the serving (I use a cheapo kids' water colour brush), keep the line under tension for another 20 to 30 minutes for the glue to go off before you release it or cut off any excess thread.

                                    Mattias


                                    Edited By Banjoman on 19/02/2018 08:32:10

                                    #75904
                                    Banjoman
                                    Participant
                                      @banjoman

                                      Oh, and I forgot to say that the 0.1 mm thread I use is most definitely the Caldercraft one: http://www.cornwallmodelboats.co.uk/acatalog/caldercraft_C82010N.html#SID=182

                                      Mattias

                                      Edited By Banjoman on 19/02/2018 08:33:42

                                      #75909
                                      John Arnold 3
                                      Participant
                                        @johnarnold3

                                        Thanks Mattias,

                                        Glad to learn that it has started to warm up in Belgium (I often wonder what happens to the poor little "boy" on the statue in Brussels when the water freezessurprise.

                                        It is still very hot where I am with average maximums around 35C.

                                        I think I will opt for a simple knot as the method you explained of 'wrapping' 0.10mm thread around the line sounds difficult and tedious especially when working with a 0.7mm line and possible twisting.

                                        By the way (for my knowledge) what is the "rigging CORD natural HEMP" mainly used for (instead of "rigging THREAD"?

                                        I still look in awe at the photos you published of the Moonbeam but of course it would not have been so fiddly as it is a larger scale.

                                        I think that I must be starting to "count rivets" as after noticing that the helm would be attached near the top of the helm pedestal I comparing the helm pedestal (I constructed from the laser cut ply) to the one on the real boat I realised that it is not tall enough and also the top was not angled back towards the deck nearly enough so I glued addition pine to the top and reshaped it. I must stop this 'nonsense' wink

                                        John


                                        Edited By John Arnold 3 on 19/02/2018 09:19:47

                                        #76173
                                        John Arnold 3
                                        Participant
                                          @johnarnold3

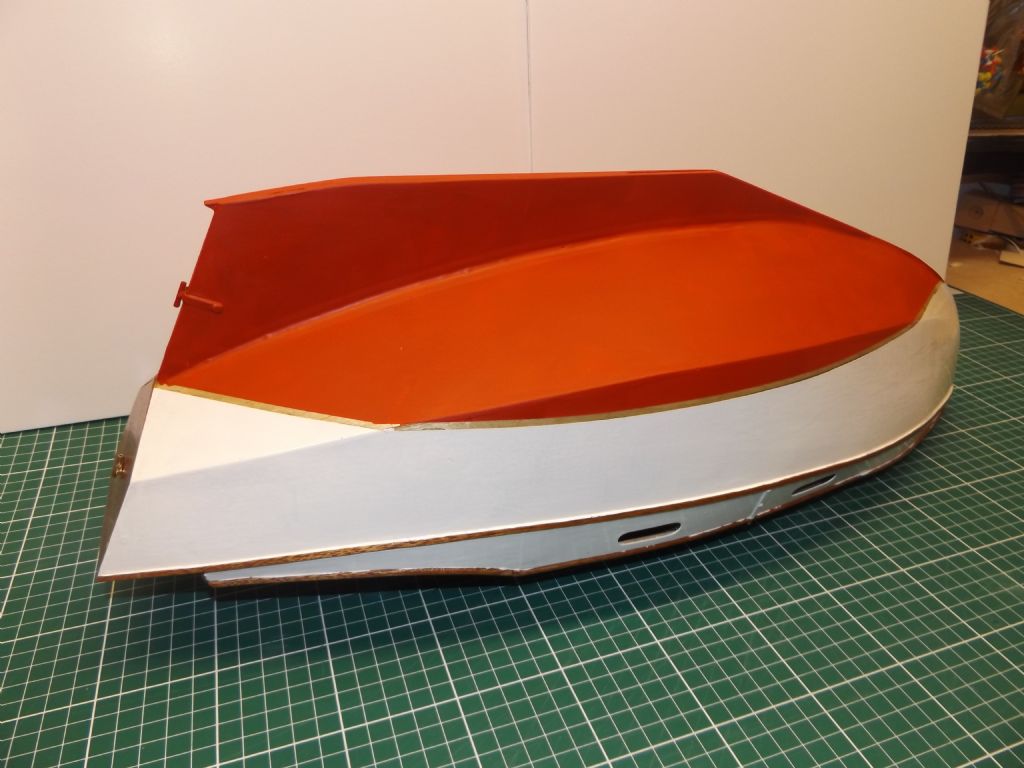
                                          Just a quick update on where I 'am'. Unfortunately I have not been able to spend much time on my boat for a while but now back 'into it' painting plastic parts and the hull at last (well just the area below the water line so far).

                                          I used AK Interactive AK731 RAL 8013 Schiffsbodenfarbe III Rot 5 17ml **LINK** which I thought more closely matched the colour I see in videos of the real boat. Note the colour shown in the link looks darker than how it looks on the model. I was very happy with the ease of use using a number 16 flat brush and the first (thin) coat went on very easily. I ended up giving it three coats even though it looked good after the second coat.

                                          I am now waiting for the paint to dry as much as possible before removing the masking tape (I looked back in this thread and it seems that the paint should be allowed to dry before removing any masking tape – correct?

                                          Once I finish painting and installing the deck structures I will take a photo and add to my 'gallery' before I start the rigging which I must say I am a little scared of not only to get the lines where they belong but also threading the lines through those very small holes in the deadeyes etc.

                                          John

                                          Edited By John Arnold 3 on 07/03/2018 22:21:15

                                          #76174
                                          John Arnold 3
                                          Participant
                                            @johnarnold3

                                            Wanted known – brush painting with areas masked off with masking tape.

                                            I have just removed the masking tape after applying acrylic paint to the bottom of the hull and found that paint has 'seeped' under the masking tape onto the other part of the hull (painted with primer) even though I pressed the masking tape down as firmly as I could. It happened more where the masking tape was 'folded' onto itself to allow for slight curvature. This is not a problem yet as I will be painting the area where it seeped onto with black acrylic paint BUT obviously I don't want the black paint seeping under the masking tape onto the bottom of the hull now painted with red/brown colour.

                                            Is there a best way/secret or whatever in brush painting acrylic paint to masking tape and getting any pain seeping under the masking tape? Try and paint with the brush as 'dry' (using as little paint as possible) even if that results in more coats needed?


                                            Lastly. If I want to make a brown coloured acrylic paint lighter will adding a small amount of white acrylic work (I am trying to imitate a wood colour on some of the plastic parts). Is it advisable? What about mixing different brands of paint.


                                            Thanks

                                            Edited By John Arnold 3 on 08/03/2018 04:27:46

                                            #76175
                                            Banjoman
                                            Participant
                                              @banjoman

                                              John,

                                              Glad to hear that progress is being made!

                                              The classic trick for at least making seeping paint slightly less likely is to "seal" the edge of the masking tape with a small amount of the previous paint, i.e. that pant that sits under the masking tape. In the instance you've just come out of, before applying the red/brown bottom paint, you would have painted along the tape with primer once or twice. Not thickly, just enough to as it were pre-seep with primer in any spots where that would be likely to happen.

                                              However, from your description, it sounds as though you will mask off the same line twice, once from above and once from below? In my opinion it would have been better to not bother with masking off for the bottom paint, but just to paint it on to a little bit higher than the actual water line, then to mark out the water line with a pencil on a block of wood and mask off along that line from below and finally to paint on the black topside colour.

                                              That way, you only have to mask off once; also you don't have to make the second masking match the first.

                                              If, as you describe it, you had to fold the masking tape in on itself to make it follow the curvature, it does, I'm afraid, sound to me as though you've used too wide a masking tape, which is rather an open invitation to seepage.

                                              What sort and width of tape did you use?

                                              Personally, when masking off waterlines, I prefer to do the actual edge with a 2 or 3 mm wide tape, as that will be flexible enough to follow the curvature while still lying perfectly flat. My preferred such narrow tapes I get from a place in the Netherlands called Airbrush Services Almere, where it is labelled as "washi microtape" but without any brand name (**LINK**).

                                              It would, I dare say, be a tad over the top to send off for these from The Netherlands all the way to Australia, not least because a quick dry-run through their webshop shows that the p&p would be around $35 (!), but if you'd like to try some, I'd be happy to reel off a meter or so of each width and send it to you.

                                              Anyway, when masking I will next build up the masked off area by a second round with 6 or 10 mm Tamiya tape, overlapping the washi, and sometimes add yet one more round of 18 mm Tamiya. If even more masking is required (it usually is when airbrush painting) I will use clingfilm and/or some other form of plastic sheet and/or a less expensive house painting masking tape. I never use newspapers for masking off in touch with a surface, as there's always a risk that the ink will smear.

                                              Finally, yes, you can make paint lighter by adding white, although it is not a straight-forward process; the (dark) art of mixing colours is still a bit of a mystery to me, but other options might include mixing with lighter browns (siennas for instance) or even yellow. The best way forward is to simply experiment!

                                              Mixing two brands of model acrylics should in principle be possible, although there may be incompatibilities, either between the mediums or the thinners used; however, I would be quite surprised if you had a problem mixing two different brands of water based model acrylics. Again, if you have the paints to hand: do a test piece! If you need to send off for one of the mix ingredients, I'd stick with the same brand just to be on the safe side.

                                              Mattias

                                              Edited By Banjoman on 08/03/2018 06:47:41

                                              #76176
                                              Banjoman
                                              Participant
                                                @banjoman

                                                Oh, and bye-the-bye, for making not wood look like wood at your scale of 1:100, a flat brown of a suitable hue will be absolutely adequate. At larger scales, though, I find that oil paints on top a flat brown or yellow make for very realistic wood effects; for an example, have a look at the bottom post on p. 30 of my Moonbeam thread (**LINK**) and on p. 31 (http://www.modelboats.co.uk/forums/postings.asp?th=115648&p=31).

                                                As I said, at scale 1:100 this would be more than over the top, and you will get a nice enough effect with just flat brown. If you really want to go to town, you could try dry-brushing either a darker brown on a lighter brown base or a lighter brown on a darker brown base. Dry-brushing means using a stiffish (usually flat) brush, dipping it lightly into the paint and then wiping off almost all of it again on some kitchen roll or similar before brushing or stippling miniscule amounts of paint on top of a base colour. For an example, have a look at how I did a verdi-grised bronze effect on the row-locks for the Eilean Mòr jolly boat: **LINK**. (That page, by the way, also has a further example of oil paint wood imitation).

                                                In any case, you won't need much dry-brushing at all on your very small blocks and similar parts to break up the too-even effect of a flat paint surface, and I think you'll find that it works a treat with model acrylics!

                                                Mattias

                                                Edited By Banjoman on 08/03/2018 07:03:52

                                                Edited By Banjoman on 08/03/2018 07:05:28

                                                #76179
                                                John Arnold 3
                                                Participant
                                                  @johnarnold3

                                                  Hi Mattias,

                                                  You are a star (don't blush). Firstly what a beautiful sailing boat you made (where you linked for making not wood look like wood) and what a great tutorial and pictures.I had found another web site which indeed showed a similar process using yellow paint covered by shades of brown but at 1:100 (as you point out) it is hardly worth the effort even though I have the roof of a deck structure which IS wood so could have stained and varnished it (actual size about 50mm x 39mm) BUT I also have small plastic parts to paint the same colour (eg frames of skylights and wow they are hard to paint even using a 5X magnifying glass). And I take your points re mixing paint. I will just need experiment a bit with small amounts as even these small 10ml and 17ml bottles contain way more than I could ever use. And to think I was concerned about how much paint to purchase for the hull – I used possibly less than 1/2 a 17ml bottle of paint for 3 coats below the water line which is the largest area I need to paint of one color!

                                                  I noted that you painted the belaying pins brown which I think I will also do even though they appear to be grey on the real boat. Brown will make them more noticable againisg the white rails many are in.

                                                  I take your suggestion of using a narrow masking tape to allow for curvature. The one I used is 23mm wide which was purchased from a hardware shop and is a special 'low tack' one designed to prevent pulling wanted paint off and also for allowing the tape to remain on the surface for an extended time before removal. The narrowest one they have is 18mm wide which is still too wide I think. I just found that the shop in Melbourne sell 6mm Tamiya masking take and also Tamiya "Masking Tape for Curves (Width: 2mm)". I will just have to mark time which I wait for it to arrive by post.

                                                  Also your tip to 'prepaint' along the edge of the tape using the same colour as what is being masked off before applying the colour I require is very sound. Yes I will be masking off twice. I considered just masking off the bottom of the hull to paint the top and not sure why I decided not to do it that way. I guess I didn't think of marking the water line AFTER painting the bottom of the hull.


                                                  I also would like to know if it is advisable to prewash the cloth supplied for the sails before sewing. I feel that you mentioned this a long time agi but I can't find the thread/post. I may have found someone to sew the lines (imitating the joins in a sail) and the edges. She does really great quilting using a sewing machine.

                                                  Thanks again

                                                  John


                                                  Edited By John Arnold 3 on 08/03/2018 10:20:18

                                                  Edited By John Arnold 3 on 08/03/2018 10:21:44

                                                  #76186
                                                  Banjoman
                                                  Participant
                                                    @banjoman

                                                    John,

                                                    'tis no use: I am blushing. You are much too kind, but warmest thanks nevertheless for your words of praise!

                                                    On a static model that is unlikely to ever get wet or need to have its suit of sails washed, I would say it is not necessary to pre-wash the material. You may have seen a mention of doing this is my Moonbeam thread, because I did indeed wash the cloth for her sails before using it. As that boat will go on the water, it makes sense to make sure the cloth is fully shrunk before its cut and sewn to size, but on a static model there's not really any need from that point of view.

                                                    The only reason I can think of would be if the cloth has been treated in any way, as cotton (I assume it is cotton) often is, with some sort of agent to help it stay smooth on the bolt. That may make it a tad less easy to handle for sewing, and would thus warrant being washed out.

                                                    That said, giving the cloth a wash and iron is neither difficult nor very time consuming, is it … ?!

                                                    I have never tried the 2 mm Tamiya tape myself, but given my excellent experience with Tamiya tapes in general, I'm sure you will find it to be the right thing for getting the masking line just so. I have always found their masking tape to be the best by several country miles for model work masking, with a perfect balance of amount of tack. The only time I have had paint come off with the tape was when I had painted on a piece of PVC tubing whose surface was so slick that the paint film had hardly stuck to it all.

                                                    Mattias

                                                    #76189
                                                    John Arnold 3
                                                    Participant
                                                      @johnarnold3

                                                      Thanks Mattias,

                                                      Re painting PVC tubing. If that is the same PVC as used in house guttering and downpipes I have always sanded the surface lightly to get rid of the very smooth surface and that seemed to give a good 'key' for painting.

                                                      Since my last post I have found that Humbrol have a matt acrylic (110) named 'natural wood' also (118) 'tan' looks ok.

                                                      John

                                                    Viewing 25 posts - 76 through 100 (of 135 total)
                                                    • Please log in to reply to this topic. Registering is free and easy using the links on the menu at the top of this page.

                                                    Code of conduct | Forum Help/FAQs

                                                    Advert

                                                    Latest Replies

                                                    Home Forums Beginners Topics

                                                    Viewing 25 topics - 1 through 25 (of 25 total)
                                                    Viewing 25 topics - 1 through 25 (of 25 total)

                                                    View full reply list.

                                                    Advert

                                                    Newsletter Sign-up