Help required for building Billings Bluenose II “600”

Advert

Help required for building Billings Bluenose II “600”

Home Forums Beginners Help required for building Billings Bluenose II “600”

  • This topic is empty.
Viewing 25 posts - 51 through 75 (of 135 total)
  • Author
    Posts
  • #75525
    Banjoman
    Participant
      @banjoman

      John,

      No, I don't have a 3D printer (yet); I dare say, one day one will be acquired, but it sits a pretty long way down on my wish list.

      The squares I've got are these (**LINK**) and these (**LINK**); as you can see, not exactly given away for free, but given how much I use them, I've never regretted buying them (Huh? As if I would ever regret buying a tool!), but for a one-off job of course way too expensive, especially if you managed to improvise one for free that did the trick for you!

      Exact final setting time for the 5 minute epoxy will vary a bit with brand and also with room temperature and humidity, but I'd expect it to be fully cured in somewhere between two and four hours. It should also be eminently sandable, so I would indeed suggest trying to remove any visible excess. Although it can be painted over, no worries, if there's a bump it'll show up as such under the paint. It's worth remembering that, unless you lay it on with a trowel (which would create its own set of issues), paint will not hide but usually highlight any unevenness or preparation fault in a surface.

      Mattias

      Advert
      #75532
      John Arnold 3
      Participant
        @johnarnold3

        Mattias,

        I should have been more specific about the epoxy resin glue. The 'extra' glue on the hull is only close and adjacent to where the chain plates are as a result of me having to reposition some of them after they initially made contact with the hull. I will though carefully sand those places.

        John

        Edited By John Arnold 3 on 02/02/2018 21:50:26

        #75534
        John Arnold 3
        Participant
          @johnarnold3

          Mattias

          I just looked at the web site for the place I purchased my pin vise.

          There are some cheaper set squares ) made of stainless steel) which might be worth considering. **LINK**

          John

          #75535
          Banjoman
          Participant
            @banjoman

            John,

            You are the one who (a) know how it looks, (b) decides on how much effort you want to put in and on how good it needs to look in your own eyes for (c) you to be happy with the result!

            Because in my view of things, that, in the end, is the only thing that counts: that you are happy with your build!

            As for the try squares, I’m sure they’ll do for the purpose; they are likely to be flatter, though (maybe 2 mm thick?) and so will have less of a surface against which to press things, but as I said, they should indeed do you well enough for much less money!

            I am not at home this weekend, and the phone is not as suited as the computer to posting so I won’t post much if at all today and tomorrow …

            Cheers,

            Mattias

            Edited By Banjoman on 03/02/2018 08:28:46

            #75538
            John Arnold 3
            Participant
              @johnarnold3

              Thanks Mattias,

              Yes I realise that it is I who I have to happy (and so far I am very pleased with what I have achieved).

              The question about the 'extra' epoxy resin was only to find out when to paint over and how to prepare which you advised.

              John

              #75563
              John Arnold 3
              Participant
                @johnarnold3

                I have just 'sized' the holes in the deadeyes (using the drill kit I purchased) and I think I will either one of those desk mounted large magnifying glass or those worn on the head (like a watchmaker) when threading the rigging. My wife has just started a jig saw puzzle so it will assist her too.

                The holes in the small dead eyes are 0.5mm diameter and in the larger deadeyes 0.7mm they are only about 2.5mm and 3.2mm in outside diameter respectively.

                Also the eye bolt 'stems' are only 0.45mm in diameter and 10mm long.

                I wonder how they manufacture such small parts? I also wonder how manufacturers of kits supplied parts such as hull ribs and parts to make the deck structures before laser cutting was available. I guess you know. Maybe the hobbyist had a lot more work to do?

                #75564
                John Arnold 3
                Participant
                  @johnarnold3

                  Sorry Mattias

                  I need more of your thoughts.

                  Placement of belaying pins (for securing lines of running rigging). The only place in either the instruction manual or plan where I can see where the belaying pins are fixed to the hull are next to the shrouds for the foremast.(5 each side – there are also 5 chain plates and associated deadeyes and rigging on each side). Obviously they usually go where the shrouds are and so there should be another 6 each side for the main mast (although not shown in the manual or plan). Are there any other places they are normally? I have 24 and if 5 and 6 each side that leaves 2 left over unless of course there should be 7 each side at the main mast.

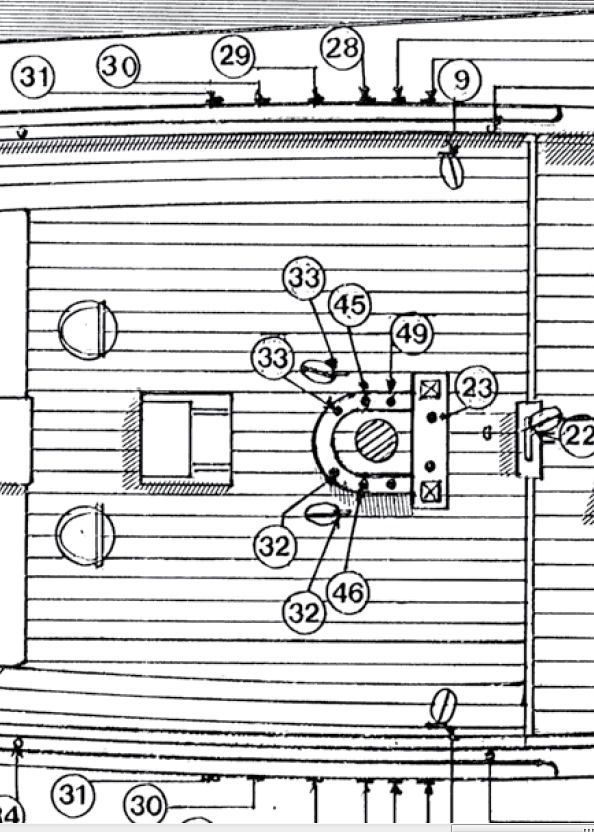
                  Also the part referred to in the other instruction manual as the 'horseshoe-shaped fife rail and bitt' and is mounted around the main mast is supplied as a plastic part with very small holes which I assume are for 'eye bolts'. So rigging would normally come to this point? See image below of the placement of the 'horseshoe-shaped fife rail" and note nothing about the belaying pins at this mast or the extra wood required to mount them on.

                  bluenose fife rail.jpg

                  This kit is TERRIBLE The plan for this kit dated 8-12-1986. Wouldn't you think Billings would have improved since then?

                  Every now and then I feel like throwing it away and then when you explain the missing information my interest picks up.

                  Thanks so much again.

                  John


                  Edited By John Arnold 3 on 04/02/2018 06:42:41

                  #75571
                  John Arnold 3
                  Participant
                    @johnarnold3

                    Sorry for yet another post.

                    It's regarding my previous post about placement of the belaying pins. I have been replaying a video of the real boat I downloaded from Youtube over and over to try and understand where they are and on the real boat I can only see belaying pins on the railing next to the foremast together with coils of rope hanging off many of them. In fact I see many more belaying pins than indicated on the plan. I have used this same video to help me understand lots of other things too.

                    Could it be that there are only belaying pins adjacent to the foremast and none at the main mast? Sorry I don't know how sailing boats are usually rigged.

                    I guess it doesn't really matter but I am trying to create this model as closely as possible to the real boat.

                    #75595
                    Banjoman
                    Participant
                      @banjoman

                      John,

                      A fife-rail is a rail for belaying pins, so the black dots in the "horseshoe-shaped fife-rail and bitts" on the plan represent belaying pins for the main mast! If you look again at page 1 of the plans, you can actually seem them drawn in as well, and likewise, they're visible in the photo on p. 22 of the building instructions.

                      In the photos of the real ship on this page (**LINK**), I also note two small belaying pins in the main chains on either side, although these are not shown on the kit plans or in the instructions. For the rest, these photos show more or less the same amount of belaying pins in more or less the same positions as in the kit.

                      In other words, it seems that the kit shows a total of 18 belaying pins: five in the chains either side of the foremast, and eight in the fife rail around the main mast. The number of belaying pins needed has nothing to do with the number of shrouds and stays (it is, I'd say, more coincidence that there are five of either each side of the foremast). Shrouds and stays are part of the standing rigging that is in principle never fixed to belaying pins. The latter are for running rigging only, and so their number will depend on the exact configuration of the running rigging.

                      And unfortunately, no: I am not very surprised at all that Billing Boats haven't improved their kit since the mid-1980's, as it fits with the not altogether positive image of them that I have had ever since a friend and I tried (and failed) to make sense of their instructions for a kit when we were in our early teens …

                      Although to be fair, there has been some improvement, even to Billing kits! back in the day before laser cut plywood, you would get the bulkheads and similar parts just printed onto a sheet of plywood, which you then had to cut out yourself with whatever means you had to hand.

                      As for blocks and deadeyes, in Billing kits they used to be injection-molded plastic; these days, I suspect that most such parts made from wood are CNC turned and or milled.

                      Mattias

                      #75596
                      John Arnold 3
                      Participant
                        @johnarnold3

                        Thanks Mattias,

                        I could not see the belaying pins in the image on page 1 but YES on page 22 I can just make them out – my eyes are not so good and that is why I have ordered a desk mounted illuminated 5X magnifying glass. That will make things a lot easier especially threading the deadeyes and wood blocks.

                        I had not seen those photos in the LINK you gave and can just make the pins out in one photos. I have accumulated lots of photos and videos of the real boat but none showed the fife rail.

                        The fife rail comes as a plastic piece in the kit 'predrilled' with holes which only appear to be large enough to mount eye bolts and not the belaying pins which have a much larger diameter. I think that is what confused me (together with not seeing them on page 22).

                        I was talking with a friend today and mentioned my boat and he asked was it a Billings kit. He said that he purchased one when he was in his 20's and didn't even start it as he thought it looked far too difficult and hard to understand. Makes me wonder how they stay in business.

                        Yes the deadeyes and wood blocks are wooden and the belaying pins also looks to be wooden – certainly not part of the plastic parts 'webbed' together. I just cannot fancy cutting out all those parts from ply without a suitable jigsaw stand. Thanks goodness for laser cutting which I first came across a year ago when I had to replace some balusters on my decking which have fancy patterns cut out on them – I didn't have to remove the centre part though the fancy 'holes' were already there.

                        You might remember in a post I asked about thinning acrylic paint using water and answered came back suggesting I use the thinner sold by the manufacturer as the 'medium' might not be identical to water. I found that AK paints (have you used them?) state that their paints come ready to use with airbrush or brush and if any thinning is required then EITHER their acrylic thinner or WATER can be used.

                        Thanks for letting me know why the belaying pins would only be used on the rails adjacent to the foremast. The shop owner I mentioned earlier suggested that when rigging not to cut the line off but make a small coil to more authentic looks. I might even experiment in using watered down PVA glue on the coil to keep it together unless you have a better idea.


                        Edited By John Arnold 3 on 05/02/2018 08:16:24

                        #75597
                        Ray Wood 3
                        Participant
                          @raywood3

                          Hi John/Mattias

                          I can understand you wanting to throw the model away, and I would If I were you ! these tiny kits are manufactured to sell a dream to the unwary with the picture on the box, having said that, the small version you are building is labelled for the advanced beginner. The larger models are easier to build. Having said that I still have my Billings Krabbencutter plank on frame fishing boat which my wife bought me for my 21st birthday 42 years ago

                          Regards Ray

                          #75602
                          Banjoman
                          Participant
                            @banjoman

                            John,

                            No, I have never tried AK paints, so can't really comment on them, other than to say that I think they are fairly popular in at least some corners of the plastic kit scene. However, if you are brush painting, I don't see any need for you to thin the paint; that is mainly a concern when airbrush painting with a fine needle/nozzle set.

                            And yes, the belayed ends of running rigging should ideally include a coiled-up end! In real life, a rope in the running does of course have to be long enough that it can be worked between its extremes, and after the rope has been worked, the free end will be coiled up and hung over the belaying point in question. It can, however, be fairly tricky to coil the actual free end at scale 1:100, so an alternative is to cut it off after it has been belayed, and then make up a loose coil off the ship and then place it over the belaying pin; at anything beyond a couple of inches, you can't tell the difference, and it is rather easier. See the last page of the Pickle manual for more details!

                            If one wants to be as true to nature as one can, the free length to be coiled should of course be calculated as a function of whether whatever a given rope works is worked or not. For example, the halliards used to raise a gaff will have a much longer free end if the ship is shown with sails set and the gaff thus in the set position: in order to raise the gaff, the halliard is hauled, resulting in a longer free end; if the gaff is taken down again, the rope is of course slacked off, and most of the free end will "disappear" into the tackle, leaving only a much shorter "starter" length free to be coiled.

                            Mattias


                            Edited By Banjoman on 05/02/2018 09:28:55

                            #75605
                            John Arnold 3
                            Participant
                              @johnarnold3

                              Hi Ray,

                              Every time I consider throwing it away I think of all the time and money I have already invested in it. I would hate to have to replank a hull it's (my model) overall finished size fits in where I want it to go. I love the look of the Bluenose and a model at 1:65 scale would be too big. I would have to replace it with an already built model and they are so expensive unless you forego the detail and get one like I saw in the window of a shop window at Looe (south coast of England) when I was visiting there. It was only around GBP70 but at that price it could not have had the detail.

                              I knew absolutely nothing about building boats from kits when I purchased it but I had built flyably model aircraft in the past including aircraft with tapered ellipical wings etc so thought it should be ok. I will persevere longer especially now that I seem to have everything understood. I also think that if the instructions were better and more like those which come with the Artesania Latina Bluenose II (1:65 scale) I would not have had to ask so many questions.

                              'Talking' about small versions of the Bluenose I note there is a kit by Constructo which is scale 1:135 – that is small.

                              John

                              #75607
                              Ray Wood 3
                              Participant
                                @raywood3

                                Hi John,

                                Fair play to you for keeping going lets have some pictures to admire .

                                Regards Ray

                                #75610
                                John Arnold 3
                                Participant
                                  @johnarnold3

                                  Thanks Mattias,

                                  Understood about how much line would need to be coiled when the halliards are raised. I am not interested too much though in the authenticity of the loop left over but take your advised about making the coil separate.

                                  FYI I successfully tapered the bowsprit today using an electric drill. Clamped the drill to the bench, inserted the dowel into the chuck and clamped lightly then turned on the drill and used abrasive paper against the spinning dowel. Did take long and looks good. Very satisfactory method.

                                  I just found what I think are more belaying pins. The diagram on page 32 or the foremast appears to have belaying pins near the base of the mast. In fact there are two plastic parts with 'predrilled' holes to glue on the base of the mast. So 5 each side at the rails, 6 on the fife rail and 8 in the parts attached to the bast of the foremast but that is 24 which are supplied – 'problem' solved. It seems I can't "see the forest for the trees"frown

                                  Regards

                                  John

                                  #75645
                                  John Arnold 3
                                  Participant
                                    @johnarnold3

                                    Ray I was just about to take a photo of the unpainted hull (the deck has been clear varnished) when I decided to fix the aft of the boat. Either I had placed the last 'rib' (the very rear of the hull) at an incorrect angle and/or the instructions are lacking but it resulted in the 'transom' not being at the correct angle to be completely 'flat' between the base of the 'transom' and the top of the hull at the rear. I wasn't going to bother doing this as no one would know the difference but since you have asked for photos I didn't want that pointed outindecision.

                                    I realise that it is only I who I have to 'impress' but now it seems there could be an audience surprise.

                                    Also even though the model isn't true to the real boat where it could be (eg there are 6 portholes on the sides of the structure on the rear deck and only 3 on the real boat – wouldn't you think that Billings would have got that correct?) I want the boat to be as similar to the real one as possible and still be happy with it.

                                    I have carved away parts of the transom and glued a piece of 1mmx3mm pine to fill a gap. Once it is dried and sanded and filled I will take a photo and publish it. I will then take a photo after all the finishing coats of the hull are complete, when all the deck structures and fittings are in place etc.

                                    Regards

                                    John

                                    #75646
                                    Banjoman
                                    Participant
                                      @banjoman

                                      John,

                                      It would be a truly mean rivet counter, indeed, who'd go around and calculate the remaining lengths of coiled rigging thread on a 1:100 model … but having some form of coils there does make a very positive difference to the appearance of realism, I always find!

                                      I'm glad to hear, too, that you got on well with the drill tapering method!

                                      And you are ever so right about those final belaying pins! They're even visible in one of the photos that I linked to yesterday!

                                      I also take the liberty of applauding your decision to remedy the small error you had detected on the transom! Not because I would have been critical of it (or even have spotted it for that matter) but because I think that it is the right approach: if you see a fixable problem, it is almost always worth fixing it, even if only you will ever know!

                                      If you fix it, every time you look at it, you will feel quietly pleased for having done a thorough job; if you don't, chances are you'll always wince on the inside when you spot it, and when someone admires your model, you'll feel obliged to point it out … So kudos to you!

                                      Edited By Banjoman on 06/02/2018 06:31:08

                                      #75683
                                      John Arnold 3
                                      Participant
                                        @johnarnold3

                                        Hi Mattias,

                                        I have learned so much these past few weeks thanks to your good self.

                                        I think that had I been aware of such things as belaying pins and where they normally are I would have found them a long time ago.

                                        The 'rebuild' of the aft section below the deck (transom) is almost complete and is looking better. I am so glad that this boat has a painted hull as the paint will cover my mistakes and fixes.

                                        John

                                        #75720
                                        John Arnold 3
                                        Participant
                                          @johnarnold3

                                          Sorry for taking so long (to 'publish' a photo of my model WIP). It has been so hot and humid here and no aircon in my workshop.

                                          I am now ready to prime the hull (at last).

                                          A couple of photos in my album. Not too good as taken at night with my mobile phone.

                                          John

                                          #75722
                                          Banjoman
                                          Participant
                                            @banjoman

                                            John,

                                            Thanks for the photos — it looks like a very nice build so far!

                                            Good luck, too, and have fun with the painting!

                                            Mattias

                                            #75748
                                            John Arnold 3
                                            Participant
                                              @johnarnold3

                                              Thanks Mattias,

                                              You may have noticed that some of the chain plates aren't completely parallel to each other. I marked the hull with pencil at the top rail and just below the bottom of where they would go using the plan for exact placement (some are closer together than others which I don't understand but that is how the plan/blueprint has them) and they are so small even using tweezers to place them and move them when necessary still didn't get them perfect. Talk about fiddly. Once painted (that part of the hull in black) hopefully it will be less noticeable.

                                              #75809
                                              John Arnold 3
                                              Participant
                                                @johnarnold3

                                                next 'episode' smiley

                                                At last I have primed the hull (and some deck structures).

                                                I carefully measured out 17ml (the Vallejo Surface Primer bottle holds 60ml) as I wanted to see just how far it would go so that I could gauge how much final (hull red) paint I would need.

                                                WOW. I think that I might have used only about 1/3 of that 17ml. It covers heaps.

                                                Can I assume that a top coat will cover at least as much as a primer? That way I can't see why I would required more than a 17ml bottle of 'hull red' even applying 2 coats especially as it goes onto only about 2/3 of the hull (lower 2/3).

                                                It brushed on VERY easily using a number 10 'flat' Monte Marte Gallery series brush and boy does it dry quickly probably as it soaked into bare timber.

                                                Should I apply a second coat of primer?

                                                Also what is the normal time needed before next coat primer or top coat. The bottle only states to allow 24 hours before 'masking'.

                                                Regards


                                                Edited By John Arnold 3 on 13/02/2018 02:33:47

                                                #75810
                                                Banjoman
                                                Participant
                                                  @banjoman

                                                  John,

                                                  I won't say "I tried to tell you so", but I will say "indeed!"

                                                  Furthermore, I think you are going to find that the top coat will cover even better than the primer did!

                                                  Whether or not to do two coats of primer is, I would say, probably not a major issue, but if you look again at my test piece photos, below, you'll see that where I put on two coats of primer, in the middle of the piece, the same amount of subsequent top coat does have a somewhat deeper and more vibrant colour, so perhaps it wouldn't be a bad idea to do one more thin coat of primer?!
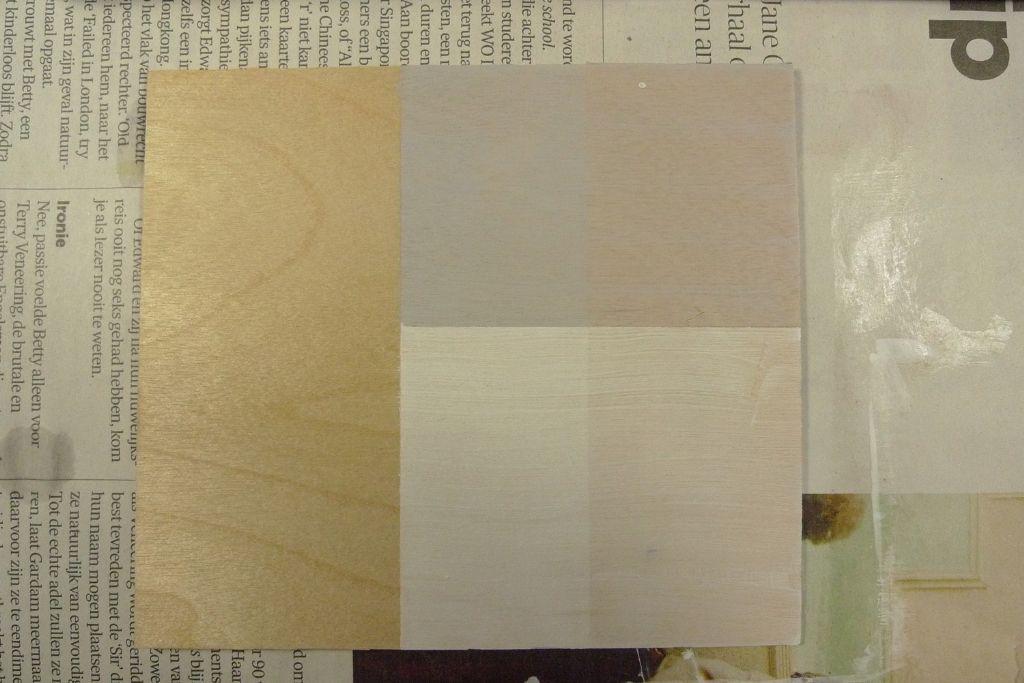
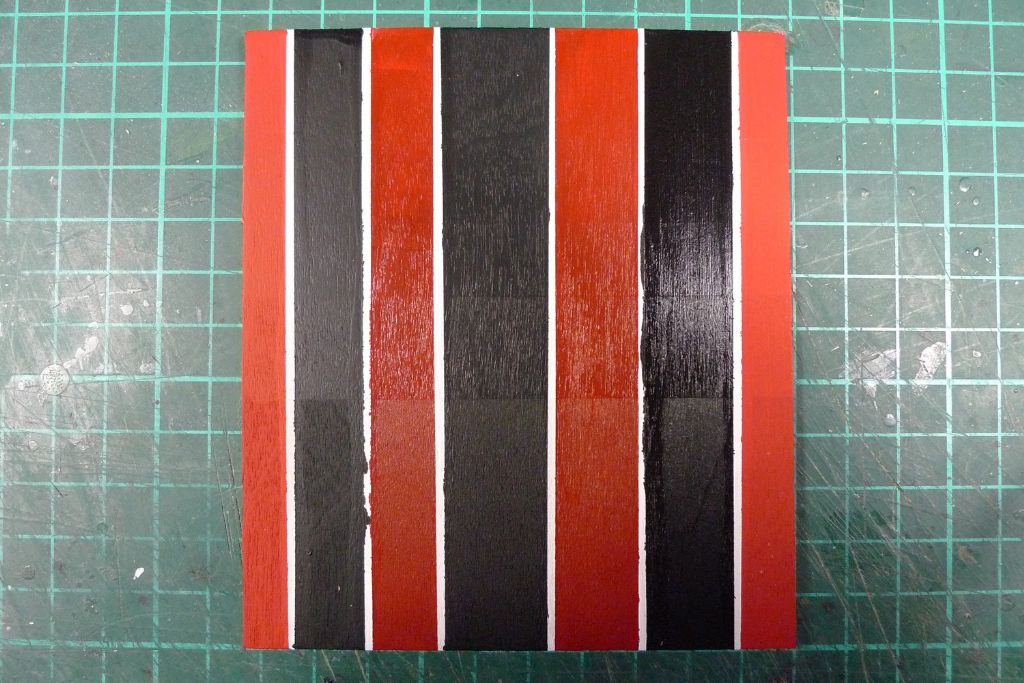
                                                  test5.jpg

                                                  test8.jpg

                                                  As for how much time before overpainting, I'd say a couple of hours should be more than enough, provided the previous coat wasn't brushed on too thickly. As you have noticed, these acrylics are very fast drying!

                                                  However, they are very right to warn you against masking off too soon! Acrylics dry from the outside in, and you should indeed give them at least 24 hours to harden properly all the way through; also, it is a question of not only the (water based) solvent drying, but also the medium.

                                                  A further thing to consider when it comes to masking off is the order of the paints involved. If it were I who was painting this type of colour scheme, I would start with putting on the white boot topping top coat in a wide enough, unmasked (to avoid raised paint edges) band around the entire mid of the hull. Once that was well and properly dry (say 48 or even 72 hours later), I would mark out the upper edge of the boot topping with a pencil held in a holder of some sort all around the hull, and then apply a single and continuous, thin (1 mm? 2 mm?) strip of flexible masking tape just below the pencil mark (so that, when the black top coat goes on, it covers the pencil line) all the way around the hull (with the ends meeting up in the middle underneath the stern counter).

                                                  After pressing down this masking tape very well indeed, I would then further protect the upper half by adding a wider strip of masking tape overlapping the first from above, and then go on to paint on the red bottom hull top coat.

                                                  Once this was done and properly dry, I would reverse things, with a second wider strip of masking tape overlapping the boot topping masking tape from below and go on to paint the top half black.

                                                  Once everything is nice and dry, the initial strip of thin masking tape is removed, and hey presto: you have a hull with black topsides, red bottom and a crisp, even white boot topping!

                                                  The main advantages of this order of procedure is that you don't have to try to mask off the boot topping edges from both above and below (which can make it quite tricky to get an even width to the line), but instead create the line by using the width of the masking tape. Also you don't have to put white paint on top of black and red, something which will require several more and thicker coats of white to get a good, solid cover to the white (in other words, if at all possible, always put darker paints on top of lighter ones and not the other way around).

                                                  Finally, for masking tape, don't use DIY/house painting tape! Some of those have too strong a glue, and may lift your paintwork; others again are likely to be too weak. Personally I am a great fan of the Tamiya range of dedicated model masking tapes! You should be able to get them from the hobby store you said you found …

                                                  Mattias

                                                  #75811
                                                  Banjoman
                                                  Participant
                                                    @banjoman

                                                    John,

                                                    I forgot to say in my previous post that an alternative to a painted boot topping is to use white trimline instead: **LINK**.

                                                    Mattias

                                                    #75812
                                                    John Arnold 3
                                                    Participant
                                                      @johnarnold3

                                                      Thanks Mattias,

                                                      Regarding the thin white line. I had considered using automotive PIN STRIPE vinyl tape. I can get it in 3mm wide. I have watched a Youtube video on how to apply it (to a motor vehicle) and being vinyl it can be stretched around curves. Have you seen it used on model boats? What are your thoughts?

                                                      If I do it with paint I totally agree with the method you suggested. Indeed it would be difficult covering dark colours with white rather than the other way around. My main problem with that is that the (Billings) video tutorial suggests using a pencil on a block of wood run around the hull at the height where the water would be near to get a straight line which is the correct height all the way around and that makes a lot of sense to me. Painting an area of white and then trying to apply masking tape with no guiding (pencil) line seems to be difficult.

                                                      Thanks for the advice that Tamiya have a masking tape as I was going to use a household one which is marketed as "low tack delicate", can be used on freshly painted surfaces, and gives up to 10 days for removal. What worried me is a tape to prevent the newly applied paint 'leaking' under the tape onto the masked off area.

                                                      I will look for a source for Tamiya tape.

                                                      I am at present trying to locate all the places to attach all the eye bolts using the plan and instruction manual. Some are clearly labelled but many aren't and I can only assume that where a line attaches to a boom there should be an eye bolt there. There are 41 supplied and as all other supplied parts have a place to be used I can only assume all 41 go somewhere. I will have to look at the manuals for other Bluenose boat kits. So annoying that Billings seems to assume the builder knows where things go. It is more annoying that it slows me down trying to work these things. Nothing worse than pulling a car engine apart, rebuilding it and have some parts left oversad

                                                      John

                                                    Viewing 25 posts - 51 through 75 (of 135 total)
                                                    • Please log in to reply to this topic. Registering is free and easy using the links on the menu at the top of this page.

                                                    Code of conduct | Forum Help/FAQs

                                                    Advert

                                                    Latest Replies

                                                    Home Forums Beginners Topics

                                                    Viewing 25 topics - 1 through 25 (of 25 total)
                                                    Viewing 25 topics - 1 through 25 (of 25 total)

                                                    View full reply list.

                                                    Advert

                                                    Newsletter Sign-up