Plastic Magic modellers have been waiting for, first released in the USA and then in the UK in late 2010. At 1:200 scale it is one of the largest plastic model boat kits to be produced with an overall length of 926mm, beam of 162mm and with 1040 parts and fittings in the box. This excludes the ‘after market’ photo etched detail items now being marketed by White Ensign Models. It is sold as a static plastic kit, but it cries out to be motorised and made suitable for radio control. To that end, it is a perfect project for assembly indoors during the long winter nights if the external workshop is too cold, since relatively little drilling, sawing and cutting for the conversion project is required.
Photo 1 is of what is the box and the illustration on the lid is absolutely superb. It is almost worthy of framing for your workshop wall! Photo 2 shows how well it is packed. It is worth mentioning the display box is itself inside a stout brown cardboard box for added protection.
The hull is a two part moulding, split at the waterline with most of the main deck on the upper section. There are numerous plastic sprues with hundreds of fittings; the gun barrels are in metal and also included are two sheets of fine detailed photo etched parts for the cranes and railings etc., plus a set of decals and the signal flags. A 36 page step by step instruction book, together with a full colour sheet with suggested paint schemes is included. The quality of the kit is just out of this world.
All the parts are perfectly packed and the recommended retail price of the Trumpeter kit is currently £163.98. It is distributed by Pocket Bond and sold through the usual retail outlets including White Ensign Models and SHG Model Supplies. Also, as of July 2011, an online retailer was offering it for £145, so perhaps shop around for the best price, but watch the p&p. To this of course you will have to add the cost of the running and r/c gear should you wish to convert the kit to radio control operation, but that can vary depending on exactly what you decide you will need.
Getting started
As I wrote earlier, the hull and deck come in two parts which split at the waterline, Photo 3, and Photo 4 is of the ‘under the waterline’ section upside down. All the propshaft exit fairings are included and of course this enables the static modeller to build USS Arizona either as a waterline or full-hulled static model. Photo 5 is of the fore and aft deck sections, which fortunately for us are separate from the main deck, so access to the rudder post will not require the cutting of a hole in the moulding.
So, as you can see from these pictures, access to the central section of the hull was still required, but here again the problem was easily resolved. Photo 6 shows the single piece upper hull section with its included central deck section (a very clever piece of moulding) and note the slots for the base of the citadel bulkhead moulding seen in Photo 7, which then fits onto the main deck and then the deck section which fits over that, Photo 8. So, clearly this central area of deck was going to be an area that could be removed for access, but leaving the funnel support frame intact as in Photo 9 and Photo 10 is of the same, but with the citadel bottom perimeter bulkhead in place. It was convenient to paint the deck at this stage, which is far easier whilst it as unobstructed as possible.
I was still not too clear about how to motorise USS Arizona, so opted for the easy route and decided to have a go at some of the fittings, which is the nice thing about a project such as this. One can ‘chop and change’ a bit in the early stages without compromising the model as a whole.
The moulding of the plastic parts was (and is) first class and everything goes together as it should without any serious adjustment. Photo 11 is of the main bridge and citadel unit and Photo 12 is of the funnel. Photo 13 is of the aft, tripod mast. These are all straightforward assembly tasks using (in this case) Revell Professional Contacta Plastic Glue, but some may prefer to use liquid polystyrene glue. Also, note the etched brass parts on the tripod mast.
The main battery gun turrets are supplied with turned aluminium barrels which can be installed in an elevated or stowed position. These are matched to separate blast-bags giving the turrets a most realistic look, Photo 14.
The ship’s boats are a project on their own. The detail incorporated is perfectly moulded and like everything else, they all fitted together with no problems, Photo 15.
To be honest, assembling all the detail parts was tremendous fun and very enjoyable, Photos 16 and 17. Mind you, storing everything then in a clean environment is essential and fortunately for me some redundant clear tool cases, as in Photo 18, proved to be ideal for the task.
On the subject of painting, this is the sort of model where it is best to paint as much as possible before final assembly. The instructions provide a clear painting guide, but there is no reason why you cannot do your own research to get it absolutely 100% correct. Anyway, none of this gets us away from the small matter of the r/c conversion and motorisation.
The ‘Plastic Magic’ bit…….
Having decided that access to the motors, r/c and batteries was going to be via the central deck section and from within the perimeter bulkhead (remember the hull upper section is not yet glued to its underwater part), the first job was to determine the length of the propshafts, which needed to be very long! Following consultation with S.H.G. Model Supplies, website: www.shgmodels.com, they supplied four 2mm dia propshafts and tubes of the correct length, complete with brass propellers, couplings and motors as in Photo 19. As will be clear from this photo of the installed running gear, the outer propshafts are a different length to the inner two. The small white boxes under the couplings are drip trays that were installed because the entire length of each propshaft is below the waterline, so there is a real possibility of water working its way up the tubes.
At the stern, the propshafts run exposed from the tubes in the plastic moulded ‘A’ frames, which will need drilling out to 2mm. Be careful when doing that as you only really get one chance to get it right. Four of 20mm three bladed propellers were also supplied by S.H.G. Model Supplies as in Photo 20.
Due to the long length of the propshaft tubes, very careful alignment with the couplings and motors will be required. I made a simple jig as in Photo 21 to ensure all the propshafts were in perfect alignment. The motors were just secured in place with clear silicone bath sealant. The propshaft tubes were secured into the hull at their exit points by epoxy adhesive, backed up with silicone sealant.
The rudder was the next task which was easy, owing to the removable deck section at the stern. The scale plastic rudder from the kit proved to be perfectly adequate when fitted with proper rudder post and tube. This was installed and a short rod connected it to the rudder servo via a commercial tiller arm, Photo 22. However, there is a note of warning. You can get everything ready, but the installation can only be completed once the upper and lower hull sections are joined together. A servo extension lead will also be required to reach the centre section of the model for connection to the receiver of the rudder servo.
The battery is a 6v 4Ahr sealed lead acid type, mounted in a plastic tray on the bottom of the centre section of the hull beneath the cutout in the upper hull section. On top of this battery, a plastic tray (from scrap material) was mounted on which the 2.4GHz Planet receiver and an Mtroniks esc could be fixed with double-sided tape. It’s all a bit of a tight squeeze together with the ‘choc block wiring connector, but is doable, Photo 23.
Owing to the fragile nature of the superstructure and the possibility of damage when removing it, a separate receiver switch was mounted inside of B turret, Photo 24. A blob of Blu-Tack retains the turret adequately when sailing.
Joining the two hull sections
How best to join these? This is virtually the last task apart from the rudder tube installation as mentioned earlier. Well, in the end it was quite easy as the Revell plastic glue applied to the lip stayed liquid long enough for the two sections to be correctly located to each other and left to dry. Rather handily, the join is bang on the waterline, so black model aircraft trim tape provided the boot topping, hid the join and after three thin coats of clear matt varnish it would all seem to be waterproof with no leaks at the time of writing in July 2011. Photo 25 is of the completed model.
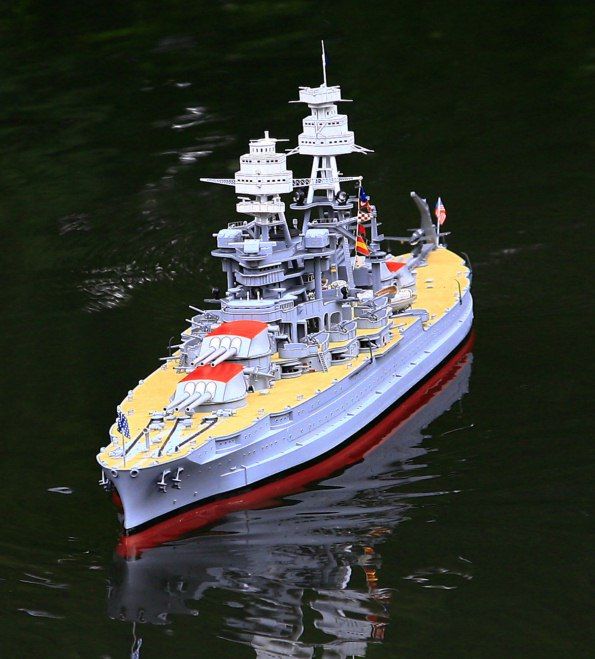
On the water
A small amount of lead ballast was fitted between the four propshafts in a domestic flotation test and that was it. The model is very stable, majestic and controllable, with the small propellers giving a surprisingly good turn of speed. She looks really good on the water, but is not a model for rough conditions. However it is perfectly safe on a model boat pond in normal average operating conditions. USS Arizona is noticeably quite stable in these conditions, Photo 26, in part due to the wide beam and deep underwater cross-section.
Conclusion
White Ensign Models (WEM) in the summer of 2011 released a two sheet etched brass fittings kit containing a further 131 parts to further improve this into a super-detailed model, but their use is at the discretion of the model builder. For day to day operational use and the knocks that may ensue, it might be best to leave them off.
This is a fantastic kit of a famous US Navy battleship that is perfectly practicable for conversion and if you should choose to go down the route of the ‘after market’ photo etched railings etc., then you will certainly end up with a true showcase model of which you will proud.
Thanks in particular to SHG Model Supplies for the running gear and the assistance of White Ensign Models with this project – Dave Abbott, July 2011.
The photos below show the model in more detail and afloat.
Advert
Enjoy more Model Boats Magazine reading every month. Click here to subscribe.
Article Tags:
About the Author
Main interest is scale scratchbuilding but I build kits as well! I live in South West Surrey near the Sussex border