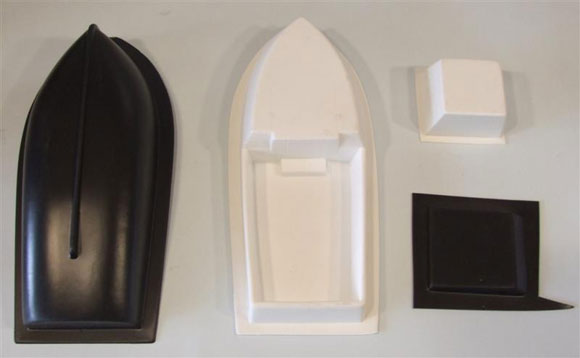
You get what you pay for. Thus when you pay less than ten pounds for a boat kit you don’t get a lot. To be precise, what you get are four bits of vac-formed plastic and a plastic bag, Photo 1. No fittings and best of all, no instructions! ‘Best of all?’ I hear you ask. Well in this case yes. In fact when I bought the kit George didn’t even have a finished model on his stand, so I didn’t really have any idea what I was going to build. What I did have was the freedom to do what I wanted without anyone telling me that I had got it wrong. First impressionsLooking at the parts it was pretty obvious that there was a black hull on to which a white deck and superstructure part fitted. On top of this there was a wheelhouse and a roof – pretty simple really. I reckoned that the result would be a one-man operated work boat or inland waterways tug. Since my boat club (Knightcote MBC) was planning steering and towing competitions this was going to be my entry.
Article continues below…
Enjoy more Model Boats Magazine reading in the monthly magazine. Click here to subscribe & save. Power!George recommends a motor from a dismantled servo as power for the model and indeed that would be suitable if you didn’t want to do serious towing. However I’d asked fellow modellers how to give a tugboat ‘grunt’ and was advised that you should be able to water-ski behind an unloaded one at full tilt, so I ignored the manufacturers’ advice and used a 380 motor, Photo 2, attached to a shortened propshaft which drives a 35mm diameter brass propeller. Our towing challenge craft is big and heavy, so this boat needs grunt! A couple of 2mm plastic bulkheads were fitted inside before the top went on. I’m not sure why really, but they seemed like a good idea at the time. SuperstructureThe lack of instructions lead to a bit of head scratching when I came to fitting the top. Obviously it needed a hole cut in it, if I wanted to see the motor again and this needed to be pretty big as the hull would be full of ‘gubbins’ and all needing access. A line was drawn using a CD marker pen around the deck and across the top, Photo 3. I fiddled with this until happy and then had a go with a sharp scalpel. The plastic cuts cleanly and the two parts plug back into each other nicely enough, with a ledge made of 1mm plastic supporting the removable part all the way around the hole. Rather than try and hide the join I decided to emphasise it to look like removable panels at the front. To this end fake bolt heads from Cambrian Mouldings were added. The wheelhouse was a challenge. Faint lines are supplied to suggest where the windows should be and I basically followed these. Supporting the plastic while cutting was a problem, until I remembered a little device I had for supporting metal being attacked with a fretsaw. Available from Squires, it’s called a Combination Bench Pin and Anvil – Pt. No.WB1341 and consists of a metal part that this clamped to the bench with a wooden wedge that sticks out from the front. This wedge was just the right size to fit inside the wheelhouse, Photo 4. The resulting part, Photo 5, is more hole than plastic. I braced the top edge to give something to stick the roof to later. Before sticking the top in place I opened out the doorway in the superstructure and then glued the two parts together, Photo 6. The wheelhouse inside was built up from more plastic to give my skipper somewhere to stand. No measurements were used at any point during this build. I just made things up as went along. According to the excellent talk our club received from Mobile Marine Models at our AGM, tugs should sit low in the water and have freeing ports to keep the deck clear. So I cut some in the sides using a paper template to make sure the holes were the same inside and out and on both sides. The ports were lined with very thin plastic.
|
|
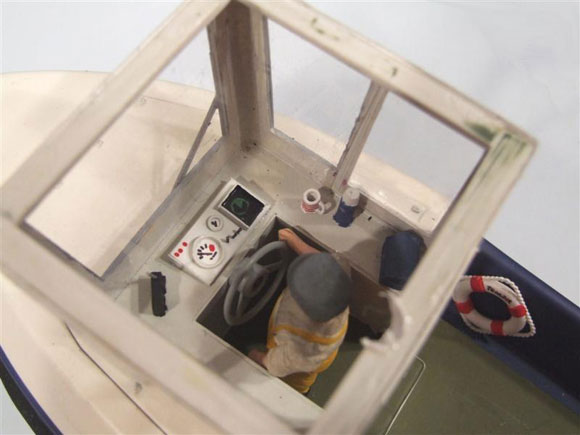
Towing bollardIf I planned to enter a towing competition, then the rope needed to be attached somewhere and a towing bollard needs to be stuck in place more firmly than just by glueing it to the deck. But I needed to be able to remove the deck – so the bollard had to be removable. My solution was fabricated from bits of K&S brass tube, soldered to a bit of paxolin sheet that is fixed to the model, Photo 7. The cross piece is a bar that is threaded through holes drilled in the upright tubes. The bottom half of the arrangement is bonded firmly to a bulkhead with car body filler. This solution works pretty well with the bollard being slid out before the deck is removed. It hasn’t shown any tendency to slide out when used for towing, saving me the hassle of working out a locking mechanism. WheelhouseOne mistake I made when buying my kit was not to buy a crew at the same time. Having a suitable figure makes it easier to work out where things should go in the wheelhouse. The skipper comes from George’s range of 1/32nd resin figures. When he arrived I felt he was a bit short, but managed to insert 4mm into his legs above the wellingtons, Photo 8, using bits of plastic, superglue and filler. Once painted the addition is invisible, Photo 9. Before fitting the roof I took the opportunity to add some details made up from scraps of plastic such as a mug, flask, instrument panel and radio, Photo 10. With such large windows (glazed after painting with clear plastic recycled from the collar stiffeners of new shirts, I felt something had to be done to bring the area to life. The roof had to be trimmed to size and then stuck to some plastic as it’s larger than the top of the wheelhouse to allow for an overhang. Based on pictures of real tugs, I added a mast from plastic tube along with lights from various sources, Photo 11. The mast acts an aerial tube – I fed the wire up from inside the bottom end and glued it at the top. MechanicsWith the body together ,the rest of the works were fitted inside. Steering is provided by a Robbe rudder worked by a mini servo held in place with a big blob of Blu-tack. Speed control is a M-Troniks Viper unit. The battery is an eight cell 9.6v 700mAh unit picked up from a model shop and chosen because it would fit. It sits on a ledge between the bulkheads above the servo which places it just below the waterline. Some extra lead was required to ballast the model up to 550g, which my highly unscientific tests in the bath showed was required. There isn’t a lot of space inside, Photo 12, as the finished boat is only 27cm long and 11cm wide. First sailingOn the water the model behaved well. Top speed was wildly excessive and good for water skiing, but the model was fine at more sensible slow speeds. It even sounded right with the large heavy propeller making the hull resonate like a slow revving engine. The model was a bit nose heavy, but then I understand tugboats often are, so I didn’t worry too much. Hitched up to the towed boat, the model managed to pull it quite successfully despite the difference in size. The pair proceeded around the lake until I decided a picture would be nice. While fiddling around with my camera, the boat being towed caught up with the tug and headed for the bank. I tried to pull it away at too great an angle, tilting Tomsk and swamping it. The first thing I knew was that my boat was sitting lower in the water than it should. A run to the bank was thwarted by the size of the tow and the tug disappeared below the surface! Fortunately the tow line stayed attached and we were able to rescue a muddy Tomsk from the depths, pretty waterlogged, but intact. A day drying out and everything was back to normal, but obviously some changes were needed.
|
|
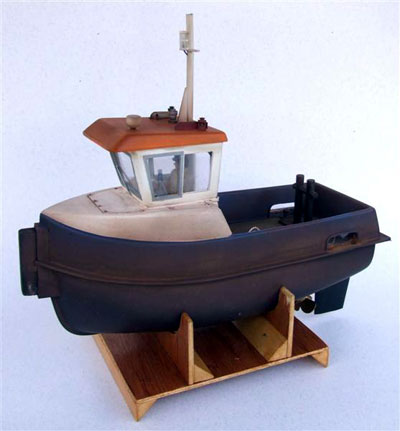
ModificationsFirst, the freeing ports obviously didn’t do what I wanted, letting water on to, rather than off, the decks. These have been filled with clear plastic fixed with canopy glue. It’s a subterfuge, but not an obvious one especially from a distance. Next the receiver was wrapped in a plastic bag. If I have to make a break for the bank, the electrics need to keep working. A little weight was removed and the rest moved backward slightly. Finally the small amount of space remaining inside was filled with polystyrene foam. Better that than water! I also fitted some plastic to hold the servo in place. I know you aren’t supposed to rely on Blu-tack and doing this has sharpened up the steering a lot. Paint and detailsBefore the submarine adventures I’d given the model a basic paint job using Humbrol enamels. But a working boat should look like it’s seen some action and that means weathering. First the model was washed over with a weak mix of rust colour so this gathered around the bolt heads. Then a very weak mix of greys and browns was blown over everywhere using an airbrush. This allowed me to gradually build up the effect until I was happy. Finally some weathering powders (Squires again) added some texture. Compared to most model boats this is a grubby tug, but that’s how I wanted it. An old oil drum and tools came from a 1/35th kit of parts intended for military modellers. Lifebelts also came from the spares box, but I think they are Billings items. At the front a wooden fender is fitted so Tomsk could act as a rescue boat and shove dead models to the bank, not that I’ve ever needed such a service myself you understand…… Back on the waterA much better and tolerable performance, Photo 13. The deck stays dry even at top speed and in tight turns. The model will turn in 30cm diameter circles which makes it possibly too manoeuverable – or at least it was in the steering competition. Steering astern isn’t bad although you need a bit of thrust to make the rudder take effect. The position of the battery is critical in keeping the craft level. Ideally it would be lower in the hull but then I’d have to reposition the servo making the rudder linkage awkward. ConclusionsThis was a fun model to build. The lack of instructions allowed me to give my imagination free reign, which was a pleasant change from following a set of predetermined steps. The kit is cheap, but while your wallet is happy, your brain has to work harder. However this means you end up with a unique model and that certainly appeals to me. I still have some finishing touches – the lights need wiring up and that radar dome is woefully undersized – but then you can always fiddle with a model like this by adding little bits of detail. The most important task will be the building of a suitable barge to be towed. After all, what’s the point of a tugboat if you don’t have something to pull? Kit SupplierGeorge Turner Models 77 New Road, Great Wakering, Southend On Sea, Essex, SS3 OAR £10.00 + £5 UK P&P
|
Tugboat Tomsk
by
–
Advert
Enjoy more Model Boats Magazine reading every month. Click here to subscribe.
Article Tags:


