There is nothing particularly altruistic about this short piece on my Tian Jie (T.J.) Models 1:75 scale Salvirile tug nor is it a ‘blow by blow’ account of its construction, but I thought some model builders might be interested in something a bit different. I bought mine because I liked the kit when I first saw it in April 2007 at Intermodellbau, Dortmund, Germany. I was unable to purchase it there and then, because the manufacturer, although having a stand, had actually only bought one of each of some of their range plus some made-up models, and all as domestic luggage on the flight from China! I was not too keen on giving my credit details to a business that I didn’t really know, but was subsequently able to purchase the kit from Loyalhanna Dockyard in the USA. Their website address is: www.loyalhannadockyard.com and their service is excellent. Current price is 460$ plus p/p plus UK VAT on arrival in the UK. Obviously, different arrangements apply in different parts of the world and yes, Loyalhanna Dockyard does dispatch to anywhere on the globe. The effective final doorstep price was a fraction over £400, although the exchange rate at the time was better than it is now. I emailed Loyalhanna to confirm that they had the kit; once that was confirmed I telephoned them and gave my credit card details verbally. After that I received an email confirming dispatch, likely arrival time and in fact approx. 10 days later Parcel Force sent a card to say that they had it and the VAT payment required for delivery to be completed. So, the point of this little homily is to say that purchasing from ‘across the pond’ for UK residents is straightforward, provided the supplier is reputable. TJ Models have their own website: www.tjmodels.com.cn which includes information about the product range.
What’s in the box?
Lots is the simple answer! A one piece 66cm hull including the deck, with the motor mounts, propshafts, Kort nozzles and rudder posts all in place. Rudders, propellers and hardware are also included. A large clear plastic bag with the etched brass fitting sheets, a box with all the bagged resin fittings, die-cut styrene parts for the superstructure, crane and bulwark supports, transfers, sundry rod and strip, plus a plan and an instruction book, broadly speaking complete the box contents. Now this last item wasn’t really an instruction book at all as it only includes a detailed illustrated parts list, exploded diagrams of the superstructure construction and line drawings of the model from different angles with all the fittings noted and linked to the parts list.
So, this isn’t a model for beginners, but it isn’t hard to build either if you apply a modicum of common sense to the process. The most difficult part was painting and inserting the windows into the superstructure.
This was what I would call a 400 hour model. It could be built quicker, but painting requires some forethought and I changed a few things along the way, so what did I alter?
First: I noticed that one of the Kort nozzles although centred on the propshaft was not in the same vertical plane as the other. This was noticeable when looking directly at the side of the hull. It wasn’t difficult to drill around the nozzle hull mounting boss, unsolder it from the skeg, re-insert into the hull, re-solder it to the skeg at the correct angle and secure by fibreglassing around where the boss pierced the hull.
Second: For some reason the hull was painted in a rather rough white primer. It took a lot of work with wet and dry sandpaper to make it as smooth as the proverbial babies’ bottom! Not difficult, but just a bit time consuming.
From then on, not too bad to put it simply. There is a bow GRP bulwark to be added to the front of the hull which fitted okay, styrene bulwarks to be added to the after section of the hull plus capping rails and bulwark supports etc. to be added all around. There are no freeing ports in the bulwarks on the after deck – there should be, but no indication on the plan for these so I left them as supplied. Deck fittings are mostly resin castings; ladders are folded up etched brass and the safety bars either side of the stern deck are supplied as resin castings. I wasn’t too keen on these as they were fragile and I fabricated identical ones out of brass tube that plug into the deck. So these are not actually fixed and can move slightly if the stray hand should bump them.
There are also pre-cut styrene rubbing strakes to be added to the hull. Not difficult as thin superglue is a wonderful adhesive; the difficult part is making sure they are positioned the same on both sides of the hull. The tyre fenders, which are actually rather nice resin castings including the tread pattern, are attached to the hull between miniature etched brass eyelets. These were a nightmare to fit, so I substituted tiny hand rail knobs from James Lane who advertises in this magazine.
The superstructure
This actually fitted together rather well – so well in fact that I assembled it in a weekend, then wished I hadn’t. Why? Well apart from making it difficult to install the windows it also became a real pain to paint, because for practical reasons (windows and painting) it would have been easier if the wheelhouse section complete with water cannon platform had been removable from the lower part. Since I then merrily went on my way and added the railings this made it all a real masking task for painting. On the subject of railings, this model is 1:75 scale and James Lane does some rather nice etched 1:72 scale versions. Near enough and it is easier to install these individually rather then endeavour to make the pre-prepared etched lengths fit in place. I did however use the etched version for the walkway around the rear of the superstructure that overlooks the deck working area.
Crane and winches
Not too difficult – all went together okay, a little bit of fettling and extra detail added, but they look the business.
Painting
The hull
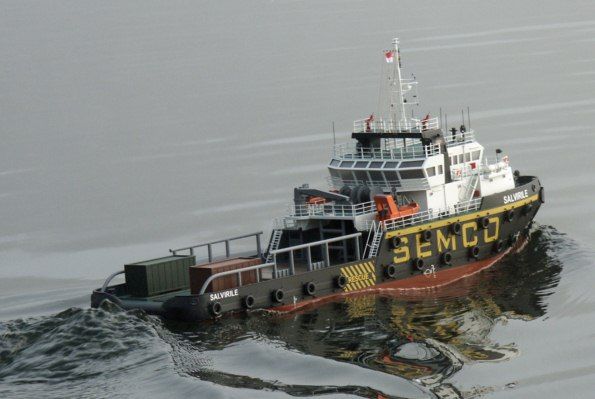
Now the ‘biggy’! First you will notice SEMCO on the sides and the rescue zone markings. These are supplied as sticky decals. Big problem: They would not readily take the contours of the hull or lie properly over the rubbing strakes, so what to do?
Well, after priming the hull with Halfords Red Oxide Plastic Primer (this is the base colour for the bottom) and then spraying the rest of the hull Humbrol Satin Black No.85, I used the SEMCO lettering sheet with the letters removed as a stencil through which I sprayed the word SEMCO. The sticky vinyl stayed on for just about enough time for the yellow spray not to ‘bleed’ onto the black, but it was touch and go. The same technique was used with the “Rescue Zone’ cross hatching except that BECC lettering was applied instead of stenciling.
The hull was weathered in my usual style to take the ‘edge’ off the base colours. Humbrol rust, light and dark grey plus aluminium colour were used. Why aluminium? Well, for bare metal effect it is less harsh than silver.
The superstructure
A nightmare – again! As I have already written it would have been so much easier if I had built it in two or even three separate units all screwed together after painting. Anyway, as always equal to the challenge, it was all primed in Halfords White Plastic Primer, then airbrush coated with Humbrol Satin White (with a touch of gloss white added to harden up the finish) as the main base coat, then masked to paint the black and then masked again to hand paint the green deck which was not easy with the railings in place. This all took about seven days of fiddling about, which wasn’t so bad as working at home as Editor I could spray in the early morning, lunchtime, teatime and last thing at night whereas if out at work all day only one coat would have been possible every 24 hours. Finally the windows were installed. I had prepared templates for all of them and they sort of all hold each other in place with just small blobs of 10 minute epoxy. This glue does not attack the clear styrene and is ‘wipeable off’ to a degree using a cotton bud – another unintended use for these personal hygiene implements.
Final finishing
The hull, superstructure and detail bits, once all in their final colours, were protected with one thin coat of Ronseal Polyurethane Clear Satin varnish, then weathered, then varnished again using an airbrush. My choice of airbrush? Either a Badger Crescendo 175 with the biggest nozzle giving a 3 inch diameter spray cone or the Anthem 155 which has only one nozzle but with a spray cone also from zero to 3 inches diameter. Personally I have come to the conclusion that the former is easier to use, at least for me with Humbrol paints. On the subject of varnish, Ronseal seem to have discontinued their range of coloured polyurethane varnishes that were handy for stands etc., but I noticed that the UK Wilkinson chain of shops that sell all sorts of things quite cheaply now stock their own ‘Wilko’ brand of coloured polyurethane varnishes. I’ve tried some on the display stand of the current project and it is just fine.
If you are wondering about the two OO gauge containers on the stern? Well, they contain(!) the stern ballast. Being on deck at that level has not affected stability and they also ‘fill up’ a rather empty towing deck.
Motors and radio control
Nothing complicated here. The 385 motors (not supplied) fit into the built in motor mounts with the rudder servo between them. The rest of the r/c gear and speed controller is on a platform over the battery tray under the main superstructure. Ballast, mostly forward, was needed to bring the model down to the waterline. I do not have individual control of the motors as this was not intended as a scale steering competition model, but for normal sailing manoeuvrability it is more than adequate and it is a surprisingly dry boat even when going astern.
Conclusion
Would I build another T J Models kit? Yes, if there were something that appealed to me. They list a couple of RN warships, a fair number of US warships and some Russian ones as well. I understand that the key movers in T J Models are ex-Naviga World Championship winning modellers, so they should have a fair idea of what makes a decent kit. As for obtaining the kits I would recommend going through a known intermediary such as Loyalhanna Dockyard rather than endeavouring to go direct to China, if only for convenience, language and service reputation.
General particulars
Salvirile is an ocean going towing and salvage tug built in 2005 at Gui Jiang Shipyard, China. She is 49.95 metres long, has a beam of 12.6 metres, draft of 4.8 metres and a gross tonnage of 951 tons. She has accommodation for a crew of up to 30. The two main engines each produce 2500 bhp at 750 rpm driving constant pitch propellers in fixed nozzles. Bollard pull is 65 tons and maximum speed is 14 knots. She can be used for oil spill recovery, fire fighting and cargo carriage on the 220 sq. metre free deck space as well as long range towing. Salvirile is classified as: ABS + A1(E) + AMS, ‘Towing Services’. Call sign is 9V6779 and she is managed by SEMCO PTE Ltd., of Singapore. The model is to a scale of 1:75.
Advert
Enjoy more Model Boats Magazine reading every month. Click here to subscribe.
Article Tags:
About the Author
Main interest is scale scratchbuilding but I build kits as well! I live in South West Surrey near the Sussex border