Saam
TERRY SMALL reviews this Almost Ready to Run tug from the USA
Enjoy more Model Boats Magazine reading in the monthly magazine.
Click here to subscribe & save.
.jpg)
The modeller now has a wide choice of Almost Ready to Run (ARTR) models to choose from, be it fast electric, sail, scale or even i.c. The internet has made it easy to browse and purchase the chosen model without even a visit to a shop, which could be anywhere in the world. On a trawl of the web I came across an internet link: www.rcscalemodel.com based in the USA. The company statement is that it is committed to excellence and the range of models, some of which are unseen in the UK, is quite interesting. The model that took my eye was the Saam harbour tug and looking closely at all the photos and information, the model was to a scale of 1:50 representing a hull length of 625mm, beam 250mm and height of 450mm, making it a nice easy to handle model and well detailed with a sprayed satin paint finish. The hull is of GRP and the fittings are crisply detailed, made from either resin, metal or perspex. Inside there are two pre-installed 550 motors and gearboxes housed in a very neat plywood framework, driving two four bladed handed brass props within steerable nozzles, making for a very powerful and highly manoeuverable model. All that is required of the modeller is to obtain and install their own radio gear, batteries and then off to the water. On top of the wheelhouse there are two red fire monitors with all the pipework fitted and including a six volt pump which just requires some means of being switched on or off. The minimum requirement is a standard two channel radio set and one electronic speed controller, correctly rated such that it could cope with driving both motors. Even a good quality sturdy perspex display stand is supplied. Saam looked good and sounded just what I like, so a purchase was made using the on-line ordering system. Within an hour, an email reply was received to confirm my order details and even an estimated delivery date. On dispatch I received an email giving me details on how I could track my package through the system.
The model
On arrival I was very impressed with the packaging as it took half an hour to gently locate, cut and release the hold down straps to access the model. There are no assembly or radio control instructions supplied, so the purchaser needs to have some prior knowledge on how to do things. The quality of workmanship was inspected along with any damage incurred, both on the surface and the inside of the model, during the long journey and this resulted in just the two liferaft canisters broken away from their launching rack and one dislocated rubber fender – all easily repaired with superglue. The mainmast and HIAB crane are secured down within their own separate packaging on the deck of the model for transit and have to be fitted in position. The three legged mast is designed to be a push fit into the three locating holes on the superstructure roof. This can be either glued in permanently with superglue, or better still if you are to construct your own carry box I would suggest leaving it removable, as this reduces the box height for better transportation and reduces storage space. A very nice profiled self assembly perspex and metal tube stand is supplied.. The quality of workmanship was found to be very high, all perfectly finished in satin spray colours with clean lines, no bleed or overspray noticed. All the markings for name etc. are of the sticky vinyl type. Some of the fittings on closer inspection are laser cut perspex or cast resin. Stanchions, handrails and water cannons are made from brass. The superstructure has been well constructed from laser cut perspex with a large clear glazed window area giving an uninterrupted view inside the wheelhouse containing three control desks. On looking underneath, one gets a good indication of the build quality. On close inspection I found that the internal wheelhouse floor could be removed from the underside by carefully undoing two small retaining nuts and bolts. After testing the model I added my personal touch by drawing paper dials and control panels then gluing one to each control desk. I also purchased from Model Slipway some whitemetal figures plus some ropes and a small cloth Singapore flag from BECC model accessories, www.becc.co.uk., ref. SGP01, length C (38mm). All these little additions make the model come alive. There are two round access hatches for access to the steering gear, which have to be slowly turned until a point is reached where the retaining rod underside lines up with two cut out slots or notches in the surrounding deck. These I found hard to remove not knowing from the outside where the notches were. The use of a small extendable inspection mirror inside the hull or a ladies make-up mirror can be a big help. On installing a standard size servo for steering control, within the purpose built plywood tray glued into the bottom of the hull, I found the connecting control rod needed to be shortened by 35mm to suit. This is another easy little job to do as an adjustable slide coupling is supplied for this purpose. To install all my required radio equipment, I made up my own mounting plate from a piece of styrene which slots inside the front plywood box of the fitted radio tray, thus making it easily removable if required, but if a standard two channel set and one esc is installed, then the supplied plywood tray can be used. I also applied a little silicone grease to both shafts and the gearboxes to ensure adequate lubrication.
Radio
The drive motors have been pre-wired together in parallel to be controlled from a single speed controller. Noise suppression capacitors are fitted, although the component legs are long and uninsulated, so care is required not to create any short circuits to the metal motor casings. The water pump is also wired and installed, although I was not totally confident with the way it was attached to the hull water inlet tube, so I secured it with another cable tie and a little application of silicone bath sealant. As I wrote earlier, the model has been designed to make use of a standard two channel radio control set, using one standard servo for steering and one for speed control. With a little modification using a micro-switch sited near to the rudder servo horn so that on full turn lock, say to the left and at the same time applying a little trim, it would then actuate the micro-switch in turn supplying power to the pump and activate the water cannons. Now I do like to have full control over the model with everything requiring a stick or switch to operate various functions. So for this model I chose to use four channel Futaba r/c.
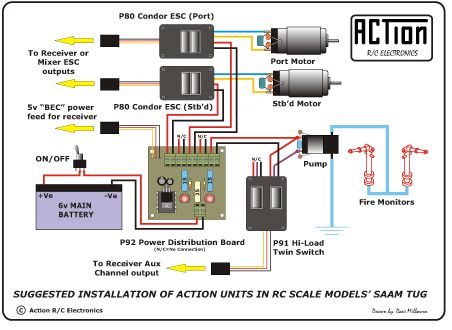
Wiring diagram produced by ACTion R/C Electronics
Ballasting
Once all the radio equipment, electronic modules and drive battery were installed, a bath check showed that a lot of ballast would be required. I used lead shot obtained from my local fishing tackle shop for easy distribution inside the hull. I place an amount of lead shot inside sealable clear plastic food bags for distribution inside the hull, adding more as required until the model comes down to the waterline all the way around. It required the following amounts: Towards the stern just behind the plywood servo tray, 4lbs of ballast and at the bows just in front of the pump, 10ozs placed as low as possible.
On the water
Once all the usual radio checks were carried out, it was time for Saams official launch. Once away, you start to get to grips with the handling characteristics. The controllers gave the model perfect smooth variable slow to full power control, with very positive steering control from both Kort nozzles. Using the left and right throttles for extra control, the boat becomes even more manageable with tighter turns and is very steerable in reverse as well. The water cannons were tried next, using the left hand stick to switch on, then a repeat movement later switched the pump off. The ACTion high power twin switcher performed well, but unfortunately the actual water output pressure produced by the 6v pump was found to be a little weak, so I will either have to increase the power supply or have a little think about the general configuration. Very little noise was produced from the two 550 type motors and gearboxes. The model could easily be used for tug towing as there is no shortage of power. Total running time before a noticeable drop in battery power from the fully charged 6 volt 4Ah battery was 28 minutes. Finally, back on terra firma, no water was found to be inside and the motors were cool.
Conclusion
For scale looks, quality and fun on the water I would rate this model very highly in the ARTR market stakes. From radio to water, as long as you have the r/c equipment to hand, it could be on the water in three to four hours. Saam makes for an ideal steering course regatta boat suitable on any size water. Saam is available to purchase from a number of sources, primarily based in the USA. As at mid-November 2008, a Google search Saam model tug produced 1320 website links. It is currently (December 2008) priced at $829 (approx. £518 plus p/p plus UK customs duty (VAT), but when I bought it the exchange rate was better. ACTion advertise regularly in this magazine and have a website: http://www.action-electronics.co.uk/


