Portholes
BRIAN KING with some thoughts
Portholes go back a long way with me. It was all so easy then, I used a match, or a similar piece of wood, to put a spot of black gloss paint on the grey hull. Provided all the blobs were more or less the same size and in a line, then no problems. Unfortunately such a simple solution no longer served when the standard of model making improved. Glazed ports became essential and that brought TROUBLE. Most of us have had similar problems and I thought a piece on the various ways of producing a glazed port might be useful.
Enjoy more Model Boats Magazine reading in the monthly magazine.
Click here to subscribe & save.
Techniques
With wooden hulls I normally drill a hole and fill with a Perspex slug about 3mm long. If carefully done this looks fine, but unfortunately there are problems. Drilling wood to produce a clean hole is not easy. All you succeed in doing is to produce a ‘hairy’ hole which is also probably not quite in the correct position. One way to correct this is to drill it out to a larger size and fill with Isopon and then re-drill. This should produce an ideal, clean and sharp hole. You could of course use this technique for all the portholes, but that then becomes a bit labour intensive. I have found, contrary to most wood machining techniques (which normally require sharpness and high speed) a blunt drill produces a better quality hole than a sharp one. Another way is to drill through a layer of thin ply or plastic fixed temporarily over the surface, but positioning of the holes may become a problem here.
Sometimes a brass tube needs to be fitted to provide a frame for glazing. You really need a lathe to part off the short tubes you require for this.
I decided that trying to eliminate the need to stand at the lathe for hours parting off Perspex slugs and/or brass tube would be a good thing, so I gave the matter some basic thought.
When I built HMS Camperdown I produced it as a waterline model mainly because it was quicker than a full hull job and I wanted to ensure it was finished before that chap with the scythe turned up. I was a bit premature on that note of doom as I’ve built Bouvet since and that took me over four years. Anyway coming back to HMS Camperdown I examined the hull sections to find that the hull from the deck down to the waterline was a flat surface except there was a slight ‘tuck in’ near the stern and I thought even with my limited tin bashing capability I could do that because I was toying with the idea of making the hull surface of 0.008 inch etched brass plate.
The more I thought about it the more attractive the idea became. Just think of the advantages. The computer could be used to mark out all the detail, ports, rigols, hatches, etc. All this with much greater accuracy than I could achieve on the bench even on a good day! Getting a finish on the etching would be a lot easier than the wood. The ports on the hull were holes in the brass etching of course, but instead of filling these with Perspex slugs I cut a recess in the wood backing (onto which the etching was glued) as shown in Fig. 1.
Fig 1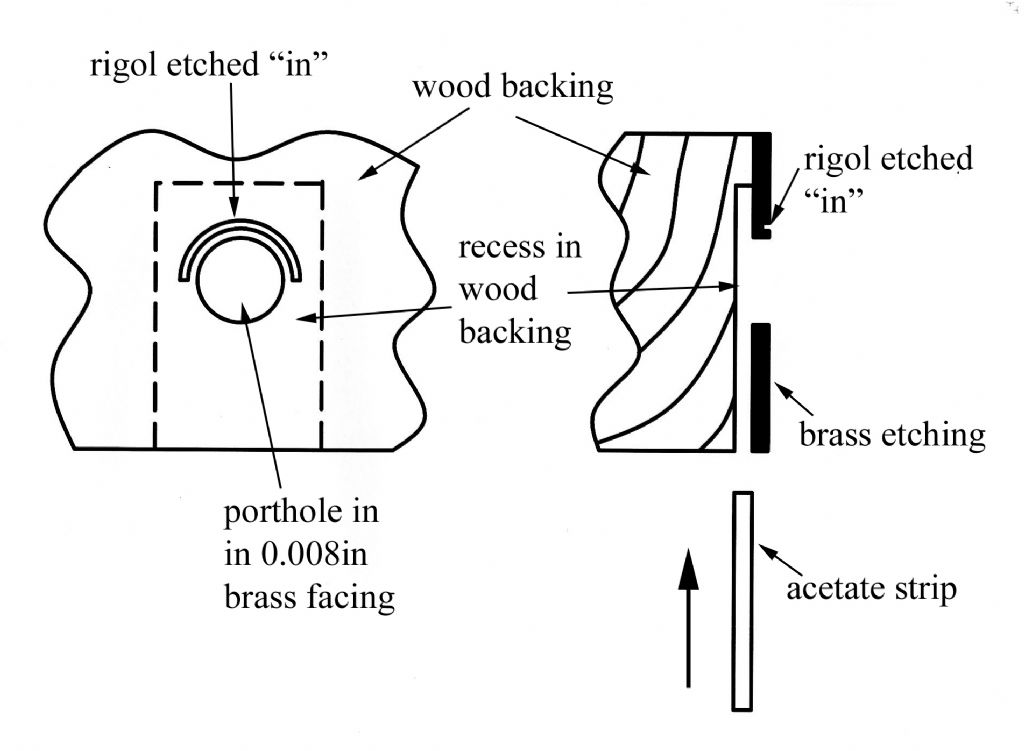
This was to house a piece of transparent acetate sheet, the back of which, was painted a suitable grey. You will note that the recess is cut from the bottom and therefore the acetate is prevented from falling out by the model being screwed to its baseboard. During the extensive spraying of the hull sides (comprising not only the basic black but also the white boot topping and the red anti-fouling below) a piece of cardboard was slipped into the recess to prevent the wood backing becoming black and showing through the acetate. Probably not really necessary, but a good precaution possibly saving a rotten clean up job afterwards.
I reverted to the use of slugs for some of the superstructure holes as I could not see then how the new method could be applied in those positions.
One of the sources of any inspiration I get has always been that marvellous book by John Leather called; ‘World Warships in Review 1860-1960’ containing photos by Beken of Cowes. The picture on the dust jacket of HMS Colossus long teased me; such an ugly ship but she is handsome! I finally decided to build her using the same methods as on HMS Camperdown. However Colossus has a clipper stern and not the canoe stern of Camperdown. This meant the method of using pieces of acetate sheet to glaze the ports could not be used. Fitting the acetate bit was the difficulty, so why not get rid of it, but how? Further thought provided the answer, paint the backing wood at the site of the port, first making sure the surface was smooth enough, with your selected grey and then put a gloss on it. I managed to find a bottle of Tamiya clear gloss and a test showed the idea to be good and very simple and time saving, Fig. 2.
Fig 2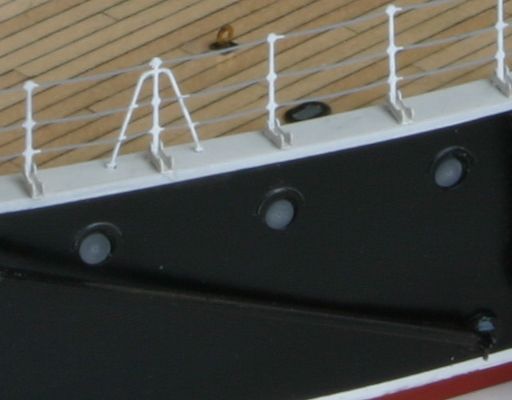
I think the development of this idea has gone about as far as it can but you never know what the little grey cells will come up with in the future.


