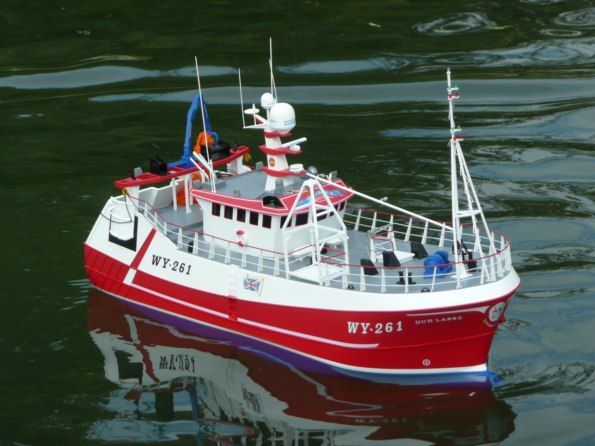
Our Lass II
TERRY SMALL reviews the Nautix A.R.T.R. model, supplied by Deans Marine
Enjoy more Model Boats Magazine reading in the monthly magazine.
Click here to subscribe & save.
A bit of history…….
Fishing boats are by their nature hard working, and once they leave the builder’s yard with an initial pristine appearance, they never quite look the same after a few months at sea.
The model
Removing the model from the packing case requires care as there are a number of ribbons and coloured cords anchoring it to the wooden framework. The first task is to remove the white polystyrene box containing the mast, antenna, crane and other small parts, Photo 2. A very nice stained plywood boat stand is supplied already assembled and which just requires the retaining ribbons removing to release it ready to receive the model. Removing the model requires a bit more work as there are lots of ribbons and cords holding it securely in place. There were a couple of minor scuff marks on the hull where these had gone around sharp corners, Photo 3, but are easily removed with a cloth and white spirit.
Internal inspection of the hull revealed a very high standard of build quality including a resin moulded motor mount glued to the inside of the hull retaining a 550 type motor coupled to the propshaft via a very strong brass and nylon linked coupling, Photo 6. The motor is secured with a pre-shaped aluminium bracket clamped over its top with two self-tapping screws. Thus, the motor can be easily removed if required. The supplied motor is wired to the included, but unmarked for power rating, electronic speed controller.
The fittings are of the same material, but some are of metal. The overall paint finish is satin and comparing the model to pictures of the real boat on the internet, it would appear to be a very good match indeed. The decals are of the vinyl stick-on type, Photo 8, and are perfectly printed. Those on each side of the model, are matched perfectly for position, which is a good sign of attention to detail. The windows are of black plastic and therefore are not clear, which you won’t actually notice too much. The hull stern openings are also just blanked off in black.
Detail fittings
The HIAB crane is a lovely little model in its own right and by adding a little netting, of the sort the sort you get with oranges from the supermarket, and draping it over the drum does help bring the model alive, Photo 12.
Radio control
The model is designed to function using a basic two channel set, so a 27MHz Futaba bottom of the range set was used, but any reasonable quality budget set will do. The receiver is located on top of the plywood box section inside the stern that also houses the rudder servo. A Robbe large diesel engine sound unit, No. 8276, was also installed to add operational realism and the speaker unit inserted into that internal stern wooden box to help magnify the sound, Photo 15. You will note that the power switch was then moved to a more convenient position just under the deck and an on/off switch for the sound unit was also added. The receiver is powered by a BEC (Battery Elimination Circuit) within the electronic speed controller. The supplied propeller and propshaft turned easily, but a spot of light lubrication can never do any harm.
Ballast
This is the killer, as you will need a lot! Before the model can be successfully sailed it will need ballasting. The SLA battery helps with ballast, but much more will be required to achieve the correct waterline, but I thought that having the model a bit ‘bow-up’ a fraction would look best. The easy way to ballast, is insert lead shot in easy seal freezer style bags and distribute these around the bottom of the hull interior. The benefit of this is that they are removable, but will also mould themselves to the hull internal shape. If done sensibly and wedged in position, the bags should not move and if you make a note of which goes where, this means that the bags can be removed to make the model lighter to carry. Alternatively lead sheet flashing can be used. This may be purchased in a large toilet roll form from a builder’s merchant. Ballasting Our Lass II will take some time and as I wrote earlier, the quantity of lead required is substantial.
Storage box
This is not essential, but useful for safely moving the model to and from the pondside and protecting it at home when not in use. My example is shown in Photo 16. This is made from plywood and strip. If you can determine the ideal size for the box, most DIY stores and timber yards will cut sheet plywood to size. 1/8th inch thick plywood is probably adequate for the box sides, top, bottom and back, provided internal stiffening is included.
On the water
A calm day beckoned, the battery was charged and a range check performed before placing it on the water and with the sound system working, off she went, Photo 17. The propeller certainly ‘gripped’ the water very well driving the model forwards and astern very easily and with minimum revs, thus indicating that the motor and esc combination was about right. The rudder motion was positive, both forward and unusually for a single screw model, not at all bad when going astern either. The displacement of the model made it very stable. The motor was well up to the task with approx. 25mins on the water from the 6 volt 4 amp battery. Once retrieved, the model proved to be bone-dry inside.
Conclusion


