Doris
ANTHONY ADDAMS super details a 1:72 scale Model Slipway Puffer
Enjoy more Model Boats Magazine reading in the monthly magazine.
Click here to subscribe & save.
When I first saw the Model Slipway kit for a 1:72 scale puffer, I immediately wanted to build one. When you see a puffer, it is instantly recognisable for what it is, namely a working vessel with loads of character. An added interest lay in wishing to add to my fleet already including the steam drifter Cosmea (also from Model Slipway) and tug Rana featured in July 2012 MB. The three models are seen together in Photo 1.
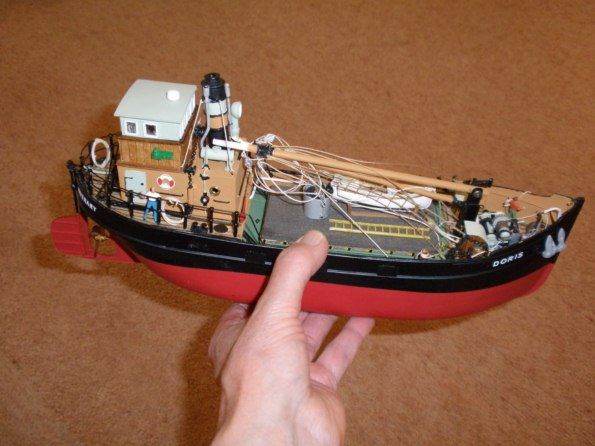
There are a variety of kits for puffers from a number of sources and those for larger scales are inevitably much more detailed than this small model from Model Slipway, which is just 13 inches long.
If the kit is built as supplied, the result will be a very nice and practical model such as this fine and neat working example by Stuart Underwood, Photo 2. However, I could not resist the temptation to add more detail to what is an excellent value for money kit. I will not deal with the kit assembly, which is fully described in its comprehensive included instructions, but rather describe my additions to this model. Small models suit my style of model making as in Photo 3!
Research
Over the years I have taken many photos of large model puffers, which have shown significant detail, not included on small model kits. I also have two books on puffers with many black and white photos of these little ships at work as well as onboard pictures. The Internet is also very useful, with some colour pictures to be found. The early puffers had an open bridge and were mainly for use inshore and through the Crinan Canal which provides a navigable route between the Clyde and the Sound of Jura and then on to the Inner Hebrides. This canal has a number of locks and reduces the travelling distance by many miles.
Later vessels for passages to the Outer Isles had enclosed wheelhouses, some of which were shaped with angled corners at the front, whilst others were rectangular. My model can be arranged with an open bridge, or a roof section can be added to make an enclosed wheelhouse.
Keel and hull
The kit comes with the hull having a port and a starboard side moulding. Before joining the two halves, a 2mm sheet was added between them to provide a more prominent stem and keel. Also, so that the model will always stand upright on a flat surface, two bilge keels were added as in Photo 4. This is an added convenience, both during assembly and in operation as the model can be safely put down on any flat surface or worktop.
At an early stage, the hull was painted matt red, as I could not feel it to be right to have such a vessel in bare white vac-formed mouldings! Later, I repainted the red and marked the waterline with the pencil held in an adjustable workshop tool, as in Photo 5. The masking tape was applied just below the drawn line so the pencil mark could be rubbed away, prior to painting. Tins of Humbrol Matt Black do seem to currently vary from being very matt to semi-glossy. One such tin had a more glossy finish which was used to give an attractive finish. Okay, maybe not 100% pro-typical, but fine by me! This may not be really correct, but it is my choice.
The lettering for DORIS is from BECC lettering. A scalpel blade is the easiest way to extract a letter from the carrier sheets and place it into position, assisted by a strip of masking tape to ensure proper alignment, Photo 6.
Electronics
The model is fitted with a number of r/c components supplied by ACTion R/C Electronics. Inside the bottom of the hull, sheet pieces were glued in forming a flat platform. This made it easy to locate the electronic components using Velcro tape so they could be removed if necessary. These flat sections also provide additional stiffness to the hull mouldings. The confusing tangle of wiring is shown before and after in Photos 7 and 8. In the bow section is the sound unit, then the receiver, battery and motor. The steam engine sound speaker is above the propshaft with the twin switcher and speed controller either side of it all. The whistle is also at the stern. To hold the rudder servo and main ON/OFF switch in place, there is a wooden beam structure. The output arm on the rudder servo has had an extension plate added to obtain the desired throw for the rudder. A smoke unit may be added in due course.
Ballasting
This was largely added before the upperworks were complete as it was more convenient at this stage. The hull was weighted with the bag of supplied castings, and a bag of stones for cargo as in Photo 9, with strips of lead making up the difference. The hulls of puffers are almost rectangular so as to maximise cargo capacity and hence they have a significant load carrying capability. The shape also enables stable beaching at low tide for transferring cargo. This initial floatation test enabled the appropriate amount of lead to be determined and a final ballasting check was done on model completion, Photo 10. Note how the stones have magically turned into coal in the hold!
Planked decks
These were made with lime strips, soaked in tea as I did not have any stain with me at the time when in France on holiday in our motor home, Photo 11. The caulking is thin strips of lime, soaked in diluted matt black paint, which penetrated right through the thin section of the lime. It was only later that the made up decks were glued to the sub-deck.
Foredeck area
The metal castings of the winch required quite a lot of fettling before assembly. The winch was painted before gluing to the deck, as were all the other fixtures on that deck, Photo 12. There is a steam pipe running all the way to the winch from the main boiler aft. The mast is mounted in a working tabernacle which allows it to be lowered as in Photo 13. Also on the foredeck is a tall stove vent. The companionway hatch and toilet are planked with lime strips and varnished with Sadolin Satin Cherry varnish, thinned 50:50. A hawse pipe for the anchor chain was also added and having a crew adds interest, Photo 14.
Bulwarks
Strips were added inside of these to simulate the steel sections that would have been riveted to join the hull plates together. At the gunwale a strip was added to make this appear sturdier. The holes in the gunwales were made by inserting shortened rivets which were from those used to form holes in a leather belt. A white insulated steam pipe on the port side connects the boiler house to the winch as featured in the Clyde Puffer book by Dan McDonald.
After deck
The main features added here were the steering chains and guides. The chains run in channels before going round guide wheels to connect to the tiller. I have not added a grating over the tiller, Photo 15, although some puffers do have this feature.
Coils of rope are lashed to the rails, with a seaman beside one. The model uses the railings as provided in the kit which are perhaps slightly over scale for a 1:72 model, but on the other hand the kit is very inexpensive, so beggars can’t be choosers! Model Slipway make no pretence of the model being exact scale.
The rudder has added stiffeners and at the top of the rudder stock, a tiller. The steering servo is set below the deck to make it less obtrusive and the thin wire linkage attaches to an arm soldered to the rudder stock, via a small slot in the hull as in Photo 16.
Boiler house and crew quarters
The funnel on top of the boiler house has a whistle at the top of the steam pipe and a further pipe at the side has a steam relief valve. The top of the funnel also has added detail as in Photo 17. This all replicates what was noticed in photos of a restored puffer.
Wheelhouse
The removable section includes the windows and roof. The vertical walls are made of clear sheet which saved the time it would have taken fitting clear windows into styrene sheet or plywood sides if either of those materials had been used. No need to cut apertures and glaze them, as the clear sheet achieved this automatically! Before cutting the clear sheet to form the four sides, it was placed over a drawing of the window positions. Masking tape was cut to size and positioned to mask each window. Then the window surrounds were glued on and the unmasked areas painted white, Photo 18. It was only after this that the sheet was cut into four lengths to form the sides. Then the curved roof and walls were glued together to make the removable wheelhouse top unit, Photo 19, which sits inside the lower wheelhouse and when in place looks just right.
The black and white tiled floor pattern was made by painting some sheet white and covering it with strips of 4mm masking tape, Photo 20. After scoring at right angles at 4mm spacing, alternate squares were removed. Black paint was now applied and then the remaining masking squares were removed to expose the white squares.
In the open bridge there is a ship's wheel, voice pipe, binnacle, chart chest, a wood grating (assembled from an Artesania accessory), plus the skipper, Photo 21. All the figures on the model are model railway accessories, purchased ready painted.
The sides of the bridge are lime planks stuck to a thin plywood carcase. A space was left between each plank to create the wooden boarding appearance of a typical wheelhouse. Sadolin was again used as the finish for the planks and Ronseal mahogany coloured gloss varnish was applied to the top rail surrounding the open bridge.
The navigation lights are not from the kit and are no doubt lying in a field in France somewhere when I lost them! These on the model are from 2mm plastic tube with a slot cut using the edge of a small flat file. A length of 1mm wire that had been previously painted white was inserted into the tube with the domed end just protruding to create the illusion of a light fitting.
Ship’s hold
Every model puffer I have seen at exhibitions has always had a cover over the hold, often with a dinghy and ladder on top. Very occasionally I have seen the hatch cover partly pulled back to expose the cargo below.
A deep box was created to form the cargo hold into which were crammed a miscellaneous collection of items that a busy puffer might transport as it sailed between isolated communities. One third of the hold is filled with coal, with a shovel carelessly left lodged in the coal ready for use. The coal is retained by dividing planks slotted between wooden guides. The coal is actually small stones collected from a beach, glued together and then painted matt black. In Photo 22 are the various items from the hold. and Photo 23 has them all loaded.
To complement the transport of coal, a large tilting bucket filled with coal was made. The screw cap from a toothpaste tube had a suitably sized cone shape, around which thin styrene sheet was wrapped to make the bucket sides. This bucket was also filled with stones pre-painted matt black. A wire hoop and release handle completed the bucket with a lead weight in the base, all suspended from the hook of the derrick boom. The operating ropes work, so the bucket can be swung out, raised and lowered as in this last picture.
Dinghy and the hold cover
The dinghy is assembled from a Deans Marine accessory and mounted on a suitable frame. A ladder sits on the canvas cover to the hold, which of course is also removable, Photo 24.
Conclusion
The model is stored between outings in a glass cabinet alongside my other small r/c craft. This is the great joy of building small models as they can all be displayed together in a smallish cabinet which keeps everyone happy in the house.
In real life, puffers had a hard and often neglected life. The seafarers who navigated such ships through tortuous channels, heaved coal, loaded and unloaded heavy loads and led a tough life. Instantly recognisable as working craft, puffers have an enduring appeal and of course VIC 32, a beautifully preserved Puffer, was featured in the BBC Coast programme.
So yes, they make great models, whatever the scale!
Kit particulars
1920’s Puffer, 1:72 scale, length 325mm (13 inches).
Kit code MS-22, price £49 + £6 UK p/p.
Available from: Model Slipway, 77 Arundell Drive, Barnsley S71 5LE, UK. Phone and Fax: + 44 (0) 1226 715576, website: www.modelslipway.com


