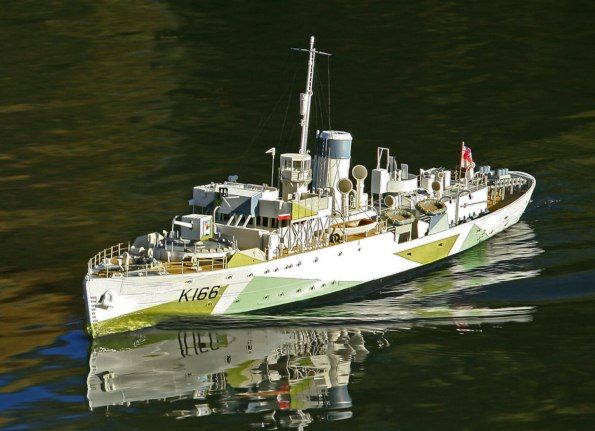
H.M.C.S. Snowberry
DAVE ABBOTT revisits the Revell 1:72 scale Flower class corvette
Enjoy more Model Boats Magazine reading.
Click here to subscribe & save.
This is probably one of the most iconic kits produced anywhere in the world. First manufactured by Matchbox Kits more than 30 years ago, Revell later took it over and continued production for a number of years. Although the kit has apparently now been temporarily dropped from current Revell list, there would appear to be plenty still on the shelves of the world’s model shops. So the purpose of this short article is to show just how easily this model can be converted into a working model, through a series of ‘how-to’ photos.
Produced as a medium sized static kit, it was (and is) large enough to convert into a working radio controlled model and this particular kit has probably encouraged many people throughout the world to start their model boating hobby. At many regattas one can almost guarantee seeing one of these on the water.
The kit builds up into a perfect size for transportation, is light in weight and can cope with the average conditions at a lake. It can be built on the kitchen table and requires only a small amount of cutting and filing to convert to radio control. Photo 1 shows the kit contents and please note that the hull is in four parts which have to be glued together. Photo 2 shows the major mechanical items required for the r/c conversion. The propshaft, propeller, motor plus its mount, coupling and rudder assembly are all available from S.H.G. Model Supplies. The speed controller selected was the Mtroniks Viper Marine 15 unit, Photo 3.
Getting started
The first task is to fit the propshaft into the hull, which is best done before the four parts of the hull are glued together. The hull will have to be filed for the propshaft tube to fit, and this can be seen in Photo 4. Do not glue the propshaft in position just yet. The two stern parts of the hull can now be glued together and the hole, then adjusted as need be, Photo 5, for the propshaft tube. The other two parts of the hull can now be glued to the stern section, double checking that they line up so the interlocking plating on the sides of the hull match perfectly, Photo 6. The glue used on all plastic to plastic parts was Revell Contact Professional Plastic Glue which is applied with a brush. Once set, a bead of clear silicone sealant (aquarium sealer type) was run along the internal joints of the four parts of the hull, to ensure it would all be waterproof.
Running gear
The motor (and its mount) will need to be installed and lined up with the propshaft and coupling. The silicone sealant is as good a way of any for holding the motor mount in place, whilst double checking a perfect alignment with the coupling and propshaft. When set, the coupling and propshaft are again lined up and only then can the propshaft tube be finally glued in place with two part epoxy. The hull spacers and deck supports plus the foredeck can also be added at this time to keep the beam of the hull at a constant width, Photo 7.
The rudder assembly is the next item on the list. A standard commercial brass rudder, Photo 8, can be cut and shaped to fit inside the two plastic kit rudder halves, Photo 9. Two part epoxy glue is best for a metal to plastic joint. Once dry, complete the final shaping and smoothing of the blade edges. The rudder assembly should now be fixed into the hull, Photo 10, and a servo installed to operate it, Photo 11. Any servo can be used and a shaped piece of plastic card was used to mount the servo glued to the hull sides.
Kit construction
It is not the intention of this article, to show how to build the detail and fittings of the kit which have been covered in the past in this and other magazines, but I am including just a couple of pictures to show this, Photos 12 and 13.
Photo 14 is of everything now together and as you will have realised, the complete deck sections lift off with the superstructure.
Radio control installation
First: A 6v sealed lead acid (SLA) type of battery was mounted in the bottom of the hull in a plastic tray, made from scrap plastic sheet.
Second: On another plastic tray is the Planet 2.4GHz receiver, the Mtroniks esc, receiver battery box and a set of electrical chocolate block connecters for the wiring to the motor etc., Photos 15 and 16. ‘Keep it simple’ is a good idea! With care and careful positioning of the battery, only a nominal amount of ballast will be required to bring the model to its waterline.
Conclusion
I hope this encourages readers to build this great plastic kit and convert it into a working radio controlled model. Even if you don’t intend to build it immediately, it is a relatively inexpensive kit and can be built later! The H.M.C.S. Snowberry Kit and all items required to convert it to r/c were obtained from: S.H.G. Model Supplies, tel: 01785 840308.

