RICHARD SIMPSON with further thoughts on weathering techniques
In the last issue we had a look at two basic yet very effective and relatively easy to apply techniques, namely ‘Washes’ and ‘Dry Brushing’. We are now going to take this a step further and have a look at a few techniques to add to them that will enhance your model even further, but we are now getting into the area of quite a bit of work required for not as big an impact as the basic weathering process gives us. Nevertheless if you really want to take weathering seriously you should consider going that bit further as you strive to achieve the level of realism you want to obtain. As was mentioned last month, the idea of weathering is not to make a model look dirty, but to make it look used and possibly worn and studying the real thing is invaluable in helping you to study the effects of this. Some of these effects will result in one-off techniques as you strive to recreate them, but they will all help to enhance the overall effect of the model.
Let’s start by considering a set of steps on the outside of a vessel. As the vessel ages, the treads of the steps could well become worn, so whereas they may well start off as neat square treads of chequer plate, they will wear in the centre. If they are steel treads and the parts on your model are in white metal this could be recreated quite simply by painting the treads then gently rubbing the paint away in the middle with a small piece of very fine wet and dry abrasive, Photo 1. If they are a wooden tread and your steps on the model are wood then exactly the same technique will produce similarly realistic effects. If the real steps are steel and your model steps are made of wood then you might want to try painting the wood with a gunmetal or metallic grey paint before applying the top coat and then again gently rub the top coat away with wet and dry to expose the metallic paint. Similarly the handrails will be worn and the paint could well have started to rub away, so once again a gentle rub along the top with some very fine abrasive will remove the paint and reveal the metallic surface below. An interesting effect to try out if the top coat is a matt finish is to gently rub a soft pencil along the top of the handrail. This leaves a very effective metallic finish which can of course be very carefully controlled and has the big advantage of being removable if you are not happy with it. Once satisfied, simply seal it with a clear varnish to prevent it being rubbed off.
Enjoy more Model Boats Magazine reading in the monthly magazine.
Click here to subscribe & save.
Deck machinery is another area that demands a lot of attention to see just where the opportunities for weathering exist and again they are all as a result of general wear and tear, Photo 2. Anything that involves human interaction such as handles and foot pedals will show signs of paint wear, but you will also see the effects of oil and grease on gears which could be recreated with the application of appropriate colour paint as well as the effects of maintenance such as panels that are removed regularly. These could well look scuffed and have chipped paint around the edges and around fastenings.
Specific application techniques
Let’s move on and have a look in a bit more detail at some specific techniques and how they can be applied to your model.
Pastels and Pigments
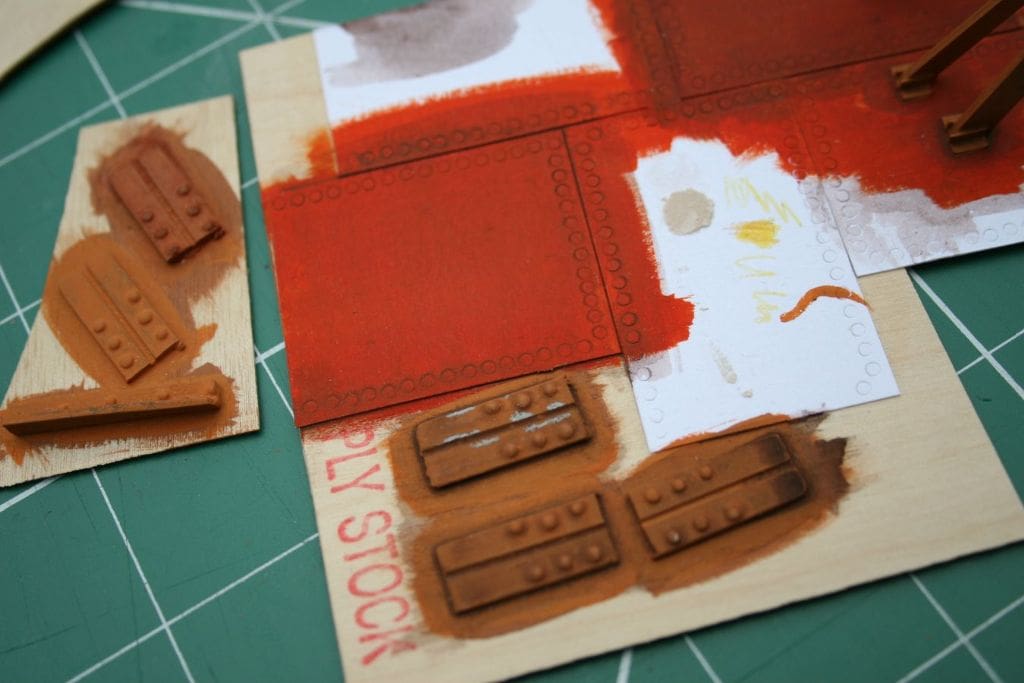
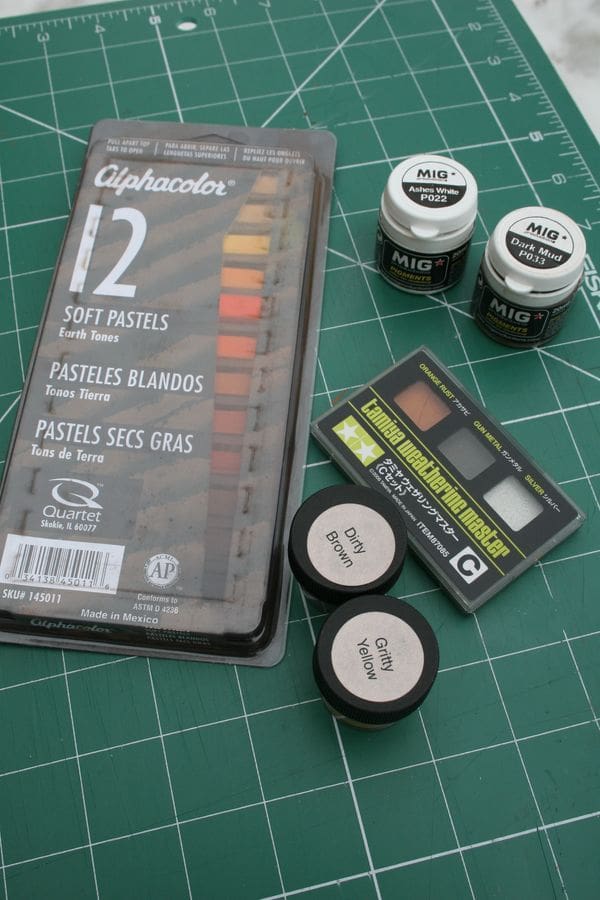
Apart from using pastels and pigments as a colour medium to mix into washes they can also be used on their own. Pigments are generally nothing more than coloured powder, not far removed from the old powder paints we used at school but usually blended into more appropriate and useable colours and a finer consistency. You can buy them individually or you can buy them in sets, quite often designed for specific tasks such as for armoured vehicles or buildings and these tend to be that little bit cheaper, Photo 3. In this powder form they can be applied directly to a model with a brush to the area you want to weather and the effect is a very soft shading, Photo 4. You can of course apply one colour over another, but the pigments are very subtle and do not have a pronounced effect.
If you want a stronger or denser covering then pastels could well be an option. These are generally the same sort of medium as pigments and come in similar colours and sets, but they are formed into a hard cake in a stick like shape so they can be used like old fashioned colour crayons, Photo 5. They apply the pigment in a much more dense form which can then also be blended and rubbed in with a brush and colours can be added over the top of each other.
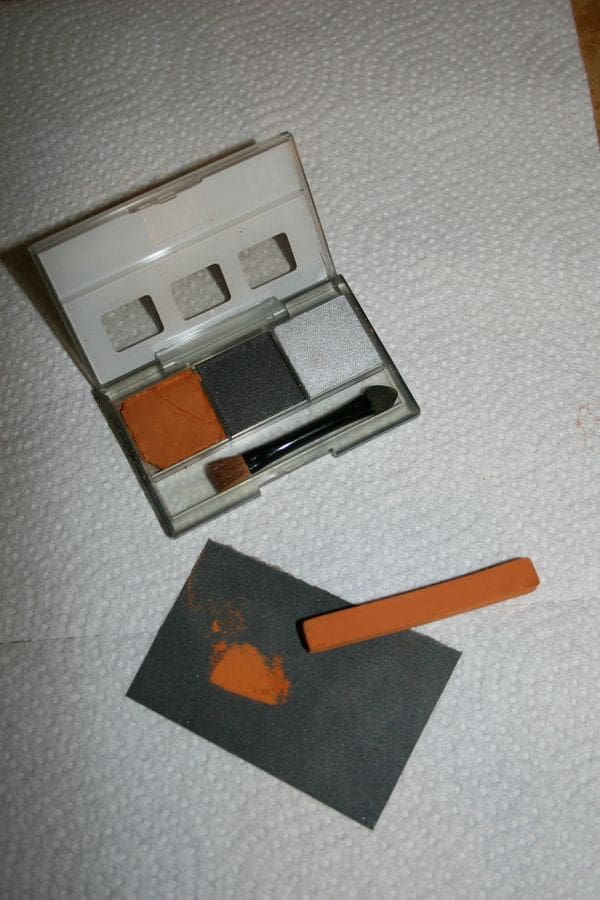
Both pastels and pigments work considerably better with matt surfaces as the rough surface holds the pigment a lot better and high gloss surfaces may not even show any effect at all. It is exactly the same as drawing a line with a pencil across a normal piece of paper and then drawing a line across a piece of glossy photographic paper. The normal paper is more abrasive and wears the pencil tip down a lot easier and thus holds the graphite on the surface. Pigments and pastels are both very useful for making a particular area grubby and dirty and when used over a wash they give more interesting colours than a simple all over wash. Once applied though they must be sealed with some sort of clear top coat otherwise they will very soon be weathered away themselves!
Oils and enamels
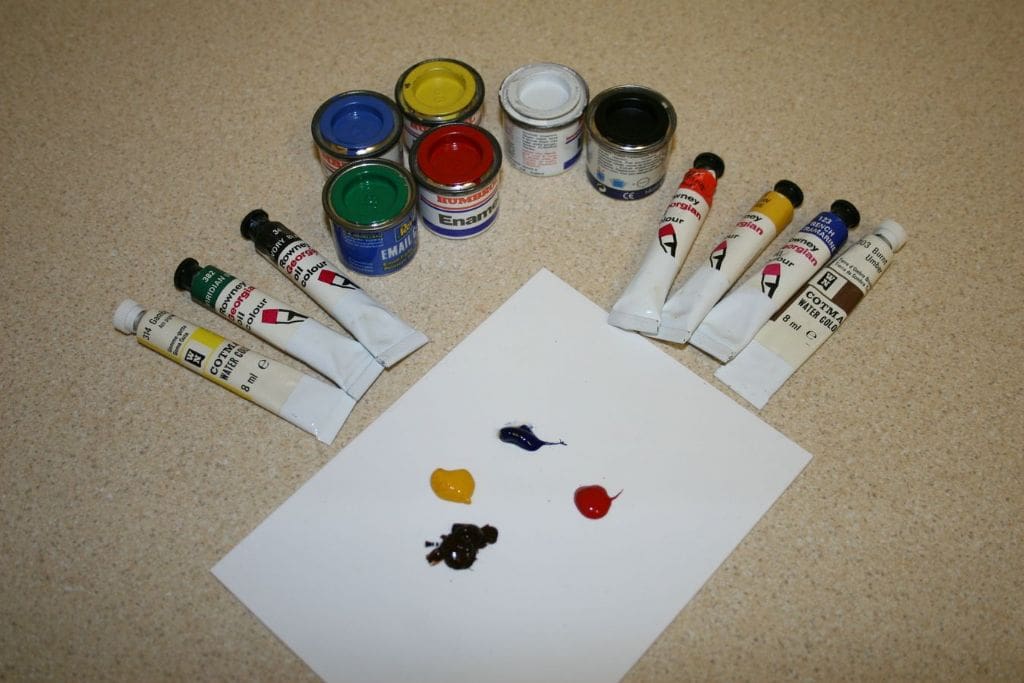
This is obviously more normal territory for most of us as we are very familiar with enamels but using them as weathering mediums might be a new area. Oil paints tend to share similar properties to enamels, but have an advantage of much longer drying times. This gives you much more time to play around with the paint before it starts to go tacky so building up of colours is more controllable. Another advantage is that they can be used over enamels without disturbing the base coat, so once again you can play around with oils for as long as you want over a matt enamel surface without fear of the enamel softening. That advantage can then become a disadvantage as you have to wait a long time before you can put anything else over the top and to get any sort of matt finish you will have to mix some form of powder into the oil paint to generate a textured surface. One interesting aspect that is opened up for experimentation is to apply oils and then dry pigments over the top of them before the oil dries. Here though you most definitely must first experiment on scrap material as you might get a reaction with the oil paint and with the clear coat sealing coat you subsequentially apply over.
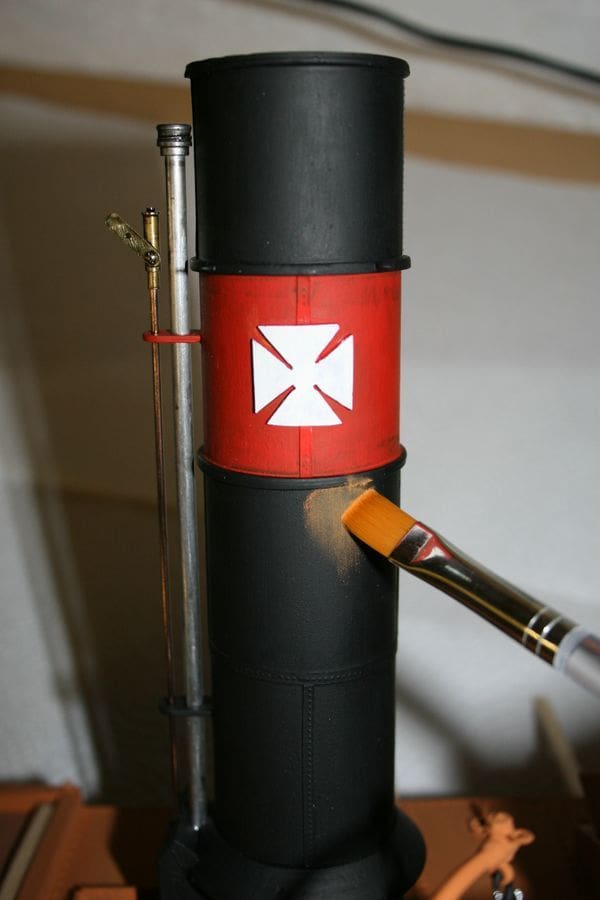
Probably most of us are used to applying enamels on our models with either a brush or spray application. It’s time to start thinking a bit more outside the box now as we venture into enamels as a weathering medium. To start with, for tools you will need a glazed surface that is impervious to the paint and preferably white. Old saucers are perfect. but check with your partner first that their perceptions of ‘old’ are actually the same as yours. Alternatively a clean piece of perspex or other non-absorbent material will do the job, but a saucer is best. On this surface, around the edge, put a few blobs of different coloured enamels that will be appropriate to the article you are weathering. Browns and reds work well with possibly a blob of green and a blob of blue with a light grey and a dark grey for lightening and darkening, Photo 6. Then start to play with it on your test piece. Mix the paints, a tiny spot at a time, in the middle of the saucer and generate the shade you are after. Keep it fairly thin with additions of thinners as your paint dries and apply in a mixture of techniques from dry brushing to solid painting and even a bit of shading and blending on the item in question. This is when it is really important to do the model as a whole rather than just one small area. This will ensure a consistency in your techniques and the model will not look odd. As with all weathering, be very cautious and gentle and don’t be tempted to overdo it. Enamels and oils generally give strong cover so what you do will stand out quite well so be very restrained to start with and use test pieces as you go along. I regularly have a test piece next to the palette and try out a technique before I apply it to a model before actually progressing with the model. This is the very technique that I use to create rust effects which we will discuss in a bit more detail later.
Physical damage
Yes, of course you read that correctly, we are going to look at physical damage. This is one of the more overlooked aspects of weathering and the one that requires particular attention to the old adage ‘Don’t overdo it!’ It is however an extremely effective way of making your model look more realistic if done carefully and thoughtfully, but this probably requires more pre-planning than any other area of modelling.
Yet again, scale plays a major part in this and the damage you are likely to see on a warship hull in 1/96 scale will not be noticeable. However the Irish Sea coaster in 1/35 scale will probably have quite visible levels of various types of damage. I can’t over emphasise the requirement to be subtle here as it would be so easy to do too much and get it wrong, but careful and controlled application of ‘damage’ can be very effective. Once again having a look around a real ship in a museum is invaluable and it allows you to see not only how fittings can become damaged, but how the ship really looks.
Let’s first have a look at very simple damage as a result of wear and tear. We have already looked at paint worn off surfaces such as handrails, but wherever crew regularly walk, the area will become worn away. Wooden deck areas around winches will be worn down and probably display damage where years of tool handling have taken their toll and there could well be handles bent out of alignment. The decks can actually be carefully rubbed away to ‘scuff’ the wood and as already described, steps can be eroded away slightly to wear them in the centre of the tread. Handrails are a really good example and are regularly seen damaged on real ships, but take care to bend them in a manner appropriate to the scale. Usually you are looking at a single horizontal rail slightly bent by inadvertent handling of an oil drum or striking with a paint platform plank etc., so do not over emphasise the bend on your model. Probably one of the biggest areas of physical damage will be around the hull and here again scale is extremely important. There is no ship at sea that doesn’t have a few dents and scratches around its hull, but the scale of your model will dictate as to whether you can see it or not. Taking the 1/35th scale coaster again as an example, there will almost certainly be quite noticeable dents and scuffing around the forward plating, vertical sides and rubbing strakes.
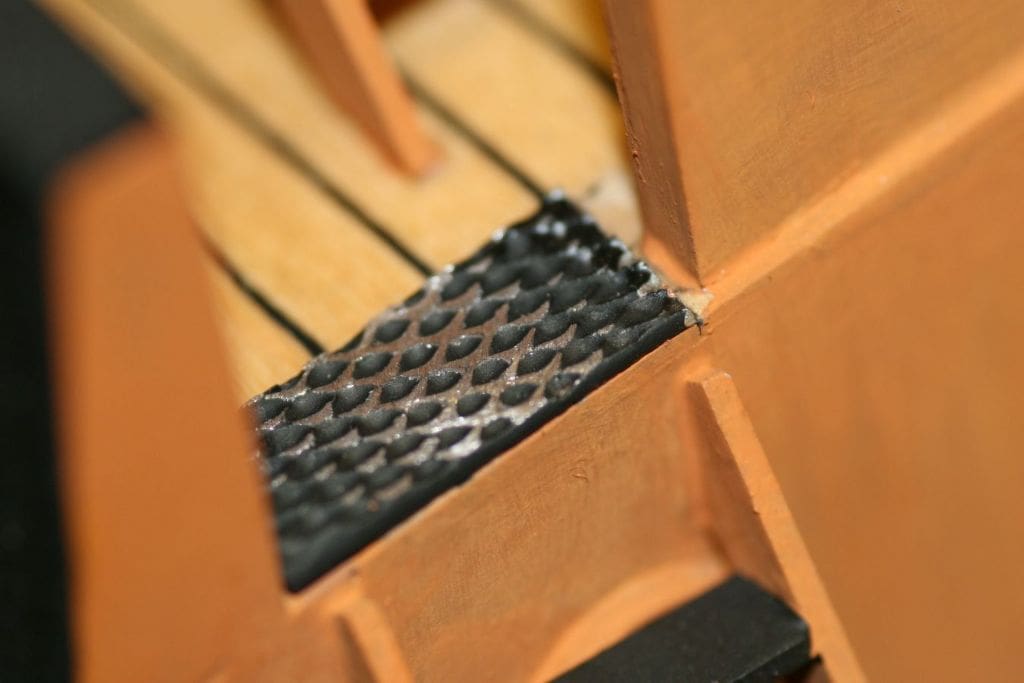
For dents of course, to attack your model with a hammer is only going to end in tears so careful removal of material with a grinding tool or abrasives is the only way. Scuffing is that bit easier and is best done with a very course file or sandpaper before painting inside the scuffs with a metallic paint and finally applying rust effects. Rubber fenders of course may have a multitude of scuffing effects on the outer surface as a result of rubbing against other vessels or the quaysides, so recreate these with a combination of paint and abrasives to build up the finish and texture you require, bearing in mind that the exposed material will now be matt black.
Although there are areas of various types of damage around the ship, there are probably not that many more that would be visible on a model except one built to a large scale, maybe 1/12th. Even here though, take very small steps to ensure that the model looks realistic, rather than to appear if it’s been in a tumble drier for half an hour!
Rust
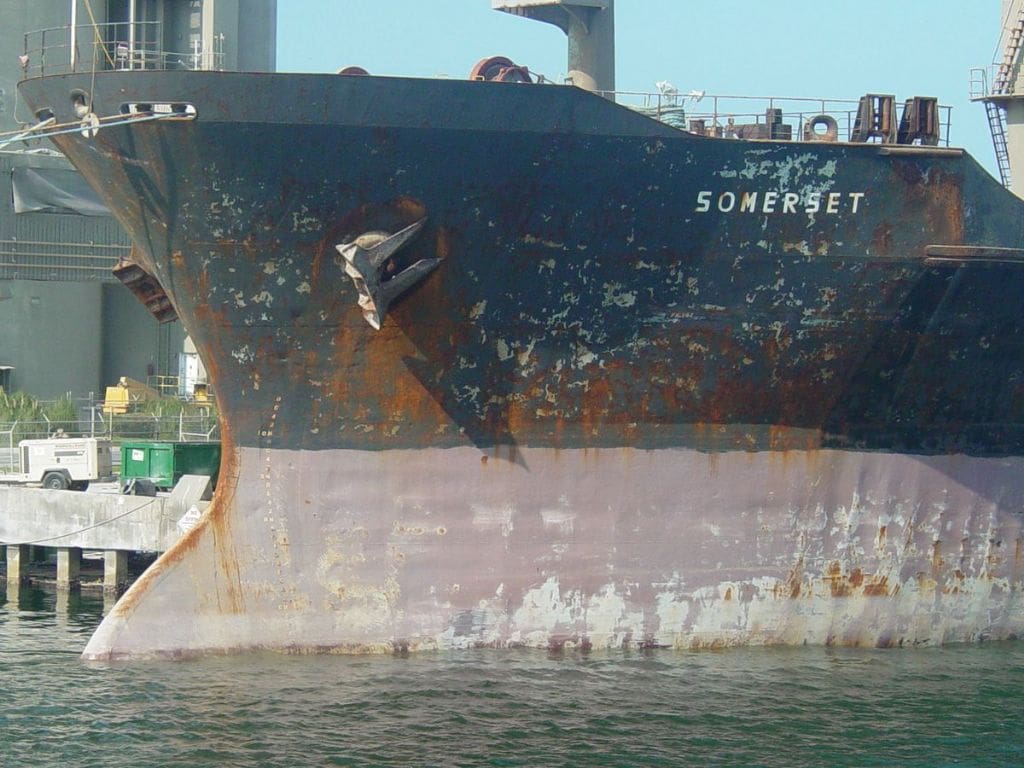
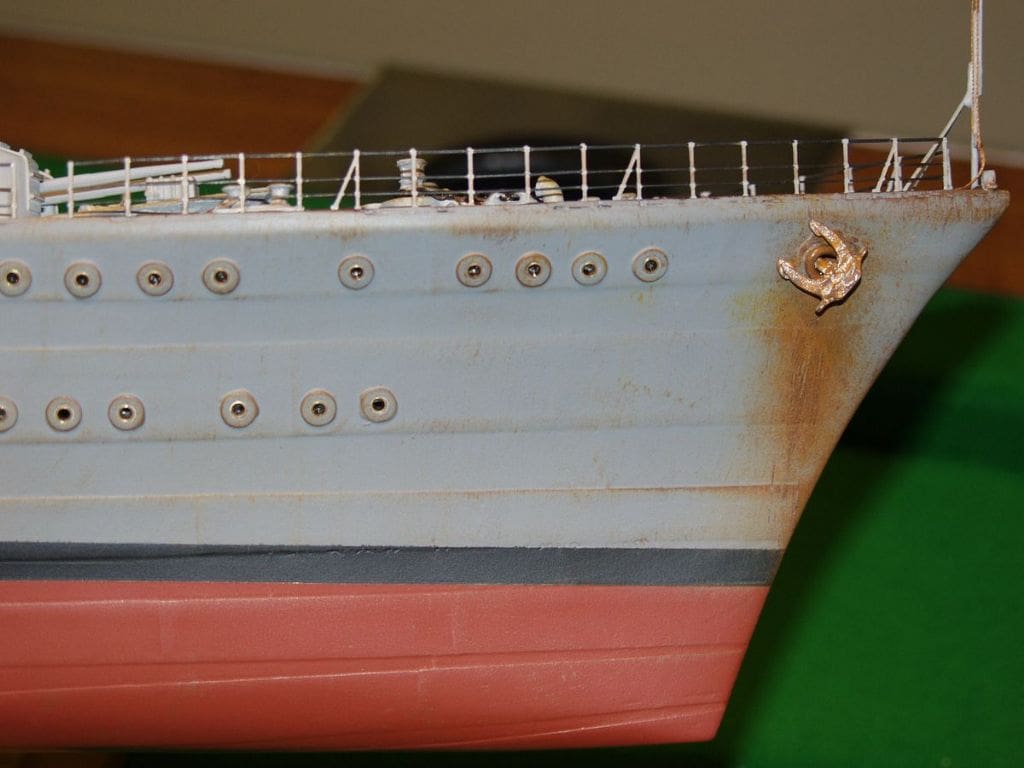
Although relatively specific, this is one of those areas of weathering that just about everyone has had a go at some time or another, probably with varying degrees of success, yet it is almost certainly something you will want to consider on a weathered model. All ferrous materials rust and when they get into contact with salt water they can rust very quickly. Maintenance of any vessel invariably involves fighting rust where ferrous materials have been exposed to the environment and adding rust to your model has to take into consideration the type of vessel, its operation and its possible maintenance regime.
Ship’s construction as with everything else is a compromise between cost and quality. Non-ferrous materials, whilst offering long term advantages with maintenance, usually cost considerably more in the first place. Consequently, although you may find brass ports or stainless steel fittings on some vessels, you will almost certainly be dealing with cast iron winch gear housings, bollards and steel hulls on a lot of them. Do your research though and don’t get carried away. Aluminium hulls and superstructure do not rust, so adding the effect will only look very wrong and adding rust steaks to stainless steel fittings will look equally odd. Steel superstructures, cast iron fittings and steel hulls are however all fair game for a bit of iron oxide.
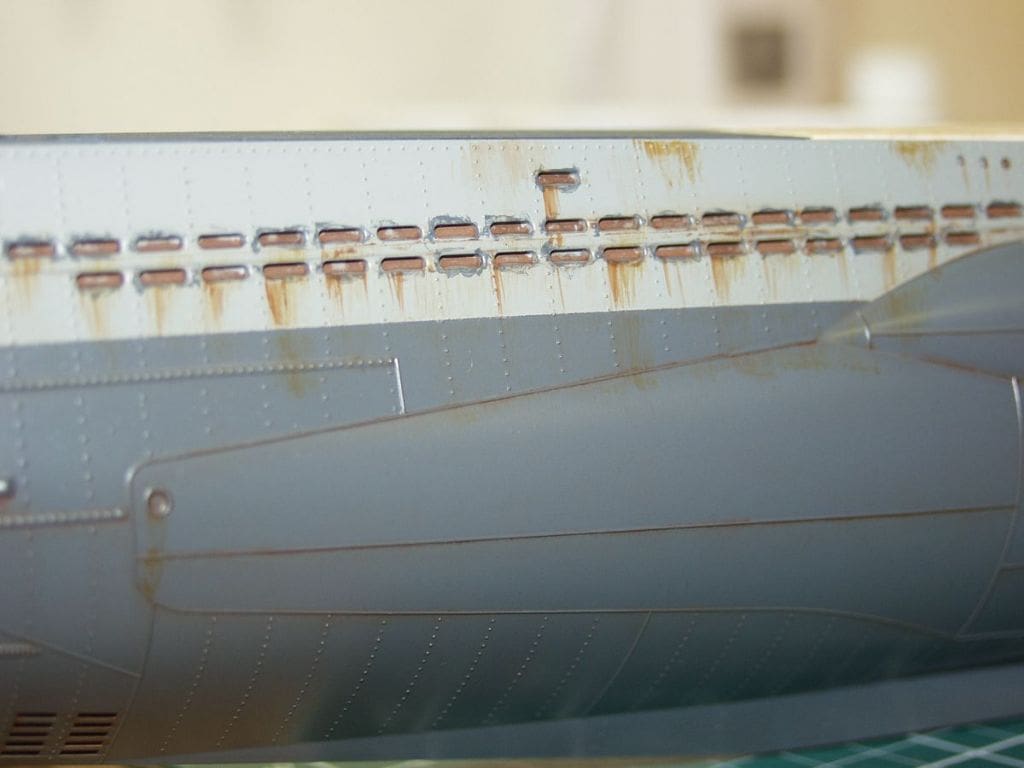
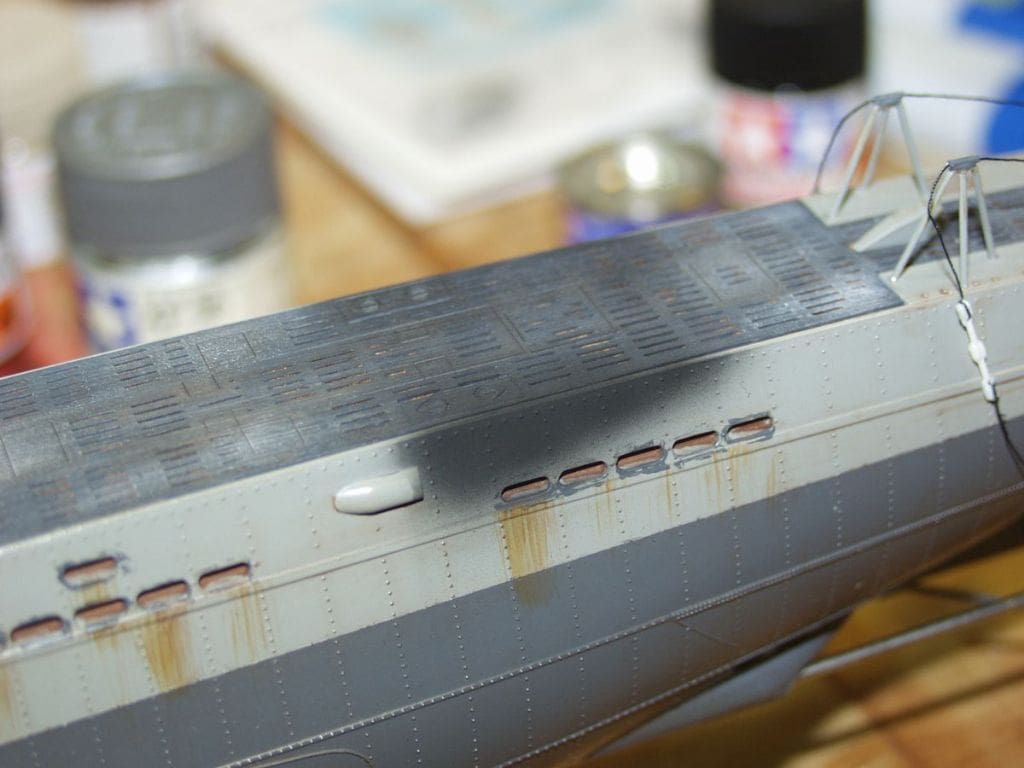
Rust can be applied in many different ways and most modellers have their own favourite. I know there are those out there who make their own real rust from corroded iron filings, but the important thing for me is that rust is never one consistent colour, so study it on ship pictures, Photo 7. It is always built up over time with the various stages of the corrosion and tends to be darker the older it is, and a brighter orange in a newer state. Ideally your rust application should reflect this, so don’t restrict yourself to a single colour. I always use the technique described earlier with enamel paints and have a palette to hand with blobs of brown, purple and bright orange on it. These three in various combinations generally produce the range of colours you are after. I tend to apply with the dry brush technique and regularly vary the mix of colours. The end result is that you should be able to make out distinctly different colours in the rust effect. Another consideration with rust is how it forms and therefore where you will put it. Although sometimes spots do appear in the middle of a plate for no apparent reason, much of it forms as a result of water flow. Consequently where water flows over the edge of hull features such as rubbing strakes, around fairleads and hawse pipes etc., you will frequently see streaks of rust at these points, Photos 8 and 9. Dry brush the rust in vertical applications in line with the flow of water and always vary the density and colour of the paint. When you have finished with the enamels it may be worth considering adding some dry pastels to give the effect of a texture and to further introduce some varying colour shades.
Another variation on this technique, and one that you may want to use in conjunction with it, is to apply the colour then go over it with a flat brush loaded with thinners only to further streak and water down the opacity. I have seen this method used with oil paints that are then streaked with turpentine, which works extremely effectively and the additional drying time you have with the paint can be used to add pigment powders or pastels.
There are also specific products on the market that are designed to give your model a rust effect straight out of the bottle. Some of these are more effective than others, but invariably most of them are nothing more than a rust coloured wash that you paint on and build up to create an effect. Again I would suggest the introduction of additional colours on top of these products to get away from the single tone that they generate.
Salt
This is something that generally seems to be ignored on many models, even those with quite a heavy application of weathering, yet salt is in evidence on all ships to varying degrees. Most cargo or utility vessels will almost certainly be washed down with salt water from sea spray or by the crew themselves washing down the ship. If you think about its formation, it is only going to be visible as crystals after the sea water has evaporated, so applying an effect should reflect this. Dry brushing is almost certainly going to be the most effective method and is the only one I have used. The danger however with dry brushing a light colour is that you could end up with nothing more than an unrealistic highlighted effect which picks out the relief detail on an area so you have to modify the dry brushing technique a bit.
First, get some matt white enamel on your palette and then tone it down with a spot of earth or dark grey to give you the colour. Then dry brush as described in the last issue, but rather than gently wipe over the detail, rub it into the model a lot harder. As with all dry brushing this will work best on a matt surface and as always, apply the effect according to the scale with which you are working, Photo 10. Another method of producing the salt effect is to add a spot of your off white enamel to some thinners and then place quite a significant size blob of it on a flat surface such as a steel deck. The thinners will dry out leaving the enamel looking something like a water mark and produces exactly the same effect as you would see on a steel deck when a puddle of sea water dries out leaving the salt behind.

Salt will also be particularly in evidence where heat is involved when obviously the sea water is dried out more readily thus leaving heavier deposits. Funnels on old coasters are a great example because spray would regularly be able to reach them and the heat of the funnel would dry out the water leaving quite noticeable salt effects around it. Dry brushing over the surface in conjunction with a few rust streaks and some soot will give you a very realistic effect.
Soot
Talking of soot, you will not find an engine exhaust that does not have soot around it, be it from a diesel, petrol or coal fired engine or a boiler, Photo 11 (the exhaust is in the side on the casing). Applying a degree of soot to the area works wonders bringing a level of realism to the model, but unfortunately it is the one substance that really has to be applied with an airbrush. You may be able to get away with a mini-spray can if you are careful on a larger scale model, but an airbrush does make life a lot easier. Some people would not consider purchasing one for single use, but perhaps when you get to the stage in your modelling when you want to experiment with new techniques and you decide to purchase one, the application of soot will be a perfect use for it. As with all weathering I try wherever possible to emulate real life in the way it is created. Painting with a small flat brush rather than spraying gives a much more realistic texture and creating the salt puddles is following the same process that creates the effect in real life. Similarly with soot, the only way to get the realistic sooty effect is by careful building up with a number of layers of airbrushed matt black paint. Also remember the effects of the exhaust on the rest of the ship and not just the funnel as well as bearing in mind the combustion process. Old coastal steamers were notorious for poor combustion, so they would tend to produce not only a lot of soot around the funnel top, but this would quite often be all over the aft mast as well. This is, of course, exactly why a lot of them were painted black, but quite often the soot would cover a wider area, Photo 12.
Woodwork
Weathering of woodwork can be a subject all in itself and the results if done carefully can be extremely realistic. It is also probably one of the easiest areas of the model to get wrong, so great care must be taken and you should constantly refer to test pieces. Whatever wood is used for the decks, vertical structures, lifeboats etc., should first be prepared as sample sections by gluing short lengths of them to pieces of ply and then finishing them in exactly the same way as the model. These samples can then be used to apply various effects to see exactly how the model can be expected to look. I sometimes have a selection of wooden coffee stirrers in my hand with various effects applied to the tip and a note written along the stick to guide the use on the model. (Writing down what you have done, and with which colours and tools, can be most useful for your future models – Editor)
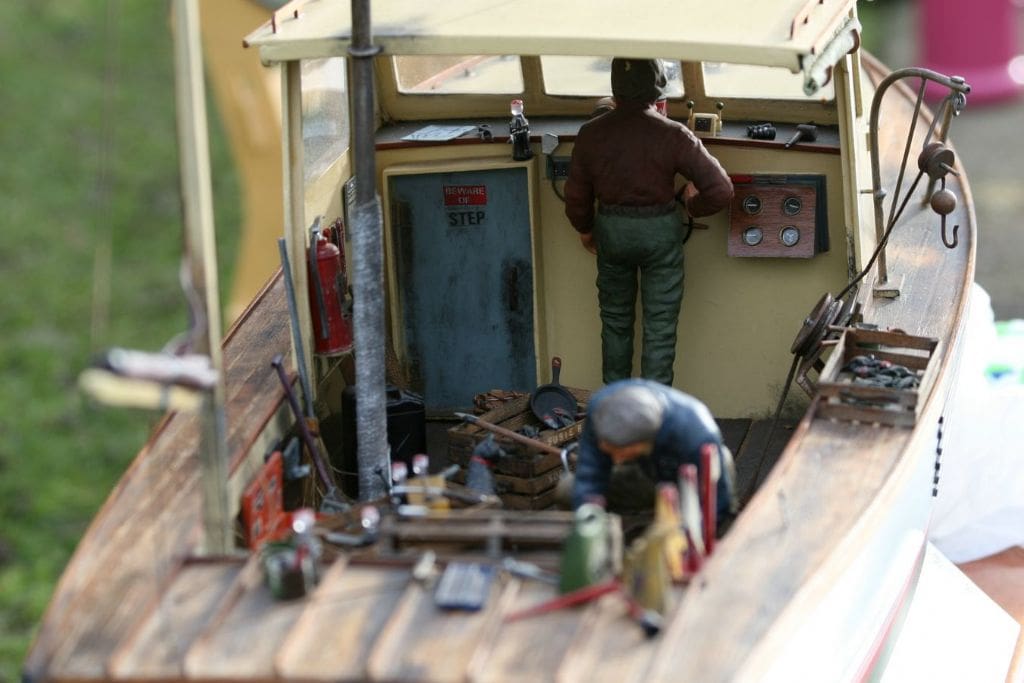
First, prepared planks as purchased may well require the surface to be roughened up slightly, especially if we are looking at a heavily used deck area. This is called ‘distressing’ and is best done with some sort of wire brush. With ‘distressing’ remember the scale you are working in and take this into consideration with the effect you are trying to achieve. You would not be able to distinguish worn deck planking on a 1/96th scale warship, so the wood would be best left in its as natural purchased condition, but certainly larger scales would benefit from some weathering effects. I have known modellers do this with wire brushes in a power drill, but I think there is far more control if a hand held brush is used. One very useful tool is a brass wire brush as used for cleaning suede footwear, but you can also purchase specific tools for the job which come like a pen with a retractable bristle, which can vary the hardness of the brush with the amount of extension. Distressing wood can be done on planks before laying them onto the model, or can be done on the model after the wooden sections have been fitted, which may be more appropriate where you may want to do an area of deck that is more heavily worn, such as around deck machinery. What you are basically doing is creating very fine scratches on the surface of the wood, which will then absorb a wash much more effectively than a pristine new plank. The washes should then be applied quite thinly and built up over a number of subsequent applications to create different depths and shades of the wash. Photo 13 is of the cockpit of a small fishing boat with planked decking around the cabin.
In conjunction with this you should also be gently eroding areas of the wood away with very fine wet and dry abrasives to simulate a bleached effect that you will find as a result of action by the sun. The amount of wash and the colour you use should be determined by your sample pieces first and you should always be referring to them and adjusting them as you progress through the model. It is also extremely important to do your entire model at one time when using a technique such as this, as it would be easy to end up with one area of a deck looking quite a different shade to another. Maintaining a consistency across the model is critical to the overall effect and the weathering applied to each type of wood, be it decking, bridge sides, deck houses etc.
Finally sealing the wood after weathering is completed is important to ensure that washes and any pigments you may have added are not then eroded. I have not come across a clear finish that is really matt from a spray can, so I usually find that a dull coat of hand painted enamel matt varnish from a tin gives a much better matt finish. Most types of wood varnish will invariably leave the wood with a satin sheen and quite possibly create a degree of colour enhancement that you usually will not want after all your careful weathering, so perhaps it is best to avoid these.
Airbrushing
As I final word I just want to mention the use of airbrushes. You will notice them used quite frequently on weathered models and they are usually used to generate dirty and stained areas of a boat. In my own experience and after studying numerous examples of weathered ships, I don’t think that airbrushes give the most realistic effect. Consequently, I use them only for one thing and that as already mentioned, is for making sooty stains from exhaust outlets. All other weathering is almost certainly better created by brush work with different types of media and trying to produce the effect in the same way it was in reality. Rust, dirt grime, salt and almost all other signs of use invariably form as a result of sea water or rain action and don’t end up being a very gentle shaded effect of a single colour. I know there are obviously a great number of supporters of airbrushing, but personally I really don’t think they give the most realistic effect.
Conclusion
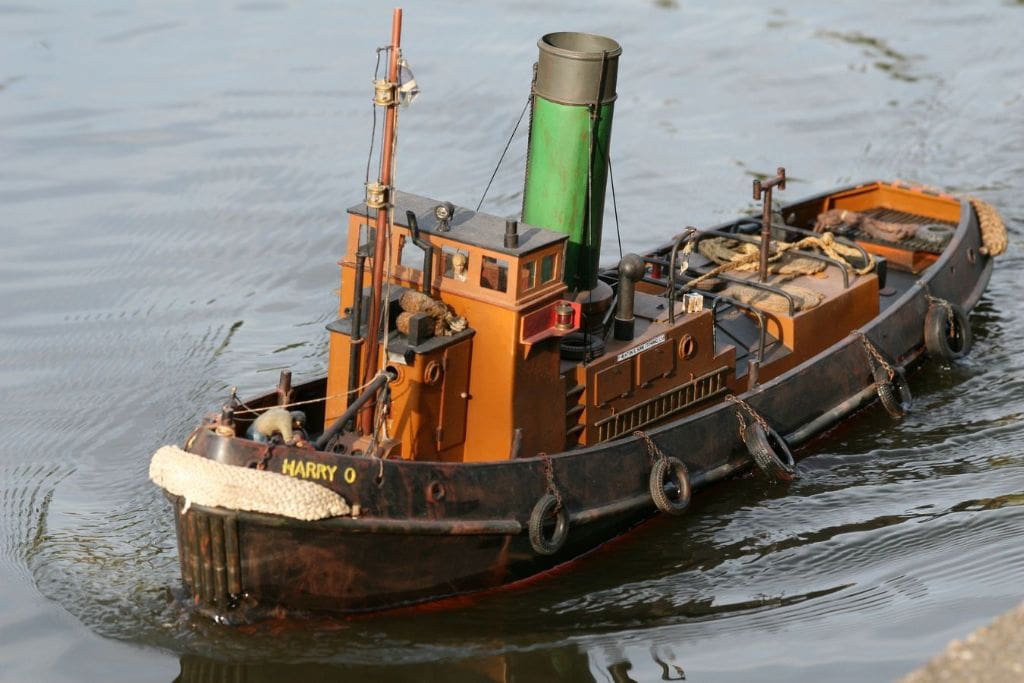
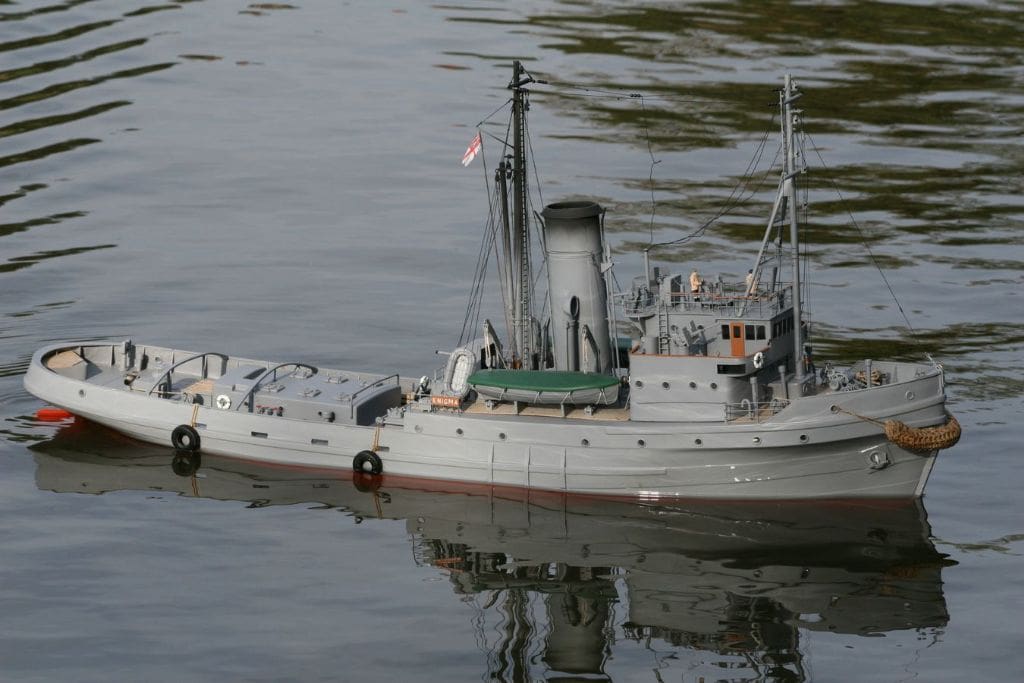
These are my thoughts on the practicalities of weathering and are not definitive, but I hope the techniques suggested are useful. Photo 14 is of a very well and elegantly weathered tug.
Start with the easy techniques and move on to the more complicated, but always experiment on spare fittings or test pieces, Photo 15. I have no doubt whatsoever that you will enjoy playing with these techniques and will be impressed with just what you can achieve with them. Never forget though, that ‘less is best’ and build up the effects slowly and don’t be tempted to overdo it.