PLASTIC MAGIC!
Vosper MTB 77
DAVE ABBOTT converts the 1:35 scale Italeri kit to radio control
Enjoy more Model Boats Magazine reading.
Click here to subscribe & save.
This is the kit that many British modellers have been waiting for, a British MTB from the Italeri range of 1:35 scale model boats. This 72ft 6 ins Vosper MTB 77 comes out at 63.1cm long and 16.5cm beam, which is an ideal size for conversion to r/c, with adequate space inside the hull for the running gear, battery, receiver, esc (electronic speed controller) and rudder servo. The kit is supplied as a static model with no information for r/c conversion, but having a one piece removable deck means I suspect, that Italeri had realised its potential for conversion to r/c prior to release. Hopefully this article will guide the modeller towards a practical working r/c model.
What's in the box?
The hull is produced as a one-piece moulding and the fittings are supplied in the usual way on sprues, together with a set of photo-etched detail parts, decals, a stand, instruction book etc.
Photo 1 is of the full colour box and within the box artwork are a series of full colour pictures of a finished model, which are an added help in construction, Photo 2. Also included is a photographic reference manual detailing the history and origin of the Vosper motor torpedo boats from 1910 to the WW2 designs and there are 21 pages of super photos covering these MTB's at sea together with detailed pictures of their wheelhouses, bridges and armaments etc. At the end of this reference manual are also depicted a range of the service colour schemes of these MTB's.
Basic construction
There is little point in giving an in-depth 'blow by blow' account of this, since if you have the kit then you will have the comprehensive instruction manual and all you need to do is follow the prescribed construction sequence, but bearing in mind your proposed r/c conversion. Since the deck is removable as a one piece unit with the cabin, bridge, torpedo tubes and deck fittings all attached to it, any conversion work in practical terms will only be on (and in) the one piece hull, Photo 3. The included photo-etched detail parts greatly enhance the model as can be seen in the pictures. So here follows some pictures of the various deck detail parts of the model to give you a flavour of what you get for your money.
Photo 4 is of the machine gun mounting and you can see how the photo-etched parts greatly add to its fine detailing.
Photos 5 and 6 are of the torpedo tubes and their torpedoes and you can just see the thin photo-etched brass support bracket under the hydraulic launch cylinder and the central lifting bracket on top of the tube. The torpedoes can be inserted 100% in their tubes, or left completely out, or be part inserted. This picture also shows the very high quality of the injection moulded components.
Photo 7 is the liferaft and it is exactly as the original with the floor slats being open to the sea beneath, a very clever bit of injection moulding.
Photo 8 is the underside of the bridge windscreen 'dodger'. Note once again how photo-etched brass has been used for the supports and how they combine very well with the main injection moulded body piece. The navigation light mountings are also folded-up from photo-etched brass components.
Full interior detail of the cabin that is forward and immediately below the bridge is included as Photo 9 shows. The cabin top and bridge unit are removable to reveal all this, but the attention to detail is outstanding. Note the control panel dials that are on the decal sheet.
Photo 10 is of the main bridge and cabin unit with the front bridge panel with its door leading down to the internal control position, still to be inserted. On that panel please note that even the ladder down into the cabin is included and that the handrails and other detail items are 'moulded-in' to the main body of the cabin unit.
Photo 11 is of the whole single piece deck and the convenient central hatch enabling access to a receiver and power switch etc.
Photo 12 is a general view of some of the parts mentioned earlier. The front bulkhead of the bridge unit is best left off for painting before final assembly.
With all the individual parts assembled, a trial 'dry run' was a good idea and Photo 13 is of that process, The deck is held to the hull by countersunk self-tapping screws hidden beneath bollards and fairleads and these locations can be seen around the edge of the deck. The whole thing fits together very well and is a credit to the Italeri design team.
Painting
It is probably best to do this after you have completed your r/c installation in the hull, although the fittings etc. can be painted as you proceed with the kit's construction. A recommended full paint scheme is included in the instructions, although you have the opportunity to complete your model as one of the others referred to in the reference manual. Humbrol paints were my choice, but the instructions include reference numbers for all the common paint suppliers. A model such as this needs to be airbrushed, otherwise the fine detail can be obscured and as is always the case with plastic and brass components, any moulding residue or grease should always be removed prior to painting. The plastic parts don't need a priming coat and their surfaces, apart from basic cleaning and inspection, are ready to accept the colour coats of paint.
Radio control conversion
The hull is a one piece moulding that is totally open at the deck level, so r/c and running gear installation is quite straightforward. However, although it is possible to install three small motors to the three shafts, I opted to have only the central propshaft driven using a Hydra 15 motor and esc combo-unit from Mtroniks. This is an outrunner brushless motor supplied with a 15 amp forward and reverse brushless speed controller and is suitable for use in small r/c model boats. Yes, there will be some drag from the non-powered outer shafts and propellers that were left free-turning, but the power of the brushless motor more than overcomes this.
A single hull mounted rudder was positioned on the centre line just behind the central propshaft as in Photo 14. Okay, this is also not pro-typical, but is a practical solution on this model as otherwise linkages would be complicated to the external transom mounted scale rudders, that would in any event probably be ineffective on this working model. The two free-running shafts (as does the driven shaft) use the original plastic propellers from the static kit, but the 2mm propshafts and tubes were supplied by S.H.G. Model Supplies as was the Mtroniks brushless motor combo.
Internally, the installation is as in Photo 15, on the basis that a decent picture tells a thousand words. The battery is a LiPo 3s 11.1v 1300mAh which is small and light, but ideal for this project. A mini-servo is adequate for rudder control and you can see how the on/off switch is just in front of the motor and under the removable deck hatch. Please remember that for safety reasons a LiPo battery usually needs to be charged away from the model. In this last picture you can see the two 'idling' outer shafts, the battery box made from scrap styrene card and the drip tray under the top of the propshaft tube which emerges into the hull immediately in front of the battery box. The small black object on the port side of the battery box is a weight to counterbalance the esc to starboard. The Planet receiver is of negligible weight. Slow-setting epoxy is as good as any for gluing to the (roughened) hull the various mounting plates for the internal components and Photo 16 is a view of the separated whole hull and deck unit. Bearing in mind it is only 63cm long, you can see just how small the motor is in this hull. Forward of it is the usual mini-toolkit, retained within the hull, for any pondside essential maintenance. If you look closely at this last picture, you can also see the locating bosses in the hull for the seven securing screws for the deck unit. These screws are hidden by the bollards etc. as mentioned earlier.
Photo 17 is of the completed model on its supplied stand and even if built just as a static model, the kit is superb value for around £80.
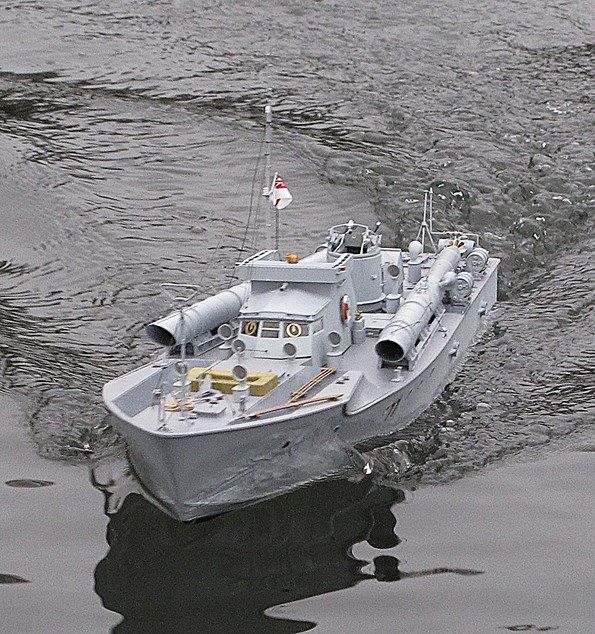
On the water
Brushless is the way to go! Small and light, such a motor is far more powerful than a conventional brushed motor of a similar size. The current range of esc's for brushless motors seem to be much more 'boat' friendly than a few years ago and the Mtroniks package although not the cheapest, does what it says on the packet. Using just one of the scale plastic propellers, it gave a decent enough scale-like performance, Photos 18 and 19. Going vastly over the scale maximum speed is not to be recommended as to be honest the hull (and model) are not designed for it.
Conclusion
A nice project. You would be hard put to build from scratch a working model with this level of detail and the conversion works well. Yes, it is not an all-weather model, but then you wouldn't expect that from something only 63cm long, or would you? Great to see a British subject at last from Italeri who are outstanding at producing high quality kits of this type.
Key information
Vosper 72ft 6in MTB 77 by Italeri, Part No. 5610, scale 1:35. Price is around £80. The propshafts, rudder and other r/c items including the Mtroniks Hydra 15 Combo can be obtained from S.H.G. Model Supplies or other retail outlets that advertise in this magazine.

