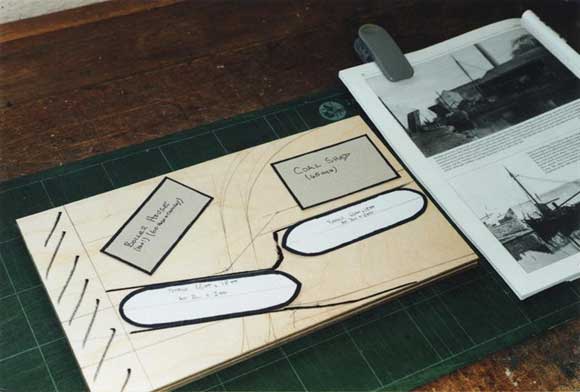
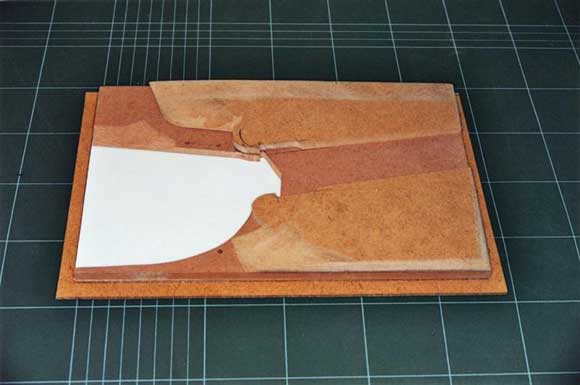
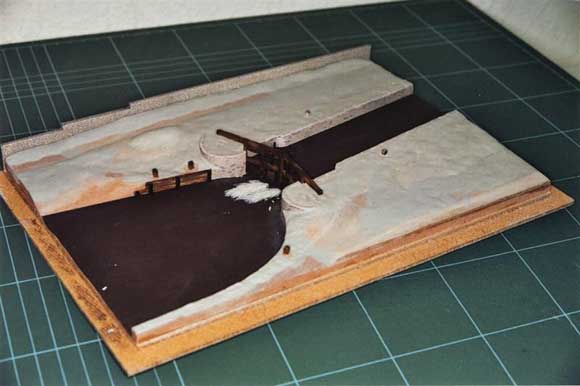
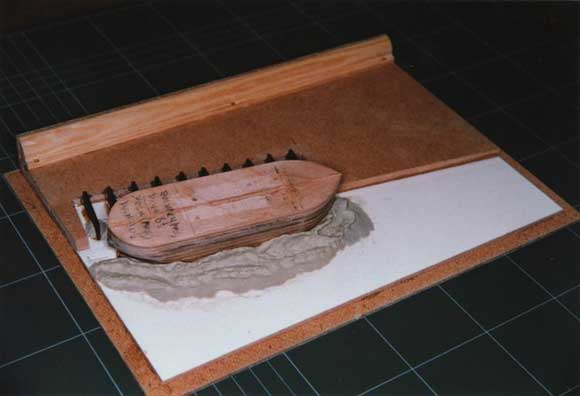
Pic 1: Evaluating the ‘Camelon Bridge’ diorama with the aid of cardboard templates and the photograph that inspired it. Pic 2: Building-up the contours for ‘Lock Thirteen’ from MDF, edges are shaped before gluing and a lip has been created to take the final trim. Pic 3: The basic contours have been blended together with Milliput and some of the infrastructure embedded.
Building small maritime-themed dioramas presents the challenge of using our imagination and creativity whilst getting involved in a low-cost table-top project that fits comfortably into the more usual pattern of building larger working models during the winter months, and then using and displaying them at the many events that give us such pleasure throughout the summer season. They provide a theme that can be readily adapted for use within a club, perhaps as an annual competition, or as a regional event with clubs modelling a scene from their own particular locality; and they also have the benefit of providing exhibits at our regular shows that are just that little bit ‘different’ and seem to appeal to fellow modellers and the visiting public. As much of the interest in this form of display arises from the range and variety of subjects, and their very individual interpretation by the builder, my intention here is to offer some personal observations that may help or inspire others looking for their next modelling project.
Pic 4: This tranquil, if mucky, canal surface has been achieved with five coats of amber tinted varnish on top of Burnt Umber acrylic paint; weed at the water’s edge was added before varnishing. These buildings are commercial items from a Railway Modellers’ range. Pic 5: Rough water is being formed from an epoxy-putty such as Milliput which may be worked and re-shaped with dampened tools for a convenient length of time. Here the plug for the Nelson’s hull is being used as a former to achieve a custom-made splash.
Enjoy more Model Boats Magazine reading.
Click here to subscribe & save.
Overview
So given an open brief, perhaps with guidelines about overall dimensions, what makes for an interesting Diorama and what is a Diorama anyway? Well what I am not describing here is a beautifully crafted miniature vessel mounted in a simple but appropriate setting such as a sea that shows the model off to maximum advantage; that is what I think of as ‘ship modelling’ and is best left to those who specialise in the miniatures that we marvel at when visiting the MEE. A diorama is simply a means of presenting a picture or story (vignette) in three-dimensions such that the viewer is drawn into the scene and may believe in the scenario being presented; hopefully their eyes are teased into looking further as more detail becomes apparent and the storyline unfolds. Activity within the bigger picture is the key to an interesting diorama provided that it doesn’t take over from the main theme, just think back to the fascination of a good model railway layout or the ceramic miniatures of ‘Olde Worlde’ cottages that have become very popular these days. Dioramas also offer a means of presenting our subject in a natural setting that conveys both purpose and scale to an audience who may have limited nautical awareness.
Inspiration
You may already have a suitable model that you would like to incorporate into a realistic setting for display purposes, or a theme, period, local scene or photograph that appeals to you and would like to reproduce in three-dimensions – and so you have all the inspiration needed to develop it further.
Alternatively a broad theme may be suggested as we do for the SWAMBC Weymouth Festival, having used ‘Nelson’ and ‘Brunel’ to connect with the public’s current interest.
Don’t be put off if a suitable scene looks otherwise bare and uninteresting; use your imagination to add what could plausibly be present just an hour later: possibly a passing yacht or tug, a cart or lorry delivering stores, a coach and school-party visiting the scene; the possibilities are endless!
If you are really stuck for inspiration then think what it was about the role of your last model that appealed to you and develop that theme: a fishing boat – unloading her catch, a small coaster – being scrubbed on a grid, a tug – fighting a fire, and so on. Remember that all marine-craft exist for a purpose; in addition to travelling safely and efficiently between two points they have a role that can be depicted and communicated by means of your diorama. One of our exhibitors was inspired by the nautical scene on a table-mat – and transformed it into a unique and delightful diorama.
Overall size and scale
A diorama can be of any physical size that suits you and your preferred modelling scale but there are some factors that are worth considering at an early stage. A maritime scene will inevitably contain one or more vessels which at typical ‘pond model’ scales will produce quite a large diorama, and, whilst buildings or harbour walls may be ‘sliced’ to fit the scene, a truncated ship will look unnatural and distract the eye. A largish diorama also requires a great deal of work to fill its surface area and could easily take over your life by becoming a major project; and then it has to be stored, transported, possibly require re-assembly for display and at best it can only depict one scene when, later on, you may like to develop another completely different theme and have to build, and live with, another one! The larger diorama does offer scope for a group of modellers to contribute smaller components over a period of time to a themed project, possibly a local maritime scene of historic interest, and as such could make a worthwhile on-going club project that would enhance your exhibitions.
Where a number of dioramas are to be exhibited together, as at Weymouth, then available display space has to be considered and tables allocated in advance; hence our guide lines that suggest relatively small dioramas for this event. However it should not be assumed that these restricted dimensions necessitate small-scale modelling; a long narrow rectangular base could accommodate a large-scale harbour front whilst a circular base would suit quite a large ‘Titanic’ on the point of sinking, or a lighthouse with a stranded yacht at its base – it just requires a little imagination! The diorama’s physical size is going to be influenced by the chosen scale (and vice versa), and the scale that is most convenient is likely to be suggested by the availability of commercial human-figures which may be used to convey the activity and purpose within your scene. These figures can of course be hand-made to any scale but I suggest that if numerous figures are required it is more practicable to chose a scale that will accommodate the many inexpensive railway, farm or military model figures (and other accessories) that are readily available.
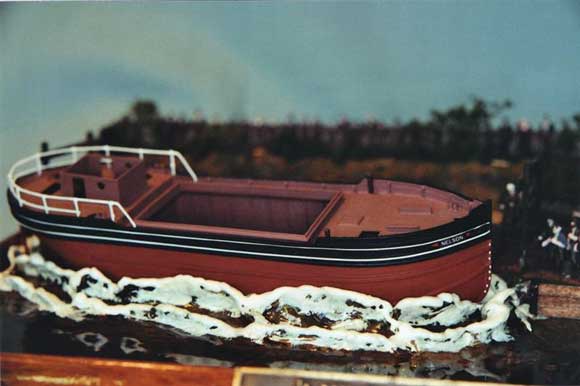
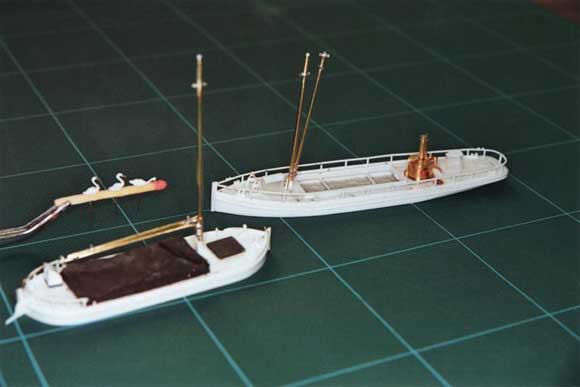
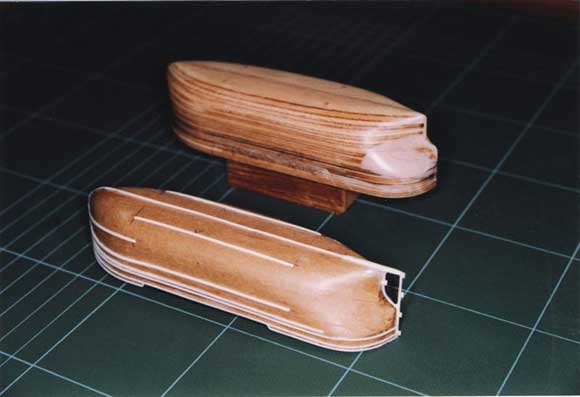
Pic 6: Alternating between coats of varnish and various shades of acrylic paint enhances the moulded contours and helps to simulate the effect of non-uniform turbulent water. Pic 7: The lock’s outflow was built-up from alternate coats of Artist’s Gloss Medium (an acrylic) and white paint on a transparent former. Adjacent timberwork was treated in various shades of wood stain to avoid a ‘too perfect’ finish. Pic 8: ‘General purpose’ trees and shrubs may be simulated from various domestic materials at little cost. Here brass picture-hanging wire has been shaped and soldered to produce a skeleton and then painted with a mixture of domestic-filler and white glue to simulate the trunk and thicker branches. The foliage is commercial ‘shrubby stuff’ and scatter-material attached by white glue and photomount spray. Pic 9: Styrene sheet, some Perspex, and brass were used to make these ‘bread-and-butter’ vessels; the puffer’s hatch was cut out to create depth and provide interest whilst the gabbert’s hatch-covers are represented by tissue-paper. The swans are made from bent copper-wire, solder and some Milliput. Pic 10: The carved plug and gummed-paper method proved ideal for the empty hull of the newly-built puffer ‘Nelson’; external details and the internal framing were represented by styrene strip and rod.
Evaluating your idea
At this stage it is worth spending some time evaluating your idea and considering how it may appear to others. Bear in mind that your small model cannot really convey the sense of perspective that you may have taken for granted in the original scene or photograph; accept that it may be necessary to apply some artistic licence and adapt the setting to make it more viewer friendly. A little time spent with rough cardboard templates of the main features allows you to evaluate and develop the original idea by fine-tuning their positions, orientation and possibly size; by setting them out on a larger area and simulating the baseboard’s dimensions with masking-tape or strips of wood you may decide to re-orientate the entire scene or change the size and shape of its base, Photo 1. It may help to simulate some of the vertical dimensions by using further cut-outs for front walls or other major features, and if you already have a vessel or building made then of course use that. As you develop your initial concept into an engaging and eye-pleasing scene you will soon become aware of two challenges that arise from the shape of boats when used in dioramas: they are symmetrical and have ‘pointy’ ends!
Given the symmetry of our subject matter there is a natural tendency to align the vessel, and hence any supporting structures such as wharfs, buildings, smaller craft and river banks with the diorama’s base-board; this consequently presents the viewer with an artificially posed scene that does not relate to a ‘snap-shot’ view of the world as seen in photographs or real life. The overall effect becomes contrived, rigid and uninviting; so try to avoid lining the scene up tidily such that it appears parallel to the viewer, it can be more inviting to be led into the subject if a quay-wall or riverbank angles or curves slightly into the scene that you are creating and then appear more natural if symmetrical objects within it lie at slightly different angles. Next consider how you might view a complex object such as a small three-dimensional model: probably by gaining an overall impression in order to decide whether you want to look more closely at it, and then by interpreting it conventionally from left to right; however, unlike printed text, objects within the diorama may ‘throw’ the viewer if they (or figures) point out of the scene, or tend to lead the eye away from the main subject. Our challenge is that ‘pointy’ boats may work against this logic and so try to avoid having vessels’ bows pointing outwards if possible, if not then set them with more scenery space in front than appears behind the craft (as with ship-models mounted in a glass case).
By viewing your mock-up from different positions you may find a more pleasing aspect than that of the original photograph; or choose to cut out an uninteresting area of water in favour of more activity elsewhere; or possibly decide that your initial idea is not practicable but that the lessons just learnt suggest another scene altogether!
Presentation
Plan the final presentation of your diorama whilst cutting its base-board as it is easier to make provision for edging strips or a glass case before any delicate detail gets added. A neat presentation can be achieved by using pre-shaped strip-wood from the local DIY store; it is readily available in hard or soft woods and in a variety of cross-sections. Simply glue the baseboard on top of a slightly larger sheet of thin plywood or MDF to achieve a small lip onto which the mitred and varnished strip-wood is later glued; add small self-adhesive feet and, if required, a homemade name plaque to finish. Small glass display cases of various shapes and sizes are available commercially and confer a very professional finish, and protection, for that special scene; it may also be worth keeping an eye open for any well formed transparent food-storage boxes that could be used, inverted, at very little cost. Dioramas may be set in a ‘light-box’ or ‘picture frame’ for presentation; this is an open-fronted box with a decorative edge that has the advantage of controlling the viewer’s interpretation of the scene and allowing concealed lighting to create atmospheric shadows and bright spots; it also results in an attractive insert to the domestic book-shelf for display.
Construction
If you have already built one or more working scale models then you will be pleasantly surprised at just how quickly your well planned and thoroughly evaluated idea develops into a satisfying three-dimensional object. This really is table-top modelling, requiring only basic facilities and whatever readily available materials you enjoy working with; it is also a very forgiving form of model making in that any mistakes are easily accommodated by using another shade of paint or a suitably placed barrel! Obviously the modelling can become as challenging as your skills and motivation warrant, the scope for scratch-building and fine detail is limitless, however for a first attempt it may be advisable to concentrate on the artistic presentation of the scene and the groundwork, and then use whatever commercial items seem appropriate, modifying them as required. I would assume that most maritime dioramas will include some form of land-mass as that does represent most people’s experience of seeing a ship, and I suggest that the land is far easier to replicate than a realistic looking deep-sea wave pattern. Constructing the land, its features and infrastructure are more usually the province of the railway or military modeller, their specialised books and commercial accessories are readily available to us for the maritime diorama and the following brief observations are meant to be no more than an introduction to this fascinating type of modelling. There are broadly three phases to be tackled when constructing a maritime diorama: groundwork, infrastructure and the marine craft.
Groundwork
Whether modelling a seascape, the land, or the boundary between them you will need to construct the contours that add the third dimension to your scene. On smaller dioramas the various elevations may be simply built-up from suitable thicknesses of scrap wood, shaping and distressing their edges before gluing in place. MDF off-cuts are ideal, being a stable form of timber with a clean surface and easily worked, but virtually any handy scraps will do, Photo 2. These elevations can then be moulded into a convincing land-mass by the use of domestic filler or clay; an epoxy-putty such as Milliput has become my preferred material as it can be shaped with dampened tools for some time, have structures gently bedded in and then removed for detailing, and it produces an ideal surface for later work, gluing and painting, Photo 3; it is not prone to the cracking that I have experienced when using clays in thin layers and is ideal for rough water and seascapes.
Larger dioramas, or large elevations, warrant a visit to your local craft shop where you will find a comprehensive range of materials such as plaster impregnated bandages that may be draped over rolled-up newspaper or wire formers, various types of Plaster of Paris and bagged paper-maché, assorted air-drying clays and other goodies that are more economical than epoxy-putties for large areas – but do bear in mind the overall weight of your finished project! Areas of water may be simulated in any number of different ways and it is well worth experimenting to find a technique that suits you and looks realistic.
Various commercial products are available that are meant to simulate water surfaces but you could start by simply using a few coats of varnish over a flat painted surface to represent smooth water, Photo 4, and building up rough water effects from Milliput before painting the area, Photo 5. Try varying the shade of your painted surface with darker colours suggesting deeper water and with green(ish) weed and scum being subtly simulated before the varnish is applied, Photo 6. I find that four or five coats of domestic floor-sealant suggests a mucky but reflective surface for slow-moving water and then build up disturbed water effects in Artist’s Gloss Medium, Photo 7. I have seen very convincing open-sea surfaces sculpted in Acrylic Modelling Paste and you may find that five-minute epoxy produces a suitable effect for small areas or have some casting-resin to experiment with; just be wary about overheating or cracking with these materials and watch out for the ‘meniscus effect’ at your quay wall!
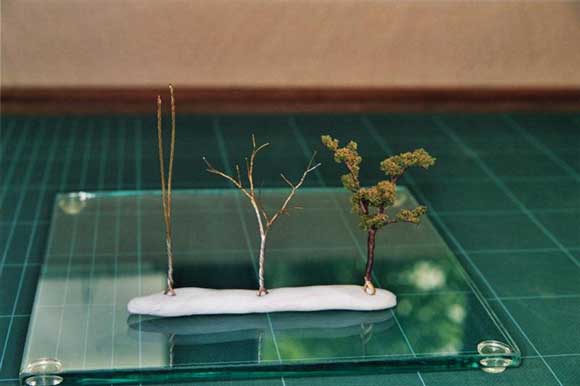
Giving life and colour to the terrain may well lead you back to your local craft or model railway emporium where you will find just about every form of ground cover from paving stones to vegetables and many realistic, and some less convincing, miniature trees and bushes; the choice and expenditure is yours but do think carefully before choosing those with unnaturally bright colours! An alternative approach is to ‘grow your own’: trees and shrubs can be made from brass picture-hanging wire and domestic filler with commercial shrubbery spray-mounted in place, Photo 8; and a few minutes sweeping-up the backyard will produce plenty of non-uniform ‘stuff’ that can be sieved and washed before being scattered over areas of white glue to provide a textured surface. Small twigs are similarly cheap and plentiful but dry them out in the oven before use.

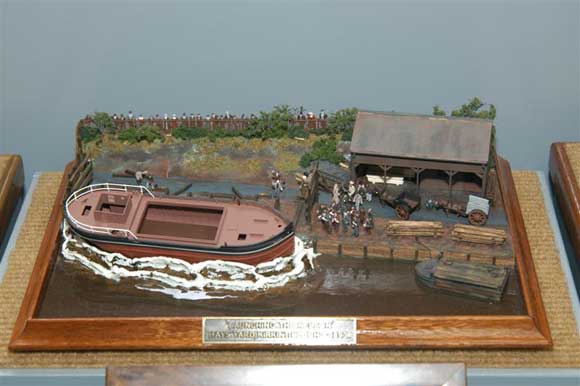
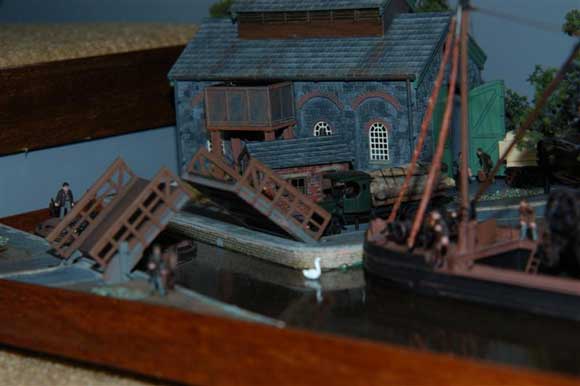
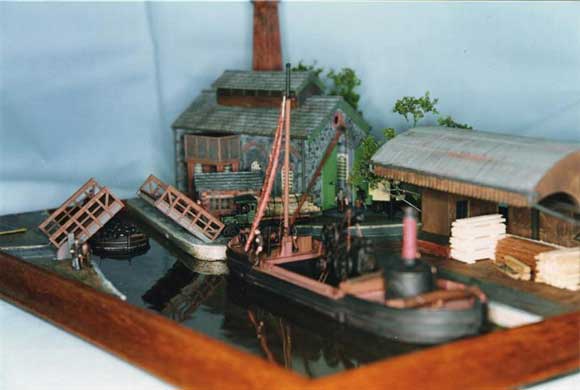
Pic 11: The completed diorama benefits from a polished surround and viewers appreciate some information that identifies the inspiration for the scene. Pic 12: ‘Launching the ‘Nelson’, Hays Yard, Kirkintillogh – 1893.’ Image: Jon Godsell. Pic 13: ‘Camelon Bridge, Falkirk – 1900.’ Image: Jon Godsell. Pic 14: Note the brickwork on the building. Image: Jon Godsell.
Infrastructure
Buildings, hardware and figures provide the context, period, activity and sense of purpose that we are trying to depict. Whilst not detracting from the marine subject they become the supporting cast that create the realism and much of the interest for the viewer who is invariably more familiar with their appearance than with the adjacent vessel. Larger structures such as warehouses or dwellings may dictate the layout of the entire diorama but can usefully be cut-down and used as a curtain or backdrop to enclose and restrict the scene; their impact is such that an interesting commercial kit may have suggested the rest of the diorama, and then the vessel! Try to anticipate major structures when contouring the terrain and allow for them to be ‘bedded-in’ or otherwise have their base to groundwork join hidden; gaps at foundation level or walls that aren’t vertical will soon be noticed and detract from an otherwise realistic scene.
Every imaginable structure and piece of hardware is available commercially if you have chosen to build your diorama to a popular military or railway modellers’ scale, typically between 1:35 and 1:150, with a more limited, and expensive, selection outside this range.
Alternatively you may wish to build some or all of these fittings from scratch; styrene is an ideal material for modelling buildings and it is worth looking at the many commercial embossed-sheets that simulate tiles, stonework and timber finishes. Accessory packs of widows, doors and fittings such as guttering or fences are well worth their cost and can enhance the overall effect for little effort. I find it useful to build up a supply of small off-cuts and strips of wood from other projects and treat them with various shades of domestic wood stain; they are then readily available to simulate rough baulks of timber, shuttering, cargoes or to be placed strategically over some earlier mistake. Positioning and posing figures or mobile objects such as vehicles should be approached with care, always ask yourself ‘why is that figure/object there and what is its purpose’ – because the viewer will!
One of the side effects of this form of modelling is that you begin to look around your everyday environment more and notice all sorts of detail such as the ‘bonds’ of brickwork, the variety of colour on roofs and the actual shape of trees – things that you took for granted before!
Ships and boats
As the majority of readers will have previous experience of building models of boats and be comfortable with their own preferred materials and techniques I will say little other than mention that, as the diorama does not warrant a structurally sound, watertight working pond-model, the vessel really can be an extremely simple representative object made from the most convenient materials – and be quite a rapid and satisfying project in its own right.
At these smaller scales I have used styrene to construct ‘bread-and-butter’ hulls, Photo 9, and even ‘sticky brown paper’ shaped over a carved plug to produce the hollow shell of another, Photo 10. Assorted sizes of styrene-strip and rod are ideal for fitting-out these small models, being easily worked and glued – and then modified if required. A selection of small diameter brass rods and copper wire is useful for the finer detail and worth considering for masts and derricks which do tend to get knocked during construction. As you build up the hull and superstructure it is worth bearing in mind that you are trying to create an overall impression of purpose and activity; this can be enhanced if hatches and doors are shown open such that the main player in your diorama appears to have depth and substance with half-hidden features available to the inquisitive viewer.
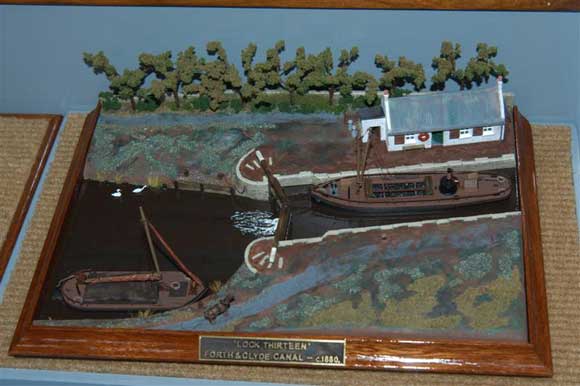
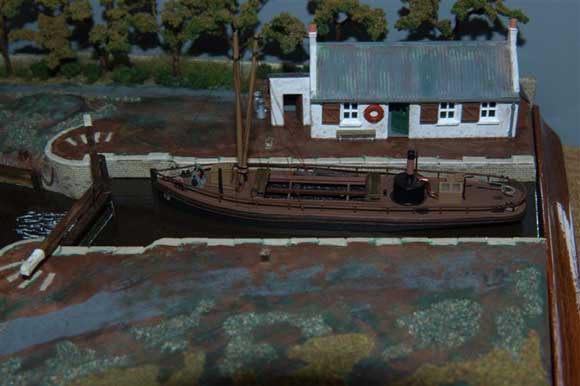
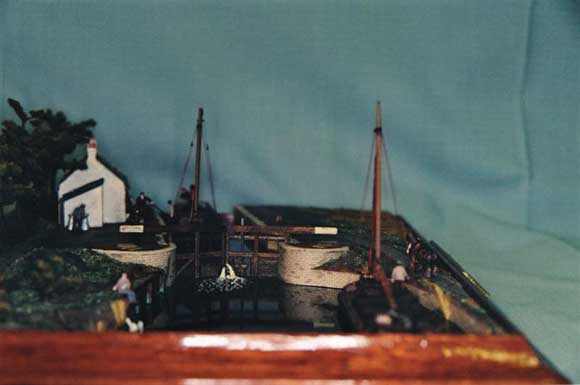
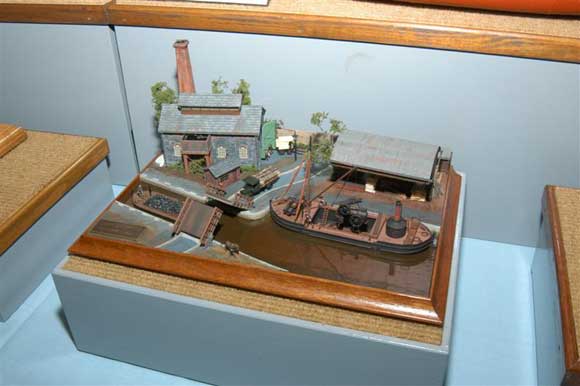
Pic 15: ‘Lock Thirteen – Forth & Clyde Canal – 1880.’ Image: Jon Godsell. Pic 16: Close up of part of the ‘Lock’ diorama. Image: Jon Godsell.
Painting and weathering
Painting the groundwork, buildings and other features of even a small diorama can be relatively time consuming, but the challenge of avoiding a perfect finish may come as something of a pleasant surprise!
Whatever type of paint, stain, ink or chalk achieves a finish that looks right is suitable for this form of ‘Artistic’ modelling. Before applying any groundcover materials or painting bare wooden surfaces the base can be primed with diluted white glue; and painting surfaces an appropriate colour before adding any commercial ‘scatter’ material avoids the wrong colour being visible through your vegetation.
I have rather taken to acrylic paints for dioramas because of their ease of use, rapid drying time and the ready availability of a wide range of shades at reasonable cost. Using different shades of wood stain on any timberwork helps to avoid producing too uniform an appearance and remember to avoid using gloss paints; if you look at your surroundings, at a comparable scale size/distance to your model, you will not see any shiny surfaces other than reflected sunlight!
‘Weathering’ is always a controversial subject amongst modellers and the subject usually generates strong views but here you are trying to create realism within a complete scene, Photo 11, and so this really is the time to weather, distress or ‘atmosphere’ your chosen subject appropriately.
Conclusion
If you have been tempted but uncertain about building a diorama then, please, get on and have a go; within SWAMBC we are still learning from each others’ efforts and I can assure you that you will develop new techniques that can only improve the standard of your usual larger-scale projects.
Be warned however, in the view of some who have tried this form of modelling, it can be quite difficult knowing when to stop adding more bits and pieces as you become immersed in your own little world!

