Sea Rover
Andy Cope’s model from a Vintage Model Boat Company kit
Enjoy more Model Boats Magazine reading in the monthly magazine.
Click here to subscribe & save.
There is something very seductive about the look of a classic vintage cabin cruiser and having already scratch built models of a Fairey Swordsman and a Sea Commander, it was perhaps only a matter of time before my attention turned to the Sea Rover. This kit was originally designed by Les' Rowell, Photo 1, and was around for some years being sold under the Aerokits brand name, Photo 2.
There are plans of this model available for enthusiasts from a number of sources, but a kit from the Vintage Model Boat Company (VMBC) definitely has some appeal. I have always been very impressed with these kits and have already built the Wavemaster, Fast Patrol Boat and Mr. Tom models from their extensive range of vintage offerings. The Sea Rover kit comes mostly pre-cut in plywood, with a full-size plan and instructions, all costing £85. Length is 29.5 inches (75cm) and beam is 9.75 inches (24.7cm) and it is powered by a single propeller. You can either use your own running gear or purchase the hardware direct from VMBC and the radio control equipment, batteries, paint and glues etc. are of course extra as is always the case with such kits.
The basic hull
With very little fettling, the basic framework and cabin sides all went together very quickly, plenty of clamps bring handy. As you can see from the pictures, the washing basket was raided for clothes pegs, but if you are going to do the same, please make sure there is no glue left on them to ensure a quiet life.
The fact that you don’t have to build this model on a fixed jig is great, but you do need to build a boat stand (not supplied with the kit) fairly early on, Photo 3, to support the model. Titebond II wood glue was used throughout construction as it sets rapidly, is waterproof and yet retains just enough flexibility to ensure the completed model boat can survive most impacts.
Skinning the hull seems to be the bit that most inexperienced modellers fear when building this type of kit, but it really isn’t a problem if you make templates from cardboard before shaping the supplied plywood. Then, as the instructions suggest, steam or soak the plywood to make it easier to bend to shape. I tend to use a single temporary screw to hold the upper and lower skins in place at the bows whilst the wood glue sets, as this gives you a secure starting point and allows some 'wiggle room' as you clamp the rest of the plywood sheet in place working backwards towards the stern. A second pair of hands might also be useful though…………
However, before the hull side skins go on, with this type of open-frame model it is easy to get the motor, propshaft and couplings all in line before losing the opportunity to view them from the side as in Photo 4. A Johnson 600 dc 6 to 12v brushed motor was installed, this providing ample power for a model boat of this size.
Deck
These come pre-etched with ‘planks’ and it is worth spending some time adjusting and dry-fitting them to ensure there are no gaps between the cabin sides and the deck pieces. Lots of Tamiya masking tape was used to hold everything down whilst the glue set, Photo 5. This tape is also perfect for masking (its intended purpose) the waterline when it comes to general painting.
With the deck sections in place and some rubbing strakes attached, there was only the painting left to do.
Painting and r/c
The deck was stained with ‘instant coffee’ (yes, that's right) mixed with cold water to create that vintage look before applying three coats of satin varnish over the stain. The hull was sanded smooth, filled where necessary, primed and painted in the conventional way.
Photo 6 shows the general arrangement of the radio control components and the varnished deck. The stern compartment is large enough for two 7.2v Tamiya stick pack batteries sitting side by side and wired in parallel, or you can use a single 8.4v battery laid sideways as shown here. The inexcusable spaghetti wiring in the bow compartment is for the LED navigation lights – sorry!
Sea Rover comes with a detachable sun roof to the rear deck area, and I think the model looks great with it on as in Photo 7. The rear seats and table are from scrap plywood, the former being sprayed with a stone effect paint and the table is based around a cabin window cut-out piece, Photo 8, which reminds me that it is always a good idea to keep the cabin window cut-outs in a safe place during the construction phase, as they can be used later as templates for the matching clear Perspex windows.
On the water
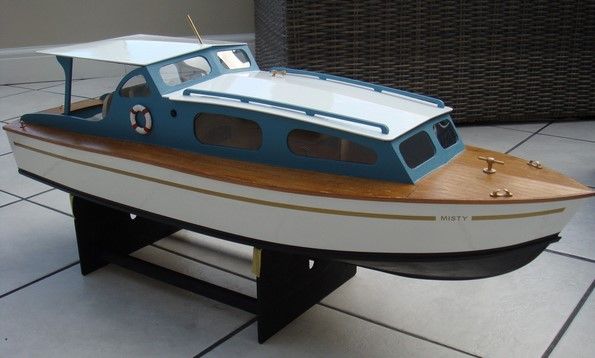
Sea Rover performs very well 'at sea', Photo 9, here without the cockpit sun roof. Mt model is named Misty, but you can call yours anything you like! It's deep keel keeps the boat sitting upright even when turning at speed and this makes it one of the most stable boats I’ve ever built. It’s a good size without being to large at 29 inches in length, and has plenty of room for r/c gear and even a detailed interior if you wanted to add it. The kit certainly presents less challenges than the smaller Mr. Tom boat pictured alongside the Sea Rover in Photo 10, a kit which is available from the same company. This smaller model is another fun craft to build, but at just 16 inches in length requires some miniature electrical components.
Enjoy your building – Andy Cope of Buxton MBC
Vintage Model Boat Company
Carousell
Spilsby Rd
New Leake
Lincolnshire
PE22 8JT
United Kingdom
Tel: 01205 270010
Website: www.vintagemodelboats.com
Sea Rover kit price – £85 +p/p


