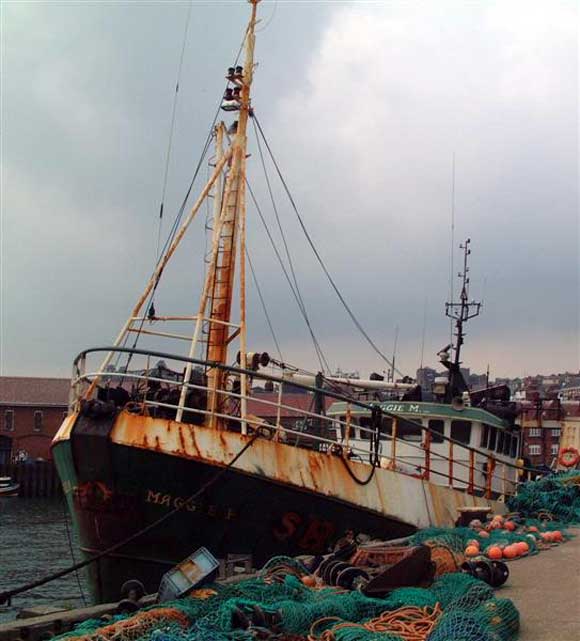
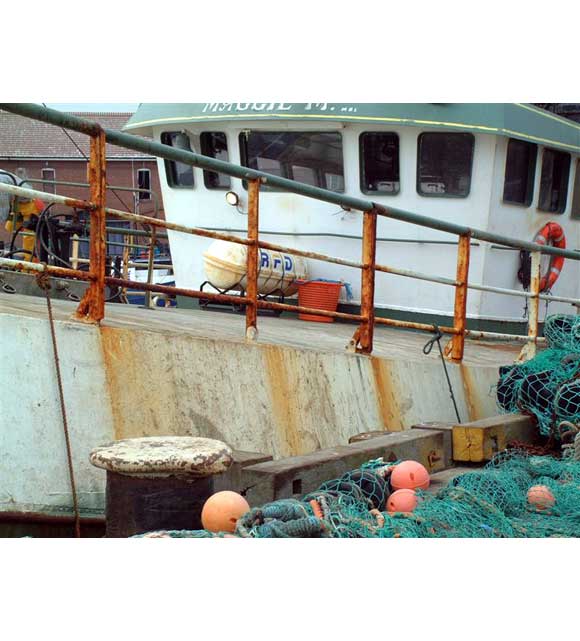
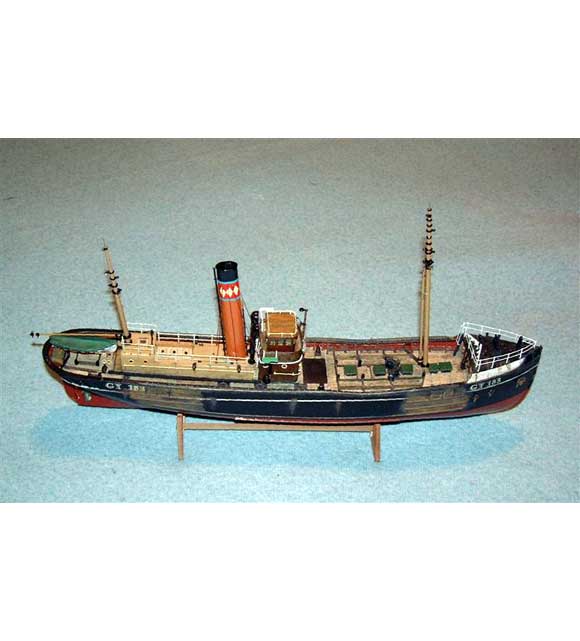
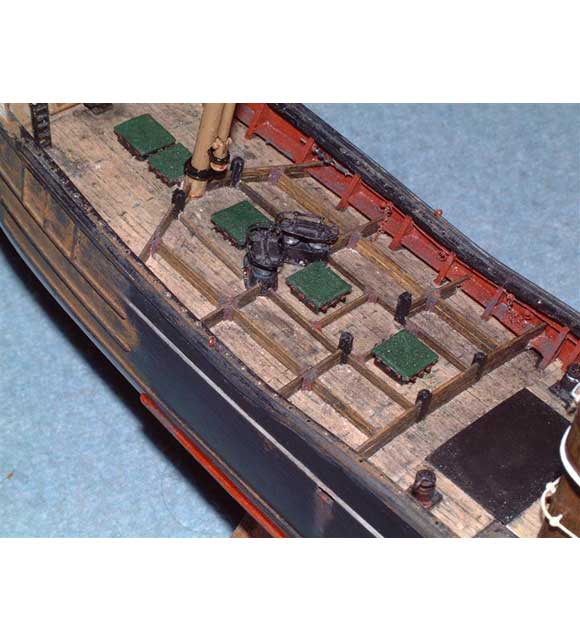
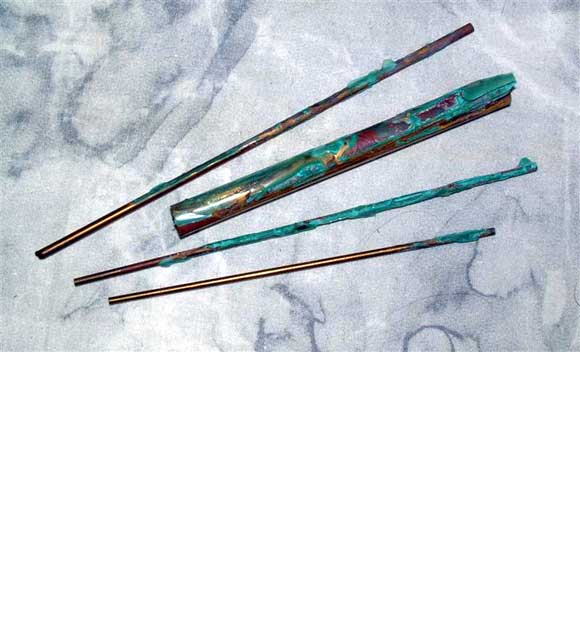
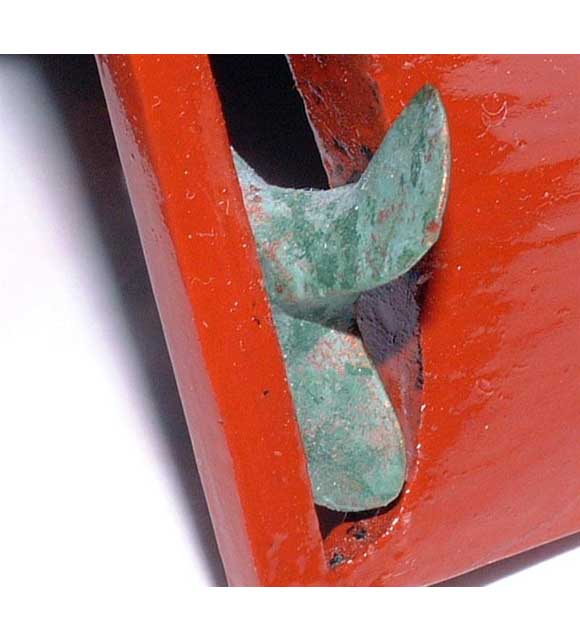
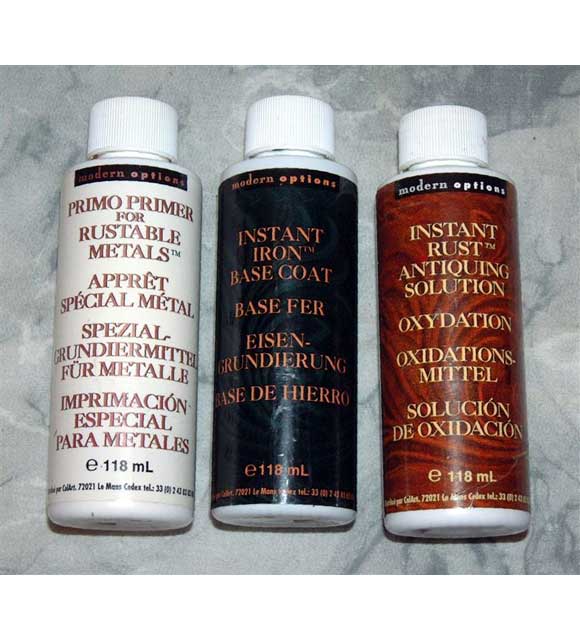
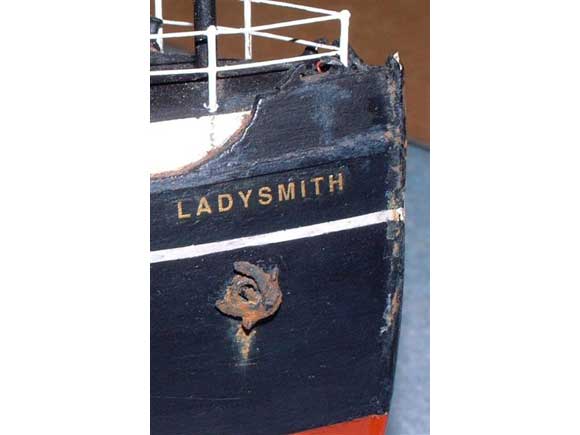
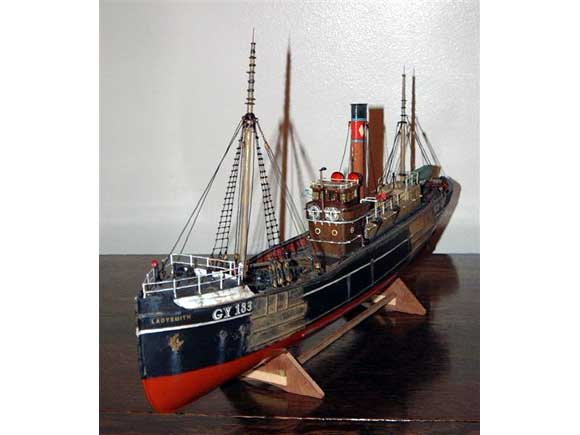
Pic 1: When you decide to give your model a weathered appearance you will have to decide upon the degree of weathering that you are going to aim for. As a general rule it is better to under-do the weathering and dirt than to overdo it, but there are some extreme examples to be seen in real life. This trawler was in Scarborough Harbour; if you weathered your model to this extent people would say that you had overdone things! Pic 2: When simulating rust and dirt on a model it is helpful to have a set of photographs of real ships to work from. This is typical of the Photos I use as reference and shows how rust streaks form at the base of the railings and run over the edge of the whaleback. Note how the rust streaks diffuse towards their edges, giving them a range of tones and hues. Pic 3: Although this model of the 1906 steam trawler Ladysmith is not complete yet, the range of weathering, wear and dirt effects are already giving her quite a realistic appearance. Pic 4: The deck planks of real sidewinder trawlers quickly became discoloured as a result of the mass fish gutting operations that took place on deck. Dovedale Studios series of videos Distant Grounds 1-8 give a good insight into the colour that is needed and I created the effect using a mixture of acrylic and glass paints. Note how the planks inside the deck pounds have been made dirtier and darker, reflecting the fact that most gutting was done in this area of the deck. Pic 5: The forecastle end and foredeck of the model of Ladysmith. Here a combination of instant rust and acrylic paint washes give a convincing illusion of dirt and rust. Pic 6: I keep these corroded copper pipes in my workshop for reference. As you can see, they show a range of colours, which I matched when mixing a set of paints for the propeller. Pic 7: The illusion of verdigris on the propeller was created entirely using differently coloured paints. Pic 8: Rust effects can be created using rust-coloured paint, but I have found that it is possible to achieve more convincing results using Instant Rust. The workpiece has to be primed first and then the Instant Iron base coat has to be applied. Finally, the Instant Rust Antiquing Solution is applied to the base coat. This activates the chemical reaction that causes real rust to form, giving authentic colours and textures.
Should we build our models to reflect vessels in pristine condition, or should we add dirt and rust for realism? There is no simple answer to this question. It depends on many factors, not least of all personal preference, but the type of vessel being modelled and the skills of the model maker are also important considerations.
At one end of the spectrum, steam pleasure launches and prestigious sailing yachts are generally kept in immaculate condition by their owners. The opportunity for adding grime to models of boats of this type is therefore limited. In contrast, many coastal fishing boats look as if they have gone for years without a coat of paint and they offer the model maker an opportunity for adding a wealth of dirt and rust details.
Enjoy more Model Boats Magazine reading in the monthly magazine.
Click here to subscribe & save.
In the notes that follow, I will explain how I have created some of the weathering and wear effects on my model of the 1906 Steam Trawler Ladysmith. This model marked a departure from my usual style of creating pristine models, so I felt nervous when I started to cover it in grime and rust. I was aware that it is all too easy to ruin a good model with poor or unconvincing weathering details, so it took a leap of faith to start mucking the model up!
If I have learnt just one thing from experimenting with weathering and wear details, it is that it is vital that you pay attention to detail. Even the smallest details can make or break the appearance of your model. I have also learnt that it can be as big a mistake to add too much rust or dirt as it can be to add too little. Generally speaking, though, it is better to under-do the weathering and grime than to over-do it. If you plaster your model with too much rust and dirt you will obscure details and the weathering will dominate.
The main effects that you can add to a model to make it look used and weathered are rust, dirt and wear marks. If you observe real ships and boats, particularly working vessels, you will see examples of all three in profusion! As with all model making, there is no substitute for observing the real thing before starting to reproduce it in miniature. You should therefore make a point of seeking out rusty ships and boats and looking at them carefully. If you do not live near the coast, you can still learn a lot from looking at rusty bridges and fences, worn steps on fire escape ladders and construction equipment, etc. You will be surprised how little you have noticed in the world around you until you start to look closely at such things, but it will all help you to achieve realism in your models! When you see good examples it is worth taking photographs because you will find it difficult to recall the details and colours precisely when you are back in your workshop.
Rust
Rust is an essential feature if you wish to create a convincing model of a well-used working boat and it can be modelled in a number of different ways. Rust coloured paint is readily available from model suppliers, but I have found that it is difficult to achieve truly realistic effects using paint alone. Unless you are highly skilled with a paint brush, rust-coloured paint often looks like nothing more than rust-coloured paint applied to the surface of the model. Real rust has a texture and it varies in tone and hue. These effects are difficult to reproduce using paint alone.
Alternatively you can apply real rust to your model. I use Instant Rust a product primarily marketed for rusting things like garden ornaments. It comes in three bottles; a primer, an iron base coat and an activating liquid. For most applications I find the primer unnecessary because the iron base coat adheres successfully to the acrylic primers and paints that I use.
When creating patches of rust I use a brush with stiff bristles to apply the iron base coat. I load the brush only sparsely and then dab the iron onto the model in the places where I want to apply the rusty effects. For areas where only a smattering of rust is required, a single coat is generally adequate. For areas where thick rust is required I use two or three coats. Each layer needs to be left for a day or so before adding the activating liquid, which I apply sparingly with a soft brush. If working in a warm room the rust starts to appear within an hour or two, but it takes a full 24 hours to develop fully. If the rust layer is not thick enough when it has developed fully, I apply another iron base coat and rust that using the activating liquid. You can continue to do this, building further layers of rust each time until you are satisfied with the results.
Instant Rust works well on large and small areas, so it is ideal for putting rusty streaks on railings and small components as well as covering larger areas on hulls.
If you look at real ships and boats you will see that many of their vertical surfaces have rusty streaks propagating from features like anchors and railings. If you use a fine brush to apply Instant Rust to the vertical surfaces of your model you will be able to reproduce these effects. Rusty streaks of this type tend to be quite diffuse on real ships, and you can reproduce this by gently sanding the rusty streaks when they have been developed by the activating liquid. If you use very fine glass paper with care you will be able to produce subtle effects that look very realistic.
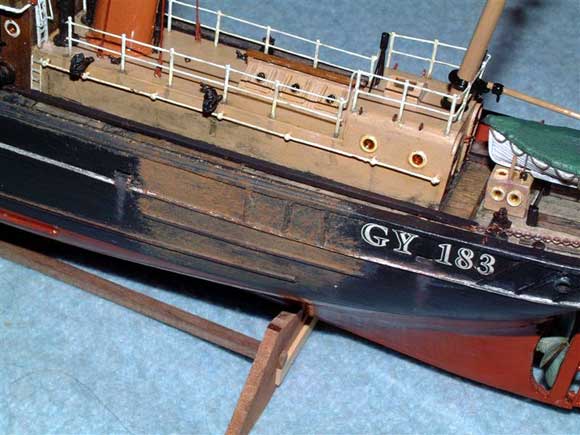
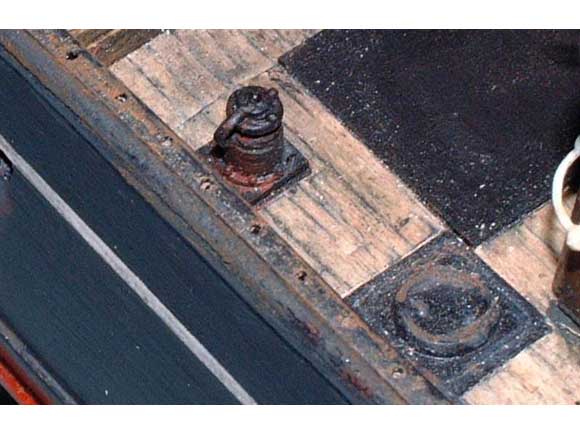
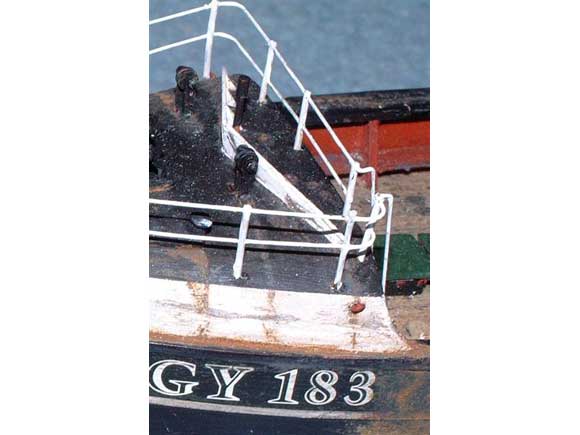
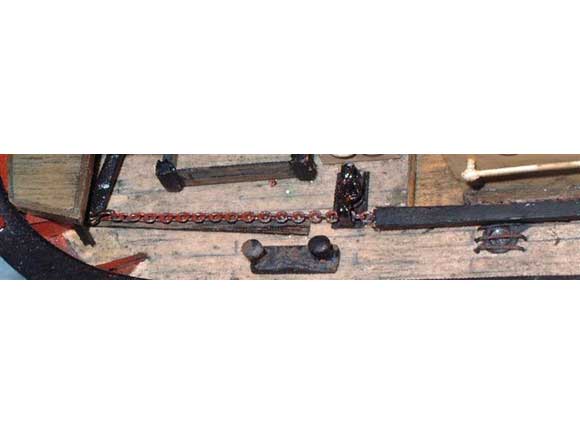
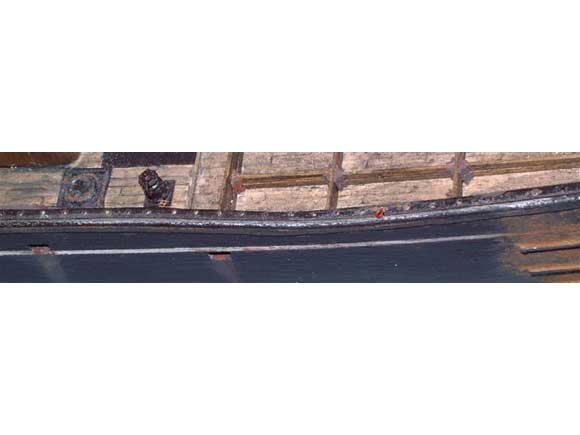
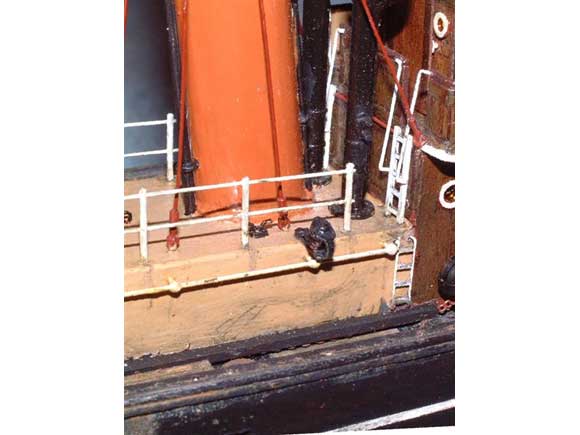
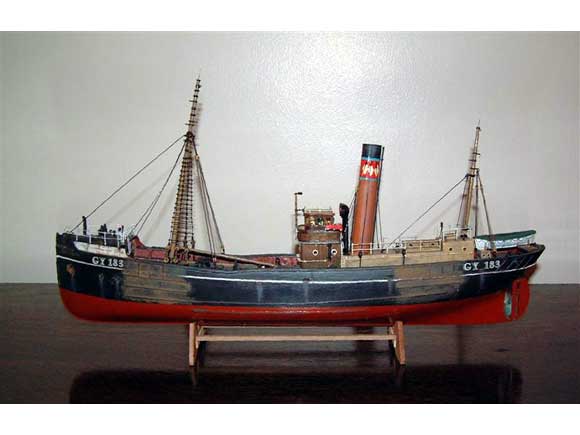
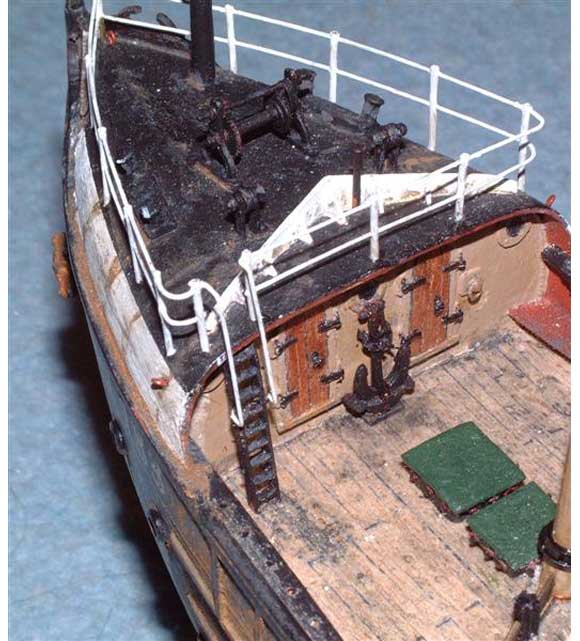
Pic 9: When the trawl was hauled aboard a sidewinder trawler the trawl doors (Otter Boards) hit the side of the ship, taking the paint off and causing large patches of rust below each set of gallows. These patches of rust were built up on the model using layers of Instant Rust. Pic 10: The rust effects on the anchor and stem of the model of Ladysmith were all created using Instant Rust. Pic 11: General rust and dirt effects on the wing bollard and rail of the model. These were all created using a stiff brush and Instant Rust. Pic 12: Streaks of rust add realism to the whaleback. This picture shows streaks that are in the process of being created. Small deposits of Instant Rust have been applied and are ready to be activated by the antiquing solution. When the rust reaction has finished the streaks will be sanded gently to soften their edges. Pic 13: Dry-brushing of silver paint over a rust-coloured base coat gave the required effect on the steering chain. Pic 14: Sidewinder trawlers had half-round metal chafing plates which were attached along the top of their rails to take the wear and tear of the trawl net being dragged over the side of the ship. The abrasion of the net as it was hauled on board removed the paint, giving it a polished appearance that soon developed a thin layer of rust. This has been simulated on the model using dry-brushed silver paint and thin patches of Instant Rust. Pic 15: The general grime on the walls of the casings and the dirty tracks left by men using the ladders were created using paint washes. These were built up in several layers to give a suitably random and patchy finish.
Other metals
It is not only steel and iron-based materials that oxidise in salty conditions. Copper and bronze components also react to form verdigris with its characteristically green colour. I reproduced this effect on the trawlers propeller using paint effects alone.
The first stage was to prime the propeller and paint it with a bronze paint that can be polished when dry. Then, referring to several piece of corroded copper tubing that I keep for reference, I mixed a range of green colours to match the various patches on the corroded tubing and applied these patches in layers, building some areas up more than others and leaving small patches of the original polished bronze-coloured paint exposed.
Grime
Few working boats have clean decks, and a model can be transformed if its deck is given a realistic layer of grime. If you look closely at real fishing boats you will see that most of their decks have a greenish-black sheen to them. I reproduced this colour for the trawler using a thin mixture (virtually wash-like consistency) of black and brown acrylic paint with the tiniest hint of dark green glass paint. The glass paint gives the mixture an opalescent quality that suggests the fish oils and other detritus that give real decks their characteristic appearance. The mixture does not dry the same colour as it appears when wet, so if you use this method yourself be sure to experiment by applying different mixes to scrap wood before you apply it to your models deck. In much the same way as I apply the rust, I built my deck colour up in thin layers until I was happy with the final colour and effect. By applying it in layers it is possible to create a convincingly patchy appearance as well, which helps with creating realism.
If you look at real deck timbers you will see that the staining is more pronounced at the ends of planks where the dirt has soaked along the end-grain of the wood. To reproduce this effect I apply a thin layer of varnish to the top and side surfaces of the deck planks before sticking them onto the deck. By leaving the ends of the planks unprotected in this way, more of the wash soaks into the end-grain when it is applied to the deck. The resultant staining therefore forms in the same way as it does in the real world, giving realism.
Wear and tear
Wear patterns are another effect that can greatly enhance the realism of your model. On real ships the paint wears away from areas that are repeatedly scuffed by boots, ropes or gloves. Handrails become polished and steps and ladders become soiled from repeated use. These are all effects that are worth adding to a model of a working boat. On my model trawler I used a dry-brushing technique and silver paint to reproduce the wear and polishing that results from dragging the trawl net over the chafing bar on the ships rail. Dry-brushing of the Instant Rust then provided the thin layer of rust that quickly forms when polished steel is exposed to sea water. As trawlermen only worked the trawl from one side of the ship at a time I only gave one chafing strip a polished appearance and on the other side of the ship I gave the chafing strip a thicker layer of rust.
To reproduce general grime on paintwork, such as dirty patches on the walls of deckhouses, I use black washes with a hint of brown. I keep the washes extremely thin and apply them in layers to achieve the patchy effect that you see on real ships. Using a thin wash offers the advantage that the dirt runs into cracks and crevices and builds up in much the same way as it does on a real vessel. It is therefore possible to achieve very pleasing results.
There is no doubt that it takes courage to move away from creating models of spotlessly clean vessels and enter the world of grease and grime, but from my own experience it can be very rewarding. If you are handy with a paint brush and have a good eye for detail you will enjoy experimenting with these effects as much as I do. As long as you take things slowly and build the layers up gradually, it is easier than you might think to achieve remarkably good results.
(Instant Rust is Product Code No. 29072, currently (as @ 03/08) £11.32 + VAT + p/p and listed by Great Art, Normandy House, 1 Nether Street, Alton, Hampshire, GU34 1EA Tel: 01420 593333, or website www.greatart.co.uk., or any good art shop – Editor)


