In the following weeks after Pearl Harbor on 7th December1941, America’s submarines were her only weapons capable of carrying the war to Japan. The three aircraft carriers that had been at sea and had survived the bombing at Pearl Harbor were held back as the last line of defence, so it was left to the submarine fleet and a large portion of responsibility fell upon the submariners to hold back total Japanese domination of the pacific. In 1941 the US Navy had only a few modern submarines at its disposal, so a grim warning was passed on to their skippers before the first war patrol, “don’t go out there and try and win the Congressional Medal of Honor in one day. The submarines are all we have left.” No one could have imagined the extent of the retribution that the US submarines would eventually exact from Japan’s Imperial Navy. In the course of the war the American boats would sink no fewer than 201 Japanese warships and over 1,000 Japanese merchant ships of more than 500 tons. Altogether, the submarines would sink 55% of all Japanese ships lost in the war, more than the US surface navy, carrier planes and the army air forces combined. This achievement, however, came at a heavy cost – 52 boats and 3,505 submariners would fail to return.
Article continues below…
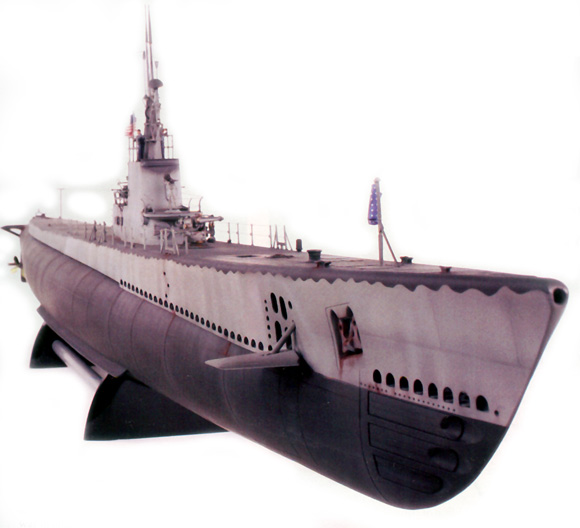
Enjoy more Model Boats Magazine reading in the monthly magazine. Click here to subscribe & save. There were three main types of US submarines in service during the Second World War, the TAMBOR, BALAO and GATO classes. The GATO Class submarine was ‘state of the art’ in American design at the start of the War. Using the previous TAMBOR Class submarine as a model standard, the GATOs incorporated improvements that increased their efficiency and allowed for greater patrolling and combat abilities. Modifications to the diesel engines and batteries increased patrol duration over that of the TAMBOR and internal alterations provided better conditions for the crew. The crews were in fact able to withstand the hardship of such lengthy deployments significantly better than the German submarine crews; these new boats were, in comparison, luxuriously equipped and their hot showers, air conditioning and refrigerated stores made deficiency sickness virtually unheard of, allowing a patrol endurance to last for 75 days! In one of their more satisfying special assignments, the submarines would serve as lifeguards, plucking from the sea downed aircraft pilots and crews. One boat, the USS Tang commanded by Richard O’Kane, in a single patrol saved no fewer than 22 US Navy airmen that had been shot down on scattered reefs during the attack on Truck in April 1944. O’Kane would take his boat into the shallows, defying enemy gunfire, to save airmen before heading home to Pearl Harbor. Another GATO Class submarine (included on the decal sheet from Revell) is the USS Flasher, and this boat received three Presidential unit citations and six battle stars for sinking 21 ships for a record total of 100,231 tons of Japanese shipping.
|
|
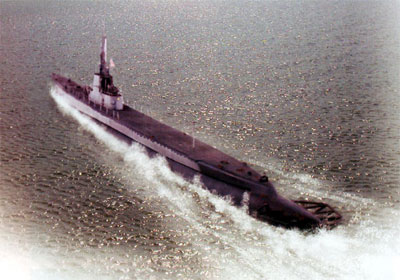
Pic 4: A GATO sets out on patrol – the author’s 1:72 scale Revell model in a photo-realistic seascape. What a Box!When Revell first announced that they were to release a 1:72 scale GATO Class submarine, I quickly rushed down to the local library for a couple of books on the subject that I had seen sitting on a shelf for some time. Wow! When I had done ‘the maths’ I couldn’t believe how long this boat was going to be even in 1:72 scale; ‘a whopping 52.25 inches (1,325mm) give or take a little, so bear this in mind when you buy one – a very long display shelf will be required. As the first batch arrived at the local model shop I couldn’t wait to get my hands on one, get the lid off and investigate, and boy! I wasn’t, and you won’t be disappointed. The box measures an impressive 38in (970mm) so at first I thought my calculations were wrong! Where was the extra 14in? When the lid was prized off, and with the help of my patient girlfriend, we were presented with a large centre hull in two parts neatly packaged in heavy cardboard. Tip; be careful to avoid cardboard cuts – unlike me! Under the centre hull packing, the rest of the box is crammed with 28 sprues just begging me to spill the contents onto the floor and drool. What Revell have done, which seems logical, is to split the hull into three parts; the main centre hull measures roughly 905mm, the bow 197mm, and the stern 230mm. Casting a quick eye over the rest, some impressive moulding detail jumped out, notably the decking, conning tower and deck guns which are the best I have seen and, to top it all off, Revell have included pre-folded metal wire steps which are superb and will save hours of bending! Also included in the kit is a nice set of water slide decals with the choice of five different subs to depict and some printed paper flags, making a truly wonderfully thought out kit? Laying the KeelThis is a large hull section to work with and although it is a time-consuming task, taking your time and dry fitting the hull section together is the key here. The two bulkheads are a fairly tight fit, which I found out a little too late after both hull sections were loaded with glue, and when mated together a snug fit was prevented along the keel. This soon turned into a ‘filling and sanding campaign’ which is a shame because it could have been avoided had I test-fitted these parts first. This was only the beginning of a filling and sanding project -‘a four foot project’ – to obtain a clean and ‘complete’ hull. Sanding sticks, courtesy of MasterCasters in various grades, were used to full advantage here, as there are large areas to sand and these can speed up the process. Some of these sticks are moulded in soft foam that will reduce the risk of removing surface detail. No problems were in counted joining the bow and stern sections together, as these are fairly small sections and only require minor sanding work, compared with the main hull section, where the real task starts is mating the bow and stern sections together.
|
|
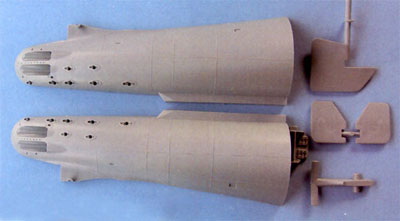
Pic 7: The bow and stern parts cleaned ready for assembly. Pic 8: Fitting the front bow planes before the two bow sections are joined together is recommended as these parts can be cleaned up a lot easier, before you have the rest of the hull hanging on the end! Pic 10: The hull section subassemblies are quite large – this is the stern unit. Pic 11: Foam sanding sticks from MasterCasters were used here after sanding joints and as they are soft they are quite forgiving and don’t tend to remove surface detail. These foam sticks can mould to the shape of the sanding subject and are good for polishing areas before priming. Pic 14: Periscope sheers are added before the conning tower is joined together. Each bow plane consists of three parts, and is nicely moulded without any mould sink marks and they should be assembled, cleaned and fitted before the bow section is joined to the main hull, otherwise it’s hard to fettle small areas with the main hull section hanging on the end. This also applies to the stern section; propeller shafts, stern planes and tubular framework were all fitted to the stern before joining it to the main hull, making handling so much easier. Section 22 in the instructions is the time when the hull becomes one; give your self plenty of time to allow for drying time. Super glue was used to attach the bow section to the main hull, and this turned out to be a bad decision on my part, as you have no adjustment once the two surfaces touch, which led to a lot of filling and sanding. The stern section faired a lot better; Humbrol Liquid Poly was liberally applied and allowed time to soften the plastic, then the stern section was mated to the main hull and lightly twisted back and forth to correctly align the raised hull detail. This light ‘lapping’ effect caused a thin bead of soft plastic/ glue to be extruded from the joint and when it was dry it was simply sanded away and no further filling or sanding was required. Hull DeckingAssembly so far leaves a huge ‘cigar’ and the next step is to fit the decking to the hull. If you want to display the boat in a dock scene diorama, now is the time to drill the holes for davits by drilling from the reverse side of the decking, so follow the instructions and you can’t go wrong. Also remember to drill the two holes for the 4-inch deck gun; otherwise you may have to guess its location. At this point the modeller is faced with fitting the three deck sections to the hull, along with the front bow side plates (parts 7 and 8), which turned out to be a real time consuming task. By the very nature of the design, there is a gap along the entire length of the submarine, from the bow flood holes to the stern. This makes for an interesting test on how Revell thought about moulding this feature, and to be fair they haven’t done a bad job, but the modeller is left with quite a bit of work to obtain a ‘floorless’ finish. First attach the bow side plates, which will leave a small joint just behind each front bow plane. Attaching the bow decking next leaves a joint along the side, followed by centre decking, which also leaves a fairly poor joint, where the side of the centre deck meets the side bow plate. This will need filling and sanding with whatever material you use if you want a good finish. The last piece of decking to be laid is the stern and this also leaves a joint that needs a bit of work along the side, where the two pieces butt together. The good news is that there is only minimal work required along the top of the deck where these three parts seem to butt up together quite snugly and they won’t require filling. Micro filler was then used repeatedly throughout, along with 800 grit wet and dry paper until the desired finish was obtained.
|
|
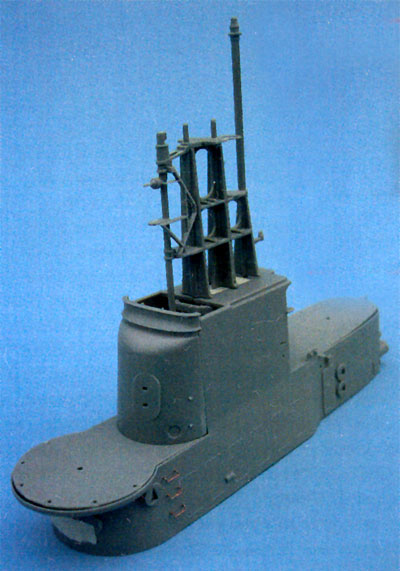
Pic 15 & 16: The conning tower under construction with the periscopes in place. Pic 17: Holes for the rails around the 20mm gun position. Pic 18 to 20: Fitting the ladder rungs is a quick task. Revell have saved the modeller a lot of time by supplying these rungs preformed in steel and all the modeller has to do is drill out the locating holes that are well marked out on the reverse side. By using a small twist drill these were first drilled out from the reverse side to act as a guide, and then turned over and drilled from the front to prevent damage to the plastic. Don’t forget to slide the plastic guide under the rungs to obtain the correct distance! A small touch of super glue is required to hold these in place again applied from the reverse side. Deck HandrailsWhat have Revell done here? When you look at the lovely planking detail, and then look at these deep square holes you ask yourself, ‘was this some kind of bad afterthought?’ But what these holes are for are the deck railings. The deck railings are reasonably moulded, but each one has a square ‘blob’ hanging on its end, which locates into the deck! Why they did not just mould a small round hole I do not know, which would have been be a lot easer and no filling would have been required, because these are not a good fit. Bridge and Conning TowerThere is not much to say about building the conning tower/bridge, apart from ‘great!’ Revell have done a good job here. What really sets this model off is the pre-folded ladder steps and if you had to fold these yourself it would be incredibly difficult due to the shape! Revell have also included a little flat piece of plastic which gives the correct depth when gluing the ladder rungs in place. The ladder-rung holes were easily drilled out from the reverse side using a very fine twist drill before the two sides were joined together. I used super glue to fix the rungs, but first that little strip of plastic is slid under the rungs to give the correct gap. It’s best to lightly hold this strip in place with a little bit of masking tape top and bottom, which prevents it from dropping out when you turn the bridge section over. A small dab of thick super glue on each end of the rung is all that is required to hold them in place. No problems were found in joining the conning tower together. When dry the ready ammunition locker doors were fixed followed by the railings, these do require a little work to clean up the flashing around them before gluing into place. The top railing around the periscope shears needed the most work and filling and sanding was required to lose the joint along the side of the conning tower where these railings fix into place. I used polished aluminium tubing of the correct diameter for the periscope shafts, rather than the kit parts, as it looks more realistic. The kit parts, if you use them, are extruded tubing which is a nice little touch and they only require painting and you don’t have to worry about trimming a split line or sanding a flat on these babies. Two pound fishing line was used for the front and side railings instead of the supplied line as it was easer to fit and it also looks ‘in scale’. The SJ surface search radar is moulded in one piece, and a photo-etched replacement part would give a much better effect, but for now, until detail sets become available for this model you’ll either have to scratch build one or simply be content with the kit part. For now and due to time restraints I was happy to use the kit part and attach it with a little PVA glue so I could remove it and replace it later if required.
|
|
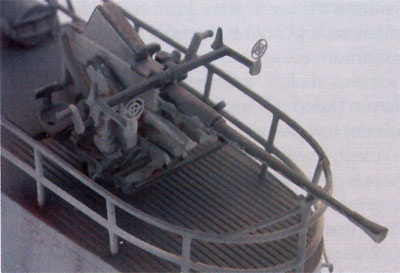
Pic 21 & 22: The 40mm AA gun and 20mm cannon are very detailed. Pic 23: A little filling is required around the top of the conning tower to loosen the joint. Pic 26 & 27: Take your time and don’t rush. Here thin coats of different greys are being applied to build up that bleached/weathered look. Pic 28 & 29: To obtain a chipped/weathered deck, Maskol was applied with a stiff brush over a base colour of grey. When dry, the deck was then sprayed with deck black using an airbrush. When this was dry the Maskol was simply rubbed away using a finger. After all the Maskol had been removed a thin topcoat is required to blend the whole thing together. Pic 31: The propellers first received a coat of Alclad II primer followed by a light sanding. Next they were sprayed with light gold and feather blended with steel. Finally, a very light coat of clear green was dusted over the entire propeller to obtain a cast bronze/brass effect. Pic 30: The submarine is nearing completion and all that’s left to do is add the rigging and the ‘Stars and Stripes’. Inset shows the the bridge with handrails in place. Deck WeaponsAs I said right at the start these are all little gems, apart from a couple of ejector pin marks on the side of the 40mm breech, this gun looks stunning along with the 20mm that sits on the front. Be careful when cutting parts from the sprue as this is very thickly moulded and the gun parts do require a little trimming, but take your time, and you won’t have any problems. It’s a real shame that Revell didn’t included any metal photo-etched gun sights, because the gun sights they supply come in the form of moulded clear styrene parts that need painting. So, for me it was back to the spares box for some Eduard photo-etched sights and now the guns look ‘complete’ and really give the conning tower that busy look! Painting and WeatheringWere do you start painting on a project this big? Starting with the hull seems to be the most sensible thing, leaving the conning tower off as a separate part gives you an easer deck to paint and weather, and will also allow for better fine detail painting of the hand rails, etc. Paints for this project were supplied courtesy of White Ensign Models and these guys have a complete range of enamel paints especially for naval craft, and they were very helpful in selecting the correct colours for a GATO Class submarine. These paints sprayed flawlessly and did not block up the tip of my airbrush once. White Ensign Models will also be releasing a photo-etched detail set for Revell’s GATO Class kit, but unfortunately not available in time for this project. Basically submarine depicted here is finished in measure 32/3SS-B the deck glossy black, all other horizontal and sloping surfaces BK Dull Black. The vertical surfaces were painted in Haze Gray, (note American spelling) whereas the edges on curved surfaces between Dull Black and Haze Gray were feather blended. Just aft of the conning tower, the Haze Gray blended into Ocean Gray, which in turn blended into a BK Dull Black stem section. The undersides of any overhanging surfaces were painted 5-U White. The forward, rounded portion of the conning tower and periscope shears were painted Ocean Gray, or sometimes a darker grey. Painting the hull looked like it was going to be a mammoth task, but it turned out to be quite easy. An afternoon’s spraying is all that it took to complete this step, using a Badger airbrush with a medium head and needle. Building up layers of black over grey primer was easy, I found starting at the stem and working forward seemed to be the best approach and once the stem and the bottom part of the hull was painted, it was seated in its display stand and the rest of the hull could be sprayed without further handling. Where the BK black would bleach in the fierce tropical sun, the sloping surfaces received a mixture of black lightened with grey to give a bleached appearance. My attention now reverted to the conning tower and for the first weathering effect, black was sprayed onto the joints/panel lines and then followed by thin coats of Haze Gray, slowly building up the colour, until the desired effect was achieved. This gives a slight bleached look and highlights are added by using heavily thinned pale grey to blend the whole thing together. The subtle use of the airbrush can never be understated. When all parts were thoroughly dry I gave the whole thing a coat of Johnson’s ‘Klear’ to seal in the Enamel colour, and prevent the paint lifting during the weathering process. For the final weathering Winsor & Newton Alkyd artists’ colours were used, heavily thinned with artists’ sprit and applied to panel lines and deck recesses to replicate salt spray, further enhancing that bleached look. After the weathering was completed the submarine received a final coat of matt clear and the job was done!
|
|
StardustNo model these days seems to be complete without the use of some kind of weathering pigment, and on this model it was kept to the minimum being used only for the rust streaks. Some modellers today believe that if they haven’t used this medium on their model, then it’s not complete and is sometimes all too evident. The best piece of advice that I can give here is again keep things simple and don’t overwork your model. Use only the pigment that closely matches the background setting and use only the lightest of covering, applied with a large soft flat brush. Try to imagine where dust would collect – and think of your car when it’s dirty! As for submarines, there’s no such thing as dust! When a GATO dived it received a wash! ‘Stars and Stripes’Flags come in the form of printed paper. These are easy to cut out from the sheet, but the tricky part is to make them look realistic! I have found it best to paint the plain surface with PVA glue and then stick the flag together and when still damp with the adhesive shape the wrinkles in it, which tend to look more natural, than doing them before it dries hard and which also runs the risk of cracking. As a final touch two CMK 1:72 scale US Navy crew figures positioned in the conning tower, lends an idea of scale and clearly show what a huge and impressive Second World War period submarine the GATO Class was. ConclusionThis was a satisfying project to work on ‘straight from the box’ and it looks great when finished, but it’s a real pain to photograph! There are a couple areas were I feel criticism is due; firstly the bow section took a lot of effort to fill and sand due to how the bow deck section fits and secondly the deck railings seem to be a bit ‘awkward’ these should have been kept simpler. On the plus side, deck weapons are well detailed so the conning tower looks busy, and is also very well detailed along with the periscope shears. You also get a choice of five submarines to depict included in the decal sheet, and the choice to display the model as if the submarine was alongside a dock. What would have been really nice is a small photo-etched set to include; hatch hand wheels, Si surface radar and gun sights, however, nothing else I feel would be needed… Wish list …Bring on a 1:72 scale destroyer! Model Specification05047 Revell 1:72 scale US Navy Submarine GATO Class moulded in grey and clear styrene, with waterslide decals, folded steel ladder rungs and printed paper flag sheet. Paints and MaterialsCMK Star Dust: Light Rust. AcknowledgementsSpecial thanks to White Ensign Models for advice on correct colours, and supplying their own fantastic brand of paint for this project. White Ensign Models, South Farm, Snitton, Ludlow SY8 3EZ. [email protected] Tel: 0870 220 1888. First published in Military Modelling Vol.37 No.5 2007
|
GATO Class
by
–

Advert
Enjoy more Model Boats Magazine reading every month. Click here to subscribe.
Article Tags:


