JAKE KELSO restores an old pond yacht
A good friend of mine was doing a job for an elderly customer of his when he was asked if he would like what was left of a pond yacht. This boat had been in the loft of the customer’s house, which had been his parent’s home before him. The customer said that it had to be at least 100 years old as the elderly gentleman who had given it to him, had made it himself as a very young man.
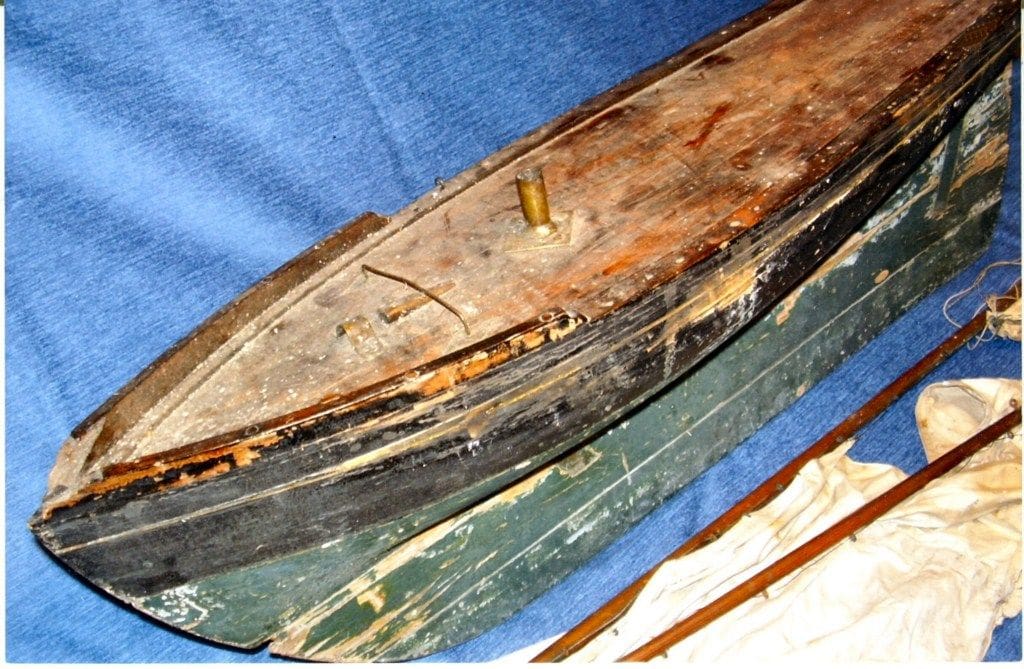
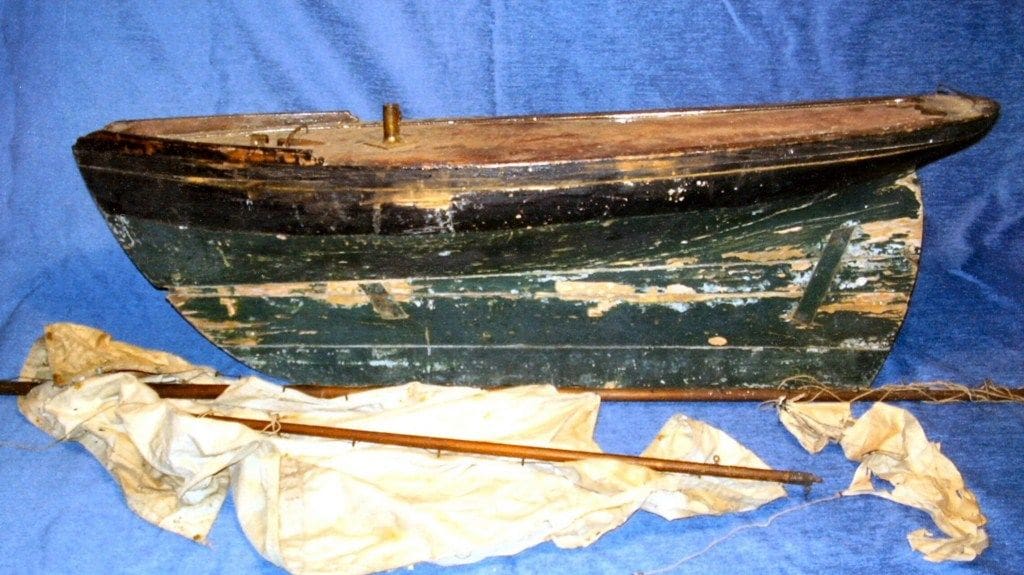
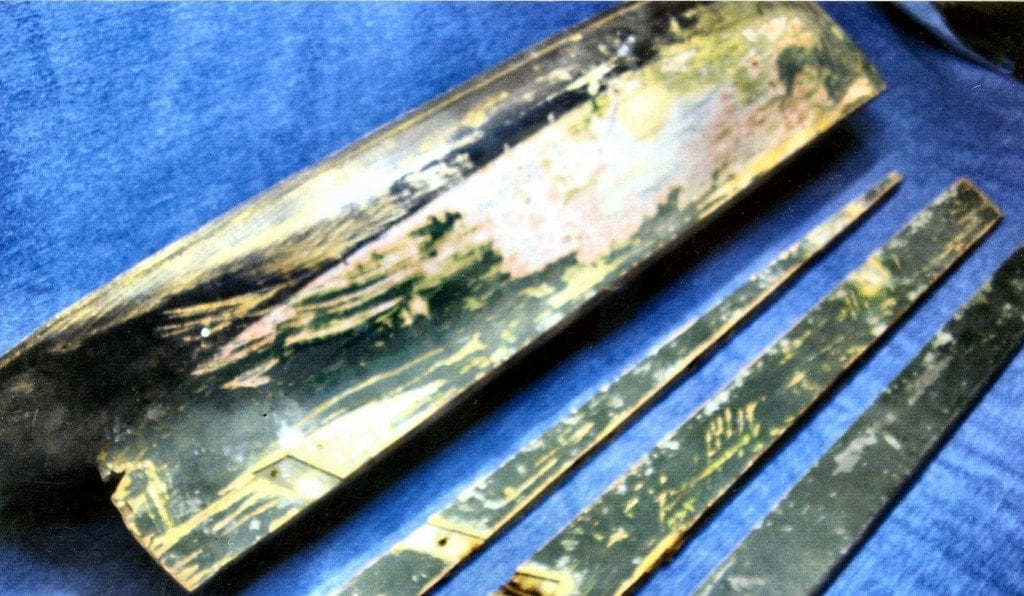
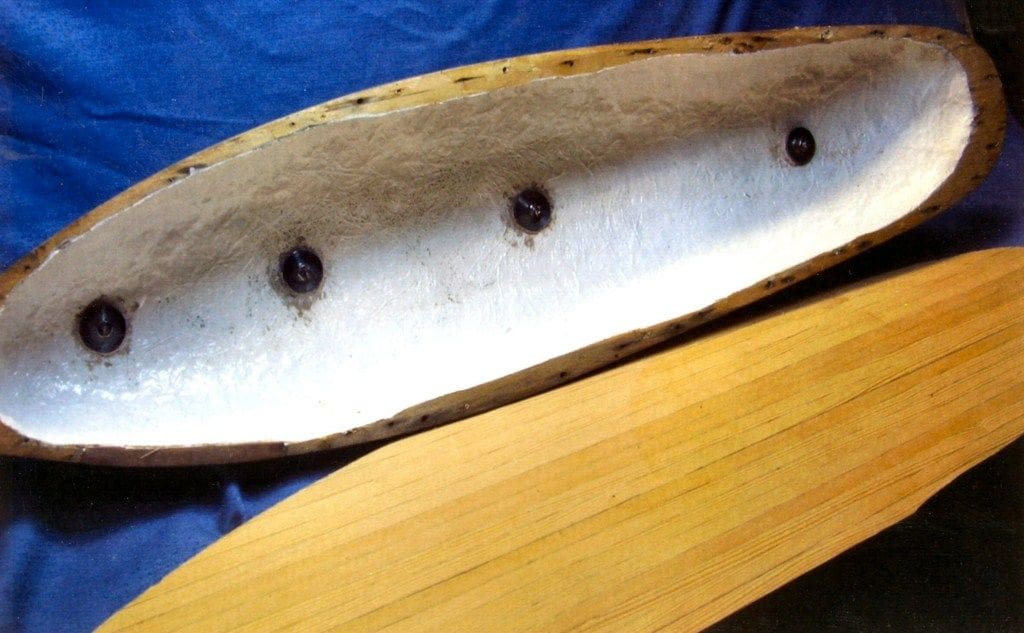
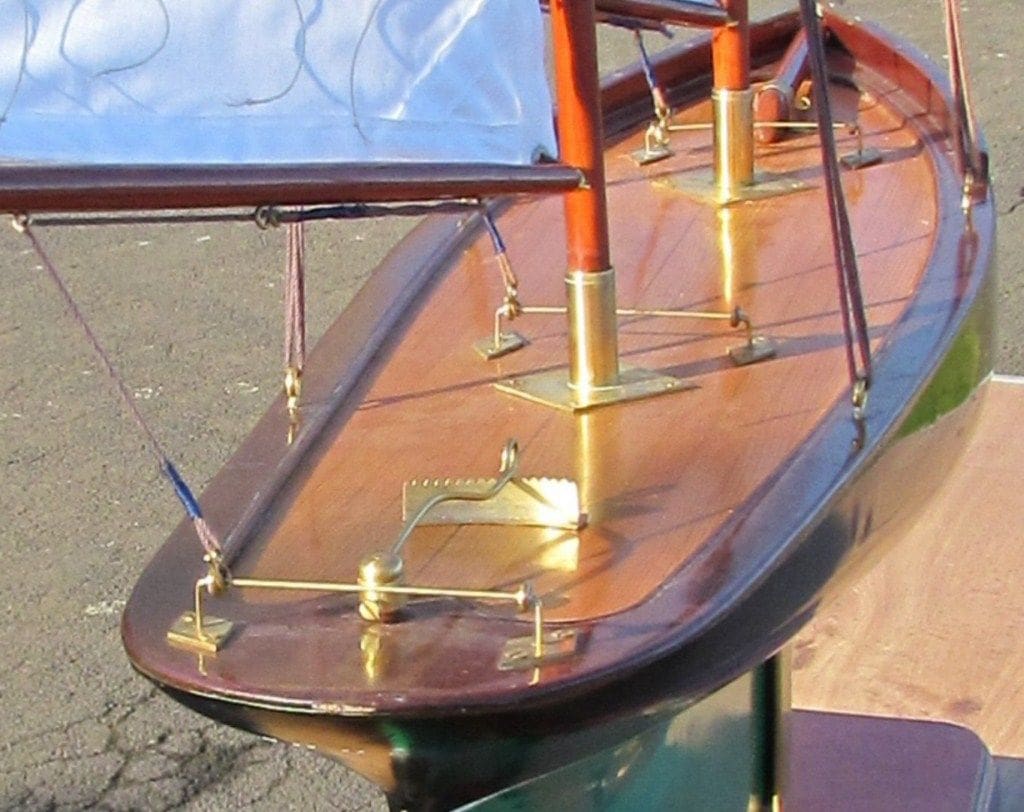
When I saw the boat I thought it would have been kinder to put the whole lot in the bin as it was in a right state, the hull of which can be seen in Photos 1 and 2. The paint was flaking off and the rail on the deck each side of the bowsprit was broken. The port quarter of the bow must have been under a leaking roof as the constant dripping over the years had rotted the edge of the deck. As you might be just able to see from these pictures, the lower part of the hull and lead keel (which was all shaped to match the hull lines) were held to the upper part by straps set into the side of the hull that are just showing through the paintwork. There is no separate rudder, the model presumably being truly free sailing and this was before even the advent of Braine steering gear. In addition the top of the hull was mushy and the mahogany margin on the deck was crumbling, Photo 3. The hull was possibly a model of what I think they called the ‘plank-on-edge’ style, although the bulk of it was carved from a solid piece of wood with the lower part and keel attached. The pieces of masts, spars and sails made it look like it had been Bermuda rigged.
Enjoy more Model Boats Magazine reading in the monthly magazine.
Click here to subscribe & save.

Getting started
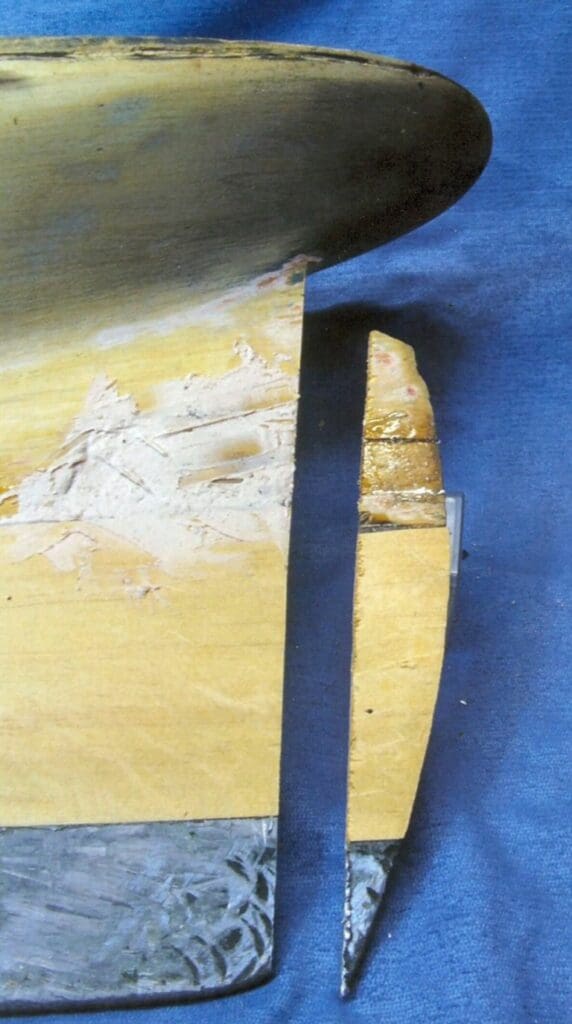
As I had nothing to lose, I decided to strip the deck off and remove the lead keel and lower hull section as in Photo 4 (sorry about the picture quality). The deck appeared to have been made from a piece of 3/4 inch (18mm) thick pine. The sheer of the deck having been carved from 3/4 inch thick at the bow, tapering to 1/4 inch (6mm) amidships and back to 1/2 inch (13mm) at the stern. No mean feat of woodworking!
The main part of the hull had also been carved from a solid piece of pine and I thought that anyone carving a hull in those days would have made as good a job on the inside as they had on the outside, but no! The inside was very rough and on the after starboard quarter, the builder must have been rather too keen with the chisel as it was a bit thin, so he had stuck a linen patch over the thin part covered with white-lead paint and varnish. The rest of the inside of the hull was also painted with white-lead paint and varnish.
Looking at what I was left with, and the way it had been constructed, it could I believe have been built in the late-1800’s. Referring to a book published in 1903, entitled ‘Model Yachts and Boats – their Designing, Making and Sailing’ by a J. du V. Governor, the examples illustrated appear to be a bit more advanced than my hull, as they encompass weighted rudders, or rudders rudiment ally controlled by the sail booms. As I wrote earlier, this hull did not have a rudder, it merely being just had the shape of one carved from a continuation of the hull and keel. Handily, on the underside of the deck, were two sets of wooden plug holes for the masts so it would seem the model had been rigged as a schooner when first built, so I decided to rebuild the model in the same style.
The first woodworking task was to get rid of the rotten piece of hull on the port bow. After cutting the bad piece out, a piece of good quality pine was scarfed into the hole and all was sanded smooth to match.
After removing and cleaning all the white-lead and varnish from the inside with much ‘elbow grease’ whilst taking care not to inhale the lead-ridden dust (mask and outside job for this), the inside was coated with fibreglass resin and a patch of fibreglass cloth over the thin part of the hull. Once cured, a further layer of one-ounce matting was laid over all the hull’s inside, plus an extra strip where the new keel studs would come through and this all was thoroughly brushed in place with fibreglass resin.
Outside of the hull
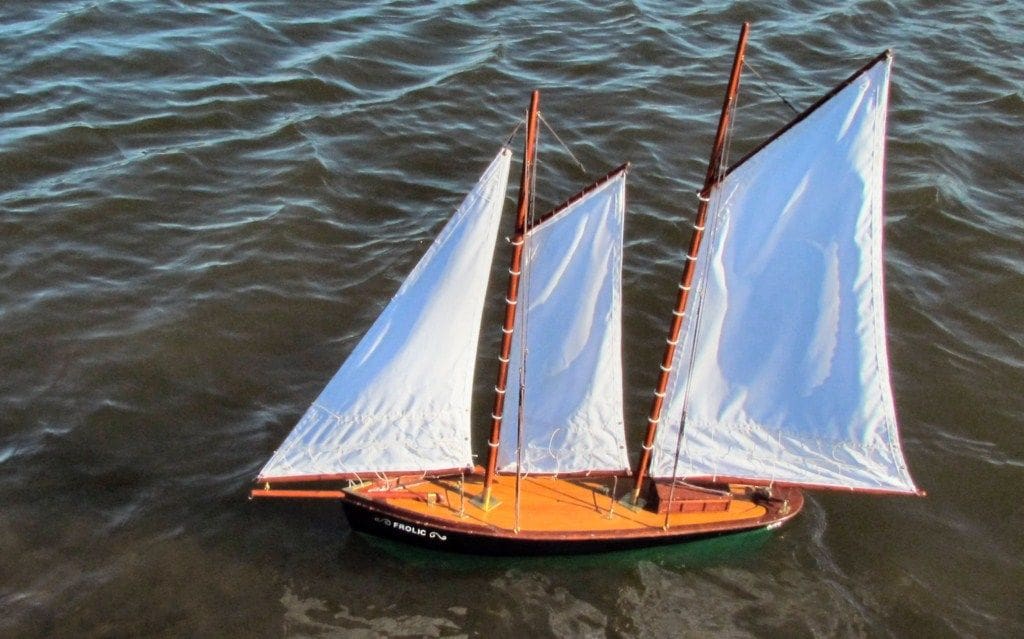
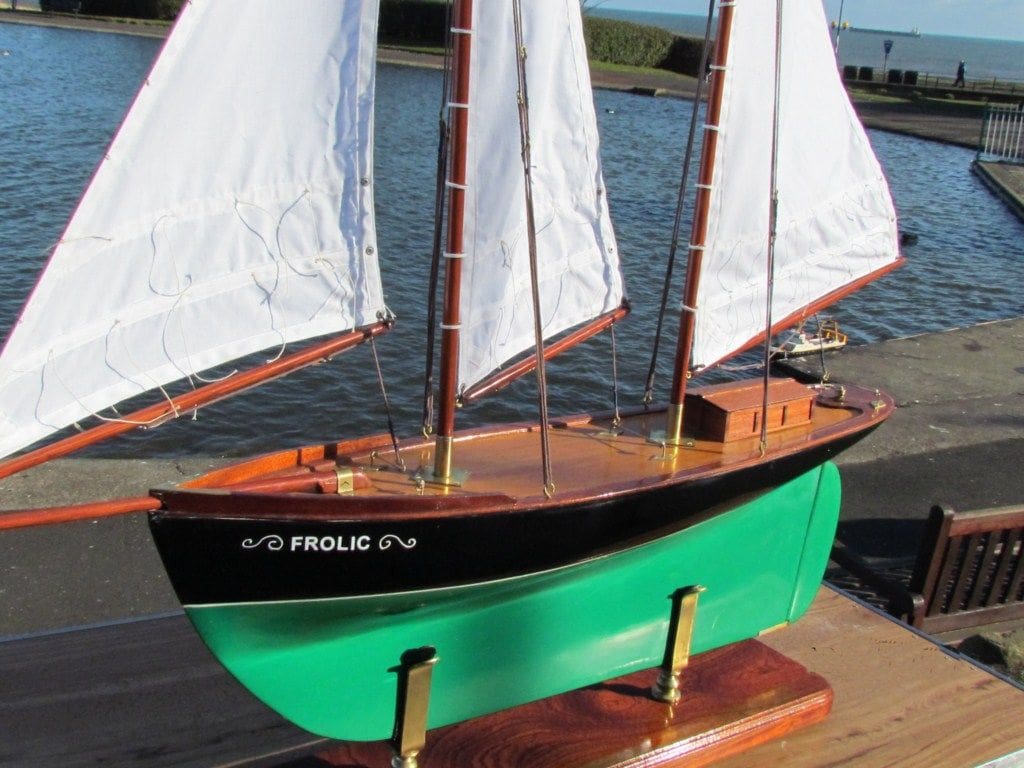
When scraping away some paint, the boat’s name Frolic had wondrously appeared. What sort of name was that for a model boat I mused? You can say that a lamb or a foal ‘frolics’, but a boat?
A book entitled ‘The Black Sail Traders’ by Roy Clark all about Norfolk Wherries, and what the people of Norfolk did in the mid-1880’s provided the answer. They were involved in boat races, swimming races, dancing and drinking, which all took place on or beside the waterways of Norfolk and these ‘fun days’ were called ‘Water Frolics’, hence the name I suspect.
A new piece of elm, scrounged from a friend, was cut and shaped to match the lower hull and lead keel. At the same time, four 6mm stainless steel studs were prepared to replace the old brass ones in the lead keel. Holes for these new studs were drilled and tapped 6mm into the lead, but drilling and tapping small diameter, but deep, holes in lead can be exciting! A mixture of white spirit and cutting oil (but almost any normal coolant and lubricant will do) kept the drill cool and when tapping, the tool must also not be allowed to ‘back-up’ with cuttings.
The studs were glued into the lead keel with epoxy adhesive and the new elm hull keel plank was laid on the studs and marked off to give guidelines for drilling the stud holes right through. A dry run, fitting the deadwood elm plank to the lead and then the whole lot to the hull confirmed everything was okay with the studding extending into the inner hull.
The lead weight and wood were glued together and then to the hull, with liberal coatings of epoxy adhesive and with stainless steel nuts and washers tightened down on the studs inside the hull, everything should be good for another 100 years as in Photo 5, which also shows the new deck.
Deck
This was next and I wanted a piece of pine 40 x 10 x 1 inches thick with straight grain and no knots to allow for finishing, so a distinct problem was looming. Salvation came in the form of some old, but redundant, interior doors of the 1930’s made from Canadian Pine. The side and cross battens were rip-sawed into useful pieces.
The original deck planks were marked as 5/8 inch broad, so the new timber was cut into 5/8 x 7/8 inch strips, the edges marked with a black coloured polyester resin and all clamped together. Once everything was cured, the whole sheet was shaped to fit the hull, including a slight camber on it plus a gentle sheer and trimmed to fit over the hull. It was then sealed with diluted varnish and glued to the hull with epoxy adhesive. Its edges were sanded and smoothed to match the hull sides, although it was not add his stage given its final varnish coat application.
Restoration wanderings….
At this stage I abandoned the idea of rebuilding it as a pure Victorian pond yacht, and decided that for current use it had to be radio controlled, at least to some degree. Thus, a working rudder was needed and so the rudder shape was cut off the back of the hull and lead keel, which was not easy, but doable, Photo 6. A 6mm hole for the rudder post tube was drilled up through the hull and out through the deck and a brass 6mm o.d (5mm i.d.) tube installed.
A section of the bottom of the lead keel was also cut away to take a 1/4 inch thick brass plate to form a skeg for the rudder. This plate was to be screwed to the lead with two stainless steel countersunk self-tapping screws.
The rudder post was a piece of 5mm dia. stainless steel rod with its lower end reduced to 4mm to fit into a pre-drilled hole in the skeg. A strip of stainless steel plate was silver-soldered down the back of the rudder post. This plate had holes drilled through it prior to soldering, as the plan was to sandwich it between two 1/8 inch plywood pieces cut to the shape of the rudder, which all turned out rather well as it so happened. The top of the rudder post had a matching boss made up with a tiller arm that would sit over the deck and then be connected to the rudder servo hidden in the deckhouse.
Finishing off the deck
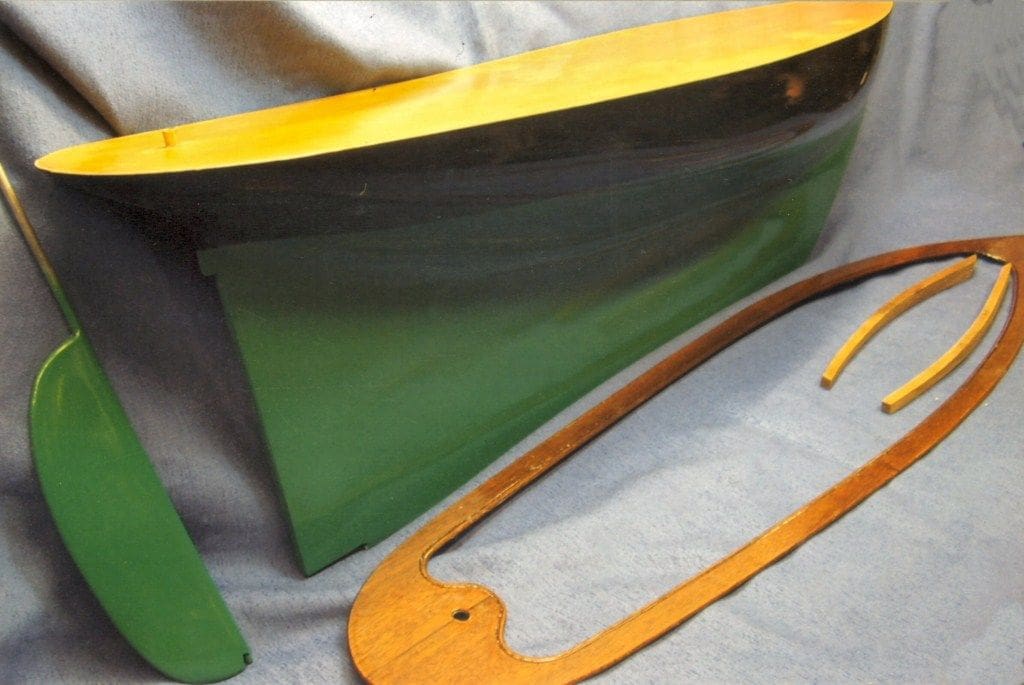
To make a one piece margin plank, a mahogany sheet was planed to 3/16 inch thick. A template of the outside of the deck existing deck was taken from the hull and transferred to the mahogany, which was then further marked to create the one piece margin plank with an empty centre section. Then, the whole thing was cut out, both inner and outer edges, all with some care! This section was fitted to the deck for a dry-run. Both it and the deck already fitted were both now given numerous coats of varnish with much light sanding between applications to attain a high gloss finish on both. It was easier to varnish the main deck separately from the margin plank and then glue the latter in place once everything was satisfactory from a finish point of view. The mahogany spray rail at the bow was also made and finished in much the same way. Photo 7 shows the new margin plank and working rudder.
Painting the hull
The underwater parts being complete now, the deck was masked off, the bare wood sealed and primed with numerous coats of paint with much rubbing down between them. On a wooden hull such as this, there is no quick way to a decent finish (unless you are using Epoxy Kote or similar) and a properly sealed and primer hull will last for many years. The final green main colour coat was from an aerosol. I get mine from discount warehouses or ‘cash and carry’ for usually half the price of the usual car accessory shops. Once hard (it is always best to wait two or three days before moving on to the next colour), the waterline was masked off and the rest of the hull sprayed black. (Please see Photo 7 again).
Brasswork
Whilst painting and waiting for the coats of paint to dry, the brasswork for the deck was commenced. Two mast stands, two horses and a bracket for the bowsprit were made as per the original and also a new brass tiller head, with curved arm, which engaged on a brass ratchet plate, Photo 8. The tiller head is round and fits over the top of the rudder post. This is how the model would have been, roughly speaking, in original form.
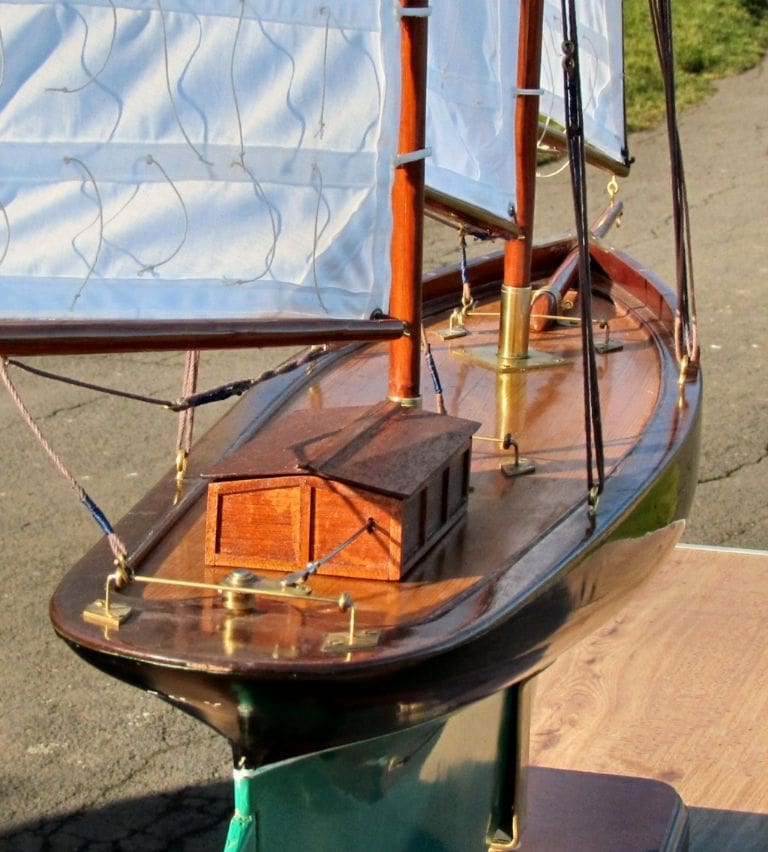
However, as radio control was now the way forward, a new deckhouse from wood was made, within which the receiver and a rudder servo, together with a battery pack and a switch was installed. Please note that no sail winch was included. A wire push rod passing through the deckhouse end connects the tiller arm to the servo, Photo 9. The deckhouse is actually a box, so just attaches to the deck and can be easily removed as a complete entity.
Masts and Spars
Once again the old Canadian Pine door wood was utilised, this time cut into square section strips that were each placed in the vee-groove of my Work-Mate. Once each corner had been bevelled, ‘rounding-off’ was completed by hand with sandpaper and a small plane. The lengths and diameters of the masts and booms in relation to hull size were obtained from the 1903 reference book. As with the rest of the woodwork, the masts and booms were sealed and varnished. Hanging them with a hook in one end makes painting so much easier.
The gaff forks on the gaff booms were homemade, the main and fore booms having a simple gooseneck formed from two brass screw-eyes. The bowsprit had a foot formed on the after end which stood on the deck and had a brass pin pushed through the bracket and foot to hold the bowsprit. The bowsprit can be easily un-shipped.
Rigging
In days of yore, men (and ladies) rigged their yachts with picture cord, so why not me?
The hooks and bowsies are from bent brass wire. They work after a fashion, but not as well as those of Graham Bantock. The attachment points are all brass screw eyes. For the shrouds, small brass cup-hooks did the trick and for the runners on the horses, figure-of-eights were formed, with a hook on the end of the sheets sprung over the eye of the figure-of-eight. There is nothing too fancy about the rigging, nor would there have been back in the 1880’s and Photo 10 shows the basic mast stays etc. The only real difference between then and now, is the deckhouse hiding the basic r/c gear.
Sails
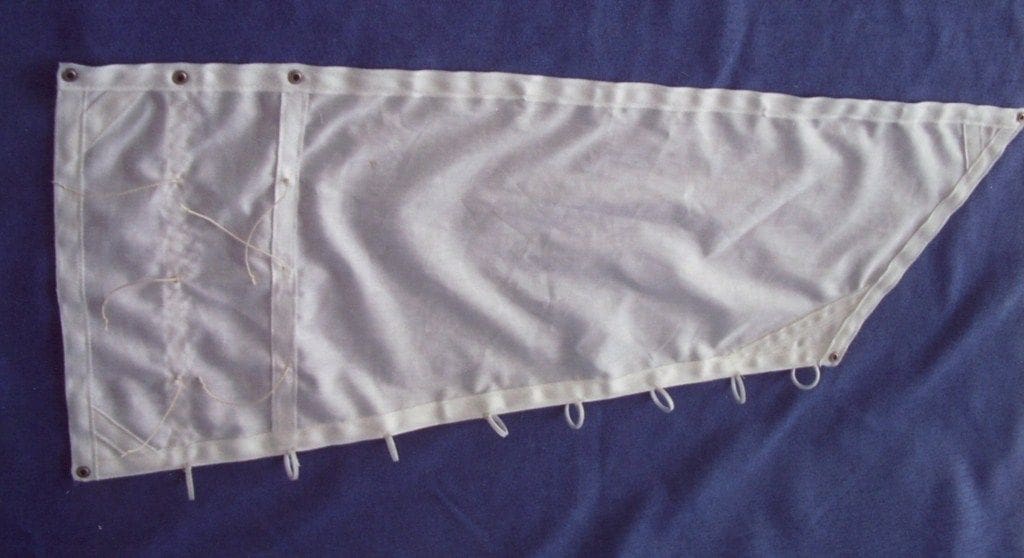
My wife bought for me a few years ago a surprise Christmas present, namely a sewing machine. Bet not too many men get those at Christmas and you have to be sure of your masculinity when you stand at a crowded bar and say that you have just received such a machine! A couple of metres of white polyester cotton, plus some 3/8 inch tape were the raw materials. The finished fore-sail is shown in Photo 11, and not a bad effort if I say so myself! The completed sail was quite stiff, but a couple of washes soon softened it. The mast rings are cut from plastic tube and as good as any commercial product.
Trials
Come the day of the first launch of the restored model, it was found to be a little stern-heavy, so back to the workshop. A small amount of lead was removed from the keel; the hole plugged with balsa and then sealed, sanded and sprayed to match the surrounding finish.
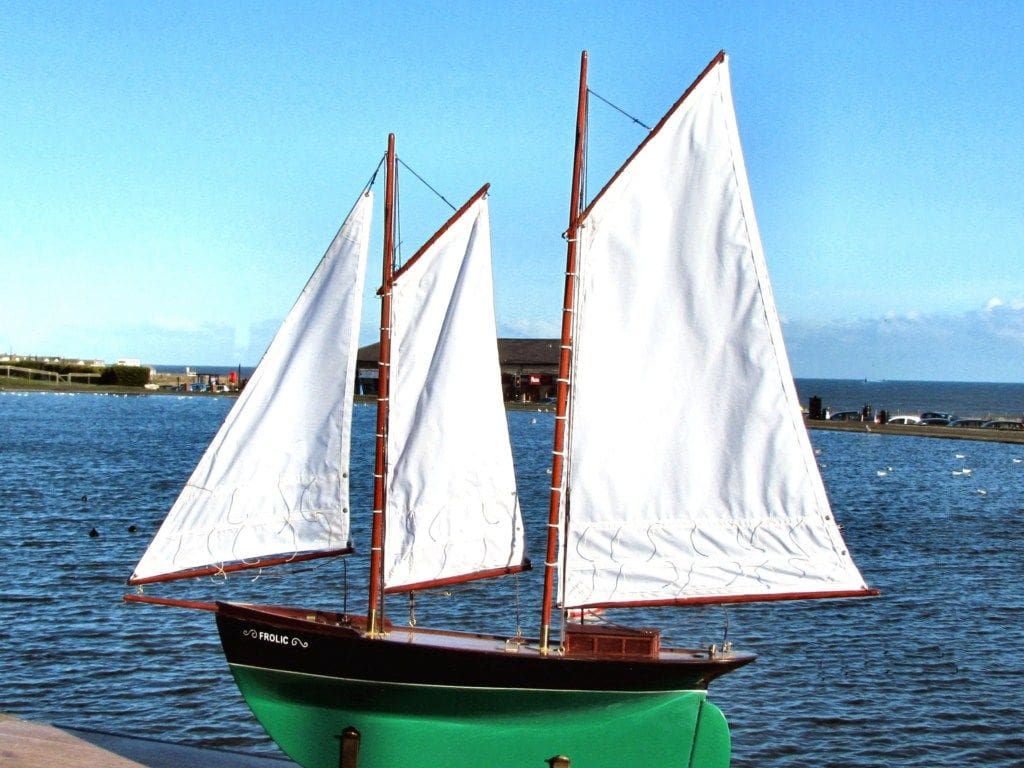
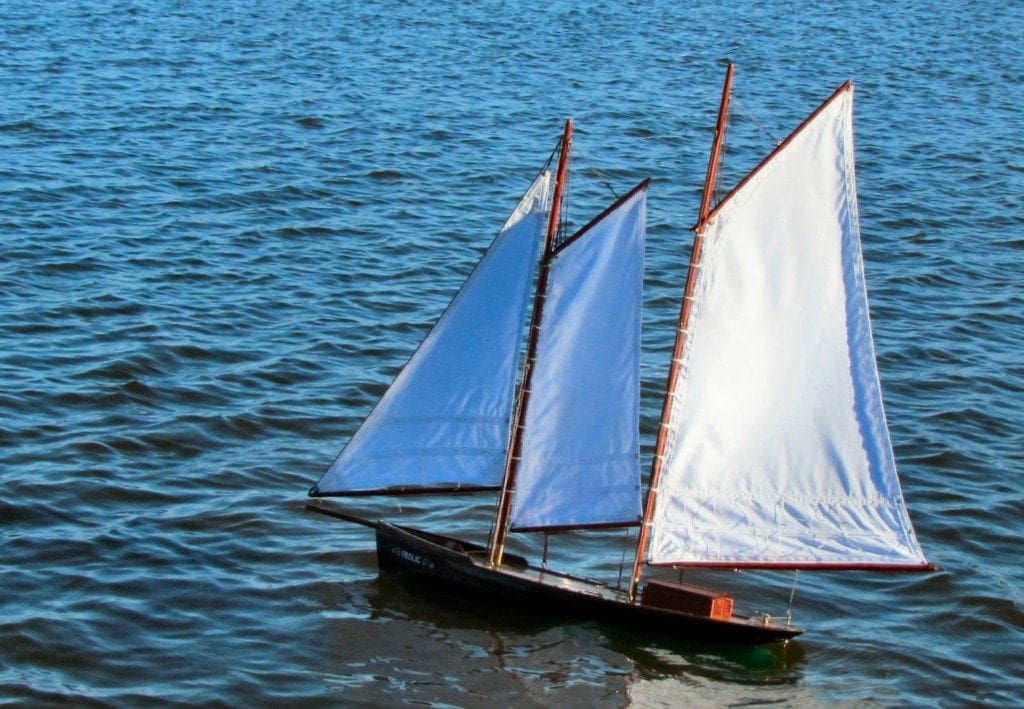
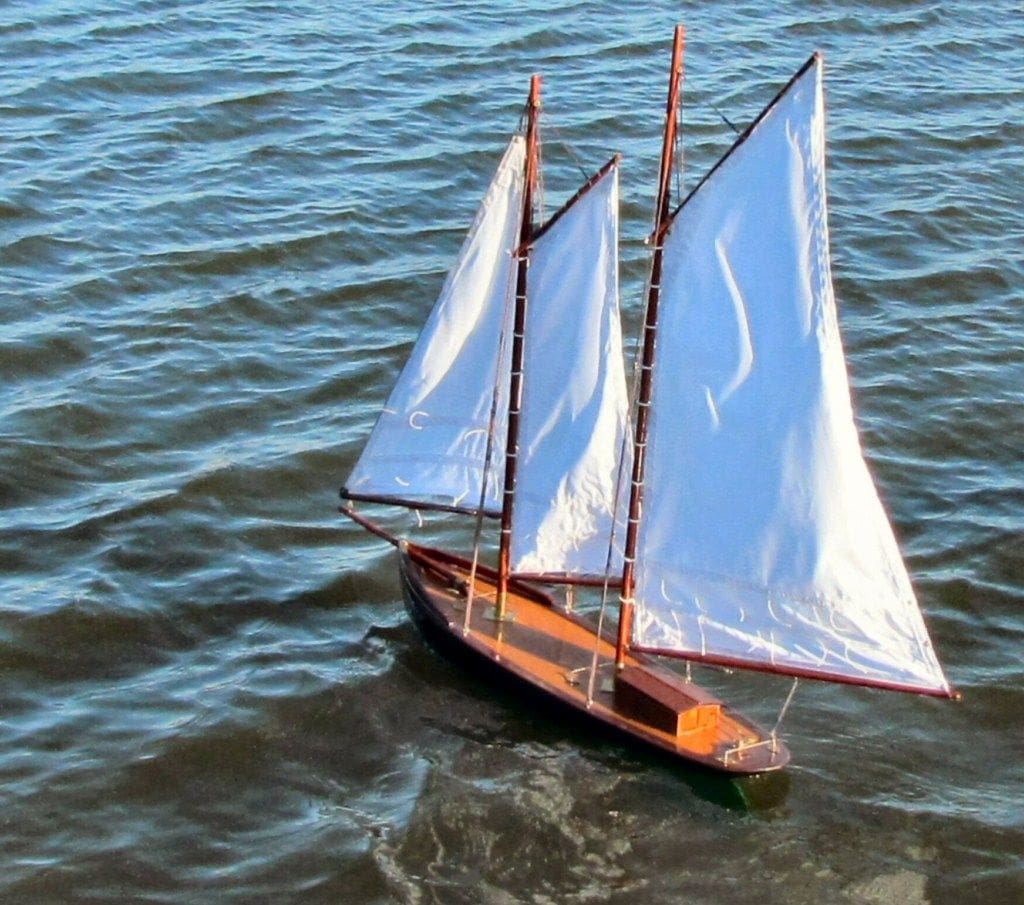
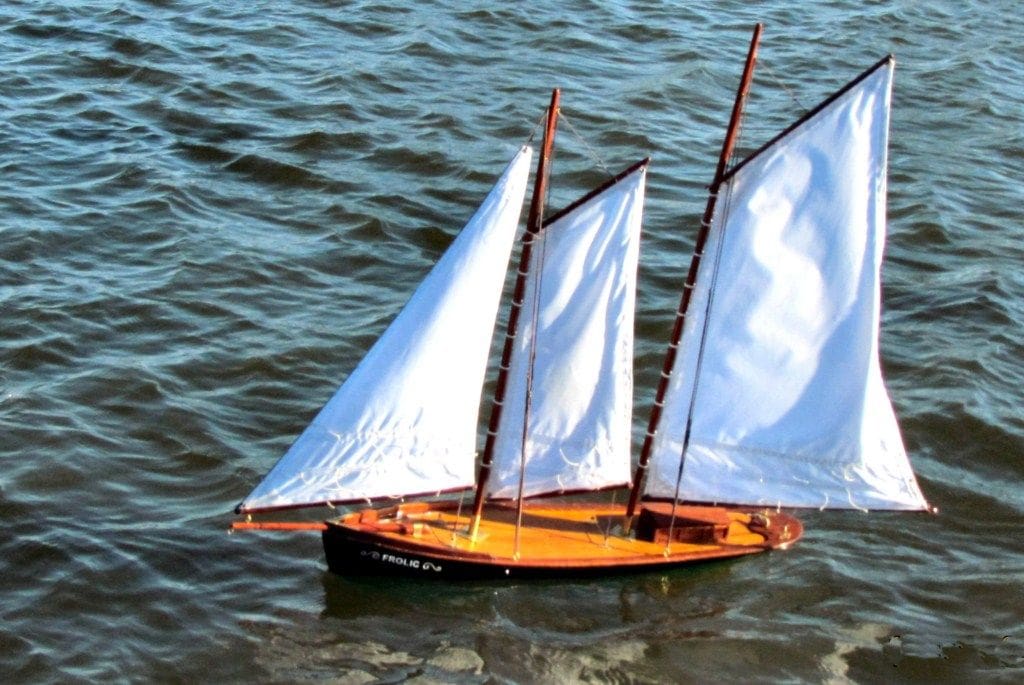
Back to the lake again, and this time the hull balance could be lived with. The model is surprisingly buoyant and sails well, Photo 12. With the sheets manually eased off, Frolic can sail the full length of the lake and having the ability to move the rudder by radio control is very handy!
Conclusion
I have often wondered if the person who built this model originally would be impressed with the tools, materials and glues to which we now have easy access. We just do not know how lucky we are in the this 21st century, but I guess in a 100 years’ time, people will look back on us now and wonder much the same!
The model has been an interesting restoration project and is a joy to sail. So, if ever you are offered an old model, however derelict, don’t dismiss it out of hand as restoration can be very enjoyable and rewarding. In addition you will end up with something that most likely will be unique and perhaps a further 100 years down the line it may still be providing someone with pleasure?