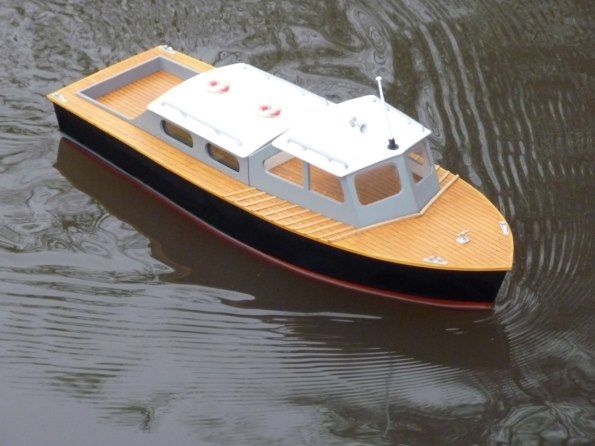
Fast Patrol Launch
JOHN ELLIOTT reviews the Vintage Model Boat Company kit
Enjoy more Model Boats Magazine reading in the monthly magazine.
Click here to subscribe & save.
After completing my last project I fancied building something from wood. Whilst searching the web for some ideas I came across the Vintage Model Boat Company (VMBC) who produce a range of wood kits from the 1950's and 1960's, but updated using modern technology. This Fast Patrol Launch has a distant similarity to the Veron River Police Launch kit that I have always wanted to build, but sadly is no longer available, hence the choice was obvious. Overall, the model measures just 20 inches in length with a 6.75 inch beam.
What's in the bag?
When placing the order, I took the opportunity to add the recommended motor, propshaft and rudder which are extras to the basic kit. The package arrived very quickly and included are three sheets of laser cut ply, four thinner sheets for the hull skins and a dozen or so pieces of strip wood for deck supports and stringers, a plan, two pages of instructions, plus the extras that were ordered, namely a brass tubed propshaft, rudder and a 545 type 7.2 volt rated motor. The building sequence follows one of the standard methods of the 1950's and 1960's for a hard chine model, by starting with the keel and then adding bulkheads, the transom, breast hook and cabin sides to create rigid framework. Deck edge and chine stringers could then be added and the hull finally skinned, so all pretty much standard stuff. There were a couple of discrepancies with the part numbers on the keel, which I assume came about when the kit was re-jigged for laser cutting, but these are minor and easily identified, so is not really a problem.
The hull
Basic framework and forward cabin section
I started as suggested with the keel and followed with the bulkheads and cabin sides placed in position, but not glued, to check for fit. The forward cabin section is removable, so this was constructed now, it having sides, cross members and a top. Although the parts for this were accurately cut, it is probably the most difficult part to assemble, as numerous clamps are needed whilst gluing it together and it does of course need to fit into and over the deck. The joints were pinned to give some added strength and to help hold them together whilst the glue set. It was assembled over the hull framework to ensure all was square and a good fit with the hull.
Following this, the frames were glued to the keel, together with the cabin sides and breast hook. The latter part was glued to Bulkhead B1 with pins through the thickness of the bulkhead to provide additional support and help maintain the deck curve whilst the glue set. Stringers were then glued to the frames for the chines and deck edges. All this is very straightforward and very much in the style of how wooden hard chine kit models were constructed 40 or 50 years ago.
Bottom skins
The ply skins were placed in position to check for fit. I soaked these in some hot water for a couple of minutes to make them pliable and then they were clamped in position and left overnight. This enabled them to take the general shape of the hull bottom and remove some of the stress in the wood when glued in a curve. These bottom skins were glued first, rather than the side pieces as suggested in the instructions, my reasoning being that as these had the greater need to curve and in two directions as well, I had more of the stringers on which the clamps could press.
Glue? Well, slow-setting epoxy adhesive is as good as any, but some modern PVA type glues might also be more than adequate. Once all was secure and the glue fully cured over a day or two, the edges of the bottom skins were chamfered to match the chine curve and transom line.
Motor and propshaft
Before fixing the side skins and whilst still having good access through the open-sided hull, the motor mounting plate was installed and glued in position whilst ensuring the motor and propshaft were properly aligned. Two pieces of brass tube were used as an alignment tool, one fitting inside the other, with their outer ends over the propshaft itself and the motor output spindle. The length of the alignment tool was adjusted to match a standard single Huco style flexible coupling. The propshaft tube was then glued into the keel, once again with slow setting epoxy adhesive. The motor sits on two blocks of wood to prevent it moving laterally and is secured with cable ties. I also took the opportunity to drill the hole for the rudder post tube through the keel and check that the rudder blade would not foul the propeller. The rudder post itself had to be reduced in length, otherwise it will foul the underside of the deck.
Side skins
Only now were these glued in position, then followed by the deck. Some sanding of the edges of the side skins was necessary at the chine and deck edge, before adding the deck and to create an overall smooth hull.
Deck
This was stained with a light wooden colour and the printed planking enhanced by going over it with a ballpoint pen. Lines were also made on the stern well deck piece to simulate wooden planking. To hide the 545 motor and offer some protection from water, a forward cabin section floor was created from a piece of scrap plywood and also finished with stain and pen lines like the main and well decks.
Finishing off
The whole model was carefully rubbed down and blemishes filled or sanded away. The wood will of course need to be sealed properly before painting. Traditional sanding sealer (or dope) is as good as any, before the hull was sprayed with Halfords aerosol car touch-up acrylic primers and paints, all followed by a couple of coats of satin varnish.
Not supplied is the window glazing, so back to the spares box for this! Quite handily though, you can use the now redundant laser cutout window pieces as templates for the glazing.
The rudder was re-installed and a tiller arm added. An 'off the shelf' basic two bladed plastic propeller was attached to the 4mm threaded propshaft and the motor and coupling also refitted into the model.
Some sort of bracket will be needed to hold the rudder servo and you will also need to devise and make a battery tray. These were made from scrap plywood with additional pieces for the receiver and electronic speed controller units to be mounted out of harm's way.
Sundry spare fittings from the good old spares box, were used for the flagstaff, fairleads etc., and two flashing blue LED’s were installed in the forward cabin roof. Some fittings can be purchased from the VMBC if the builder so wishes.
And on the water?
This first took place on a rather cold November day. Not too successful to be truthful, as the dreaded 'weed' was lurking in some unexpected areas, somewhat hampering maximum speed trials and the model did show a tendency to 'dig in' on fast turns anyway, so back to the drawing board! The easiest thing to do was to reposition the rudder servo and move the battery as far aft as possible which solved the problem of digging-in. The 545 type motor is heavy and to be honest seems too big for this model. Perhaps a geared 380 type might be better, bearing in mind its size, but on the other hand, the 545 motor doesn't have to be run flat-out all the time.
A second trial in January 2013 (still somewhat cold!) and things were much better. At full speed, up went the bows and the Fast Patrol Launch rode the water nicely with a lovely bow wave. At slower speeds it turned with a tight radius, so has the potential to be a good regatta steering model, even though only having a single propeller. Mind you, going astern with a single screw and flat transom is a bit problematic, but in the right hands, who knows?
Those who want to experiment would probably also find one of the new small brushless motors a suitable proposition, as these are a lot lighter and more powerful in terms of size, weight and output.
Conclusion
I enjoyed building this model as it is not very time-consuming to construct and it all went together very well. The basic kit retails for just £59.95 with the rudder, propshaft and motor adding another £14. With postage, the whole lot was just under £81.
Manufacturer: Vintage Model Boat Company
Website: www.vintagemodelboats.com
Tel: 01205 270373
Address:– Winterdyne, Spilsby Rd, Eastville, Lincs. PE22 8JR.

