What do you get for your money?This is the latest Almost Ready To Run (ARTR) model in the Graupner Premium line of products, a series of particularly high quality ready made models, with an exceptionally high standard of detailing. The core of this model is the robust moulded GRP hull, complemented by the superstructure and deck which are constructed from very accurate laser cut ABS parts. Many of the small items are manufactured from metal, and almost everything is factory assembled by hand. The hull, parts of the superstructure and the masts and fittings are spray finished using semi-matt paints and the decals are already applied. The many details and scale fittings give the boat an impressive scale appearance, both on and off the water. The large deck openings make it a simple matter to install the radio control components, and that procedure is quickly completed. To prepare the boat for running, all you have to do is to install the r/c equipment, the drive batteries, carry out a little soldering and the model is ready for the water. This is an accurate scale model and an excellent representation of the original vessel.
Article continues below…
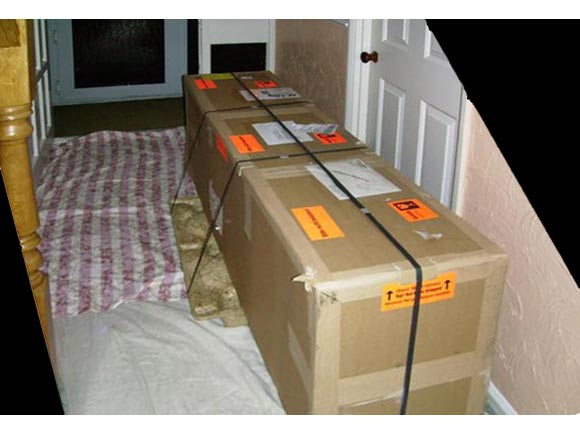
Enjoy more Model Boats Magazine reading in the monthly magazine. Click here to subscribe & save. Model specification:Length approx. – 1600mm. The original vesselThe Cap San Diego had a very busy life and is now preserved as a museum ship. Graupner have based their model on the original drawings provided by the Cap San Diego Operating Company mbH (www.capsandiego.de). In 1962 the ships of the Cap San Class ushered in an era of fast freighters, with their large refrigerated holds and facilities for up to twelve paying passengers. With their slim hulls and pronounced stem and stern rakes, these ships were more reminiscent of elegant motor yachts than freighters and that was why they also became known as the White Swans of the South Atlantic. However, after the 1980s, the container became the dominant means for the transport of goods, resulting in the end of the mixed cargo freighter. This resulted in the sale of the Cap San Diego to Spain during 1981. Rescued from the scrapyard, the ship returned to Hamburg in late 1986, where she was then completely restored to a seaworthy condition and since that time the vessel has been stationed at the Überseebrücke in Hamburg. Further information on the ship is also available via the internet at www.wikipedia.de or the website of the operating company. This vessel is propelled by a two-stroke MAN diesel engine with nine cylinders, producing some 11,600 horsepower. On her trials she reached a maximum speed of 20.3 knots at 118 revolutions per minute. Four auxiliary KHD engines rated at 500hp each with generators, supply the whole ship with electricity at 440v/115volts AC. During her 20 years service she completed more than 120 round trips between Hamburg and South America. In that period of time, every week a ship of this class was commencing the same voyage. Cap San Diego was the youngest of six sister ships, the others being Cap San Antonio, Cap San Augustin, Cap San Lorenzo, Cap San Marco and Cap San Nicolas. The delivery boxA big model needs a large box and especially this one. Having first hand experience of watching the delivery guys unloading it off the lorry with the use of the tail lift and pallet truck at 7:45 in the morning and making enough noise to wake up the whole street, I started to think very quickly about what I had done. Photo 1, is of the box in my hallway. Reality then hit me, because a model of this size and detail would need some serious protective packaging to survive the journey. The outer box cardboard material was 10mm thick and with great care was opened in such a way that I could use it later. Once opened, this revealed a second box – surely not pass the parcel? This time the usual colour Graupner box, with photos of the model on it and I must say it looked mighty impressive. With careful opening, I was then confronted with the model and the first impression was what a super clean detail and paint job. The model within its wooden crate construction was extremely well secured, the strip wood crate is simply nailed together which once in the box becomes a very strong rigid structure and just required pulling apart with gentle hand force. The various holding straps including fine cord with protective foam was removed and my son and I lifted the model out carefully. The model comes with its own named and stained plywood stand which was a nice finishing touch. Over a well deserved cuppa a much closer inspection took place.
|
|
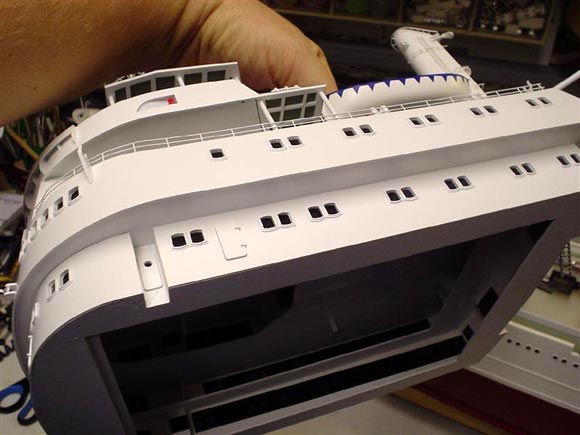
InspectionIt is a model well worth taking a slow visual walk from stem to stern, all 1600mm of it, to take in all the detail. The masts were perfectly upright, stanchions vertical, derricks all in place together with all the rigging cord. In fact, not a thing was out of place, confirming the use of good packaging. After some twenty minutes looking and talking, it became very clear that although this is an almost ready to run model, the build quality was certainly the highest I have seen so far with individual clear glazing for windows set inside shaped window frames, vents and doors well modelled and brass etching has been used to create the railings and mast components. On inspecting the underside of the superstructure I was amazed how clean and exactly everything had fitted together, with no residue of glue. The swimming pool has been superbly modelled, along with the wooden deck area on the superstructure roof. The paint finish has been sprayed on in satin finish colours and extremely well done, with no ridge where the two hull colours meet, so a truly professional job. Another good sign at the business end (the stern), was that it had a quality brass propeller fitted. At the other end of the propshaft there is a motor attached and just waiting to have some power put through it. Enclosed within the big box and also securely retained, was a sealed envelope containing the operating instructions. These are in various languages, the English version being some 12 pages long and extremely comprehensive, including b&w photos of the model being fitted out with radio and batteries, so after some serious reading, work commenced. Photos 2, 3, 4, 5 and 6 are detail shots of what you get for your money. The extrasThe statement ARTR implies you do have to add a few things to make the model function. The instructions do give a complete list of what is needed, describing Graupner accessories, which you would expect. These can be ordered or purchased at any good Graupner stockist. Of course with any model, other products can be substituted, provided that they meet the required specification. The electric motor has been pre-fitted at the factory and looks to be a 550 type motor. Without removing it I cannot confirm this as it was very well mounted, Photo 7. A quick test can be carried out by hand spinning the shaft to see if there is any binding. A good quality coupling had been fitted and all moving parts had been pre-lubricated with silicone grease, so I decided not to interfere. I did need to establish what sort of off-load current the motor pulled from the batteries, so by connecting two fully charged 6v drive batteries in parallel, as this would be the eventual installation, along with a digital meter, the current was measured at 4.7 amps off-load and will rise a little once in the water and on-load. I did think this was rather high, but decided that since the model will be power supply rich so to speak, it would not be a problem. A suitably rated electronic speed controller was obtained, this being from Electronize who manufacture a very good and reliable range with advice and backup service to match. My choice was to use model number FR12VR as it has a BEC (Battery Eliminator Circuit) fitted internally, which would allow me to run everything from the main drive batteries. They are superb units, are very reasonably priced, of British design and 100% supported. More importantly, they are easy to set up, giving optimum variable power from the slowest of propeller revolutions right up to maximum power. Thus the model responds superbly on the water in whatever situation you are in. For radio control, a standard two channel set can be used with one of the servos for the rudder control. For main power, four batteries are required and these are 6 volt 10Ahr, although only two are actually used at any one time. These are wired in parallel, the other two can be used as a standby power supply until needed. The truth is that all four batteries act as the main ballast, required to bring the boat down to the correct waterline. Connectors and the correct gauge of wire are also required, together with a metre length of two-part self sticky Velcro. One of the best places to obtain the electrical items is www.modelpower.co.uk, especially the four heavy batteries. The other source is Maplins electronic stores, which are based all over the UK, Photo 8. AccessThe main centre superstructure lifts off sufficiently to be placed alongside the model on a box or transmitter case as suggested by Graupner, Photo 9. This is because the cord from the two front derricks restricts movement. This I chose to modify, by changing the route of the cord from the two front derricks to avoid entanglement when moving the superstructure. By cutting the cords as low as possible where they attach to the winches, I could fit tiny little hooks made up from fine wire and painted black. These would then just hook into the remaining cord on the winch drums when the superstructure is replaced. This makes it much easier to remove and replace the superstructure. Photo 10 shows one of the hooks just above the winch. The rear anchor winch deck plate is removable and this allows access to the rudder tiller arm. The four loading hatches along the centreline of the model are also removable and are primarily used for checking and positioning the drive batteries. The hatch at the very stern can be removed only after dismantling the derricks above it and to be honest, there is nothing below it, so it is not really worth the hassle. The working hatch as I call it, actually being the second access from the stern, is where the rudder servo fits within a very nicely moulded tray, suitable for a standard size servo, which is all the model needs for steering. The holes for mounting the servo have to be drilled out to suit the screw diameter and spacing required, Photo 11.
|
|
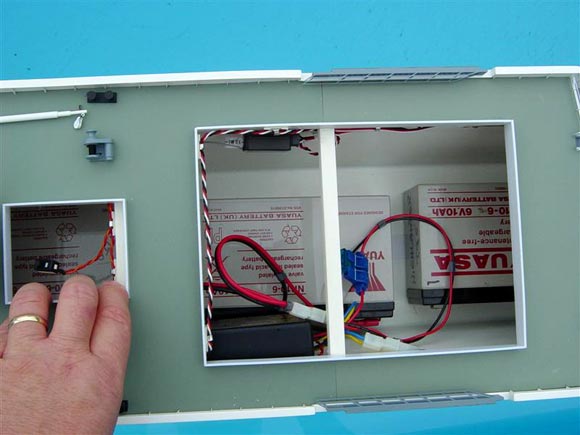
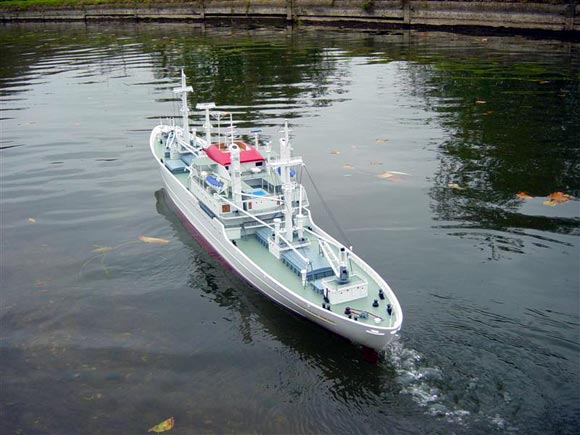
Radio and battery installationInstallation is very simple, as the motor is already fitted with the appropriate wire, but no connectors are supplied or fitted, since that is for personal choice. I have used in-line high amp type connectors as per the instructions, but some of you may choose Tamiya style or even standard electrical connecting screw terminal blocks. Do make sure that the connections are secure and of the correct polarity. My advice is that terminal blocks can be unreliable and should be the last option. The use of the correct gauge wire with a good outer insulation is also very important, so that it can handle the amount of current being drawn. I have made up a battery supply Y cable, so called because it connects two 6v batteries together in parallel making the voltage delivered still six, but doubling the amp. capacity and therefore giving longer running duration. Graupner can supply this cable as Pt. No.3061 if needed. A step by step guide with pictures are included within the instructions and are very easy to follow. They can also be downloaded or viewed on Graupners website as a PDF, so you can view before even buying the model. If you do use the crimp type connectors, I would also strongly advise soldering them as double back up, because the wire can work loose over time. With the rudder servo already fitted earlier, I decided to mount the receiver on the inside of the hull at the main access point. Do not restrict the opening too much as the batteries need to be put in and removed as required. I had to obtain a servo extension cable for the rudder servo as it was a long way through the hull to the receiver. The receiver aerial follows my usual method of running it under the deck taped in place going towards the bow and this is also described by Graupner. Never shorten or increase the receiver aerial wire as it is a tuned length. Aerials should always be as high as possible above the waterline and should run around in a broad curve and not a tight one. GRP material does have a slight adverse effect on radio reception, but this would only be noticed if the model was 500 metres distant from the operator. The speed controller had the appropriate mating plugs and sockets fitted. It also has its own on/off power switch which I have located directly under the hatch just in front of the superstructure for easy access. Both receiver and speed controller are held in position using Velcro which is a nice easy method of attachment. The drive batteries being heavy, have to be as low down as possible and the instruction photos show them in the approximate position needed within the hull, and although shown upright, ideally they should be laid down horizontally. The idea is to slide them inside the hull to roughly the correct position, then place the boat on the water and adjust them in such a way that the model floats level at the marked waterline and requiring final checking and adjustment once the superstructure is in place. Now no information is given as to making sure that the batteries do not move, so my method was to use Velcro tape with two strips placed across the width of each battery and one long length stuck down the centre line of the inside of the hull. That way the batteries can be positioned and by a gently wiggle motion of the battery where required on the Velcro, they are locked in place. I will modify this at some stage by having the batteries slide within the model on a wooden base plate. As with all rechargeable batteries a suitable charger needs to be purchased. Please do not use car type battery chargers as they are not designed to charge this type of sealed lead acid battery cell and damage or even an explosion could happen, Photos 12 and 13. Water trialsWith all batteries fully charged, a radio check was carried out along with checking the rudder movement and propeller rotation. This can all be easily checked by operating the transmitter throttle stick in the forward axis. This should result in a draught being created astern from the propeller. If incorrect, this can be cured by either changing the reverse switch on the transmitter for that control stick or by reversing the motor wires. Please note never to reverse the main power wires from the battery to the electronic speed controller, as damage will occur. It was now ready for its maiden voyage and lifting the model into the water took two people, but thats if the main ballast, namely the batteries, is already fitted. If it is to be a one man job, I would suggest adding the ballast once the model is on the water. With the correct trim, the r/c system was switched on and power was applied. Following a turn to starboard, and then returning the rudder stick back to neutral, I noticed the rudder stayed hard to starboard. Luckily the model was still by the bank and an internal check found that the plastic control horn locating pin had broken away under the stress of moving the rudder blade. The cure was to replace this with a standard metal type control horn, which luckily I had in stock. Slow motor revs were applied and with a little wash from the stern she moved off very majestically. Now being an avid reader of a magazine called Ships Monthly, which contains many stories and articles on tankers, coasters etc., I was fully aware that this type of vessel although relatively fast once underway, would require lots of space to manoeuvre and would take some time to slow down, so forward thinking is required by the captain at all times, in this case me. On the water the model looked very realistic, the white paint work showing up all the fine detail. The motor, battery and propeller combination gave it plenty of power. Steering reaction can be slow, given the size of the model and I would think this is no different to the real vessel. Once the rudder had taken effect, the turning circle was about three times the model length. Going astern in a straight line is not a problem if the rudder was not left in the neutral straight ahead position. Running time on the water from the first set of batteries was just over an hour, thats with moderate to full power testing throughout, on calm water which was excellent. In my opinion calm water is the best sort of condition on which to sail Cap San Diego. The wake and wash created looked perfect and once back on dry land no water was found to be inside with the motor just slightly warm to touch.
|
|
StorageStorage for any model is very important as it helps to prevent dust settling on it when not in use, but more importantly also prevents any damage to it. If built correctly with handles fitted, a storage box can also act as a carry case. My method of constructing a case is to build an 18mm square wooden framework which I then cover with 4mm plywood, making it strong and light in weight and the front is left open as the access point for the model. There is a sliding, drop in place, panel to cover that access point. The box is then varnished or painted for added protection. Now if one did not wish to do this, then it could be possible if the model was to be statically stored and not transported, to make use of the original outside shipping carton, this being a strong 10mm thick cardboard box and by having an opening at one end the model could be easily slid in and out. ConclusionMy first experience of ARTR models in 2004 was with the Graupner Southampton tug, recently bettered with the introduction of the Smit Rotterdam tug. Both are superb examples of quick to the water model boats at a good working scale size. Now with the addition of this model there seems to be no compromise on detail, size of model or indeed the subject matter. Confirmation can be seen in their latest catalogue, or on their website with warships, fireboats, steam boats, lifeboats to mini-subs available. Which models are on the drawing board next, we wait to find out. In the meantime, for me the Cap San Diego is a fine example of the detail and quality to come down the Graupner ARTR slipway. To my mind, this method of getting into model boating is here to stay and can only help to encourage new and old to this great hobby of ours, hopefully the purchaser then progressing to kit or scratchbuilding. Having not actually built this model, I have to say that the quality and finish is so high, why even bother? Just buy and enjoy. Time taken from receiving and running on the water was just a weekend. If you work out how many long hours it would have taken to build, it is still an excellent buy and for that matter should have a reasonable secondhand value. With the scale being 1:100, it looks good on the water. It does need a large amount of water to turn and dont expect it to stop immediately. One can add extra detail with a few coiled up ropes and figures as I have done, especially as there is a swimming pool on board. It is a beautiful looking model, extremely well built with lots of detail and even better is a great sailing model, possibly just like controlling the real thing. Price for the boat currently at A Model World is £659 which is the best price I have seen so far, then theres the carriage costs on top of that, so do check it out at www.amodelworld.co.uk or tel. 01606 891999 and of course check www.graupner.com for the full facts and dont forget the real vessel still exists so check www.capsandiego.de.
|
Cap San Diego
by
–
Advert
Enjoy more Model Boats Magazine reading every month. Click here to subscribe.
Article Tags:


