This new release from Graupner of a Sports Yacht is aimed at the beginner to modelling and requires minimum skill to complete successfully. A word of caution however as an experienced modeller would highlight a couple of stages in the build where slight care is necessary to achieve the level of finish he or she requires. I will highlight these at the appropriate stage. PrototypeThe model of the Beata is based on the original documents of Swedish designer Ocke Mannerfelt. The hull is identical to that of the B-24 racing boat which has been very successful in competition racing.
Article continues below…
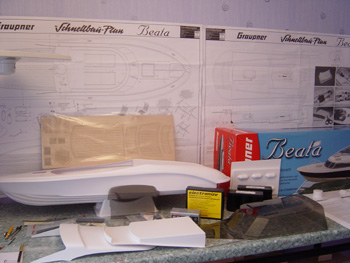
Enjoy more Model Boats Magazine reading in the monthly magazine. Click here to subscribe & save. The kitHaving received the kit from Mark Williams of ‘A Model World’ my first impression was that of the usual quality associated with Graupner. There is a large colour photograph on the lid of the kit box giving a good reference point to the colour scheme and the plans as ever give precise and simple instructions to the modeller. A lot of the work on this model has been completed at the factory with the hull and deck already joined and the cockpit pre-formed. There is even a vac-formed boat stand supplied which needs minimum attention for readiness of use.
|
|
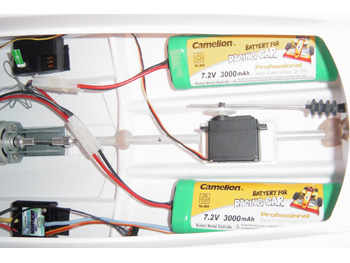
AssemblyAfter the boat stand had been cut out the first job was to solder the motor power cables and suppressor to the terminals of the electric motor which has to be obtained in addition to the kit. I used a Graupner Neodym speed 700BB turbo motor in place of the recommended one. This motor is brushless producing less drag and more torque and a little more speed. Next the internals were fitted which is quite a simple task. A motor mount is supplied along with the drive coupling and Hydro Drive Unit. This drive unit comes ready assembled and is worth a mention. The unit is designed for boats of the hydro-planing type and fits on the transom (the back bit!) of the boat. Not only is high speed achieved by the reduction of surface drag but a plume of spray water is thrown up behind the Beata giving excellent realism and sure indication of the high propeller efficiency. Model Power supplied the batteries – they are on 01827 711501. OK, so that’s the technical ‘stuff’ over with so on with the build. The fitting of the hydro unit requires a little care so that the correct angles are achieved for smooth running of the propeller. There is slight latitude for adjustment on the unit so that everything runs smooth with little drag and no ‘bite’.
|
|
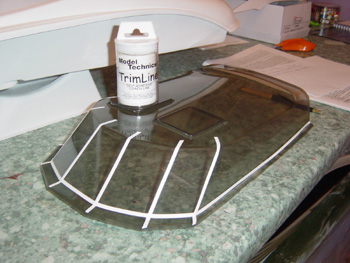
PaintingOnce all the internals had been fitted I decided at this point to paint the hull. All hardware was temporarily removed before the painting stage. The instructions indicate that painting is optional as the finish is in white and only need the decals applied. However, any slight blemishes and colour imperfections are completely covered by the application of (yes, wait for it), the use of our commonly used car aerosols, which in this instance was white primer. Gloss finish was obtained of course by a final coat of lacquer. As this review is aimed at the beginner, anyone new to modelling reading this must be aware of not mixing different brands of spray paint and varnish/varnish. Stick to one make – grown men have been reduced to tears at the terrible marbling effects that can occur when mixing brands. UpperworksNext stage was the fitting of the hatch cover and cockpit glazing. This again is one stage where great care is needed. Any beginner must be aware of the effects of ‘cyano’ (Superglue) on clear plastic used for glazing. Quite simply, don’t use it, as on curing the glue imparts a frosted appearance to the plastic which is a very much unwanted side effect. In this instance of attaching the clear glazing parts to the hull, 5-minute epoxy resin was used, but again be careful and apply thinly. There is no real load bearing area here so there is no need to ‘lay it on thick’. Next came the rear deck areas in the form of 1.5 mm thick laser-cut birch ply. Each piece fitted perfectly to its respective area on the stern deck cover and looked very neat. To seal the wood and give an excellent finish three coats of teak stain/varnish was used obtained from the local DIY store. The cockpit back panel came next along with the roof which was painted prior to fitting on the cockpit glazing shell. The mast and other sundry items were then assembled and fitted where indicated. Finally, to complete the Beata the self-adhesive decals were applied. The hull decals are in fact quite large and care is needed when fixing to the hull. I chose in this case to lacquer the hull prior to the decals and then apply another coat over the decals which gives the hull a good sheen and seals around the edges. Again, for the beginner, apply the lacquer as a thin coat. Too much and it can begin to ‘slide’ off the decal.
|
|
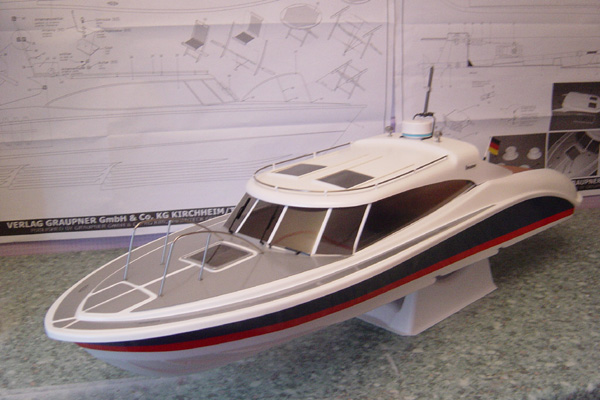
ConclusionIn conclusion this kit is an excellent introduction for the new modeller with clear photographs and instructions for each stage of the build. First sea trials indicate a very sleek appearance on the water with a good turn of speed. Graupner have again produced an excellent kit which gives good value for money and is sure to please the ‘speed enthusiast’. A big thank you must go to Mark Williams at ‘A Model World’ (www.amodelworld.co.uk) for providing the kit for this review, who I can highly recommend to all for both great prices and service. Till the next time, enjoy your modelling and ‘Calm Seas’ to all! The new Beata retails at £164.50 A Model World are at 12 Waters Edge, Anderton, Northwich, Cheshire CW9 6FA. Tel: 01606 76513.
|
Beata
by
–
Advert
Enjoy more Model Boats Magazine reading every month. Click here to subscribe.
Article Tags:


