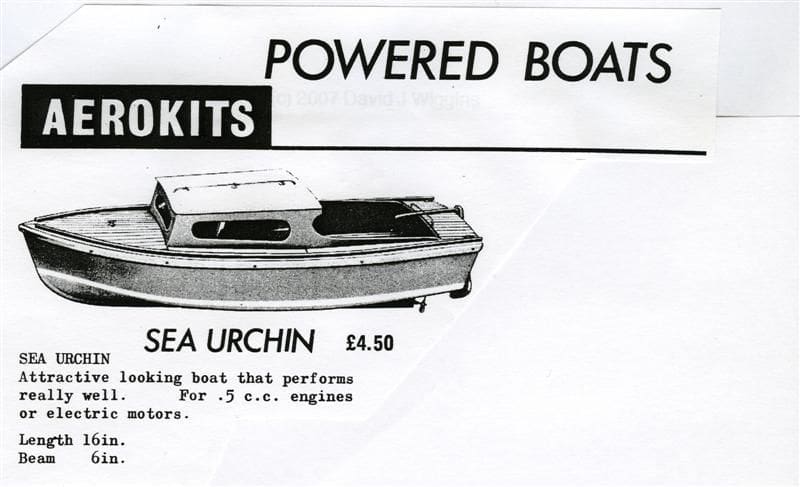
Lady for Lisle – our Sea Urchin is completed at last
By DAVID J. WIGGINS with thanks to MIKE BRITNELL


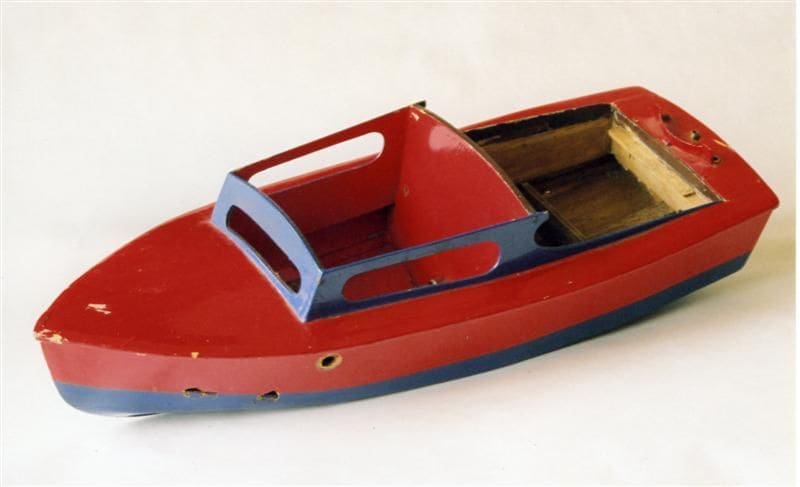
Hello yet again ye olde Aerokits fans! Over the last few months, I’ve rebuilt this poor, battered little craft and now we are firmly on the final straight, then on our way down to the pond and on to the scale steering course at sunny Southend and maybe even beyond in a couple of months time.
Enjoy more Model Boats Magazine reading in the monthly magazine.
Click here to subscribe & save.
Fitting out
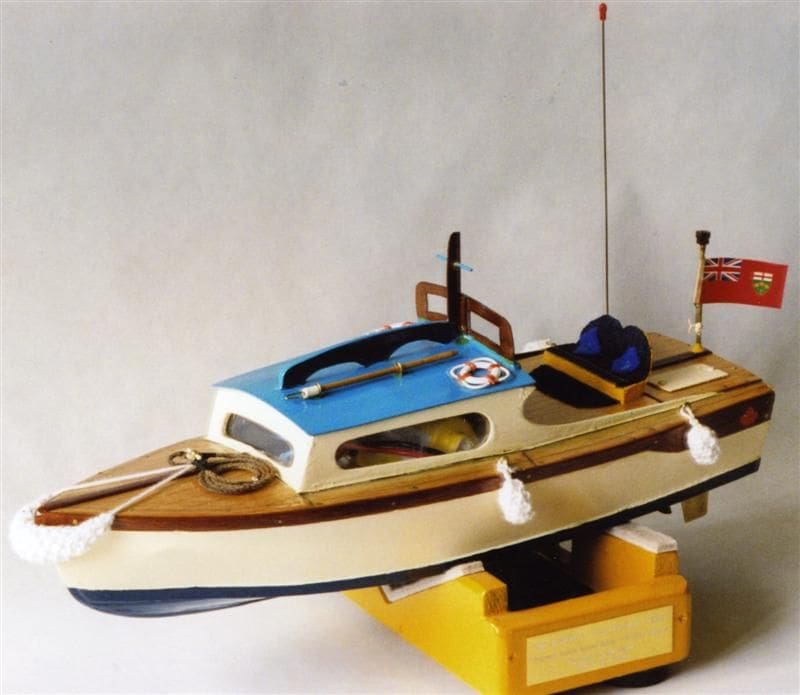
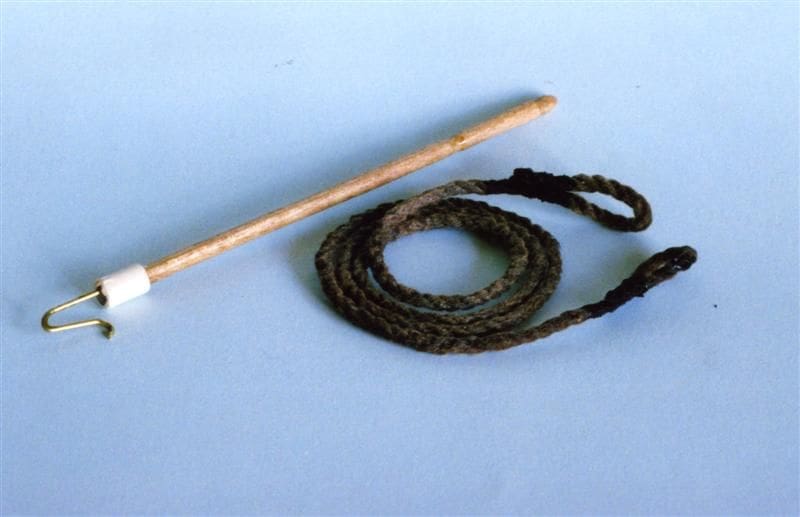
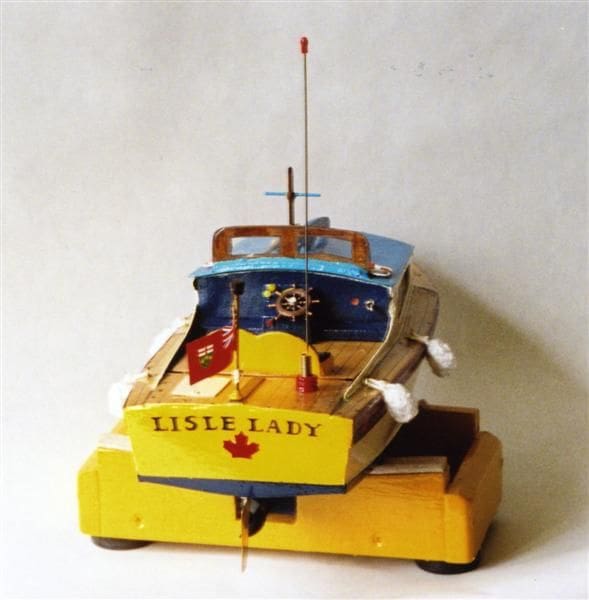
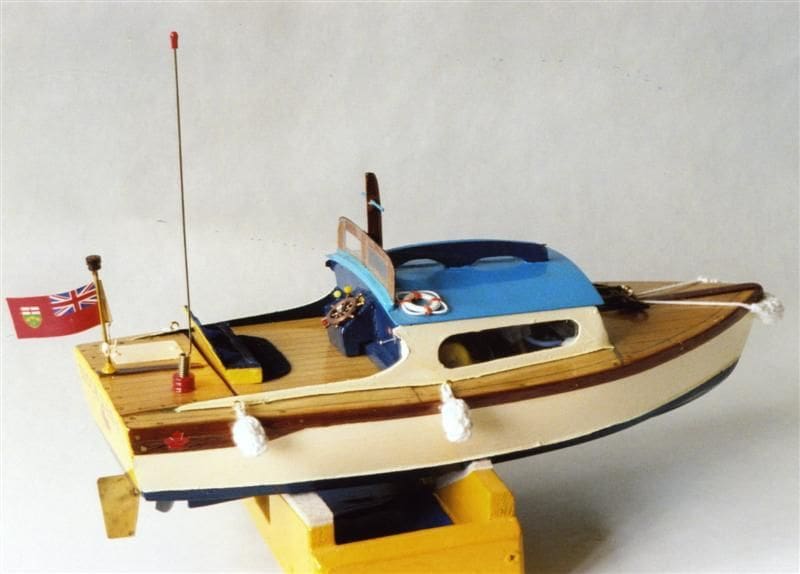
So here our once sad little Sea Urchin sits, newly painted, varnished and watertight – a glorious picture in blue and yellow. The smallest of the Aerokit range had few fittings and none were supplied with the kits anyway. In those days one bought Mersey, Veron or KeilKraft fittings as one wished. Of these none are now available, although there are some similar ranges about, often of higher quality, but also sometimes poorer. I wandered into a local shop and found a range of rather overpriced and Im sorry to say, rather poor fittings. I reluctantly bought one or two, but made most for myself, including a brass bar cleat, a boathook fashioned from a bit of dowel, copper and brass, plus two purchased brass eyes and finally four tiny brass deck hooks to secure a set of hand knitted and very vintage looking knitted fenders made to order by Southend member and one time KeilKraft sawmill man Les Cook. The cordage I did myself using string, paint and wire.
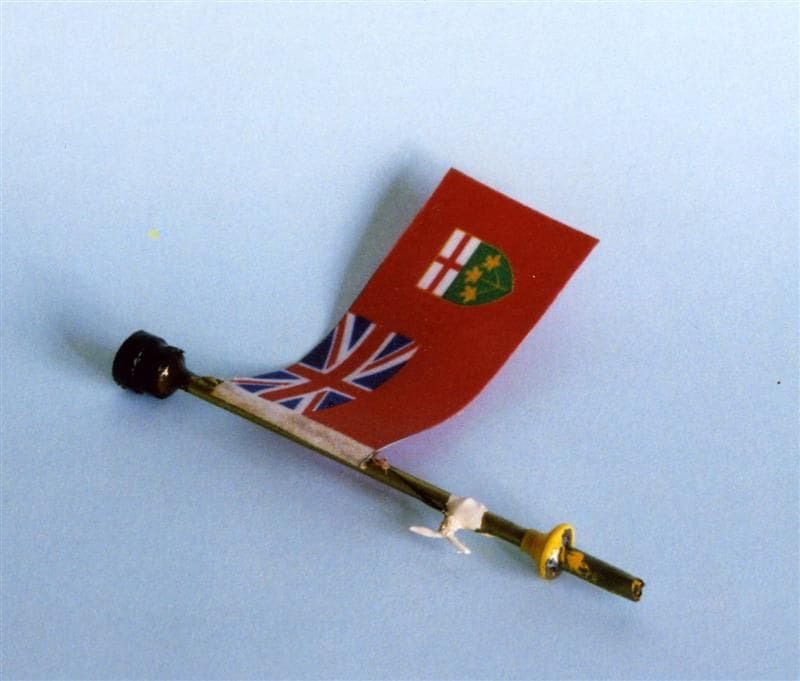
Like the boathook, the ensign staff is a Dave production being made from brass rod and tube, tinned copper wire stripped from some old electrical cable (for the tiny cleat), cotton sewing thread and a bit of dowel turned and drilled to size on my Myford. The red duster itself, a special for the province of Ontario, is from Model Flags (www.ModelFlags.com) who seem to me to have virtually every flag anyone could want and was very cheap too at only £3. (Model Flags is an independent distributor for BECC Products and Accessories Editor). I brushed the flag with Humbrol clear varnish, arranging a slight curl in it as it dried and then I cut it out and strung it with sewing thread and a spot of Evostik. The whole thing took me all of a day including the drying time.
The Sea Urchins missing central cabin roof rail I copied from illustrations in a 1960s copy of the KeilKraft Handbook, making it from painted 1/8in ply to which I then added a simple windscreen and stub mast cut from stained and varnished bits of 1/32in ply and mahogany scrap, a bit of 1/8in square strip balsa, an inch of thin brass rod and a spot of thin acetate left over from glazing the cabin windows. I also added a little lounger seat and a control console just behind the windscreen. The seat doubles as a lift off handle.
These are big deviations from the original Aerokit model of course and I admit it, but I think Ive improved the craft from the point of view of its new young owners. The only other visible deck item is a wire whip radio antenna – a purchased item for r/c cars found at a local modelshop that I cut down to suit. I realise that many scale modellers wont see any point in this, but I wanted the radio receiver to get the best signal it possibly could, as there was the chance this boat may be sailed on a large Canadian lake with the risk of going out of range, particularly if one just left the receiver antenna coiled up inside the hull. In any case, that would be poor practice and would definitely limit the range. If youve seen any of the Great Lakes in Canada youll know just how great they are. Frankly, they are not suited to model boating especially for a model as tiny as this, but I played safe just in case.
Throughout my restoration and rebuild of this 40 year old model boat, I was hamstrung by the complete unavailability of what were once routinely available bits and bobs in what few model shops we still have in my area. Its all changed I was always being told. People want ready made these days. Well, if thats so (and frankly, Im not sure it is), then the model hobby has pretty much had it I would say. Model makers are surely what we are and we are not big children playing with toys. To be fair, the electronic side of things has vastly improved in both performance and price during my 25 year absence from the scene, which leads me on nicely on to the next subject.
Modern radio control and power
Talking of r/c, I owned a 20 year old Robbe Starion 40Mhz four channel FM radio, which was one of the very first wave of sets to come into the UK on our then new frequency band. This had suffered serious damage through long term damp and cold storage and I know thats a disgraceful admission coming as it does from a professional electronic engineer. However, I part rewired the transmitter, replacing a few parts with items I luckily found at Maplins, bought and put in a brand new 700mah Ripmax/Sanyo NiCad from my local modelshop, purchased all new Futaba servos and a modern switch harness from the same source and made up a custom, four channel servo harness to convert the old M series sockets on the Robbe FMSS receiver to the modern pattern. To my great pleasure, off she whirred again after all those years abandoned in one of my garden sheds. Its true that I could probably have bought a new set for what I spent, but I liked this Robbe equipment. Friends in my club told me what to buy for my Sea Urchin, so thanks indeed to Graham and Roger and dont undervalue joining a club, because you will never regret it. In went a modern M-Troniks 15amp programmable speed controller (I reckon youd get six of these in the same space as one of my own manufactured controllers of 30 years ago) and a tiny micro servo, a modern 380 size, 7.2 volt rated dc motor and a 1500mAh Sub C size NiCad race car pack kindly given by friend Graham Fright and rebuilt by me to fit this boat. I needed a pair of NiCad batteries (one in the boat, one on charge), and tracked down a reasonably priced 1800mAh race pack at Maplins, rebuilt it and then it fitted nicely in to the boat just like Grahams gift.
As to charging, I want to recommend a charger that I got from my local modelshop, Heaths of Hadleigh. Called Hyper Charge by a firm called Prolux, it really is a super little foolproof thing. It automatically senses NiMH or NiCad cells and the total number of them, and can be set to trickle or fast charge (one or two amps), on 230v mains power or up to four amps on 12v dc (car) power. Back in the days when I did fast electric boating there was nothing like this. You had to make your own chargers, build your own battery packs etc. In this respect things have got so much better and easier for Joe Average.
The battery pack is wedged into the Sea Urchins tiny motor bay right in front of the main bulkhead and just in front of the centre of gravity. I glued a 1/4in sq. support beam to each cabin side and positioned across the boat a piece of 1/8in ply to act as a floor for the battery, thus avoiding placing any weight whatsoever on the thin bottom skins. The floor had to be artfully cut to allow access to the propshaft and coupling for oiling etc., but thats not too difficult. I made a cardboard template then cut a ply floor from that. Paint was scraped off the cabin sides to glue the beams on with fast epoxy and any damage was covered over later after the ply battery deck had been fitted. The battery pack sits on this deck nicely. You really dont want a big heavy object like this moving about at sea, so I use a bit of tape to keep it still.
Wedging the controller, motor and battery pack into the Urchins tiny engine bay is a right pain and I was pleased when all the hassle was over. No doubt there will be readers out there thinking : What is that Dave going on about – a 16in hull isnt that tiny? Well readers – it is to me. Give me the inside of a three foot model to work on any day – I guess that I have just got big hands.
Almost at the very point of going off to the pond I found myself in a slightly tricky position as regards the radio control, as the boat was not due to be taken until later to its end users with 27MHz Futaba fitted and I wanted to test the craft using my 40MHz Robbe gear. Sadly, that proved impossible to do as what I did not know at that time was that my old Starion transmitter had its servo centres factory set on 1.3 milliseconds, whilst all modern Futaba PPM radios are on 1.5. The difference sounds small, but is enough to be troublesome as regards rudder neutral, so in the end all the testing was done on the Futaba with which it will be used in future and the Robbe set, now fully overhauled and working, went back into storage (dry this time) ready for my next build.
Before going on the water
The expensive stuff bought and paid for and sorted out, I test floated her first in the hand basin (try that with a crash tender) and then in a bath. Now readers, thats a tradition – back when we all made Aerokits or Veron models, one always tested a new boat for centre of gravity and leaks etc. in ones bathtub. Anyway, now being satisfied, off I planned to go to the local pond for the first test session, but first I had one more item to make.
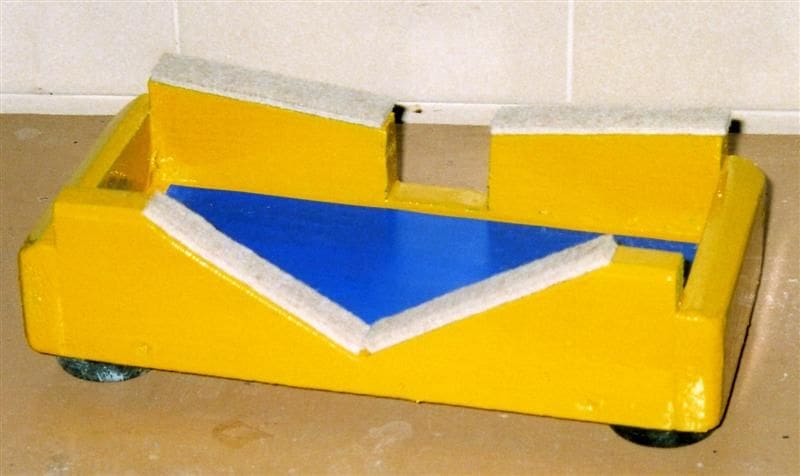
Making a stand
Dont waste our time Dave do I hear you say? For goodness sake how does the thing go? Hang on in there readers – patience, patience! Before I ventured anywhere near my club water, I thought Id better make the new owners a decent stand for their model. I had been using a scruffy old paint spattered builders stand left over from my 70s powerboat days and could hardly supply that and did not want to part with it anyway. So I knocked up something entirely from scrap wood as you can see.
Suitably equipped, I picked up the transmitter, made sure its batteries were ok, charged the NiCads and we were ready to go at last. I dont know which had been away from the pond the longest – dear old Les Rowells venerable entry level wooden broads cruiser or your vintage writer, but we both had a good time and will be back for more, probably not with a boat quite as small as this one, since I do like them a bit bigger myself and have not really enjoyed this job as much as I might.
I shot a full roll of film ( this is a vintage column, so I am not digital) of the completed boat and the resulting prints are shared between this issue and March 2009. Why the gap? Well a deviation down memory lane for a couple of months will not do any harm. Some pictures of Lisle Lady on the water will be taken for that issue and be included for your great amusement no doubt, together with a few then and now operating notes in those March 2009 pages. I know I do love to say this, but I have to ask how many plastic boats would still be usable after 40+ years and several engine changes – diesels at that in this case. Not very many is my guess and that is the reason why its the classic wooden motorboat for me every time.
Next month
Well guys, its the Xmas season yet again and next month in the January issue on sale just before Xmas, I have a little festive special for you. Not as grand as the many CC Xmas Specials of old it is true, but a nice little Xmas issue nonetheless. So pop in to CCM – it will be nice to see you.


