56ft Royal Navy Steam Picket Boat
BRIAN KING builds the Dean’s Marine compact kit of the picket boat S.S. Response
Enjoy more Model Boats Magazine reading in the monthly magazine.
Click here to subscribe & save.
I have joined a model club! The only other model club I have ever joined was the ill-fated Twickenham Model Aeroplane Club which I joined in about 1937/8. I say ill-fated, as the chief honcho was called up when the war started which lead to the demise of the aforesaid club and since then I’ve been a loner.
The one thing you really need on joining a club is a model that works and therefore has a motor, propeller, r/c, etc. which I hadn’t got, and I haven’t built a working model for about 30 years. However, I met my old friend Ron Dean at the 2010 Spring Meeting at Beale Park and he suggested his Deans Marine Compact Kit of S.S. Response, Photo 1.
Construction
The kit instructions were followed to the ‘T’ and these were mostly very clear although a few typo errors had been made and I thought some small bits were not wanted and probably referred to another kit. Apart from the GRP hull, the rest of the supplies were mainly in 0.040 inch (1mm) styrene sheet. Most of the parts required were marked out, but not cut-out, so you had to do more work than usual. Some parts were not numbered, but identifying these was not a problem. I found it best to scrape off or remove the marking and numbers with methanol before attempting to paint, otherwise these dissolved in the paint and made an awful mess. I should have explained that as well as the hull a vacuum formed sheet of mouldings was supplied. This contained the two forward superstructure pieces as well as the funnel which was supplied in two halves in addition to its flanged top and bottom fittings. All these pieces had to be cut out and sanded down to their fitting lines. I found this a bit of a bore, but that’s what modelling is all about, ain’t it? Periods of boredom interspersed with great excitement……….
Electrics
Before fixing the deck all the electrics were fitted as it is easier. As had sold all my radio gear many years ago, I could start afresh. I decided to go for the modern 2.4GHz system, which can be expensive but it has the advantage of being user friendly as you don’t have to worry about interference from other boaters.. The receiver, speed controller and servo needed to be accommodated in the hull and the very short twin receiver aerials arranged at right angles in the stern of the boat above the waterline. Photo 2 shows the arrangement which so far has worked perfectly. I powered the whole thing, receiver and drive motor, with a 7.2v, 2600mAh power pack which worked very well, much to my surprise. With the gear installed I put in a few deck beams and fitted the deck after trimming it to shape. Painting was straightforward as Halford’s acrylic aerosols in white, grey and red primer were the first weapon of choice as an undercoat. Above the waterline Halford’s Rover Nautilus spray acrylic which is a gloss dirty navy blue colour seemed to be about right. Tamiya masking tape, which I find to be the best, is great for masking and does the job perfectly. I rarely use my airbrush now as aerosols are so effective and do not require cleaning out afterwards.
Fittings
Most, if not all, of the small fittings were white metal. However, the trouble with white metal can be the very large number of imperfect bits the process throws up. I did not like the porthole frames supplied as they required to be glazed with Liquid Water which I could not obtain. In addition they were to be fitted into holes cut through the relatively thin vac-formed superstructure. Cutting large holes in thin styrene sheet has no real future as far as I’m concerned, so I thought up a new way of making these essential parts. This was helped by the fact that I have given a lot of thought to portholes recently.
Portholes
These were produced as follows:
The frame was simply a brass ring of rectangular cross-section 7.5mm outside diameter, 5.5mm inside diameter and 1.5mm thick. A disc of 0.01 inch styrene sheet was painted and forced into the ring to act as the glass. The rings were simply parted off a tube of the given size and the discs stamped out of the 0.01 inch sheet lying on a piece of thick rubber. Using a steel punch of 5.54mm diameter plus a couple of blows with a hammer produced a perfect disc with just enough interference to be forced into the brass rings. These were afterwards coated with R/C Modellers Glue on their back faces and glued in place, thus no holes in the cabin itself were required. The kit included a deck covering, but did not explain it was self-adhesive with a removable transparent protective film. Anyway, once the process was understood, applying the deck covering was simplicity itself.
General finishing
Only a small amount of lead ballast was required to bring her to her waterline, Photo 3 is of S.S. Response with the as supplied vac-formed main cabin. I was not happy about the security of the main superstructure which was not actually secured to the hull, but I just hoped it would be okay on the day.
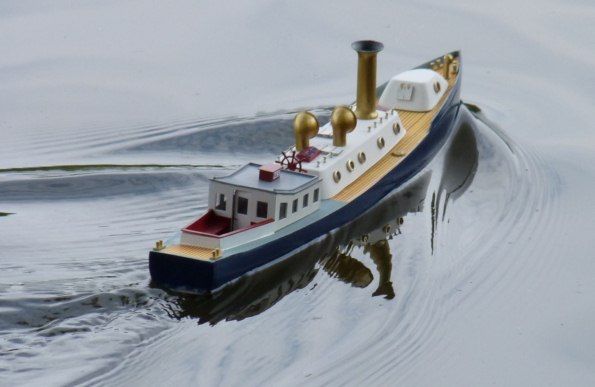
On the water
Apart from a slight heel she performed magnificently, Photo 4, with bags of speed and manoeuvrability, that is until, disaster! It was on the third outing that it ran over the tail feather of a waterfowl which disabled the motor. A club yacht then attempted a rescue but the resulting thump knocked the superstructure overboard never to be seen again!
Superstructure Number Two!
The boat was rescued but a new superstructure was urgently required and Photo 5 is of this balsa wood copy of the original vac-formed item. This time, I decided to make it from this lightweight buoyant wood (!), a material that I never normally use but it is very light and therefore eminently suitable for purpose. All the furniture, cowl vents, hatches, funnel, etc. were made from bits either from my scrap box or a friend’s spares rack. So after just four days hard work I had a complete boat again and the only parts requested from Ron Dean were the handrail brackets. Once sealed and primed, this Number Two superstructure was sprayed the colour coat (white) which was finally sealed with satin clear varnish. How can you tell the difference? Well, for one thing the later version does not have the same number of handrails.
Security
This time after much thought I also found a way to secure the superstructure. In essence a small, aluminium tube lined hole (see below middle port hole in Photo 5) was drilled in both sides of the main superstructure and a spring-loaded pin inserted in each. These pins engaged with a similar hole in the upstand of the deck. The suggested length of cord did not appeal as any excess cord in the hull would sooner or later get too friendly with the revolving bits and cause another disaster! So, Photo 6 is of my picket boat with its superstructure Number Two and most definitely fit for purpose.
Conclusion
Picket Boats
They could be armed with a 3 pdr gun or a Nordenfelt machine gun. The 56ft craft was the most numerous and became a classic of its type following service with the Royal Navy, many fine home and plenty of work in the private sector.
This model was named Nile (1888) because I am at present building the ship of that name. If you are interested, Lieutenant Commander N.B.J. Stapleton has written a book entitled Steam Picket Boats, ISBN 0-900963-63-8, published by Terence Dalton. Of note are the comments concerning the machinery. After reading of the care that had to be taken with their boilers, the naval artificers of that time must have blessed the day the internal combustion engine arrived!
Deans Marine S.S. Response
Length: 460mm
Beam: 80mm
Scale: 1:36
Price: £92 rrp
Please check Deans Marine advertisements in this magazine for address and website details.


