Shemarah II

Advert

Shemarah II

Home Forums Scratch build Shemarah II

  • This topic is empty.
Viewing 25 posts - 151 through 175 (of 371 total)
  • Author
    Posts
  • #36553
    mike farrell
    Participant
      @mikefarrell21522

      Hi Gareth ,I have followed your build since I joined the Forum and enjoyed the project a lot .Now I would like to come and see it on one of your sailing days If you would not feel I am intrusive I would like to come to Goole ,problem not clever following maps so use the the sat nav method of getting where I want to go so could you please give me the nearest post code to the club waters Then I can ask somebody for final instructions Thanks Michaelwink

      Advert
      #36554
      Gareth Jones
      Participant
        @garethjones79649

        Hi Mike,

        I may be able to save you a bit of a trip if you are available this Sunday 23rd Sept. My wife and I are planning to visit the Grimsby and Cleethorpes model boat club this Sunday morning as it is one of their open days but mainly because it is also one of the regular Vintage Model Yacht Group meetings that day. We are usually there from about 10:00 am till around 1:00 pm. If that would suit you better than travelling to Goole let me know and I will confirm our attendance closer to the date and make sure Shemarah is stowed away in the car before we set off (assuming my wife leaves room after packing her vintage yachts). I can probably let you know the post code for Sidney Park in Gromsby if you need it.

        Gareth

        #36555
        mike farrell
        Participant
          @mikefarrell21522

          Wow what a rapid reply .Thanks so much as living in mablethorpe its not too far for me I so appreciate your reply and look forward to meeting you in Cleathorpes Thank you again Michaelwink

          #36617
          Gareth Jones
          Participant
            @garethjones79649

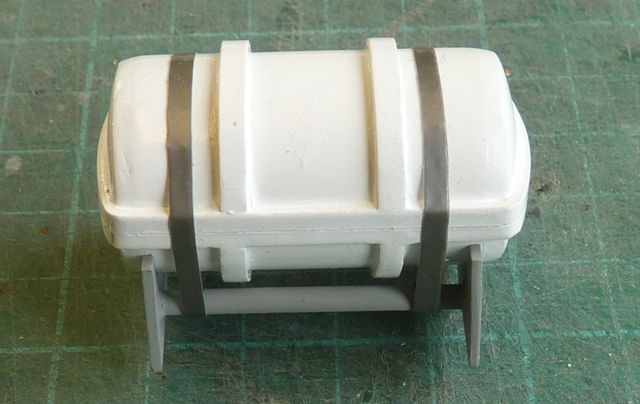
            The latest little addition has been the liferaft container, made from a short length of plastic pipe, two servo output discs, several short pieces of plastic strip, a couple of strips of Duck tape and a bit of filler.

            shemarah 260.jpg

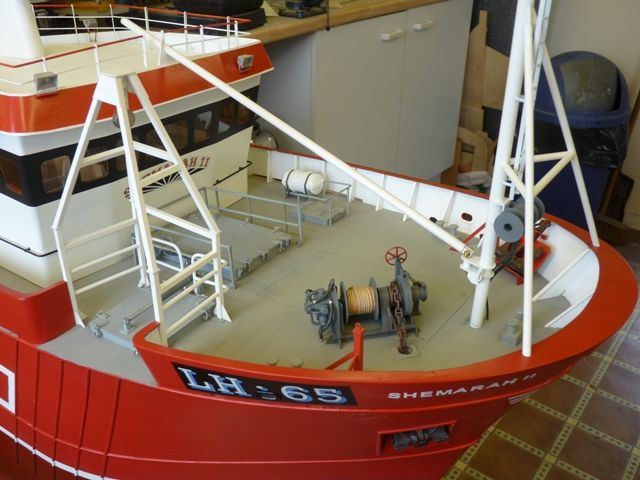
            The front part of the deck is now looking reasonably complete but when I started to make a list of the remaining jobs to do it's still quite long. Complete the derrick and associated winch, fit all the guying ropes and pulley blocks, fit the pulleys for the A frame crane to the deck, paint the railings white, make and fit the ventillators, make and fit the short length of ladder to the bottom of the mast and fit an additional hydraulic selector valve and hoses adjacent to the A frame. The deck and general paintwork needs a bit of weathering as well.

            shemarah 261.jpg

            However after repairing all the tears in my drawings and sorting out my Shemarah photos I am about to start the stern gantry.

            Mike Farrell – I hope to see you in Sidney park in Grimsby on Sunday morning. I cant find a post code for it but the car park entrance is in Park View – are you familar with the area?

            Gareth

            #36633
            mike farrell
            Participant
              @mikefarrell21522

              Thanks Gareth will be there at about 10-30 , Will find it as my grandson will direct me there Thanks again Michaelwink

              #36640
              mike farrell
              Participant
                @mikefarrell21522

                HI Garetth, Well most pictures tell the storey . Sadly until you see the real thing it does not do the build justice

                At the Cleethorpe waters I came to realise the enormaty of the build and to the proffesionalism of the builder .To all out there if you get the chance to see Gareths creation then take it . On the water she was so impressive .Glad I came and thanks . Michaelwink

                #36650
                Gareth Jones
                Participant
                  @garethjones79649

                  Mike,

                  Thank you for those kind words, I am glad you enjoyed seeing Shemarah for real and on the water. Maybe I should take it on tour when its finished.

                  Gareth

                  #36653
                  mike farrell
                  Participant
                    @mikefarrell21522

                    Maybe when you eventually retire,the weight and other logistics may slow you down It,s the type of boat with its mighty bow waves will impress both young and old .Will continue to follow the buid with a better understanding and appreciation . One day maybe I,ll present a future build ,in the mean time keep up the good work Michaelwink

                    #36727
                    Gareth Jones
                    Participant
                      @garethjones79649

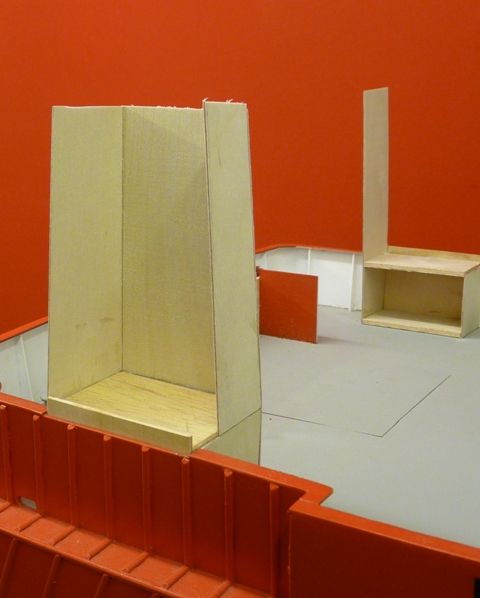
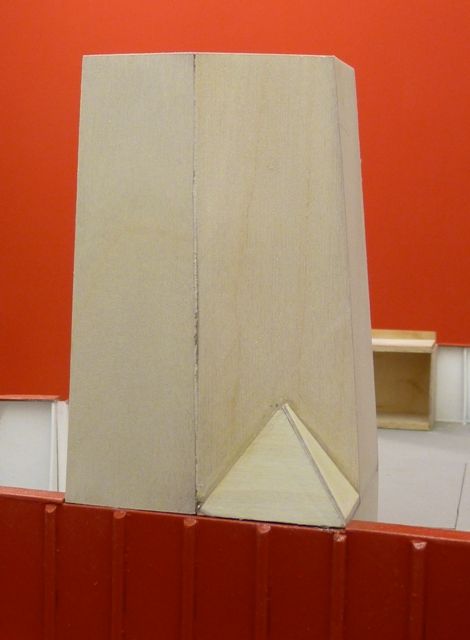
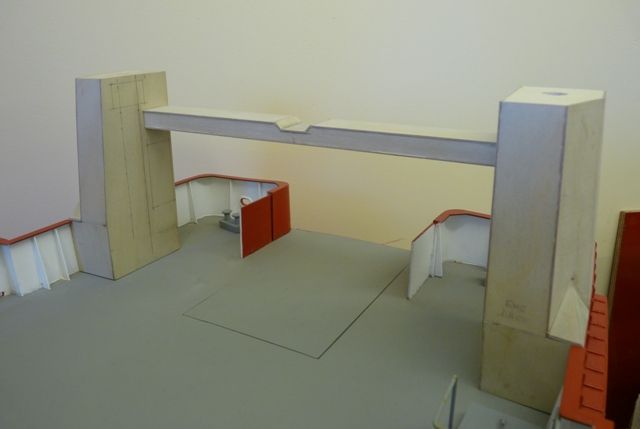
                      The first part of the rear gantry is now under construction. It is intended that the gantry and crane be a single removable item which will eventually be stored along with the mast, A frame and wheelhouse in a separate box from the hull. I plan to locate and attach it to the deck using my tried and tested method of cocktail sticks fixed to the gantry and locating in holes in the deck.

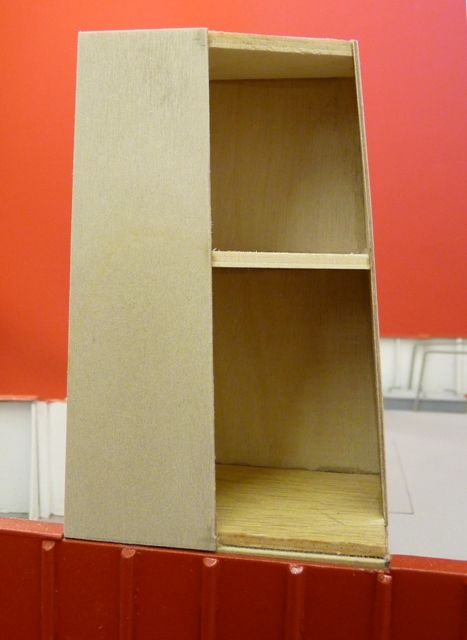
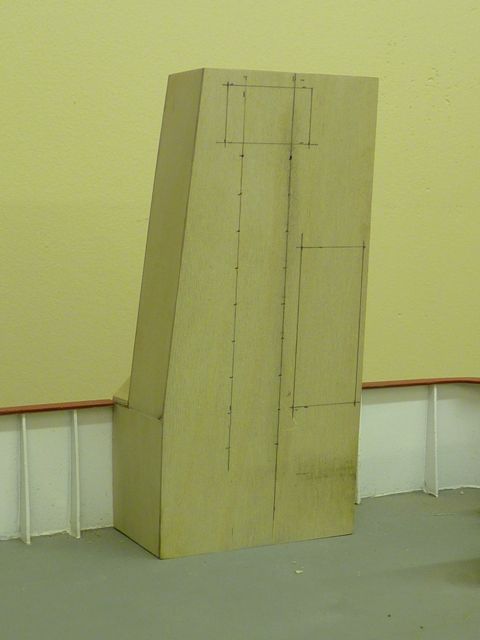
                      I have started on the two main uprights, building them with 0.75 mm ply skins and 3 mm liteply internal frames. As usual there is a mix of odd angles in the assembly but my trusty Proxxon disc sander is managing to cope so far.

                      shemarah 262.jpg

                      shemarah 263.jpg

                      shemarah 264.jpg

                      The two outer trawl warps hang from pulleys on the outside edges of the gantry. I guess the triangular pyramid shape at the bottom corner is to prevent the warp sawing through the gantry if it should get dropped on to that area.

                      shemarah 265.jpg

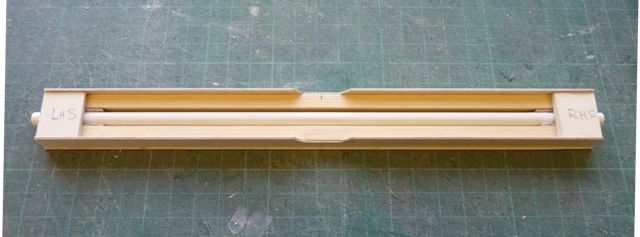
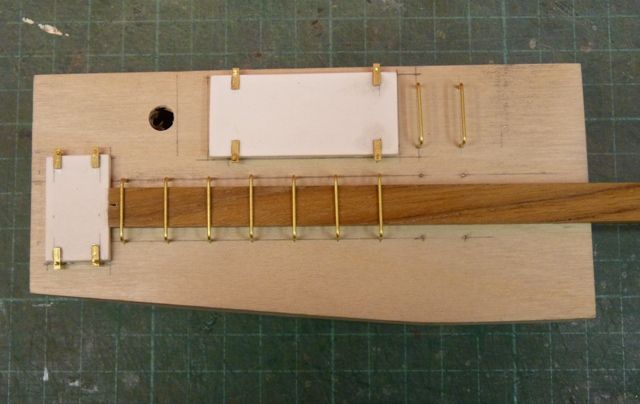
                      The inner face of the upright has been marked for the position of the rectangular ventilator doors and the rungs of the ladder. I plan to make the rungs from 1/32 brass wire using Bob Abel's eureka design bending jig so they are all identical.

                      #36728
                      Bob Abell 2
                      Participant
                        @bobabell2

                        Hello Gareth

                        Just spotted your reference to Bob Abell's bending jig…..Thank you for mentioning it

                        What I should have also mentioned, was that a fixture is also required for drilling repeating holes

                        Your model is simply exquisite and needs to be on display somewhere important

                        Bob

                        #36734
                        Gareth Jones
                        Participant
                          @garethjones79649

                          Bob,

                          I think I will manage to drill the holes without a jig, just a steel rule, pencil and a pointer to make a positive depression in the wood to act as a pilot for the drill. Making the rungs identical without a jig would be more difficult and I guess I would end up with more scrap brass wire.

                          I am not sure I would describe Shemarah as exquisite. It will be accurate and detailed but above all a working model. I am trying to build it in such a way that it is easily transportable and can be sailed without it becoming more trouble than its worth. While I enjoy the building more than sailing I get much more satisfaction from making something that can be used rather than stuck in a glass case, too fragile and expensive to risk putting on the water. I think I will try and show it around the model shows when it is finished but I dont plan to put it in a museum.

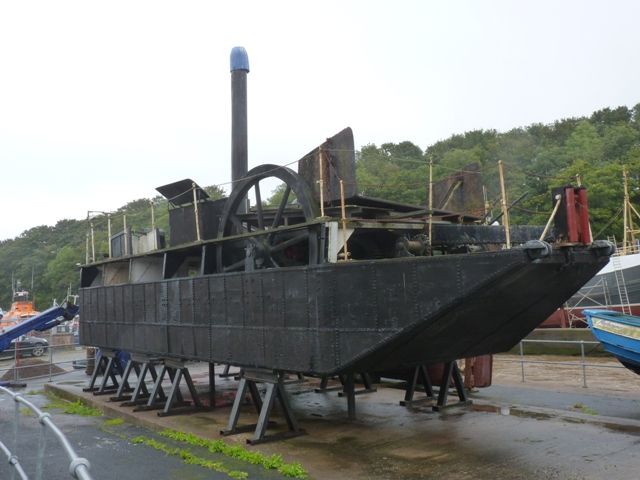
                          While I am on the subject of museums I came across a creation of your hero Brunel on Tuesday this week. My wife and I went up to Eyemouth to collect her latest ebay vintage model yacht purchase. The weather was very stormy and there were lots of interesting fishing boats in the harbour. However on the quayside was this vessel, anyone want to try and guess what it is?

                          bertha.jpg

                          Gareth

                          #36736
                          Kimosubby Shipyards
                          Participant
                            @kimosubbyshipyards

                            Hi Gareth

                            my 10p says it's a steam dredger

                            Kim

                            #36737
                            Bob Abell 2
                            Participant
                              @bobabell2

                              Hi Gareth

                              Could it be a craft for removing oil slicks in the harbour?

                              The central wheel gave me the idea!

                              Bob

                              #36738
                              Gareth Jones
                              Participant
                                @garethjones79649

                                Well done Kim, it is Bertha, the oldest steam powered vessel in the world. Apparently it was designed by Brunel in 1844 and was operational in Bridgewater Docks in Somerset until 1972, 128 years service. She was a scraper dredger, and pulled herself backwards and forwards across the docks using using a steam engine driving chains anchored to bollards on the quayside. She pushed an underwater blade like a bulldozer which moved the accumulated silt to an area where it could be flushed out into the river to prevent the docks silting up. If you Google Brunel and Bertha there is quite a bit of info on the web.

                                Bertha is now part of the small maritime museum in Eyemouth and rests on a number of trestles on the quayside. Local opinion on their website seems to vary from those who think its part of our industrial heritage and should be restored to others who think its an eyesore in the town and should be scrapped.

                                Gareth

                                Edited By Gareth Jones on 28/09/2012 12:22:28

                                #36739
                                Gareth Jones
                                Participant
                                  @garethjones79649

                                  What I meant to add to the above story was that as we were leaving the motel in Eyemouth the cleaner who was doing the rooms saw the model of Shemarah being moved back into our car and said, I recognise that, its one of Donald Moodie's boats. Apparently Donald Moodie senior came from somewhere near Eyemouth and his son is the current skipper. The reason Shemarah went on the trip and spent the night in our motel room, is that it just happened to be in the car when we set off. We were advised by the gentleman who sold Elizabeth her latest yacht, not to leave anything valuable in our car overnight.  I am not so obsessed with Shemarah that I sleep with it as well.

                                  Edited By Gareth Jones on 28/09/2012 12:21:45

                                  #36743
                                  Kimosubby Shipyards
                                  Participant
                                    @kimosubbyshipyards

                                    Hi Gareth,

                                    I have the plans for a steam dredger first used by the navy in Portsmouth dated 22 jan 1801, which could be claimed as the Navy's first steam ship. Does this beat Bertha's claim?

                                    The design incorporated a belt bucket system and like Bertha above, hauled itself about using warps and a winch driven from the steam plant, a single cylinder condensing boiler, which used sea water! The use of steam to haul herself about I think qualifies as "steam driven".

                                    Kim.

                                    PS plans from Grenwich Maritime Museumn.

                                    #36745
                                    Gareth Jones
                                    Participant
                                      @garethjones79649

                                      Hi Kim,

                                      Maybe Bertha is the oldest surviving steam driven vessel (unless the one you mentioned is also still around somewhere)

                                      Gareth

                                      #36750
                                      Kimosubby Shipyards
                                      Participant
                                        @kimosubbyshipyards

                                        Hi Gareth,

                                        could be, I've opened a new thread to clear yours – bucket dredgers, the first steam powered Navy craft?

                                        Kim

                                        #36783
                                        Gareth Jones
                                        Participant
                                          @garethjones79649

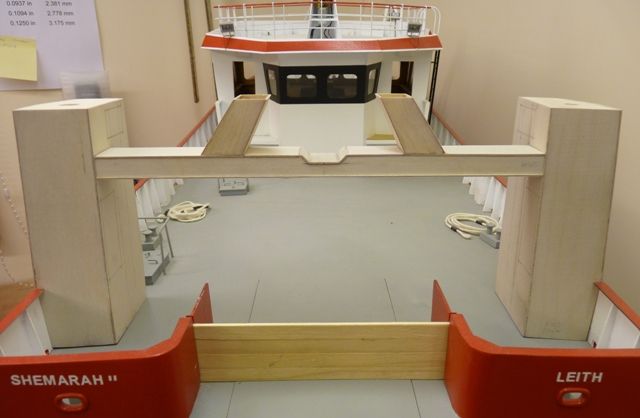
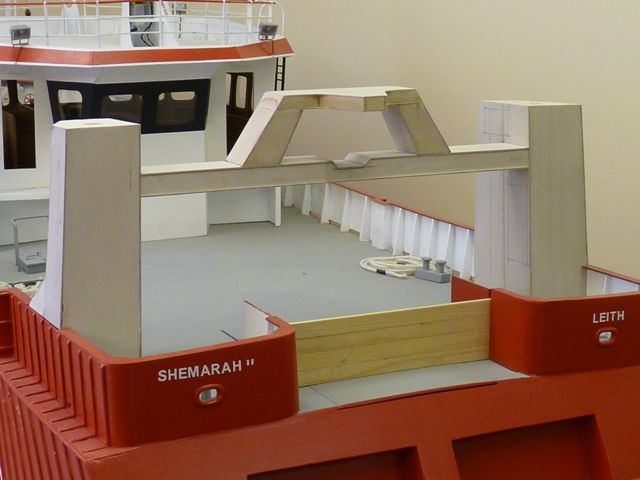
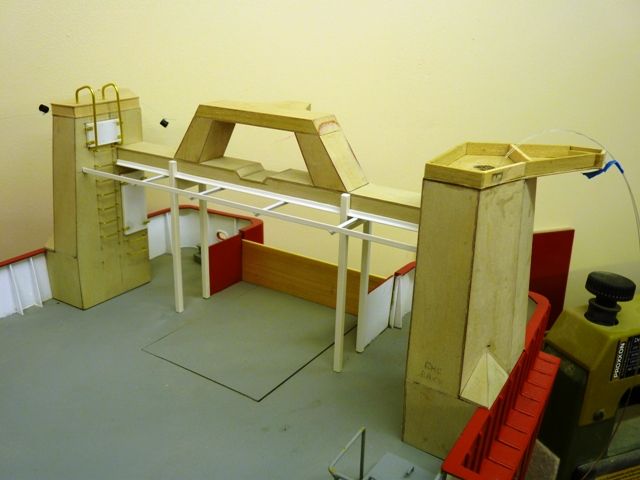
                                          Back on Shemarah after that little diversion. Most of the gantry centre section is now complete. The main structure consists of a beam made from 0.75 mm ply with two 6 mm square spruce strips to reinforce it. Along the centre is a 6 mm diam plastic tube which will be a conduit for the flood light wiring and also locates the cross beam in the two side columns.

                                          shemarah 266.jpg

                                          shemarah 267.jpg


                                          The tapered uprights mounted on the cross beam are just ply boxes with a centre frame to stiffen them.

                                          shemarah 268.jpg

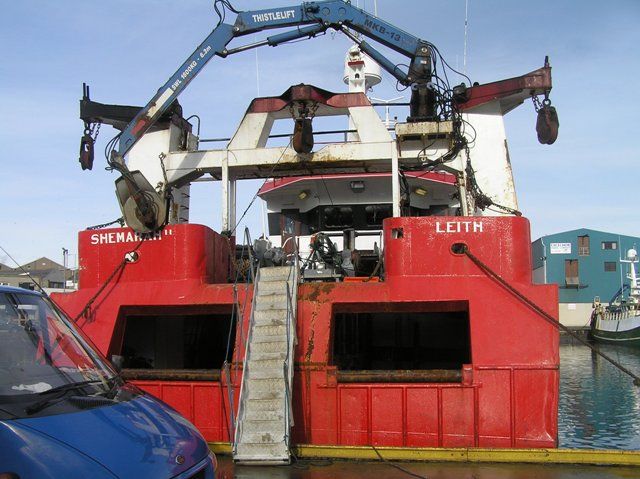
                                          The top platform is also made from 0.75 mm ply with 6 mm lime deck planking used for the sides. Shemarah did have an additional triangular extension on top of this platform and it is shown on the plans but has subsequently been removed from the real ship so I have not incorporated it.

                                          shemarah 269.jpg


                                          The next jobs are the platform for the Thistlelift crane and powerblock on the right hand side of the cross beam and then the top platforms for the two side columns.

                                          #36784
                                          Dave Milbourn
                                          Participant
                                            @davemilbourn48782

                                            Are you planning on making the crane etc functional?
                                            DM

                                            #36787
                                            Gareth Jones
                                            Participant
                                              @garethjones79649

                                              Dave,

                                              I sort of half considered it but decided it would just be too fiddly at 1:25 scale. Maybe I could have put a servo in the right hand tower just to rotate the crane but it would be a bit of a nightmare to get it all connected up and working at the right speed. Even getting all the hydraulic hoses represented statically is going to be a challenge. The picture below was kindly taken by Jim Pottinger a few months ago and shows the crane as it is now, and will be on the model, on top of the gantry. Originally it was mounted at deck level on the RHS.

                                              shemarah 270.jpg

                                              Gareth

                                              #36824
                                              Gareth Jones
                                              Participant
                                                @garethjones79649

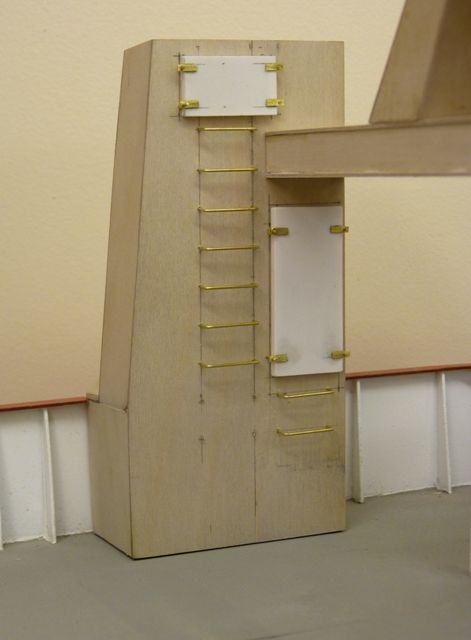
                                                I could not resist having a go at building a ladder using the Bob Abell eureka rung bending jig. Here's the result on one side of the rear gantry. Nine rungs bent identically in about 15 minutes with no scrap. Excellent tip Bob. The picture also shows one of my own little short cuts. Although the rungs are not yet ready to be glued in, I just slide a piece of wooden strip under them to get them all level when they are ready for fixing.

                                                shemarah 271.jpg

                                                I have also made the two panels that cover the vents in the gantry. I guess these are for the engine air intakes. There will be a styrene louvered panel under each one and the covers will stand clear of the sides by about 3 mm, supported on some 1/32 brass rod through each of the brackets.

                                                shemarah 272.jpg

                                                The keen eyed readers will be able to spot that the bottom two rungs of the ladder have been moved sideways. I had assumed that they were all in line but while looking at some of my photos I spotted that on this side, there is a lifebelt mounted near the bottom of the ladder and the bottom two steps are offset. Why its like this I dont know, it would have seemed more logical to have the lifebelt on the other side under the gantry crossbeam and the rungs all in line. Seems like an accident waiting to happen but there must be a good reason I guess.

                                                #36825
                                                Bob Abell 2
                                                Participant
                                                  @bobabell2

                                                  Thank you, Gareth

                                                  I'm very pleased that you found my little tip, useful

                                                  Your ladder looks very neat and uniform

                                                  Bob

                                                  #36880
                                                  Gareth Jones
                                                  Participant
                                                    @garethjones79649

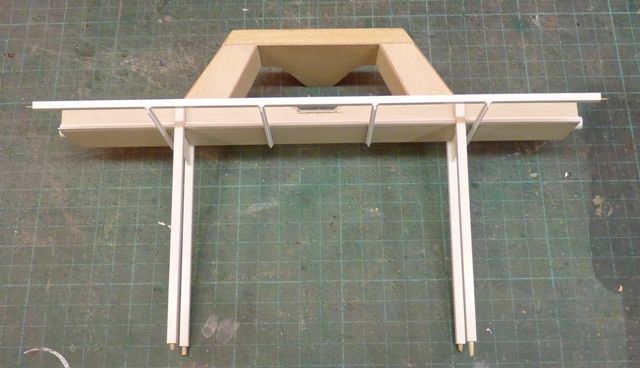
                                                    A bit more gantry has been built in the last couple of days. I have made and painted the louvered panels that fit on the two side supports for the gantry. I have also made the handrails that fit on the top of each support. The centre section has progressed a bit with construction of the walkway across using styrene sections to form the structure.

                                                    shemarah 273.jpg

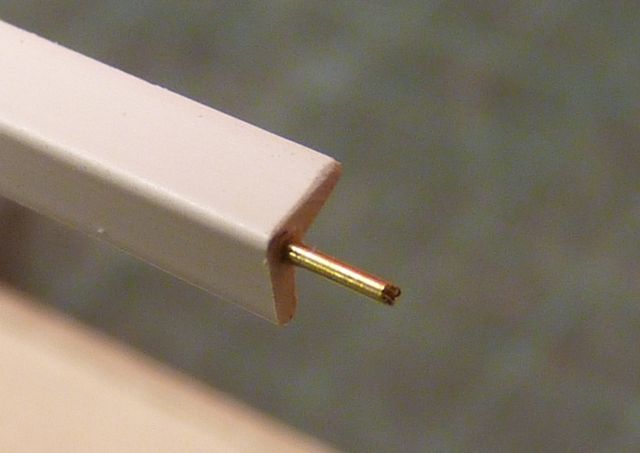
                                                    The front cross piece is made from 3 mm angle and locates in each side using a small length of 1/64 brass wire to strengthen the joint. It also makes it much easier to temporarily assemble the whole structure prior to gluing as the joints are all located and additional parts can be measured and fitted accurately.

                                                    shemarah 274.jpg

                                                    The next step is to make the hand rails across the walkway but I am short of a length of 1/32 brass wire so that will have to wait till next week. The walkway floor will be a piece of steel wire mesh to look like a steel grating, unless I can find a suitable piece of something else that looks like 1:24 scale grating.

                                                    shemarah 275.jpg

                                                    #36967
                                                    Gareth Jones
                                                    Participant
                                                      @garethjones79649

                                                      I have continued to work on the right hand gantry support over the last couple of days. There is a lifebelt fixed to the inside face so I decided to have a go at a batch of these as I will need 4 in total. I used some good quality 5 mm ply and cut some 30 mm diameter discs using my scroll saw and disck sander. I then drilled a 4 mm pilot hole through the middle and fixed in a 4 mm screw and captive nut so that I could mount the disc in my pillar drill. ( I dont have a lathe, hence I have to improvise). Using a sanding block I then sanded the outside edge to a smooth radius. The next step was to drill a hole through the middle, using a 16 mm flat wood cutting drill, being careful to avoid my fingers while holding the disc on the pillar drill. I then radiused the inside edge using a Dremel sanding drum and finally sandpaper wrapped around a piece of dowel. The central hole needs to end up about 18 mm diameter to be the correct scale size. The picture below illustrates these 4 stages.
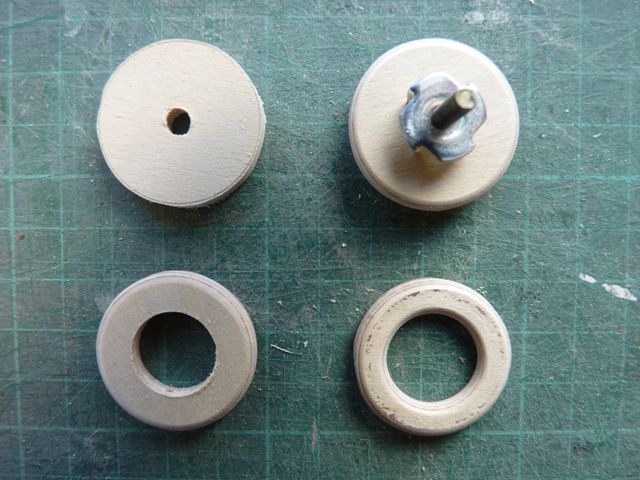
                                                      shemarah 276.jpg

                                                      I then made another ply disc about 20 mm diameter but with the outside edge tapered down to about 17 mm, a bit like a plug. This was made the same way as the first two stages above and is used as a collet to hold the lifebelt discs down for the next stage. I cut a short length of timber, marked a centreline and drilled a hole though as shown below. Each of the lifebelts was marked on the edge into 4 equidistant quadrants. The pencil line was lined up with the centreline on the timber block to allow the lifebelt to be rotaed round in 90 degree steps. I used a router cutter mounted in my pillar drill to cut the 4 small recesses round the edge of the belt. The fixture for holding the lifebelt was left clamped to the pillar drill table while I cut the recesses in all the lifebelts.
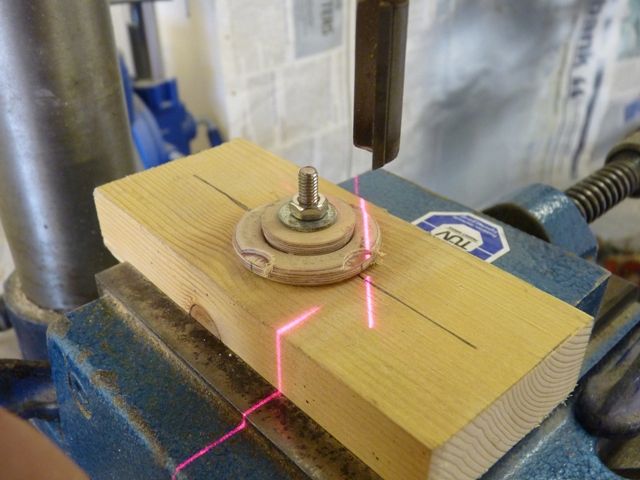
                                                      shemarah 277.jpg

                                                      I then removed the belt from the fixture and drilled two small holes through each recess for the rope to be recured. I then turned the belt over on the fixture and using each pair of holes as a guide, drilled the recesses on the other side. FInally I could thread a bit of cord through the holes to represent the rope.
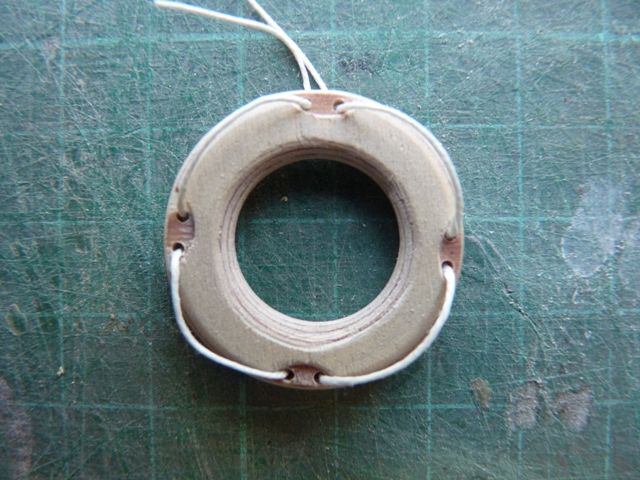
                                                      shemarah 278.jpg

                                                      The lifebelts need a bit of tidying up, painting and a short length of reflective tape wrapping round them in 4 places. However they are good enough now to allow me to make up the mounting brackets on the side of the gantry.
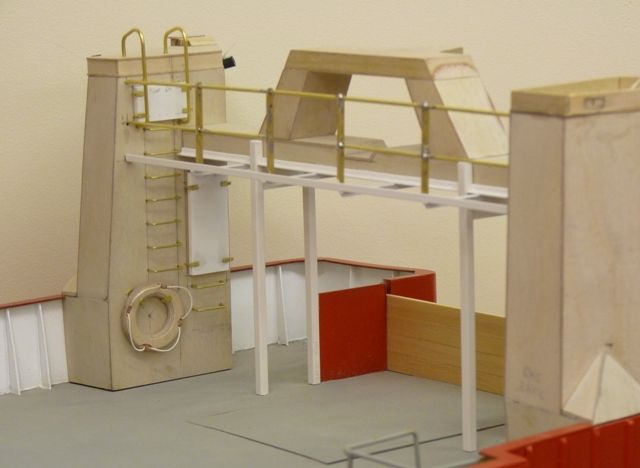
                                                      shemarah 279.jpg

                                                      As you can see I have also made up the railings along the walkway, using brass wire and stanchions. I have also made the right hand auxiliary engine exhaust using a piece of 6 mm aluminium rod, drilled out to look like a tube. I did try to make it from brass tubing but could not get a tight enough bend in it. I don't yet know how I am going to make the main engine exhaust as that is about 12 mm in diameter and needs an inner bend radius of about 20 mm so it will be more difficult to make. Anybody any ideas?

                                                      Finally I have added the outer hanging pulley which the trawl warp runs over. I happened to have three of just the right size, if not exactly the right shape, which were originally deck pulleys on my wife's Marblehead. However they will do for now unless I can find something better.
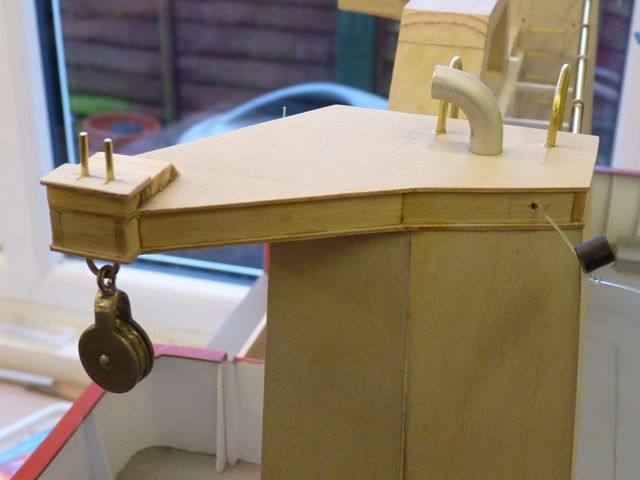
                                                      shemarah 280.jpg

                                                    Viewing 25 posts - 151 through 175 (of 371 total)
                                                    • Please log in to reply to this topic. Registering is free and easy using the links on the menu at the top of this page.

                                                    Code of conduct | Forum Help/FAQs

                                                    Advert

                                                    Latest Replies

                                                    Home Forums Scratch build Topics

                                                    Viewing 25 topics - 1 through 25 (of 25 total)
                                                    Viewing 25 topics - 1 through 25 (of 25 total)

                                                    View full reply list.

                                                    Advert

                                                    Newsletter Sign-up