Puffer advice

Advert

Puffer advice

Home Forums All things floating Puffer advice

Viewing 22 posts - 76 through 97 (of 97 total)
  • Author
    Posts
  • #124949
    Alasdair Allan
    Participant
      @alasdairallan37423

      puffer 32

      Advert
      #124968
      Alasdair Allan
      Participant
        @alasdairallan37423

        More puffer advice sought! My puffer is as she was in the 1950s. i am taking it that in the 1950s, all the lighting on a puffer including not just navigation lamps, but in wheelhouse etc, would be paraffin/ oil laps rather than electric?  if so, should I get flickering LEDS? Getting a bit ahead of myself here, no doubt!

        #124970
        Colin Bishop
        Moderator
          @colinbishop34627

          That’s an interesting point Alasdair. Lights in the house windows on the Rainbow Rock display on the other topic were flickering LEDs and meant to represent candles.

          A dig around online on a railway modelling site and about oil lamps in general suggests that if properly trimmed they would give a very steady light which is what ships would need for navigation lights. For your puffer I would use warm white for the white lights and dim all of the LEDs down by running them at lower than the rated voltage. Many modellers make their navigation lights far too bright. In reality they are often quite dim and hard to make out against an illuminated coastline.

          The wheelhouse would not be illuminated when under way as it would destroy the night vision of the lookout, there would just be dim lamps to illuminate the compass and charts.

          While I don’t know the answer, I do wonder if a Puffer would normally sail at night given that they would likely be in confined, tricky or dangerous waters with limited shore navigation aids. Anybody know?

          Colin

          #124973
          Richard Simpson
          Participant
            @richardsimpson88330

            I have read an extremely interesting book that tells the story, in their own words, of a couple of coastal steamer captains of around the first half of the 20th Century.  They certainly steamed at night even though, as you say, navigational aids were limited.  To the point of causing accidents.

            I would suggest that the 1950s were pretty much in an era of change where there were probably still plenty of smaller and older ships not changed over to electric lighting.  Having said that, I believe that in the early days of DC powered lights there probably wasn’t a great deal to choose between oil lamps and early electric lamps.  As you say I think flickering is probably not realistic as the lamps were well shielded internally and the flames adjusted to give a consistent light.

            Interestingly many underestimate the effect of the lens in ship’s lamps.  All ship’s lamps are designed such that the glass is actually a powerful lens designed to magnify the effect of the lamp.  When the regs all changed in the 1980s and copper ship’s lamps were all replaced by plastic ones, the ship I was on went through the process.  We found ourselves with a full set of copper ship’s lamps in the engine room workshop to be scrapped.  Not surprisingly the Captain had first choice, then the Chief etc. so by the time it got down to the Fourth Engineer there were only a couple of badly battered lamps left.  I picked the best of them, which was the stern anchor lamp, in a sorry state as it had spent it’s life sat on a post down the back end rattling about with the vibrating effects of the propeller.  I had to solder a new base into it and do a few more repairs but was very pleased with it when I took it home.  The intention was to put a small bulb into it and leave it on the floor in the lounge.  The trouble was, even with a small bulb, the light was surprisingly bright and overpowering.  Consequently it got a plant out in it!  It made me realise what a powerful lens the glass is.  It also made me realise just how critical it was to have the bulb in the exact centre of the lens otherwise the lens didn’t work.

            Anyway the challenge with many LEDs is that they tend to be too bright and the wrong colour for either early electric lights or oil lamps.  The Ben Ain is fitted with 12V grain of wheat bulbs but with 7.2V applied.  I don’t even know if you can still get grain of wheat bulbs.  If using LEDs you really want a warm white colour and, as Colin suggests, adjust the brightness with the appropriate resistor.  I wired my lighting in three individually switched circuits.  One for navigation lights, one for internal lights and one for a desk lamp on the bridge chart table.

            #124976
            Alasdair Allan
            Participant
              @alasdairallan37423

              Many thanks Richard and Colin. Yes, I think that the lights would all have been paraffin or oil, but from what you say, I will avoid flickeing bulbs and go for warm white! The puffers would sometimes have been out in the dark, at least in the winter when sailing longer trips such as to islands such as Tiree or Barra, though I suspect the skippers would have avoided night sailing where possible.

              #124978
              Colin Bishop
              Moderator
                @colinbishop34627

                I have found that if you use a 12v LED you can run it on a much lower voltage without a resistor. Yes, you can still buy grain of wheat and the smaller grain of rice bulbs and I have used them. By running them at much lower than their rated voltage they will last a lot longer which is important if they are ‘built in’ to the model. LEDs are best for longevity but the light output is directional whereas a grain of wheat/rice bulb is all round incandescent and gives a better effect. As always, these things are a trade off, but realistically model boats don’t run with their lights on much of the time.

                It is discussions like these on forums that I value as we all learn something along the way.

                Colin


                #124987
                Len Morris 2
                Participant
                  @lenmorris2

                  The small LEDs I used on my Puffer came from “www.brightcomponents.co.uk” part number LED-0402-PW and are warm white.  They are only the size of a pin head and easily pass through a 1mm hole.  I found them to be slightly directional.  Under an eyeglass  they turned out to be surface mount LEDs with one wire folded back to run parallel with the other.  How the wires were soldered to the LED is an amazing example of micro skills.

                  Colin is right about diming 12 volt LEDs.  I have a couple of domestic jobs where the brightness is controlled through a simple variable resistance.  I’ve also found that where the rated voltage of the LED falls it becomes much more difficult to achieve a controllable effect.

                  Ashley advised that bright on the workbench dims quite a bit on the water.

                  Len. 🙂


                  #124993
                  Richard Simpson
                  Participant
                    @richardsimpson88330

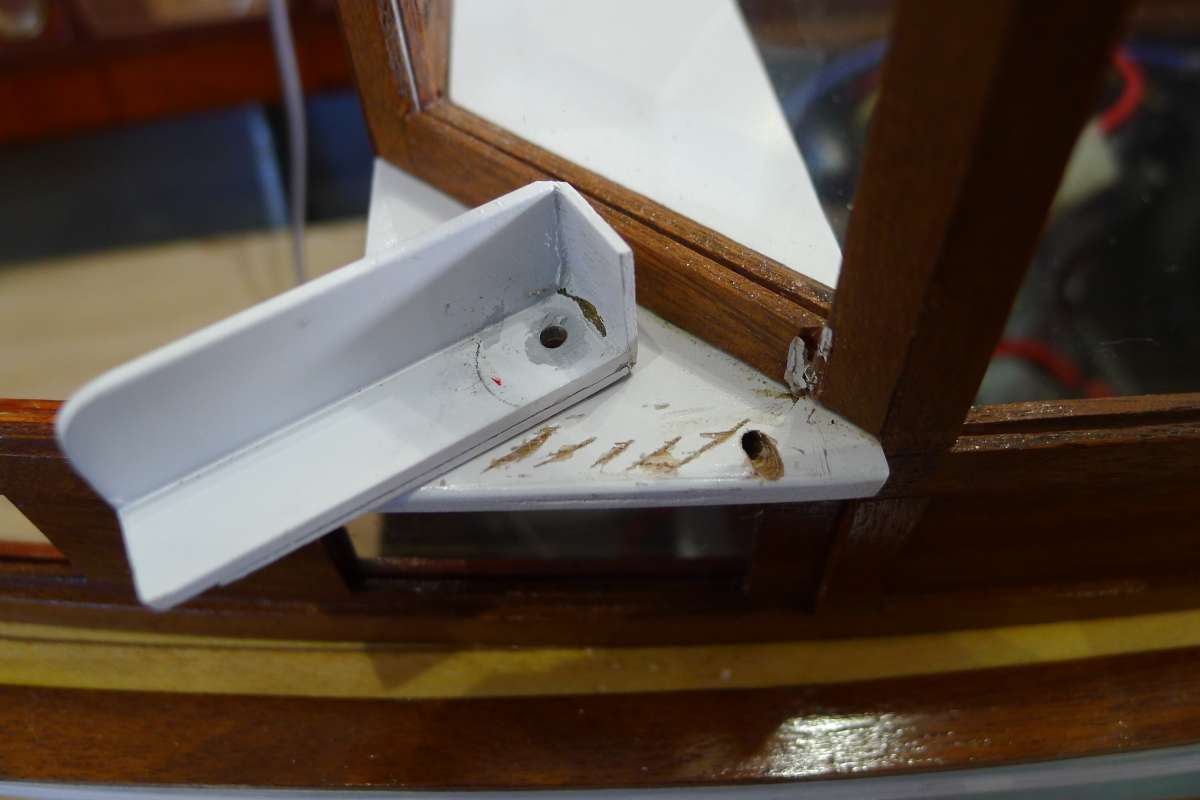
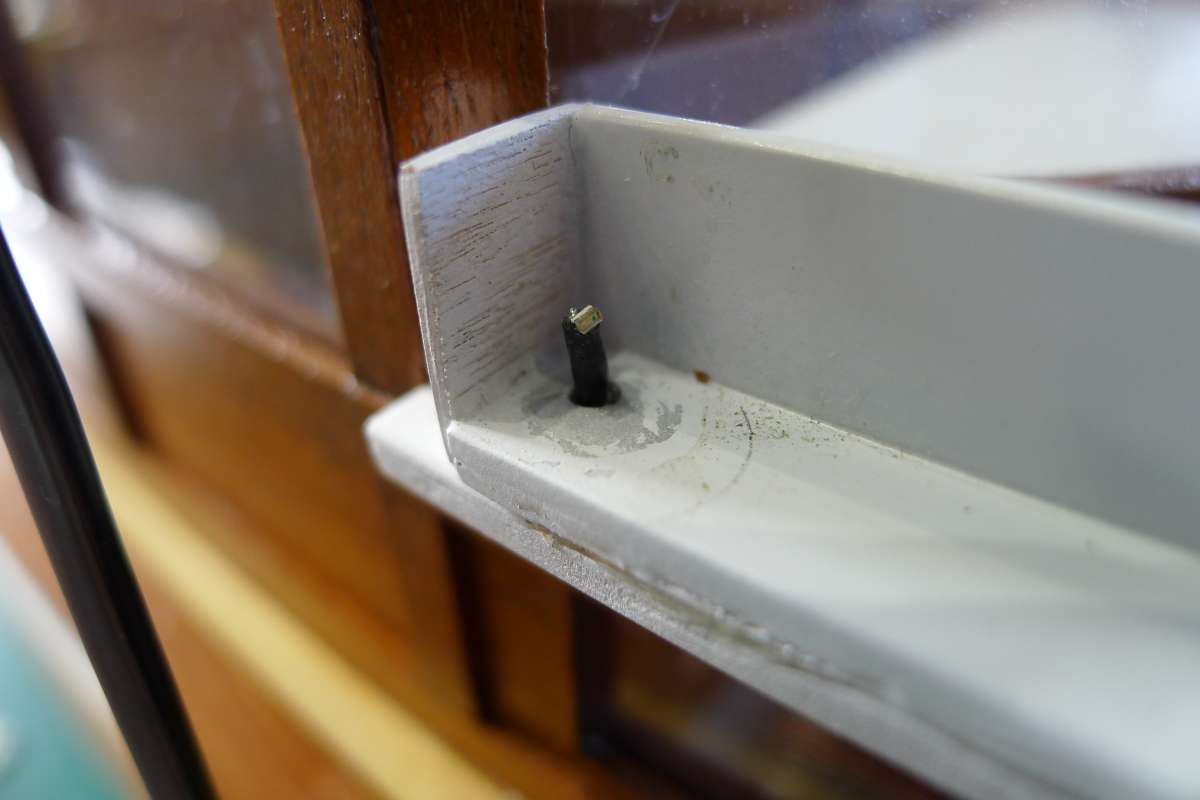
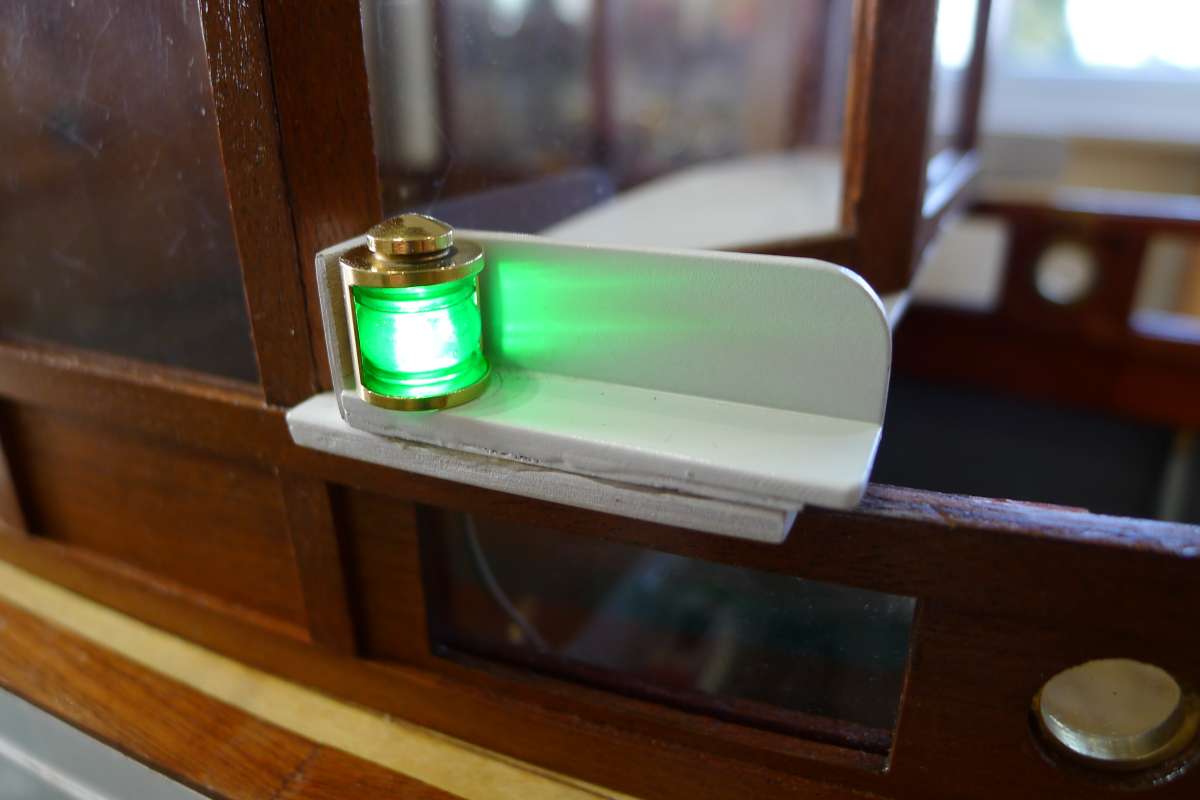
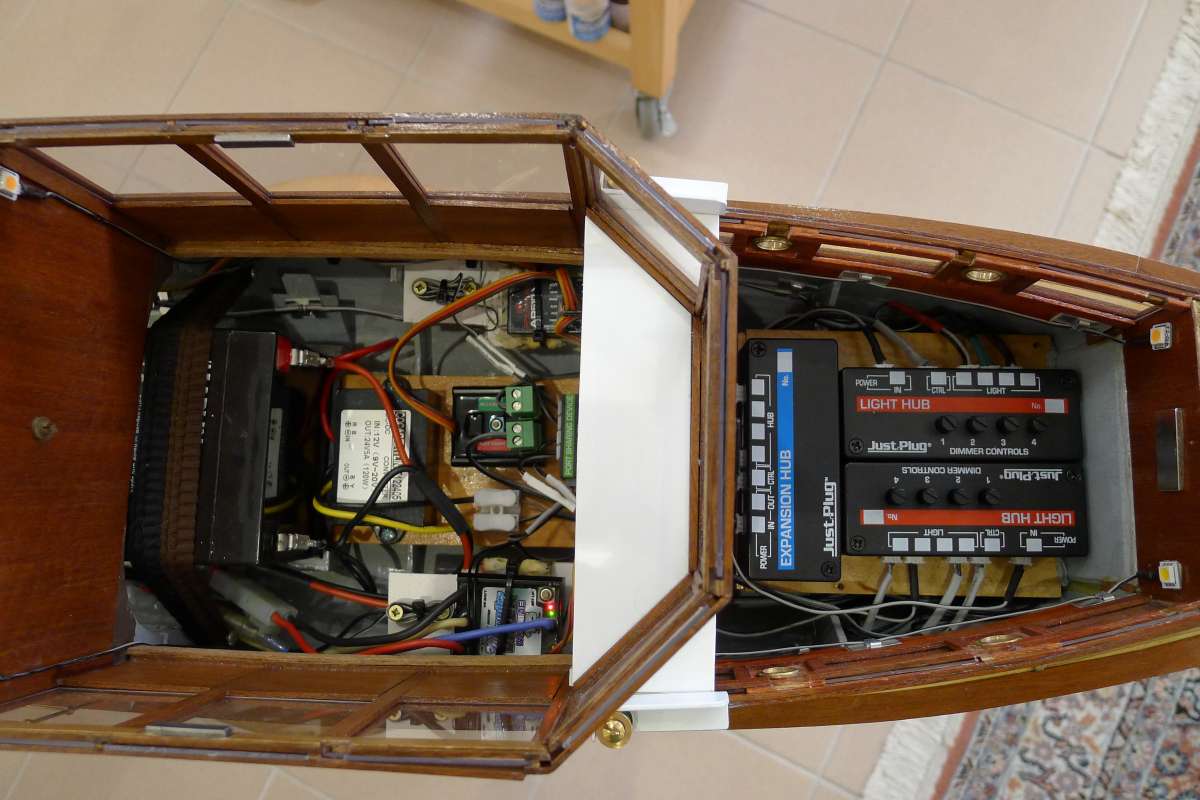
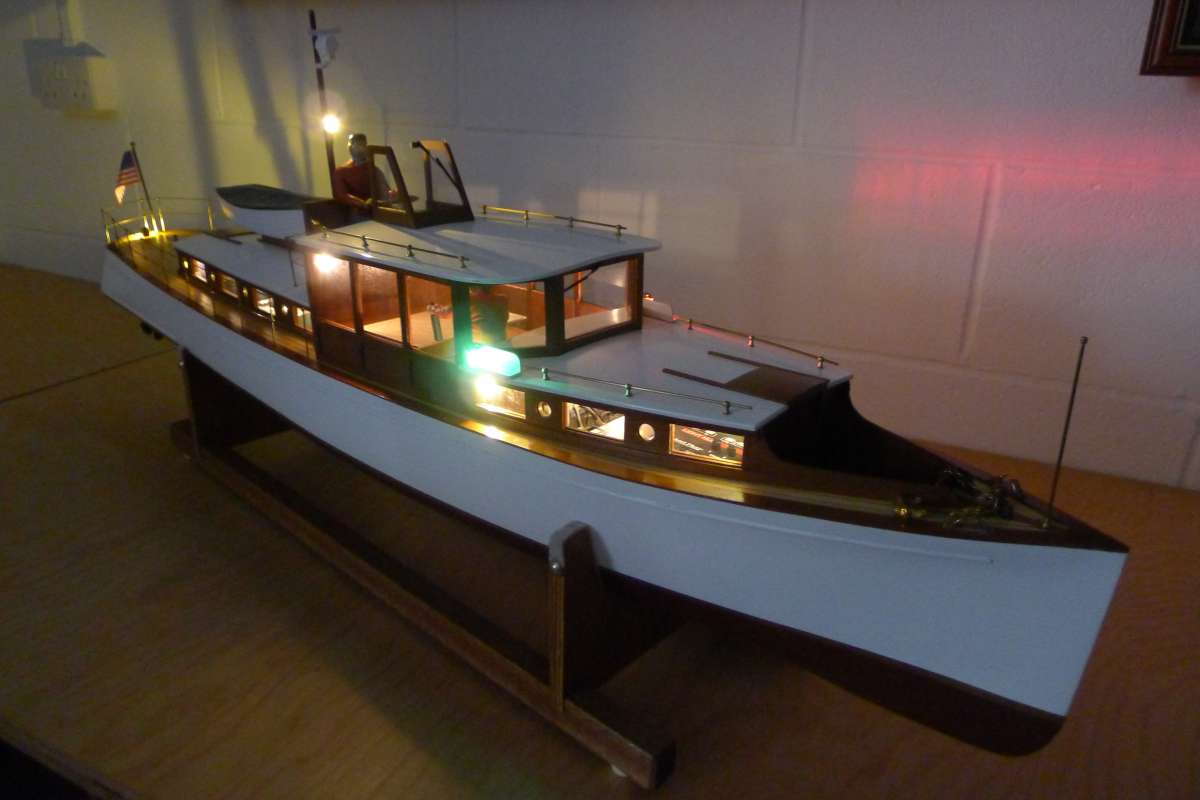
                    Absolutely Len, this is an example of where that type of LED is sometimes about the only chance you have of retro fitting lighting to a model but you must be aware of exactly where the diode is.  In this case the LED had to be pointing in the right direction as well as being at precisely the right height to put it bang in the middle of the lamp lens.

                    Then of course the lamp has to be positioned perfectly as the edge of the opening should be 20 degrees aft of the beam.

                    Interestingly this installation was an experiment to test out the possibilities of using a railway lighting product in a model boat and while, in this instance way more space was required than we would normally want to use, but it is a completely plug and play system that uses variable resistors to control the brightness of all the lights.  The last picture is everything turned up full, which is not how I normally set the lights.

                    IMG_0017

                    IMG_0018

                    IMG_0019

                    IMG_0024

                    IMG_0025

                    #124996
                    Richard Simpson
                    Participant
                      @richardsimpson88330

                      I dug out the book I mentioned above:

                      Old Time Steam Coasting by O.G. Spargo (Author) and Thomas H. Thomason (Author)

                      For anyone having any sort of interest in steam coasters during the first half of the 20th Century it is a fantastic read and you get to learn so much more from these first hand experiences than you would do from any other technical or factual book.  Highly recommended.

                      #125022
                      Stephen Garrad
                      Participant
                        @stephengarrad28964

                        I’ll second that book recommendation, an extremely good read. There’s a copy on ABE Books at £15 at the moment.

                        Stephen

                        #125504
                        Alasdair Allan
                        Participant
                          @alasdairallan37423

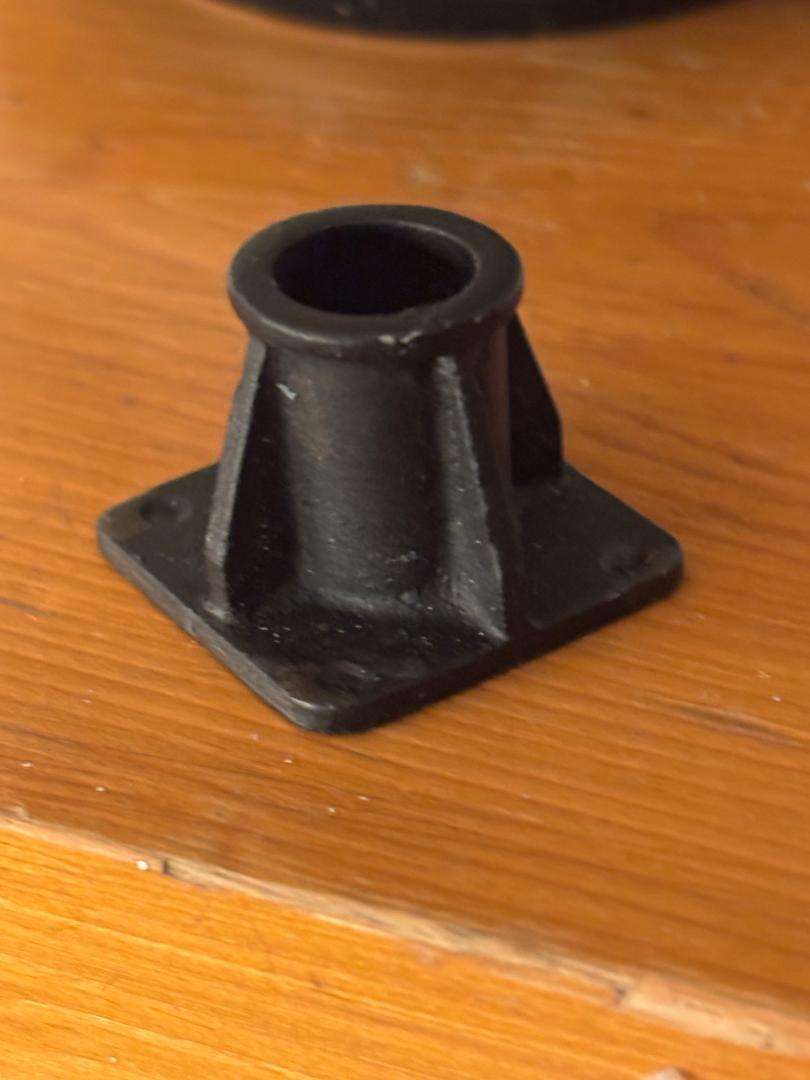
                          mast foot

                          #125505
                          Alasdair Allan
                          Participant
                            @alasdairallan37423

                            My Caldercraft puffer kit comes with the pictured mast foot.  However, someone who knows about puffers assures me that they all had folding masts which folded on a tabernacle with the aid of a locking pin.  The kit advises to use the pictured mast foot with a piece of dowel in it.  I don’t really need the mast to fold, but would be good to get it looking realistic.  Not convinced the part in the kit does that, but happy to be reassured/ corrected!

                            #125524
                            ashley needham
                            Participant
                              @ashleyneedham69188

                              I am sure ihave said it before, but…

                              Dim lights are invisible on the boat if it’s a nice day.

                              I think you either want the correct “scale” glow, or want them to be able to be switched on and seen during the day. Perhaps ideally a switch to swap resistors over before sailing would allow the lights to be either correctly dim, or extra bright for daytime sailing?

                              I put quite bright led on a couple of the bumper tops(headlights) but found that the stick-on diamanté type plastic jewels are actually more effective on a nice day in providing that sparkle up front.

                              I like the anchor question. Every larger vessel had one, along with the winch that was appropriate. But of course nobody bothered to make notes as to the execution, as it was always” as we normally do it” and therefore invisible…if you know what I mean. Taken for granted. Perhaps…like rigging on a man of war..” rigged as current practice” I believe was the phrase. Shipyard would rig as was the custom, and likely not to a strict diagram?

                              Ashley


                              #126136
                              Alasdair Allan
                              Participant
                                @alasdairallan37423

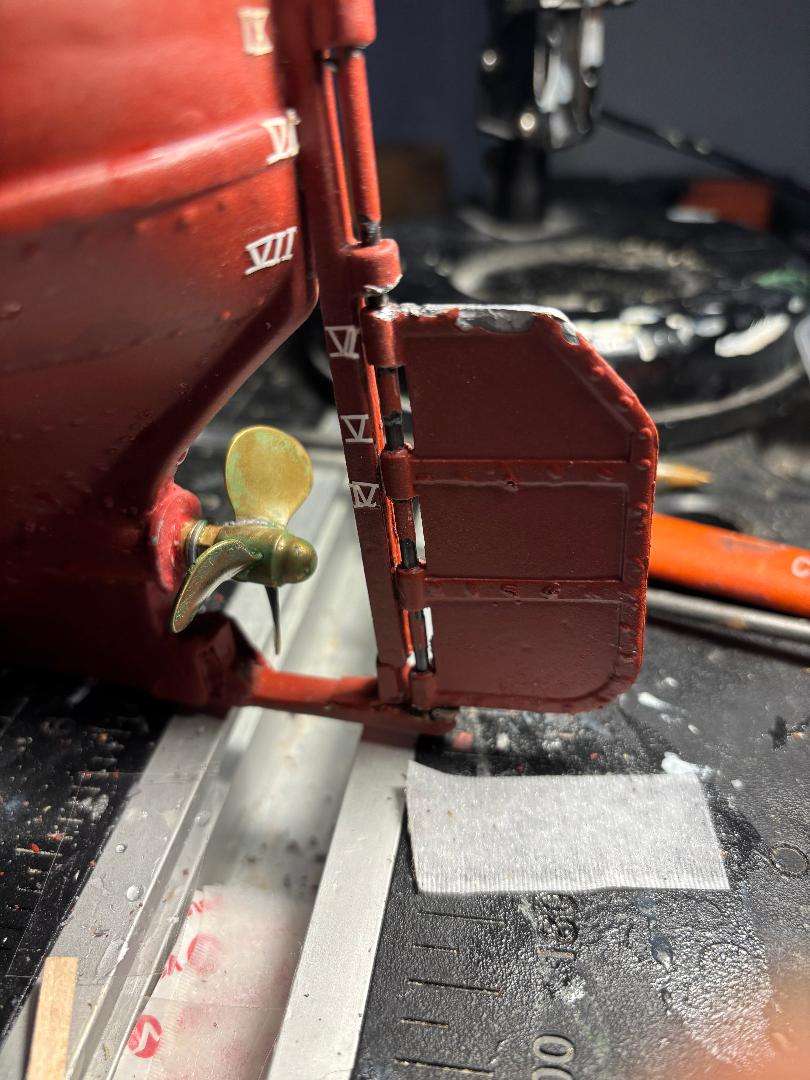
                                rudder

                                #126137
                                Alasdair Allan
                                Participant
                                  @alasdairallan37423

                                  Hmm.  I was just about to show off to you some photos of progress on my Caldercraft puffer, when another fault in the kit’s rudder area came to light… advice and help appreciated please! What appeared to be a solid adhesion between the kit’s rudder and rudder stock has, on contact with the side of the bath proved to be anything but.  The rudder now no longer moves when the ruder stick does.  This fact means that with a bit more force I should be able, hopefully, to lift the rudder stock back out of the rudder. That then leaves me with the question though of how I actually make it adhere in place when I put it back in? The bit of the keel that the rudder fits into was made by me in brass as the white metal components supplied were unusably soft and came to pieces.  It is a good kit, rudder aside! Grateful for advice on how to fit this back together in a way that ensures the rudder sticks to its stock.  Thanks!

                                  #126139
                                  Colin Bishop
                                  Moderator
                                    @colinbishop34627

                                    Hi Alasdair,

                                    You did the right thing in remaking the keel extension. You should have gone further and ditched the rudder altogether, it is only fit for ballast!

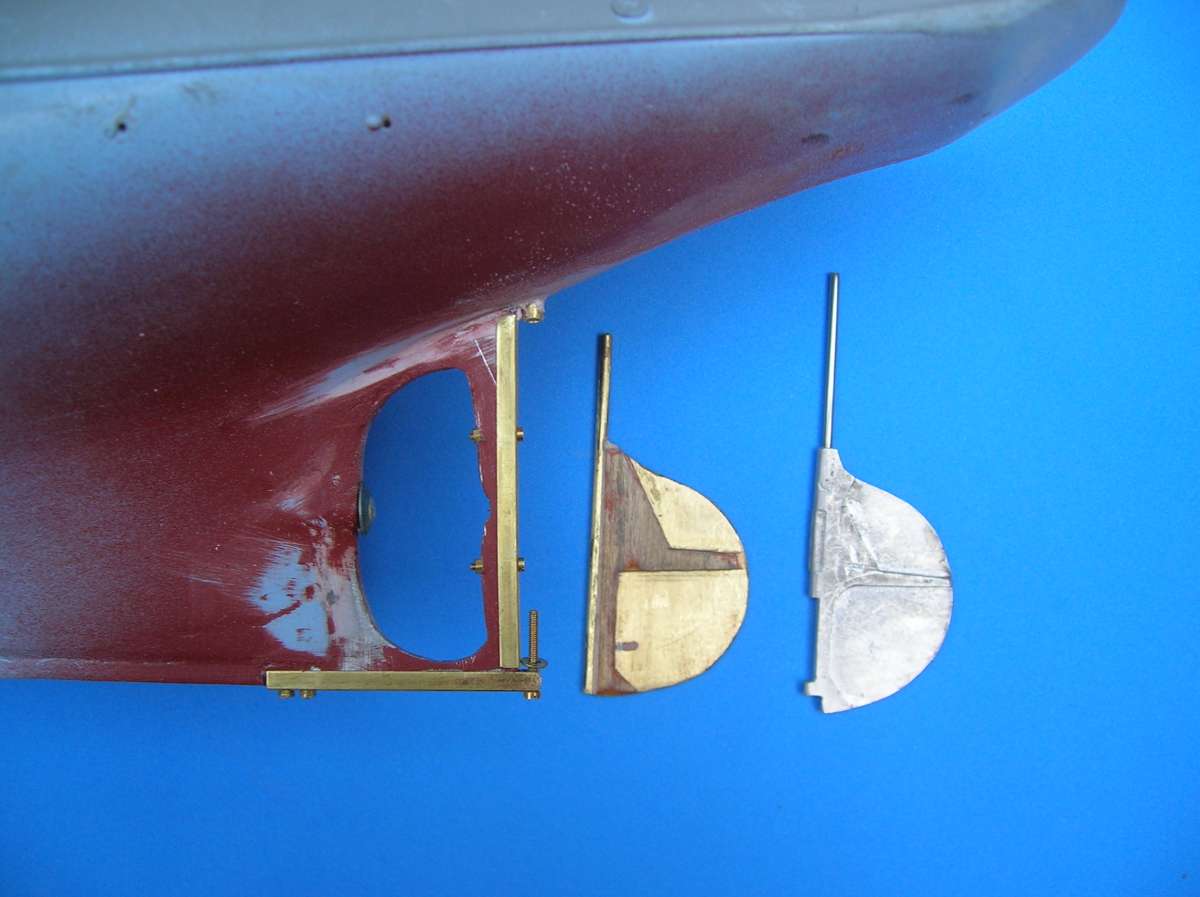
                                    I have built a number of kits with white metal rudders and always just used them as a pattern for a more robust construction. You can see what I did with my Dean’s Medea kit below. I made a new brass rudder and soldered it to the stock then added some 0.5mm ply detail.

                                    With a bigger rudder and a thicker stock I have notched the blade and drilled through the stock tube to add a peg to give an added mechanical reinforcement. Rudders are vulnerable and need to be of robust construction. Kit manufacturers unfortunately often go for the cheapie option.

                                    Colin

                                    DSCN1089

                                    #126140
                                    Alasdair Allan
                                    Participant
                                      @alasdairallan37423

                                      Sound advice as ever, Colin! will go back to the drawing board with this one and see what I can make from brass! I take it the simplest solution here is going to be to flatten the stock a bit on one side at the rudder end and just solder it to the rudder?

                                      #126141
                                      Alasdair Allan
                                      Participant
                                        @alasdairallan37423

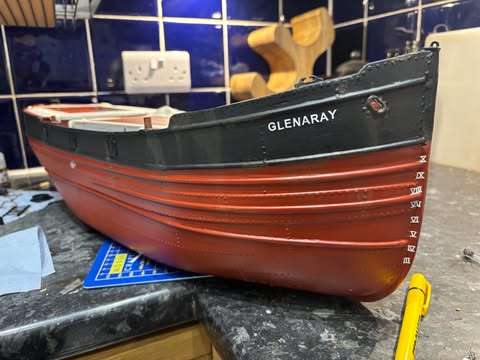
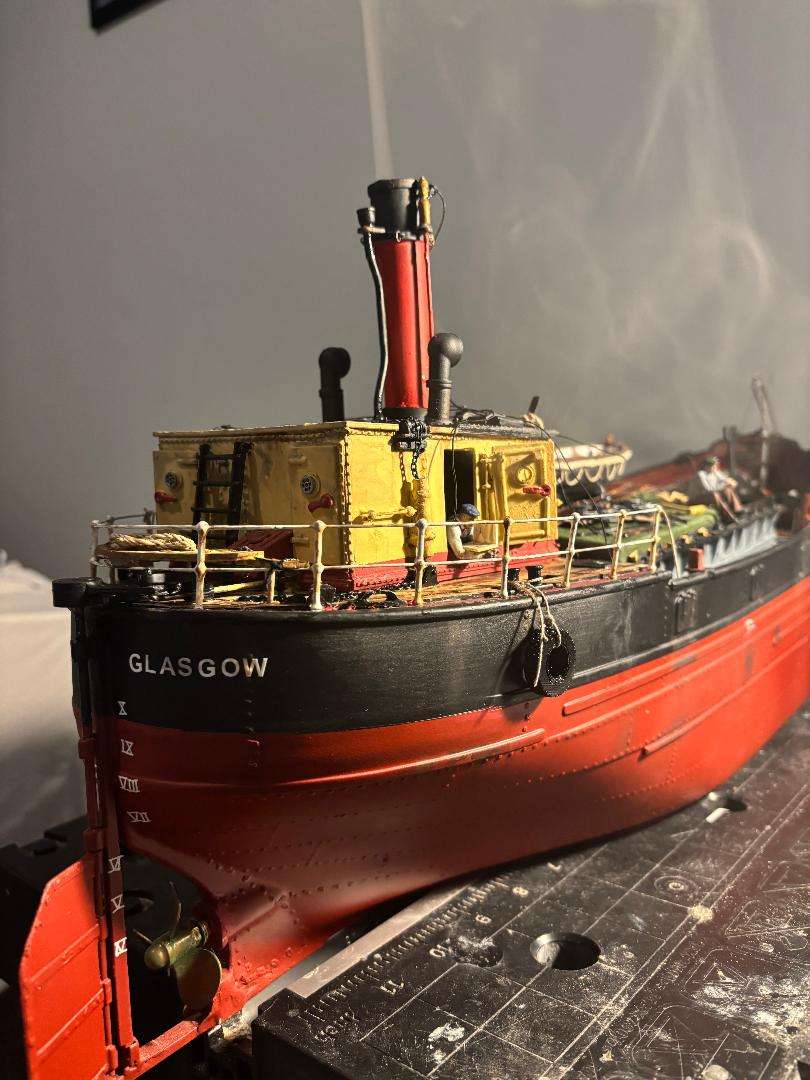
                                        anyway, here is what my puffer is looking like these days.  Got a wee bit carried away with detail for a while , but will now concentrate on getting a ruder that works!

                                        #126142
                                        Alasdair Allan
                                        Participant
                                          @alasdairallan37423

                                          puffer 50

                                          #126143
                                          Alasdair Allan
                                          Participant
                                            @alasdairallan37423

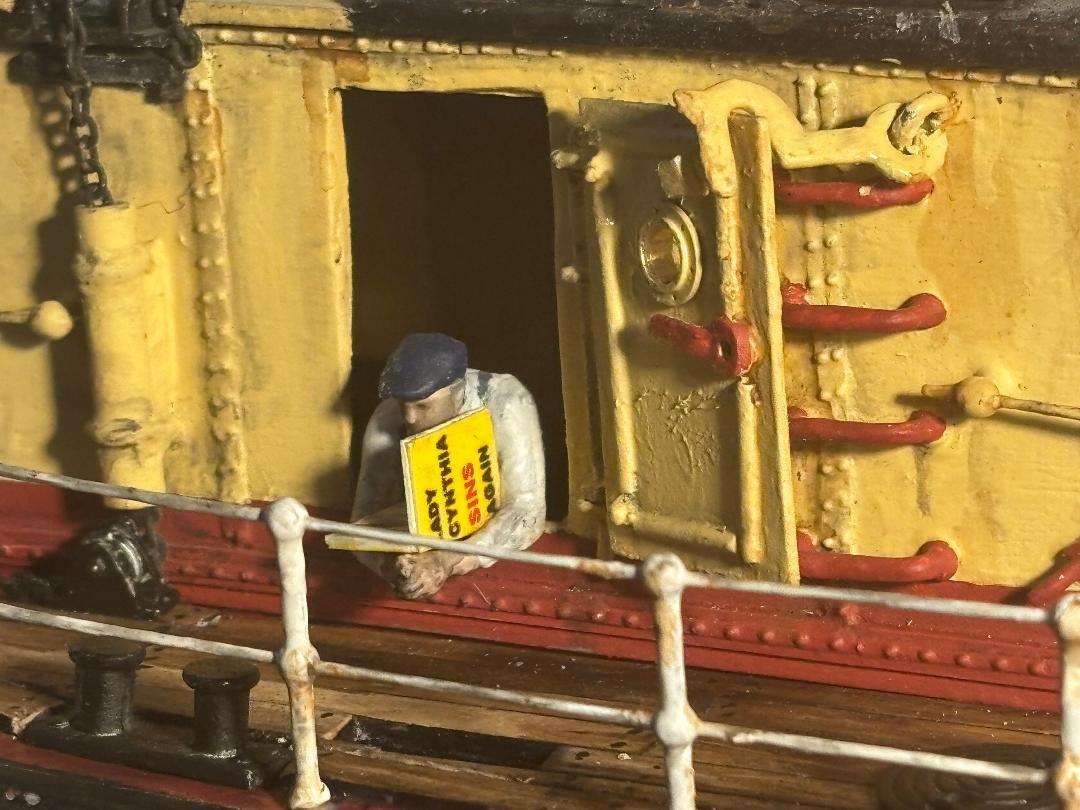
                                            if you have read the Para Handy stories, you will know that puffers’ engineers all read racy novels!

                                            #126144
                                            Alasdair Allan
                                            Participant
                                              @alasdairallan37423

                                              puffer 51

                                              #126145
                                              Colin Bishop
                                              Moderator
                                                @colinbishop34627

                                                Alasdair,

                                                I have never flattened the stock, just left it to the solder to fill the gap. But if you have got a small enough drill then you can make a couple of holes through the stock and make matching slots in the blade. Then run a length of brass rod or wire through each which greatly strengthens the soldered joint.

                                                I think the kit manufacturers just cast their rudders round the stock and hope that it will create a satisfactory bond but it doesn’t really and once it comes loose there is not much you can do.

                                                Colin

                                              Viewing 22 posts - 76 through 97 (of 97 total)
                                              • Please log in to reply to this topic. Registering is free and easy using the links on the menu at the top of this page.

                                              Code of conduct | Forum Help/FAQs

                                              Advert

                                              Latest Replies

                                              Home Forums All things floating Topics

                                              Viewing 25 topics - 1 through 25 (of 25 total)
                                              Viewing 25 topics - 1 through 25 (of 25 total)

                                              View full reply list.

                                              Advert

                                              Newsletter Sign-up